background image

11

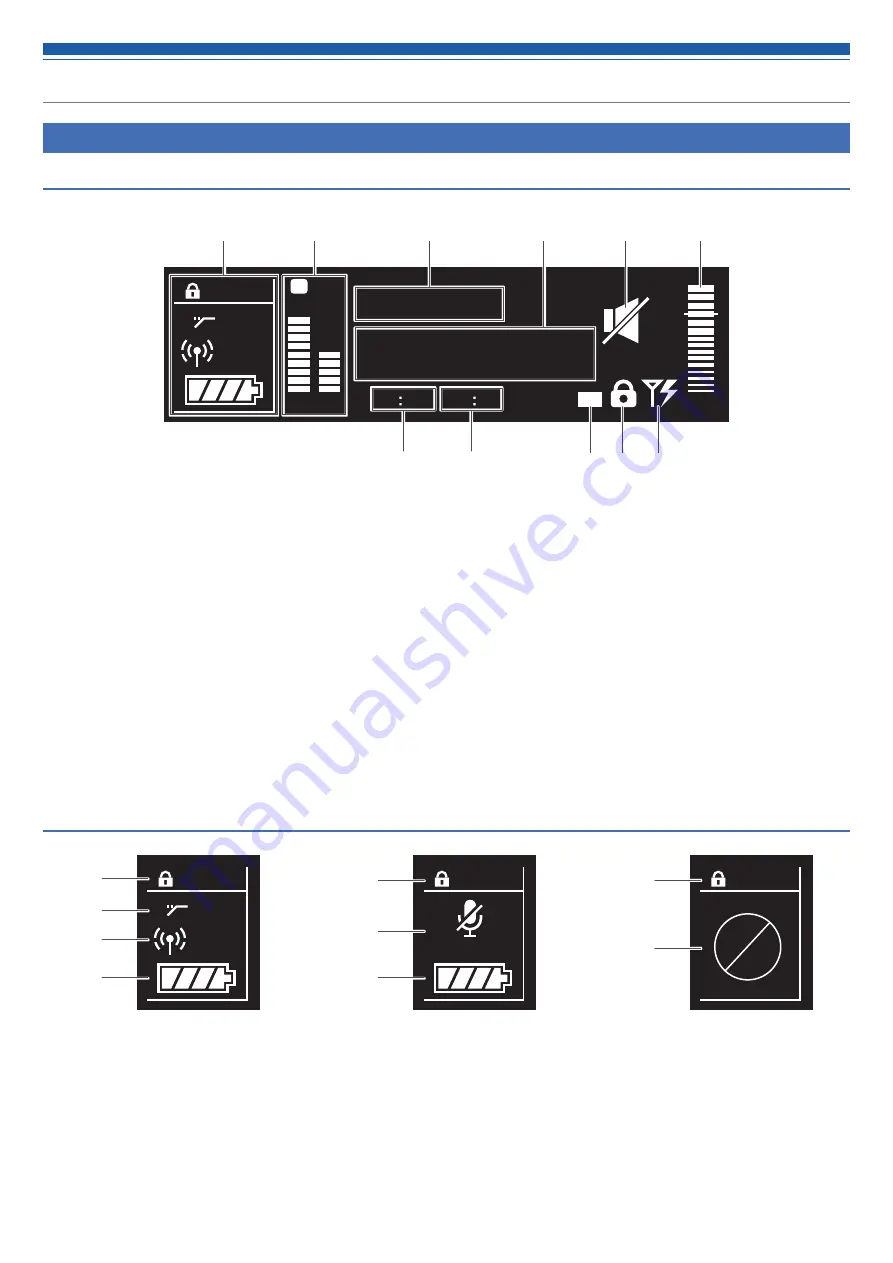
How to read the display

ATW-R5220/ATW-R5220DAN

Main screen

❶ 

Transmitter information display area

Information on the connected transmitter is displayed. Refer to 
"Transmitter information display area" (p. 11) for screen display.

❷ 

RF level indicator

Displays the strength of RF reception for antennas A and B.

❸ 

Name display

Displays the specified name. 

❹ 

Frequency indicator

Displays the set frequency.

❺ 

Receiver mute indicator

A speaker icon with a slash through it is displayed when the 
receiver is muted.

❻ 

AF level indicator

Displays the strength of the received audio signal.

❼ 

Group indicator

❽ 

Channel indicator

❾ 

Backup frequency indicator

"BU" icon is displayed when the backup frequency mode is ON.

❿ 

Lock status indicator

⓫ 

Antenna input power indicator

An icon is displayed when the antenna input power supply is ON.

Transmitter information display area

TX

HPF

50

mW


TX

MUTE

TX

Normal

Muted

Non-communication


Lock status indicator


High-pass filter indicator


RF transmission output indicator


Battery level indicator


Transmitter mute indicator

A microphone with a slash through it is displayed when the 
transmitter is muted.


Transmitter non-communication indicator

TX

HPF

B

RF

AF

BU

0

000.000

VOCAL1

MHz

A

50

mW

Gr 06 Ch 12

Summary of Contents for 5000 Series

Page 1: ...User Manual UHF Wireless Systems ATW R5220 Dual Receiver ATW R5220DAN Dual Receiver with Dante Output ATW T5201 Body Pack Transmitter ATW T5202 Handheld Transmitter without capsule 5000 Series ...

Page 2: ...tters via IR SYNC 17 Setting the squelch level 18 Setting the system related functions 18 Setting network 21 Using test tool 22 Setting DANTE 22 Setting ATW T5201 ATW T5202 23 List of setting items 23 Setting the transmission frequency 23 Setting the channel transmitter name 23 Setting the microphone input gain 24 Selecting the microphone input gain 24 Setting the RF transmission output 24 Setting...

Page 3: ...is apparatus only in the places with good ventilation To prevent fire do not cover the ventilation of this apparatus with newspapers tablecloths curtains etc This apparatus with Class I construction shall be connected to the AC outlet with a protective grounding connection This apparatus is not disconnected from the mains as long as it is connected to the AC outlet even if the unit itself has been...

Page 4: ...n into the apparatus the apparatus has been exposed to rain or moisture does not operate normally or has been dropped FCC Notice Warning This device complies with Part 15 of the FCC Rules Operation is subject to the following two conditions 1 This device may not cause harmful interference and 2 this device must accept any interference received including interference that may cause undesired operat...

Page 5: ...e to an electronic or communications device such as a mobile phone the product may produce unwanted noise If this occurs move the product away from the device When setting up the product make sure there are no obstacles between the transmitter and the receiver that might block the signal To prevent the batteries from wearing out turn the transmitter off when not in use Over time discoloration may ...

Page 6: ... Main screen Control dial Displays the setting menu when you press the dial Turn the dial to select a setting and press to confirm When you press and hold the dial TX SYNC setting screen is displayed Headphone monitor 6 3 mm output jack This is the headphone output jack used for monitoring It allows you to monitor receivers 1 and 2 Headphone channel indicator Displays which receiver is being monit...

Page 7: ...vers eight total Ground lift switch This switch isolates the GND pin of the balanced unbalanced output from the ground Normally this is kept in the GND position but if a hum develops due to a ground loop switch to the LIFT side Balanced output jack XLR 3 pin male GND HOT COLD Network interface By connecting to a PC via Ethernet you can use the PC for monitoring or control In the case of ATW R5220D...

Page 8: ...e input Display Shows the current status If no buttons are pressed for a period of 30 seconds the display will turn off BACK button Press to take the display back one screen Press and hold to return to the Main screen Lever push switch Use to select various settings UP Turn to the right to change a selection DOWN Turn to the left to change a selection SET Press to display the settings screen Move ...

Page 9: ...R SYNC with the receiver DOWN button Use to select various settings SET button Press to display the settings screen Press the UP DOWN button select the setting item and press to confirm the selection SYNC button Use to IR SYNC with the receiver ATW R5220 ATW R5220DAN Power switch Use to turn the power on or off Battery cover Function button Press to turn the screen back on if it shuts off Press an...

Page 10: ...e battery cover 4 Insert the batteries according to the plus and minus marks found inside the battery compartment ATW T5202 1 Rotate the grip case of the battery compartment 2 Open the battery cover Put your finger on the hook of the battery cover and pull it to open the battery cover 3 Insert the batteries according to the plus and minus marks found inside the battery compartment ...

Page 11: ...tighten it How to remove 1 Rotate the microphone capsule counterclockwise to loosen it 2 Detach the microphone capsule from the body of the transmitter Do not directly touch or scratch the connection surface Be sure to turn off the power of the transmitter before attaching detaching the microphone capsule Do not forcibly attach the microphone capsule Doing so may damage the transmitter or micropho...

Page 12: ...el indicator Displays the strength of the received audio signal Group indicator Channel indicator Backup frequency indicator BU icon is displayed when the backup frequency mode is ON Lock status indicator Antenna input power indicator An icon is displayed when the antenna input power supply is ON Transmitter information display area TX HPF 50mW TX MUTE TX Normal Muted Non communication Lock status...

Page 13: ... 50mW TX RF PWR 92 40 30 24 18 15 12 10 8 6 4 2 0 2 4 6 dBu 86 80 74 dBm RX 12 dB 10 dB OL Level meter screen The main screen is switched every time the function button 2 is pressed B RF TX AF A 50mW TX RF PWR 92 40 30 24 18 15 12 10 8 6 4 2 0 2 4 6 dBu 86 80 74 dBm RX 12 dB 10 dB OL RF transmission output indicator transmitter Marker when the minimum hold function is on Shows the minimum level at...

Page 14: ...attery level indicator 75 or more battery power remaining 50 to 75 battery power remaining 25 to 50 battery power remaining 25 or less battery power remaining Flicker Replace the batteries RF transmission output indicator The selectable RF transmission output may differ depending on the country or region in which you live RF Power High 50 mW RF Power Mid 10 mW RF Power Low 2 mW RF OFF RF Power Off...

Page 15: ...cified for the transmitter 1 When IR SYNC is started as part of setting the receiver the Communication in standby screen is displayed 2 Position the IR SYNC windows of the receiver and transmitter so they face each other ATW T5201 ATW T5202 3 Press the SYNC button on the transmitter Wait several seconds until communication is established 4 When the SYNC is complete the completed screen is displaye...

Page 16: ...operation is explained below While this explanation uses the UP DOWN button operation of ATW T5202 as its example it can easily be applied to either transmitter ATW T5201 Turn to the UP DOWN position ATW T5202 Press the UP DOWN button 1 Press the SET button The menu screen appears ATW T5201 ATW T5202 2 Press the UP DOWN button to select the item you wish to set 000 MHz 000 FREQUENCY Selected menu ...

Page 17: ... SETTING Set the DANTE s IP MAC ADDRESS Display the MAC address VERSION This function displays product information such as the version of the DANTE ATW R5220DAN only Setting the operating frequency Manual setting 1 From the menu screen turn the control dial select FREQUENCY and then press the control dial 2 Select MANUAL and press the control dial 3 Turn the control dial to set the first 3 digits ...

Page 18: ... you want to scan over again select Retry 5 Select the channel selection method and then press the control dial When selecting Manual and pressing the control dial available channels and frequencies are shown in a list Turn the control dial select an available channel and then press the control dial The setting is complete When selecting Find Best and pressing the control dial the optimum channel ...

Page 19: ...ve state so be careful when using this While the available range of the transmitter becomes wider as the squelch level is lower there may be cases when noises occur under the influence of other radio waves While the available range of the transmitter becomes narrower as the squelch level is made higher noises are less likely to occur due to the decreased influence of other radio waves 4 Press the ...

Page 20: ...enu screen turn the control dial select UTILITIES and then press the control dial 2 Turn the control dial select Gr Ch EDIT and then press the control dial 3 Turn the control dial select Gr Ch SYNC and then press the control dial 4 Turn the control dial to select group and then press the control dial The screen turns to an IR SYNC standby screen Refer to Using IR SYNC p 14 for subsequent steps Set...

Page 21: ...is Free Tuning 1 From the menu screen turn the control dial select UTILITIES and then press the control dial 2 Turn the control dial select ACCESS and then press the control dial 3 Turn the control dial select Free Tuning or Group Only and then press the control dial Free Tuning No limit Group Only Selection of frequency can be made only from group The setting is complete Resetting This returns th...

Page 22: ...he port number for multicast This item can be set only when Notification is set to ON 4 Set each item Setting the log message Set whether to send the log message to the Syslog server 1 From the menu screen turn the control dial select NETWORK and then press the control dial 2 Turn the control dial select SYSLOG and then press the control dial 3 Turn the control dial select ON or OFF and then press...

Page 23: ... the device name and channel label 1 From the menu screen turn the control dial select DANTE and then press the control dial 2 Turn the control dial select INFO Setting the DANTE s IP 1 From the menu screen turn the control dial select DANTE and then press the control dial 2 Turn the control dial select IP SETTING and then press the control dial 3 Select an item you want to set and press the contr...

Page 24: ...ton 4 Press the UP DOWN button to set the last 3 digits After completing the setting press the SET button The setting is complete Setting by group channel 1 From the menu screen press the UP DOWN button to select FREQUENCY and then press the SET button 000 MHz 000 FREQUENCY 2 After selecting Gr Ch press the SET button Gr Ch FREQUENCY 3 Press the UP DOWN button to set the group After completing the...

Page 25: ...utput The selectable RF transmission output may differ depending on the country or region in which you live 1 From the menu screen press the UP DOWN button to select RF POWER and then press the SET button High 50mW RF POWER 2 Press the UP DOWN button and select High 50mW Mid 10mW Low 2mW or Off 3 Press the SET button The setting is complete Setting HPF High Pass Filter 1 From the menu screen press...

Page 26: ...ess the SET button TOOLS 2 Press the UP DOWN button to select TEST TONE and then press the SET button Off TEST TONE 3 Press the UP DOWN button to select On and then press the SET button A 440 Hz test signal is output as the audio signal in place of the microphone input While outputting a test signal a microphone input will be muted Setting the system related functions Setting the battery type Set ...

Page 27: ... button to select Free or Group Free No limit Group Selection of frequency can be made only from group 4 Press the SET button The setting is complete Resetting This returns the transmitter settings to their factory defaults 1 From the menu screen press the UP DOWN button to select UTILITIES and then press the SET button UTILITIES 2 Press the UP DOWN button to select RESET and press the SET button ...

Page 28: ...rection of the input connector by attaching the clip in the opposite direction Pull both sides of the clip firmly to the outside to remove the clip from the transmitter Making connections basic connections This is an example of connections made when using one receiver Whip antenna Whip antenna Power cable To computer DANTE device or network switch Mixer input Mixer input ...

Page 29: ... of 8 in a cascade connection without using an antenna divider When cascading receivers connect either the included whip antennas or external antennas to the main receiver s antenna input jacks and then cascade each receiver via BNC cable External antenna External antenna Mixer input Power cable To computer DANTE device or network switch ...

Page 30: ...installing the product on a rack make sure that the temperature inside the rack does not reach or exceed 45 C Higher temperatures may negatively affect the internal parts of the product causing the product to malfunction Ensure at least a 10 millimeter space between the product and other devices or the top and side faces of the rack Do not place any objects around the rear of this apparatus to ens...

Page 31: ... used by another noisy component Confirm that there isn t any other nearby wireless system using the same frequency band Adjust the squelch level p 18 ATW T5201 ATW T5202 Symptoms Causes and countermeasures Reference page The power can t be turned on Confirm that batteries are in place Confirm that batteries are not depleted Confirm that batteries are inserted in the right direction p 9 There is n...

Page 32: ...31 Unit mm Dimensions ATW R5220 ATW R5220DAN 482 0 400 0 32 8 43 0 361 0 ...

Page 33: ...32 Unit mm Unit mm Dimensions ATW T5201 ATW T5202 193 Φ 37 64 70 17 ...

Page 34: ...28 Frequency response 3 ATW T5201 23 to 16 300 Hz ATW T5202 33 to 16 300 Hz 1 Note that some frequency bands might not be available in country or region in which you live or could come with a limited tuning bandwidth transmitting power due to local regulations 2 Open range environment with no interfering signals 3 Depending on attached microphone element ATW R5220 ATW R5220DAN Receiving system Tru...

Page 35: ...witchable at 50 ohms Spurious emissions Following federal and national regulations Microphone capsule Interchangeable industry standard thread High pass low freq roll off 80 Hz 6dB octave Batteries Two 1 5V AA not included Operating temperature range 5 ºC to 40 ºC 23 º F to 104 ºF Battery life High 6 5 hours 2 Mid 8 hours 2 Low 9 5 hours 2 alkaline Dimensions ATW T5202 without capsule 193 mm 7 60 ...

Page 36: ... Technica Corporation 2 46 1 Nishi naruse Machida Tokyo 194 8666 Japan www audio technica com 2018 Audio Technica Corporation Global Support Contact www at globalsupport com ver 1 2018 09 15 232417000 02 01 ...

Reviews: