background image

24

Cleaning

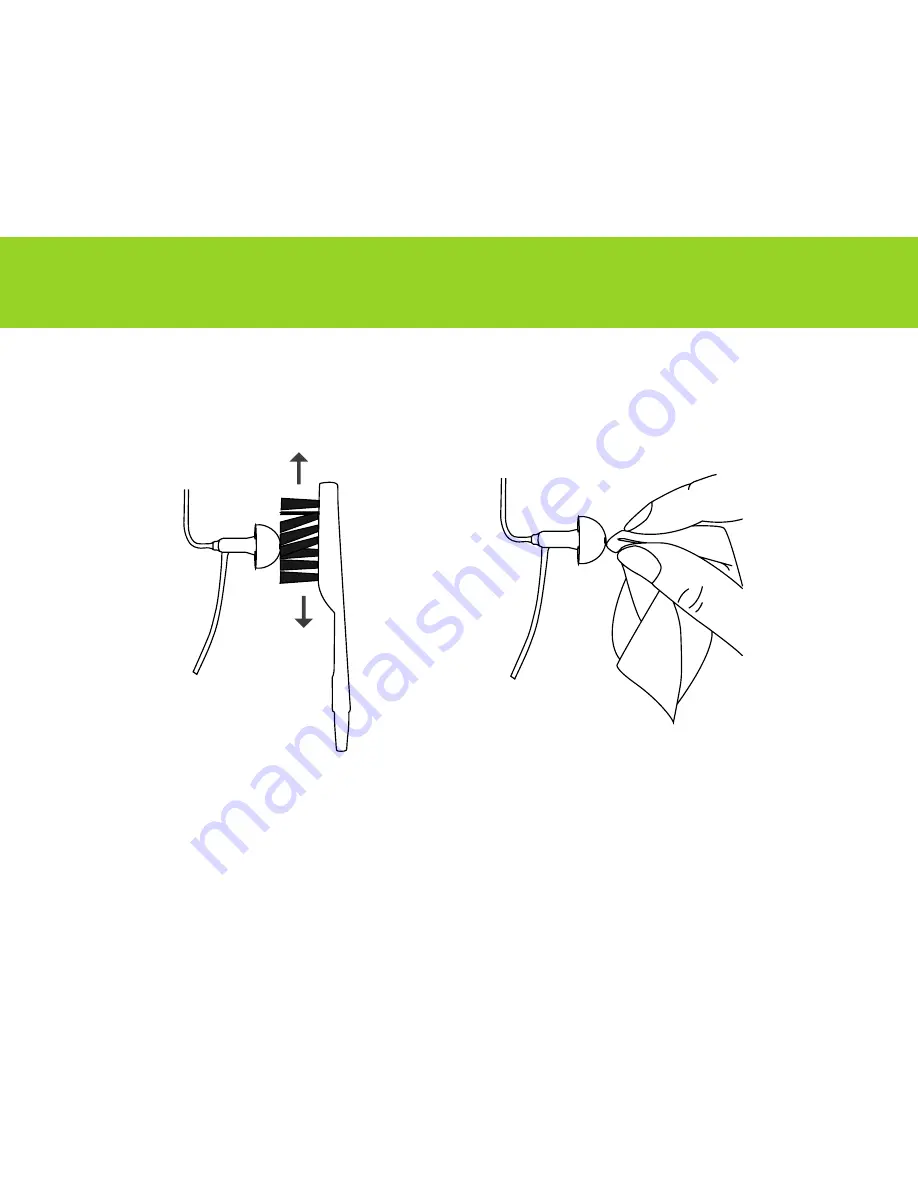
Accumulated earwax can cause diminished sound quality. We highly 
recommend cleaning the click dome regularly to prevent damage and avoid 
health problems.

Keep hearing aid dry and clean at all times. Do not submerge it in water 
or cleaning solution. Ear domes should be replaced every 2-3 
months due to regular wear and tear. 

Never use domes worn by someone else or if dirty, torn, or disfigured. 
Only use original domes and receivers provided by Audicus.

Wipe using a Cloth

Clean using 

the Brush

Summary of Contents for Canto

Page 1: ...Instruction Manual Canto ...

Page 2: ...2 Thank you for choosing Audicus We are excited for you to experience our hearing aids If you have any questions feel free to contact us at 888 979 6918 or help audicus com ...

Page 3: ...ide 6 Maintenance and Use 28 Batteries 8 Technical Information 31 On Off 13 Returns and Warranty 32 Standby Mode 14 Serial Identification 33 Wearing the Hearing Aid 15 FDA Information 34 Memory Programs 22 Warnings and Side Effects 37 Volume Adjustments 23 Contact Us 39 Contents ...

Page 4: ...res and an ergonomic body design In addition it has 1 Receiver in Canal 2 Improved speech recognition 3 Superior feedback and noise reduction 4 Sleek award winning design 5 Volume control The Canto is customized with four memory settings for various listening environments and programmed based on your hearing loss ...

Page 5: ...5 Overview Push Button Auto Adaptive Microphones Battery Compartment Receiver Click Dome Retention Guard Wire Canto Red Right Ear Blue Left Ear ...

Page 6: ...6 Clam Shell Closed Canto Clam Shell Opened Ear Domes Hearing Aid What s Inside ...

Page 7: ...7 What s Inside Manual Size 312 Batteries Brush Earwax Replacement Tool Instruction Manual Canto Magnetic end for extracting batteries ...

Page 8: ...is at the back of the hearing aid as indicated Gently pull the tab on the battery door until it snaps open Inserting the Battery 1 Open the battery compartment When opening and closing the battery door you should never have to exert force Batteries ...

Page 9: ...9 Batteries Inserting the Battery 2 The Canto uses size 312 batteries Place battery into battery compartment with the sticker facing up ...

Page 10: ...10 Inserting the Battery 3 Take off the sticker from the new battery This activates the battery Please wait a few minutes for battery to develop full output Peel off the Sticker Batteries ...

Page 11: ...t using your hearing aid e g when you go to sleep we recommend opening the battery compartment completely to preserve battery power Leaking batteries damage the hearing aid Please remove battery when the hearing aid is not in use for a prolonged period of time Low Battery Warning When your battery runs low the hearing aid will emit continuous beeps ...

Page 12: ...s according to federal and local regulations Never attempt to recharge batteries that are not rechargeable as this could result in an explosion Keep batteries away from sources of high temperature Keep batteries away from children and pets Do not carry batteries loose in your pocket or purse Do not place batteries in your mouth if swallowed consult a physician ...

Page 13: ...FF through its battery compartment When the battery door is closed the hearing aid is switched ON When the battery door is fully open the hearing aid is OFF When the hearing aid is not in use we recommend opening the battery compartment in order to preserve battery power Off On ...

Page 14: ...push button for more than four seconds until the hearing aid goes into standby To re activate the hearing aid simply hold the push button for more than four seconds Hold for 4 seconds or more Note The battery can be drained while in standby mode Open the battery door to turn the hearing aid off Hold either button ...

Page 15: ...15 The Canto can be inserted in 3 easy steps 1 Place the hearing aid over the top of your ear so that the hard casing is behind your ear and the wire is in front Wearing the Hearing Aid ...

Page 16: ...e into your ear until it sits comfortably in the canal and the wire lies flat against the side of your head The dome should be just inside the ear canal You should not see it if placed correctly Wearing the Hearing Aid ...

Page 17: ... into the bowl of your ear If retention guard is too long remove dome and pull it off See page 20 for instructions on how to remove the dome To remove your hearing aid hold the wire and gently pull the dome out of your ear canal Tuck in the Retention Guard ...

Page 18: ...to alter the shape of the tube or casing Always wear the hearing aid with the dome fully attached Do not use broken domes If a dome becomes lodged in your ear contact a medical professional for removal If you feel physical discomfort or experience irritation contact Audicus and or a hearing professional Wearing the Hearing Aid ...

Page 19: ...es from Audicus when replacement is needed Replace every 2 3 months In addition to the click domes you may have to replace the receiver The receiver may last the life of the hearing aid if proper care is taken The receiver has a 1 year manufacturer warranty The receiver can only be replaced by Audicus You can purchase replacement domes and receivers from www audicus com ...

Page 20: ...tify where the end of dome white ring meets the receiver 3 Insert your fingernails between the dome and receiver then pinch 4 Pull the dome off 1 2 3 4 Pinch where dome meets the Receiver Gently Pull Flip the dome Pull with some force Wearing the Hearing Aid ...

Page 21: ...ng Aid To Attach the Dome 1 Place new dome over the receiver 2 Press until the dome snaps onto the receiver 3 Make sure that the ear dome is securely fastened You should be able to tug it slightly without removing it 1 2 3 ...

Page 22: ...rmal situations 1 volume Program 3 Normal situations 2 volume Program 4 Situations with background noise To change programs Press button for 2 seconds When a program is selected you ll hear a corresponding beep For example when Program 1 is selected one beep will sound When Program 2 is selected two beeps will sound To move through the programs simply press the up and down buttons Memory Programs ...

Page 23: ...ening experience To increase volume Press the up button closer to wire To decrease volume Press the down button closer to battery You will hear a beep at each volume interval Only press button for 1 second to change volume You will hear a series of beeps when you reach volume limits From default you have 8 louder and 8 softer levels Louder Softer Default ...

Page 24: ...health problems Keep hearing aid dry and clean at all times Do not submerge it in water or cleaning solution Ear domes should be replaced every 2 3 months due to regular wear and tear Never use domes worn by someone else or if dirty torn or disfigured Only use original domes and receivers provided by Audicus Wipe using a Cloth Clean using the Brush ...

Page 25: ... the Wax Guard with the enclosed brush Replace wax guard as needed You will occasionally have to change the Wax Guard when the hearing aid appears to be dead or weak Identify the Receiver and Wax Guard Tool Receiver Side Front New New Wax Guard Replacement End Removal End A B ...

Page 26: ...26 To Replace the Wax Guard 1 Insert the Removal End of the tool into the used wax guard 2 Rotate the tool clockwise about 6 times 3 Pull the wax guard out A 1 2 3 Replacing the Wax Guard ...

Page 27: ...he new Wax Guard 1 Insert the new Wax Guard on the Replacement End of the tool into the receiver 2 Once firmly inside the receiver tilt the tool to leave the wax guard inside the receiver 3 Wax Guard should be flush in the canal tip B 1 2 3 ...

Page 28: ...swimming Always keep the aid protected when out in the rain If the hearing aid becomes wet remove the battery and ensure the aid is dry before using it again Never subject your hearing aid to hairspray sunscreen aftershave perfume gel cream or other cosmetic medical products In areas of high humidity periodically remove the hearing aid and put it in a warm place to dry out Note Your hearing aid is...

Page 29: ... hearing aid when using a hair dryer Do not leave your hearing aid exposed to direct sunlight for an extended period of time Storage Always remove the battery from the hearing aid when not in use for extended periods Always store your hearing hearing aid in its case in a clean and dry environment Keep your hearing aid from children and pets Consider a hearing aid dehumidifier for most effective st...

Page 30: ...e however electromagnetic field effects cannot be ruled out Handle the hearing aid over a flat surface such as a table to avoid dropping it Do not alter or attempt any repairs on the hearing aid as it will void the warranty Do not place your hearing aid in the microwave In some countries restrictions on the use of wireless equipment may apply consult local authorities for more information WARNING ...

Page 31: ...These limits are designed to provide reasonable protection against harmful interference in a residential installation This equipment generates uses and can radiate radio frequency energy and if not installed and used in accordance with the instructions may cause harmful interference to radio communications However there is no guarantee that interference will not occur in a particular installation ...

Page 32: ... Warranty All our hearing aids come with a full 12 month manufacturer guarantee that covers manu facturing defects The guarantee will not be valid if the hearing aid has been modified or damaged by the user or if the serial number has been altered or if repairs have been made without the consent and knowledge of Audicus If your hearing aid stops functioning correctly and you believe you have a gua...

Page 33: ...entification You can find your serial number inside the hearing aid If you open the battery door you will see a series of numbers The serial number usually begins with two alphabetical letters e g PF00459 RG 00000 ...

Page 34: ...are experiencing discomfort see your audiologist or hearing care professional immediately for modification of the hearing aid or earmold at the point of irritation A hearing aid or earmold may cause an accelerated accumulation of cerumen earwax Also in rare cases the otherwise nonallergenic material may cause a discharge from the ear allergic reaction or any other unusual condition Please seek imm...

Page 35: ...aid user Important Notice for Prospective Hearing Aid Users Good health practice requires that a person with a hearing loss have a medical evaluation by a licensed physician preferably a physician who specializes in diseases of the ear before purchasing a hearing aid Licensed physicians who specialize in diseases of the ear are often referred to as otolaryngologists otologists or otorhinolaryngolo...

Page 36: ...habilitation since hearing loss may cause problems in language development and the educational and social growth of a child An audiologist is qualified by training and experience to assist in the evaluation and rehabilitation of a child with hearing loss Identification Information The date of manufacture is incorporated into the serial number The warranty is based upon the date of purchase not dat...

Page 37: ... aid has been set up so that changes in volume and programs are synchronized One remote can be coupled with a single or a pair of aids If hearing aids are controlled by someone else s remote please contact Audicus If you purchase a single aid and decide to order a second you must send back the unit so that the aids can be coupled and synchronized also include the remote control If you purchase a r...

Page 38: ...ician if you have ear canal blockage a lasting ear infection or a plugged up fullness feeling Consult a licensed physician if you have ringing in one or both ears within last 90 days Keep hearing aids out of the reach of children pets and individuals with diminished mental capacity Hearing aids should be used only as directed and adjusted by your trained hearing aid professional A hearing aid may ...

Page 39: ...39 Contact Us Audicus Inc 134 West 29th St 5th Fl New York NY 10001 Tel 888 979 6918 Email help audicus com www audicus com ...

Page 40: ......

Reviews: