background image

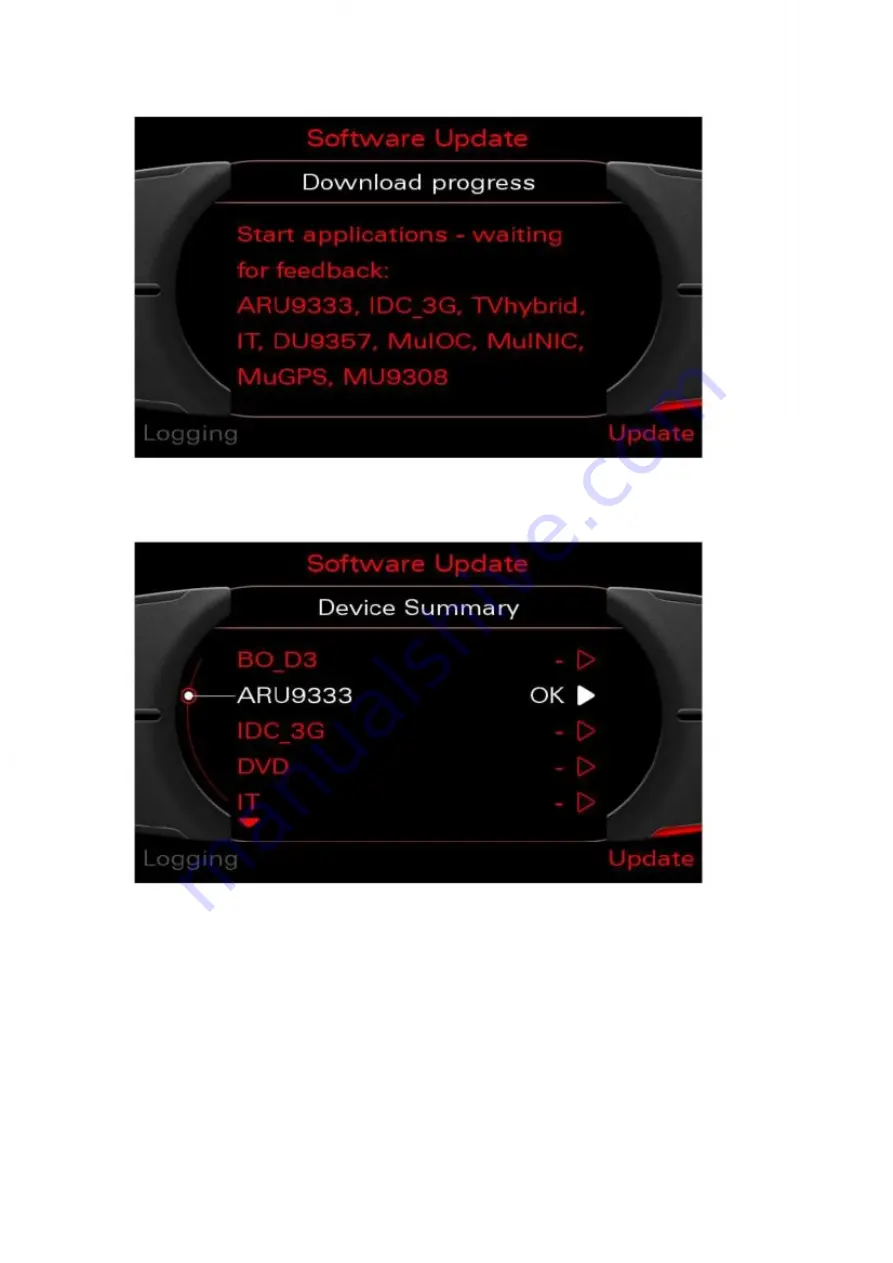
18. After successful rebooting, the devices are automatically re-initialised.

Figure 13: Starting applications after rebooting for update programming

19. Programming success is displayed in the subsequent overview screen.

Figure 14: Displaying update programming success

Summary of Contents for MMI 3G+

Page 1: ...Update MMI update programming for vehicles equipped with MMI 3G e g the A8 with feedback documentation via Software Versions Management Audi SVM Overview of the MMI 3G systems described here with rele...

Page 2: ...1 Overview of controls ON OFF button with volume control Rotary pushbutton Back button Function selector buttons Control buttons Arrow buttons Touch Pad...

Page 3: ...the vehicle 4 The Bluetooth handset if installed must be switched on throughout the entire update programming session and placed in its charging cradle 5 Diagnostic tests using the VAS tester other o...

Page 4: ...rmation electronics 3 Wait at least two minutes to allow the system to analyse the MMI update CD and for the MMI system to be ready for updating 4 Press the appropriate function selector button to act...

Page 5: ...changed at any time This process can take quite a while depending on the devices being scanned Status information is displayed on a waiting screen while the process is carried out Note Ensure that the...

Page 6: ...uration It is possible to update from the CD at any time Figure 3 Selecting update from CD using the rotary pushbutton 9 Wait at least 20 seconds for the meta information to be read If it is taking to...

Page 7: ...llowing the read out process Pressing the rotary pushbutton will continue the download process Figure 5 Waiting while the meta information is read 11 Activate the Standard choice using the rotary push...

Page 8: ...view of the devices to be updated Type of update N A No update information available on the inserted CD N No update required S Single update partial update of software will be performed Y Total updat...

Page 9: ...and activate Start using the rotary pushbutton Figure 9 Selecting Start to start updating using the rotary pushbutton 15 After confirming the download starts automatically once the system has been re...

Page 10: ...Note It may be necessary to reboot the system during the update programming session This is carried out completely automatically and does not require the user to take action Once the system has reboo...

Page 11: ...e devices are automatically re initialised Figure 13 Starting applications after rebooting for update programming 19 Programming success is displayed in the subsequent overview screen Figure 14 Displa...

Page 12: ...grammed correctly NOK select Retry and start the update again by pressing the rotary pushbutton Retry can only be selected if at least one device could not be programmed In a normal case select and ac...

Page 13: ...ion is aborted this must be repeated at a later date The fault memory entry Check Software Versions Management DTC 03276 0x0ccc is automatically cancelled when a feedback documentation has been succes...

Page 14: ...rried out the vehicle data must be transmitted correctly and completely For this reason please answer the questions at the end of Guided Fault Finding regarding the workshop order number vehicle chass...

Page 15: ...out during which all fault memories will be read If necessary follow the additional on screen instructions 9 When all control units have been requested press the Next arrow bottom right 10 Select the...

Page 16: ...ftware Versions Management Figure 20 Software Versions Management 12 Highlight Problem related hardware and software update and press the Next arrow bottom right Figure 21 Problem related hardware and...

Page 17: ...code Direct input and then press the Next arrow bottom right Figure 22 SVM code Direct input 14 In the following screen press the Next arrow bottom right to confirm User test plan Direct input SVM co...

Page 18: ...ate the screen keyboard 16 Enter the SVM code as provided in the TPI and press Q to confirm Figure 23 Entering SVM code 17 Press the Next arrow bottom right 18 The vehicle control unit data will now b...

Page 19: ...19 Then enter your SeCo GeKo user ID Figure 25 SeCo GeKo user ID 20 Now enter your SeCo GeKo password...

Page 20: ...h the MMI 3G a test program is automatically loaded on the tester when the feedback message is received from SVM This program can be used to reset the event memory entry Check Software Versions Manage...

Page 21: ...24 Delete the fault memory entry Figure 27 Opening a test plan Run the 5F Information electronics reset fault memory test program Follow the instructions on the monitor...

Page 22: ...test program Figure 28 Ending the test program 26 Exit Guided Fault Finding by selecting Exit in the Go to function Figure 29 Exiting Guided Fault Finding 27 The fault memory for all control units wi...

Page 23: ...his press the NAV function selector button to switch to the NAV menu 32 Use the control button see figure in Chapter 1 button bottom right next to the rotary pushbutton to activate the map display If...

Page 24: ...same as for the MMI update see Chapter 3 steps 1 9 2 Please note the following differences At step 10 a screen appears displaying the database information for the navigation DVD Figure 30 Navigation d...

Page 25: ...ta is taken into consideration when importing exporting a Address book entries b Sound settings c Navigation settings 3 The export file containing customer data is protected by a code This code can be...

Page 26: ...l the display changes Note You can quit this screen at any time by simultaneously pressing and holding the Tone and Back buttons for more than five seconds 2 Select the Settings menu using the top lef...

Page 27: ...will appear Pressing the rotary pushbutton returns you to the main Settings screen An encrypted file containing the customer data will now be stored on the selected medium Now you can continue by sta...

Page 28: ...process From the Settings menu select the Import option Figure 35 Selecting the import option 7 Make sure that the medium USB or SD card containing the export file is connected or inserted Then selec...

Page 29: ...appear Pressing the rotary pushbutton returns you to the main Settings screen You can now quit the screen again by pressing and holding the Tone and Back buttons for more than five seconds Figure 45 I...

Page 30: ...started a prompt will automatically appear Note The prompt only appears when the ignition is switched on The customer code can be entered by selecting the option Carry out now If you select Query late...

Page 31: ...omatic system restart the imported customer data is then available in the MMI Figure 39 Entering the customer code 4 If the code is entered incorrectly an error message will appear To re enter the cod...

Page 32: ...ollowing these instructions will ensure that this update mode does not occur Please take care to check the power supply in particular During the emergency download only a limited customer interface di...

Page 33: ...rgency download an ordinary software download must be performed manually to ensure that all system components have been updated If read errors on the update CD DVD occur during an emergency update the...

Reviews: