background image

Clock Settings: MMI®

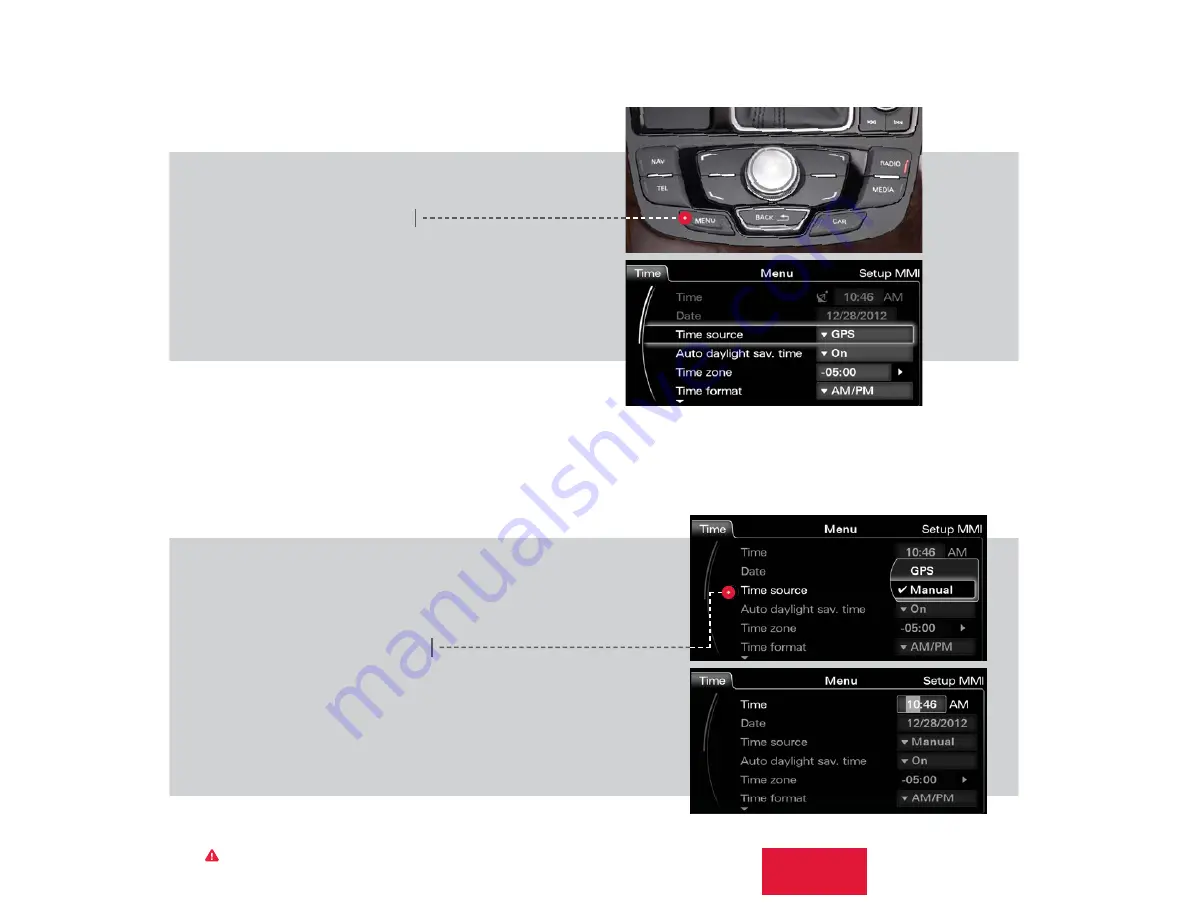
1. Press the 

“MENU”

 function button. 

2. Press the Time control button. 

3. Using the control knob, scroll to Time source. 

4. Make sure the Time source is set to GPS.

To set time with GPS*:

*Vehicles equipped with Navigation only.

Note: Ensure time zone is accurate for your location.

1. Refer to Set Time with GPS and follow Steps 1 - 3.

2. Rotate the knob to Manual and select.

3. Turn the knob until you reach Time; select to activate.

4. Turn the knob to the desired hour and press to set.

5. The minute display is now highlighted; repeat the selection process.

6. Save the time by pressing the control knob.

To manually adjust the time:

Vehicle should be stationary with the parking brake engaged while performing this operation.

Clock Setting

Summary of Contents for A7 2013

Page 1: ...A4 S4 Quick Questions Answers Getting to know your A7 S7 Quick Questions Answers Getting to know your A7 S7 Quick Questions Answers Getting to know your...

Page 2: ...hnology com Audi Explore Welcome Your new A7 is equipped with many features designed to accentuate your driving experience and create an environment that is re ned elegant and supremely functional Thi...

Page 3: ...tons known as the control buttons surrounding the control knob While operating the function options you can return to a previous screen by pressing the BACK button You can access sub menus and lists b...

Page 4: ...ontrol panel you can use the multifunction steering wheel controls to display speci c MMI features in the Driver Information System Simply press the ARROW buttons to display the MMI modes Press the ME...

Page 5: ...Press and hold the desired number on the touchpad until you hear the tone that the station has been stored MMI Controls To access your Presets Fh ii j RADIO function button then the Presets control b...

Page 6: ...nd drive Message and data rates may apply See your phone s owner manual for speci c pairing instructions Vehicle should be stationary with the parking brake engaged while performing this operation TEX...

Page 7: ...ll sound 2 Say Call Name from directory e g Call John Smith 3 To con rm the request say Yes The number will be dialed Note If multiple numbers are stored for a given contact the system will ask which...

Page 8: ...me and press MMI control knob to open contact s information 2 From the telephone menu select Directory 1 Press the TEL function button 4 Press the TALK button After the beep say Store Name 5 When prom...

Page 9: ...tinations TEXT A7ACT1 to 38981 Do not text and drive Message and data rates may apply 1 Ensure SIM card provided by dealer is present in the SIM slot 2 Press the TEL function button 3 Press the Settin...

Page 10: ...devices use Encryption type WPA2 as the default 12 On your device search for Wi Fi Networks select the SSID and enter your password to establish a connection Note You may connect up to eight wireless...

Page 11: ...Navigation Please drive safely Enter destinations while vehicle is stationary away from tra c Always pay careful attention to the road and do not drive while distracted Important Warnings and Safety I...

Page 12: ...uently used voice commands while waiting for your response When pressing the iNAV button the last navigation announcement will be repeated Google Local Search Online Destinations TEXT A7NAV5 to 38981...

Page 13: ...atically to condition the air Note AC is used to dehumidify the air Note Images and instruction re ect 3Zone Automatic Climate Control System AUTO Setting Automatic Climate Control Dual Controls Tempe...

Page 14: ...temperatures for the driver and front passenger Fan speed is the same for both zones Fan speed can be adjusted by turning the FAN control knob Fan Speed The recirculation function prevents outside ai...

Page 15: ...E light will go o 3 To resume pull the stalk towards you you will return to your set speed Your most recently set speed appears as a small icon in the Driver Information Display It remains in memory u...

Page 16: ...art Stop System Important Warnings and Safety Information which you must read are listed on the last panel under Start Stop System If you wish to turn o the Start Stop simply press the START STOP butt...

Page 17: ...n the last panel under Tire Pressure Monitoring System Note Tire pressure is a ected by temperature changes When dramatic weather changes occur and the TPMS indicator light is activated follow proper...

Page 18: ...e for your location 1 Refer to Set Time with GPS and follow Steps 1 3 2 Rotate the knob to Manual and select 3 Turn the knob until you reach Time select to activate 4 Turn the knob to the desired hour...

Page 19: ...Important Warnings and Safety Information which you must read are listed on the last panel under Rear Hatch Power Rear Hatch Fh ii WdZ ebZ j h Wh WjY button on the key fob for at least one second Fkbb...

Page 20: ...on The opening height of the rear hatch can be adjusted 1 While the rear hatch is opening press the rear hatch button on the remote key fob to stop it at the desired height You may also press the butt...

Page 21: ...e or less apparent Frequent aggressive brake application increases the wear of brake components and can reduce the potential for brake noise Frequent light brake application allows glazing to develop...

Page 22: ...ij f hWZ h ZkY if Z WdZ i _ j jhWdic_ii_ed _dje W bem h Wh eh bem h Zh_l_d hWd e dej h_Z j XhWa i eh ebZ j f ZWb Zemd jee bed eh jee e j d J _i YekbZ YWki j XhWa i je j jee ej WdZ Z_c_d_i j XhWa_d ioi...

Page 23: ...j fh iikh ced_jeh _dZ_YWjeh cWo X Z bWo Z 7ia oekh Wkj eh_p Z 7kZ_ Z Wb h Wi hkd Wj j_h i cWo X ki Z ed oekh l _Yb Oekh l _Yb h _ijhWj_ed X Yec i _dlWb_Z _ oek ki j i j_h i m d dej f hc_jj Z WcW je oe...

Page 24: ...Notes...

Page 25: ...A7 S7 2013 Audi of America Inc All rights reserved Audi Truth in Engineering 2013 A7 S7 Audi of America auditechnology com A7QQA 01...

Reviews: