background image

47 

- Flip:


* Off:

 The dome camera moves until 90

 vertically.  

* Auto:

 When the camera reaches the floor directly above the moving object, it will stop. 

At that time, release the Joystick instantly and pull it down again to run the auto-flip 
function. When you use the panning range, it is recommended to use the flip mode to 
Auto.  

* 90, 100, 110, 120:

 Allows the image to flip digitally when the camera moves over the 

setting angle vertically.  


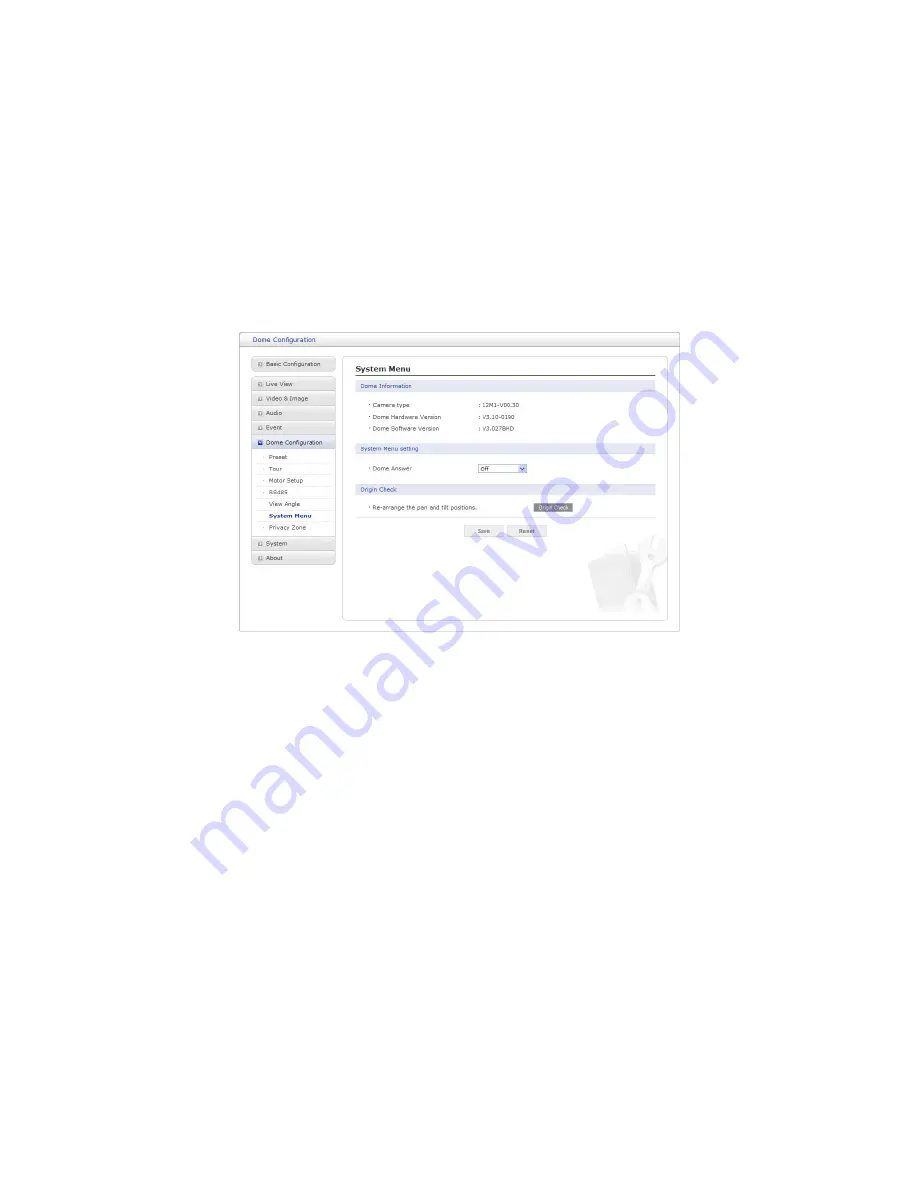
6) System Menu  


• Dome Information:

 The system information provides essential information about the dome if 

service is required. The information cannot be modified.  

• System Menu setting:  

- Dome Answer:

 Select On or Off for acknowledge command from the dome. This option is 

helpful to escape the collision of the command using some DVR.  

• Origin Check:

 If you find the dome in the wrong position during operation, execute this origin 

check by clicking 

Origin Check

 button and the dome camera will return to the right position 

after the origin check operation.  


Summary of Contents for IPSDMV122

Page 1: ...USER S MANUAL Please read this manual thoroughly before use and keep it handy for future reference 2M 12x Mini PTZ Network Camera IPSDMV122 ...

Page 2: ... GRILLS OR OTHER OPENINGS ON THE EQUIPMENT CAUTION EXPLANATION OF GRAPHICAL SYMBOLS The lightning flash with arrowhead symbol within an equilateral triangle is intended to alert the user to the presence of uninsulated dangerous voltage within the product s enclosure that may be of sufficient magnitude to constitute a risk of electric shock to persons The exclamation point within an equilateral tri...

Page 3: ...ed in accordance with the instruction manual may cause harmful interference to radio communications Operation of this equipment in a residential area is likely to cause harmful interference in which case the user will be required to correct the interference at their expense CAUTION Changes or modifications not expressly approved by the party responsible for compliance could void the user s authori...

Page 4: ...rom the apparatus 11 Only use attachments accessories specified by the manufacturer 12 Use only with the cart stand tripod bracket or table specified by the manufacturer or sold with the apparatus When a cart is used use caution when moving the cart apparatus combination to avoid injury from tip over 13 Unplug this apparatus during lightning storms or when unused for long periods of time 14 Refer ...

Page 5: ... the internet 16 3 3 Setting the admin password over a secure connection 16 3 4 Live View Page 16 3 5 Network Camera Setup 18 3 5 1 Basic Configuration 18 1 Users 19 2 Network 20 3 Video Image 21 4 Audio 23 5 Date Time 24 3 5 2 Live View 25 3 5 3 Video Image 25 1 Basic 25 2 Image 26 3 Auto Exposure 27 4 Day Night 28 5 Auto Focus 29 6 DIS 30 7 Webcasting 30 3 5 4 Audio 31 3 5 5 Event 31 1 Event In ...

Page 6: ...9 3 Date Time 51 4 Network 52 5 Language 60 6 Maintenance 61 7 Support 62 3 6 Help 64 3 7 Resetting to the factory default settings 64 4 Appendix 65 4 1 Troubleshooting 65 4 2 Alarm Connection 66 4 3 Preventive Maintenance 66 4 4 Product Specification 67 4 5 System Requirement for Web Browser 70 4 6 General Performance Considerations 70 ...

Page 7: ...he network camera is fully featured for security surveillance and remote monitoring needs It is based on the DSP compression chip and makes it available on the network as real time full frame rate Motion JPEG and H 264 video streams 1 1 Components The camera is designed with compact small size hard dome camera housing The housing is constructed of aluminum steel and plastic The housing is designed...

Page 8: ...ent video capabilities The network camera includes intelligent capabilities such as enhanced video motion detection The network camera s external inputs and outputs can be connected to devices such as sensors and relays enabling the system to react to alarms and activate lights or open close doors Improved Security The network camera logs all user access and lists currently connected users Also it...

Page 9: ...the dome camera CAUTION A silicone rubber sealant must be applied to seal the housing to secure waterproofing 2 1 1 Locking Dome Camera A Make screw holes on the ceiling using the supplied mounting Template Sheet Figure A B Fix the Mounting Bracket to the ceiling using supplied Anchors 4x and Mounting Screws 4x Figure B C Hook up the Safety Lanyard to the Safety Lanyard Hook of the Mounting Bracke...

Page 10: ... the tab of the mounting bracket into the locking slot Screws A should not be too tight or too loose when the dome is in the locked position After setting the proper positions of screws A remove the mounting bracket and install it to the proper surface If it is too difficult to lock the dome in position after the mounting bracket has been installed readjust the screws A by unscrewing them a small ...

Page 11: ...rmation HEATER Power Data Power Supply 24VAC Power Consumption 10W Heater ON at 59 F 15 C Heater OFF at 77 F 25 C POWER Use satisfies clause 2 5 of IEC60950 1 UL60950 1 or Certified Listed Class 2 power source only A B A B ...

Page 12: ...al block PINK GND GRAY ALARM INPUT BROWN GND YELLOW ALARM OUTPUT GREEN RS485 BLUE RS485 3 RJ 45 BLACK Ethernet RJ 45 port compatible with 10 100Mbps having PoE functionality 4 STEREO GRAY AUDIO OUTPUT 5 STEREO BLACK AUDIO INPUT The camera must be installed by qualified service personnel in accordance with all local and federal electrical and building codes ...

Page 13: ...he AO Alarm Output and G Ground connectors Connecting to the RS485 The camera can be controlled remotely by an external device or control system such as a control keyboard using RS485 half duplex serial communications signals Connecting the Power Connect power of 12VDC or 24VAC 1 5A for the camera When using a 12VDC adapter connect the positive pole to the position and the negative pole to the pos...

Page 14: ...vice to the network and power up 2 Start SmartManager utility Start All programs SmartManager SmartManager The main window will display and after a short while any network devices connected to the network will be displayed in the list 3 Select the camera on the list and click right button of the mouse You can see the pop up menu as below 4 Select Assign IP Address The Assign IP window will display...

Page 15: ... view streaming video in Microsoft Internet Explorer set your browser to allow ActiveX controls 3 1 Access from a browser 1 Start a browser Internet Explorer 2 Enter the IP address or host name of the network camera in the Location Address field of your browser 3 You can see a starting page Click Live View or Setup to enter web page 4 The network camera s Live View page appears in your browser ...

Page 16: ... default administrator user name and password is admin If the password is lost the network camera must be reset to the factory default settings Please see Resetting to the factory default settings To prevent network eavesdropping when setting the admin password this can be done via an encrypted HTTPS connection which requires an HTTPS certificate see NOTE below To set the password via a standard H...

Page 17: ... camera or starts playing a video stream The Pause button pauses the video stream being played The Snapshot button takes a snapshot of the current image The location where the image is saved can be specified The Digital Zoom button activates a zoom in or zoom out function for video image on the live screen The Full Screen button causes the video image to fill the entire screen area No other window...

Page 18: ...etwork camera by clicking Setup in the top right hand corner of the Live View page Click on this page to access the online help that explains the setup tools When accessing the network camera for the first time the Admin Password dialog appears Enter your admin name and password set by the administrator NOTE If the password is lost the network camera must be reset to the factory default settings P...

Page 19: ...ups levels User Group Authority Guest Provides the lowest level of access which only allows access to the Live View page Operator An operator can view the Live View page create and modify events and adjust certain other settings Operators have no access to System Options Administrator An administrator has unrestricted access to the Setup tools and can determine the registration of all other users ...

Page 20: ...y it is also possible to use it to set a static known IP address for a particular MAC address Use the following IP address To use a static IP address for the network camera check the radio button and then make the following settings IP address Specify a unique IP address for your network camera Subnet mask Specify the mask for the subnet the network camera is located on Default router Specify the ...

Page 21: ... applications for example this is the profile adopted by the Blu ray Disc storage format and the DVB HDTV broadcast service H 264 MP Main Profile Primary profile for low cost applications that require additional error robustness this profile is used rarely in videoconferencing and mobile applications it does add additional error resilience tools to the Constrained Baseline Profile The importance o...

Page 22: ...onitoring screen by enhancing the image quality users can do so by decreasing the compressibility In each case please adjust this function according to the network status and monitoring purposes Frame rate Upon the real time play users should select a frame refresh rate per second If the rate is high the image will become smooth On the other hand if the rate is low the image will not be natural bu...

Page 23: ...al line source can be connected to the STEREO Jack I O of the network camera Input volume If there are problems with the sound input being too low or high it is possible to adjust the input gain for the microphone attached to the network camera Audio Output Enable full duplex Check the box to enable Full Duplex mode This means that you can transmit and receive audio talk and listen at the same tim...

Page 24: ... section select the preferred method to use for setting the time Synchronize with computer time sets the time from the clock on your computer Synchronize with NTP Server the network camera will obtain the time from an NTP server every 60 minutes Set manually this option allows you to manually set the time and date Data Time Format Specify the formats for the date and time 12h or 24h displayed in t...

Page 25: ...e Video Mode Choose Video Mode you wish to use from the drop down list NTSC or PAL NOTE This function may not be applicable depending on the model 3 5 3 Video Image 1 Basic Refer to 3 5 1 Basic Configuration Video Image for more details ...

Page 26: ...t the image would be less sharp High sensitivity Produce brighter image in low light environment Defog Produce clearer image in hazy environment Enable flip horizontally Flip the camera image upside down Noise Reduction Control The NR Noise Reduction function removes noise to provide clearer image In bright conditions changing the NR level may not affect the image quality Level The level can be ad...

Page 27: ...Gain Limit Controls the upper limit of the gain which the camera can control This is only available if Exposure mode is set to Auto Iris Controls the camera iris This is only available if Exposure mode is set to Manual Gain Increasing exposure gain increases the brightness of image but it also increases the amount of noise in the image This is only available if Exposure mode is set to Manual Shutt...

Page 28: ...tic White Balance is enabled the camera measures the image and automatically adjusts the red and blue settings to balance white When Automatic White Balance is disabled the camera uses the values set for the red and blue settings to balance white Mode Auto Computes the white balance value output using color information from the entire screen automatically Manual Manual mode you can change R and B ...

Page 29: ...uto Focus Setting Continuously adjusts the lens automatically to the correct focus for the sharpest picture Mode Auto Auto Focus is always active Manual Auto Focus is inactive Focus limit This distance is approximate value and the focus operates from the setting value Speed The speed can be adjusted in the range 1 8 NOTE Avoid continuous 24 hour use of the auto focus This will shorten the lifespan...

Page 30: ...nd Slow motion 7 Webcasting The network camera can stream live video to a website Copies the HTML code generated on the screen and pastes it in page code of the website you want to display live video NOTE To use webcasting service the Enable Anonymous viewer login option must be checked Refer to 3 5 1 Basic Configuration Users for more details ...

Page 31: ...udio Refer to 3 5 1 Basic Configuration Audio for more details 3 5 5 Event 1 Event In On Boot This is used to trigger the event every time the network camera is started Select Enable to activate the motion event ...

Page 32: ...ally Open As an example if the Normal state for a push button connected to an input is Open circuit this means that as long as the button is not pushed and the Current state remains as Open circuit the state will be inactive NC Normally Close When the button is pushed the circuit is grounded the input s state changes to Grounded circuit and the input will no longer be in its normal state it will h...

Page 33: ... Interface Motion Motion detection is used to generate an alarm whenever movement occurs or stops in the video image A total of 8 Motion and or Mask windows can be created and configured Motion is detected in defined Motion windows which are placed in the video image to target specific areas Movement in the areas outside the motion windows will be ignored If part of a motion window needs to be mas...

Page 34: ...ting The behavior for each window is defined by adjusting the Threshold and Sensitivity as described below A motion index is a set of parameters describing Window Name Type Threshold and Dwell Time Window Types is one of Motion and Mask windows Threshold Sets up the threshold for the motion detection Dwell Time Sets the hold time an event lasts for the specified hold time from the point of detecti...

Page 35: ...pering occurs Select Enable to activate the Tempering event 2 Event Out SMTP E Mail The network camera can be configured to send event and error email messages via SMTP Simple Mail Transfer Protocol SMTP E Mail Setting Select Enable to activate the SMTP operation ...

Page 36: ...by your network administrator or ISP Internet Service Provider To ensure that the login procedure is performed as securely as possible when using SMTP authentication you must define the weakest authentication method allowed Login method Set the Weakest method allowed to the highest safest method supported by the mail server The most secure method is listed in the drop down list AUTH LOGIN AUTH PLA...

Page 37: ...r log in information JPEG Setting Pre event A pre event buffer contains images from the time immediately preceding the event trigger These are stored internally in the server This buffer can be very useful when checking to see what happened to cause the event trigger Check the box to enable the pre trigger buffer enter the desired total length in seconds minutes or hours and specify the required i...

Page 38: ...Password Provide your log in information HTTP Server Test When the setup is complete the connection can be tested by clicking the Test button Alarm Out Enable alarm out Click the Enable alarm out checkbox to enable the Alarm Out port Type The default setting is NO NO Normally Open NC Normally Close Click the Save button to save the settings or click the Reset button to clear all of the information...

Page 39: ...om your PC Provide the path to the file directly or use the Browse button to locate it Then click the Upload button An audio file for Audio Alert can be made by Audio Recorder tool in the ATVision IP software Audio Alert Test When the setup is complete the audio output can be tested by clicking the Test button To remove an audio file select index and click the Remove button NOTE For the proper ope...

Page 40: ...he Home position once the event has ended Event Notification When the network camera detects an event Notification server is used to receive notification messages as a type of XML data format Check the box to enable the service Event Notification Setting Notification Server URL The network address to the server and the script that will handle the request ...

Page 41: ...condition to this boosted level for the duration of the event Check the box to enable the service Boost Setting You can set the condition in Normal and Boost mode Boost Stream Select a video stream for each condition in the drop down list Frame rate Select a frame refresh rate per second for each condition in the drop down list Bit rate control Select VBR or CBR in the drop down list in Normal Con...

Page 42: ... has occurred HTTP Server It sends notification messages to an HTTP server that listens for these The destination server must first be configured on the Event In page Enter a message you want to send Audio Alert Select an Audio Alert file as the Network Transmitter output when audio alert event triggered The Audio Alert file must first be configured on the Event In page Event Notification It sends...

Page 43: ...40 or Home Title Up to 12 characters Alphanumeric characters and space Focus Auto Auto Focus is always active Manual Auto Focus is inactive Preset Setup Activate the PTZ Control Panel Preset Delete Delete selected Preset number Follow steps below to store the Preset positions 1 Click the Preset Setup button then shows the PTZ Control Panel 2 Choose the desired Preset number from the Preset drop do...

Page 44: ...lect either forward or backward sequence in the Tour position list Delete Tour Delete the stored Tour Position Setup list of Tour number Tour Position Setup Open or close the Tour Position Setup as below Tour Position Setup Tour position The Tour position can be selected in the range 1 100 Preset number Show the selected Preset number Dwell Time Select the Dwell Time from 0 to 99 seconds The defau...

Page 45: ...list and click Set Position button then show the saved Presets or Home on drop down list Click a Preset or Home 2 Repeat step 1 for each desired position 3 Click the Save button to save the settings or click the Reset button to clear all of the information you entered without saving it 3 Motor Setup Motor Setup menu provides the pan and tilt speed of a camera Motor Setting Proportional P T Select ...

Page 46: ...o communicate with external PTZ device Baud rate Selects one of the Baud rate Parity Selects one of the Parity bit 5 View Angle View Angle Setting Tilt angle limit This option is designed to limit the view angle as there is some obstruction in zooming out on specific areas of the tilt angle NOTE Focus issues may occur if the tilt angle limit is set below 10 degree ...

Page 47: ... moves over the setting angle vertically 6 System Menu Dome Information The system information provides essential information about the dome if service is required The information cannot be modified System Menu setting Dome Answer Select On or Off for acknowledge command from the dome This option is helpful to escape the collision of the command using some DVR Origin Check If you find the dome in ...

Page 48: ...privacy zones 1 After aiming the camera view direction and lens control by using the Arrow and Zoom button in PTZ Control Panel click Set cell of Set column at any inactive row to create privacy zone 2 You can change the Title up to 12 alphanumeric characters 3 In order to hide or display the privacy zone choose On or Off in V off column 4 Click X at Delete column to delete privacy zone ...

Page 49: ...to four locations 2 Security Users User access control is enabled by default when the administrator sets the root password on first access New users are authorized with user names and passwords or the administrator can choose to allow anonymous viewer login to the Live View page as described below User Setting Check the box to enable anonymous viewer login to the network camera without a user acco...

Page 50: ...ction HTTPS Connection Policy Choose the form of connection you wish to use from the drop down list for the administrator Operator and Viewer to enable HTTPS connection set to HTTP by default HTTP HTTPS HTTP HTTPS Upload Certificate To use HTTPS for communication with the network camera an official certificate issued by a CA Certificate Authority must be uploaded from your PC Provide the path to t...

Page 51: ...resses All other IP addresses not in this list will then be allowed or denied access accordingly that is if the addresses in the list are allowed then all others are denied access and vice versa Also see the online help for more information NOTE Users from IP addresses that will be allowed must also be registered with the appropriate access rights This is done from Setup System Security Users 3 Da...

Page 52: ...lly set the time and date NOTE If using a host name for the NTP server a DNS server must be configured under TCP IP settings 4 Network Settings in regard to network can be executed Settings for IP DNS Host Name Port and ARP Ping can be established along with setting for DDNS uPnP QoS Zeroconfig and Bonjour Basic IP Address Configuration Obtain IP address via DHCP Dynamic Host Configuration Protoco...

Page 53: ...ollowing Domain name Enter the domain s to search for the host name used by the network camera Multiple domains can be separated by semicolons The host name is always the first part of a Fully Qualified Domain Name for example my server is the host name in the Fully Qualified Domain Name myserver mycompany com where mycompany com is the Domain name DNS servers Enter the IP addresses of the primary...

Page 54: ...tv network co kr Enable DDNS Check to get DDNS service to be available DDNS Server Select the DDNS server Registered host Enter an address of the DDNS server User name Enter an ID to access the DDNS server Password Enter a password to be used for accessing the DDNS server Confirm password Enter the password again to confirm it Maximum time interval Set a time interval to synchronize with the DDNS ...

Page 55: ... 30000 and 39920 Multicast This function is for sending Video to Multicast group Enable Multicast Check the box to enable multicast operation Multicast destination IP Enter an IP between 224 0 0 0 and 239 255 255 255 Although it is empty an IP will be entered automatically RTP port Enter a value between 1024 and 65530 RTP TTL Enter a value between 1 and 255 If the network status is smooth enter a ...

Page 56: ...ating systems and clients that support this protocol NOTE UPnP must be installed on your workstation if running Windows XP To do this open the Control Panel from the Start Menu and select Add Remove Programs Select Add Remove Windows Components and open the Networking Services section Click Details and then select UPnP as the service to add ...

Page 57: ...is used to mark the traffic s IP header When the marked traffic reaches a network router or switch the DSCP value in the IP header tell the router or switch which type of treatment to apply to this type of traffic for example how much bandwidth to reserve for it NOTE DSCP values can be entered in decimal or hex form but saved values are always shown in decimal The following types of traffic are ma...

Page 58: ...lic network Internet Use NAT Traversal when your network cameras are located on an intranet LAN and you wish to make it available from the other WAN side of a NAT router With NAT traversal properly configured all HTTP traffic to an external HTTP port in the NAT router is forwarded to the network camera NOTES 1 For NAT traversal to work this must be supported by the broadband router 2 The broadband...

Page 59: ...ters and printers to connect to a network automatically Without zeroconf a network administrator must set up services such as Dynamic Host Configuration Protocol DHCP and Domain Name System DNS or configure each computer s network settings manually which may be difficult and time consuming Zeroconf is built on three core technologies Assignment of numeric network addresses for networked devices li...

Page 60: ...ing systems and clients that support this protocol NOTE Bonjour Also known as zero configuration networking Bonjour enables devices to automatically discover each other on a network without having to enter IP addresses or configure DNS servers Bonjour is a trademark of Apple Computer Inc 5 Language Select the desired language ...

Page 61: ...his will return all of the network camera s settings to the factory default values including the IP address Update Upgrade your camera by importing an upgrade file and pressing the Upgrade button During the upgrade do not turn off the power of the network camera Wait at least five minutes and then try to access the camera again Backup Save the setting values that users have entered to the network ...

Page 62: ... the Server Report button to get the important information about the server s status this should always be included when requesting support Parameter List Click the Parameter List button to see the unit s parameters and their current settings Health Check System Check Click the System Check button to get the important information about the camera s system resources You can see the pop up window be...

Page 63: ...k the Network Check button to get the information about the camera s network setting and traffic You can see the pop up window below Hardware Check Click the Hardware Check button to diagnose the camera s hardware like video ...

Page 64: ...r s Manual or use the Reset button on the network camera as described below Using the Reset button Follow the instructions below to reset the network camera to the factory default settings using the Reset button 1 Switch off the network camera by disconnecting the power adapter 2 Press and hold the Reset button SW1 on the board with your finger while reconnecting the power 3 Keep the Reset button ...

Page 65: ...wser s address bar No image using Refresh and or slow updating of images If images are very complex try limiting the number of clients accessing the camera Images only shown in black white Check the Video Image setting Blurred images Refocus the camera Poor image quality Increased lighting can often improve image quality Check that there is sufficient lighting at the monitored location Check all i...

Page 66: ...eventive maintenance allows detection and correction of minor that faults before they become serious and cause equipment failure Every three month perform the following maintenance 1 Inspect all connection cables for deterioration or other damage 2 Clean components with a clean damp cloth 3 Verify that all the mounting hardware is secure ...

Page 67: ...BP MP HP MJPEG Resolution Supported 1920 x 1080p Max Frame Rate 1080p 60 50fps 1080p 30 25fps Multiple Streaming Triple Stream 2x H 264 and 1x MJPEG IN OUT Audio In Out In x 1 Out x 1 G 711 Alarm In Out In x 1 Out x 1 RS485 RS485 Ethernet 10 100Mbps FEATURE Motion Detection Yes Event Buffering Pre Post Yes Privacy Masking Yes PrVA Pre recorded Voice Alert Yes 3 files Video Analytics Yes Cross Web ...

Page 68: ...wer with Heater 24VAC 10 Power Consumption 250mA 12W PoE 1 0A 12W 12VDC or 24VAC Power Consumption with Heater 1 5A 22W 24VAC 10 Operating Temperature 10 50 14 F to 122 F Operating Temperature with Heater 30 50 22 F to 122 F Operating Humidity 0 90 RH External Dimension See dimension drawing Weight Approx 1 6 kg for dome PTZ FUNCTION Pan Range 360 Endless Pan Speed Preset Max 380 sec Manual Max 38...

Page 69: ...69 Figure Dimension ...

Page 70: ...etting up your system it is important to consider how various settings and situations will affect performance Some factors affect the amount of bandwidth the bit rate required others can affect the frame rate and some affect both If the load on the CPU reaches its maximum this will also affect the frame rate The following factors are among the most important to consider High image resolutions and ...

Page 71: ...2M 12x Mini PTZ NETWORK CAMERA IPSDMV122 Rev A ...

Reviews: