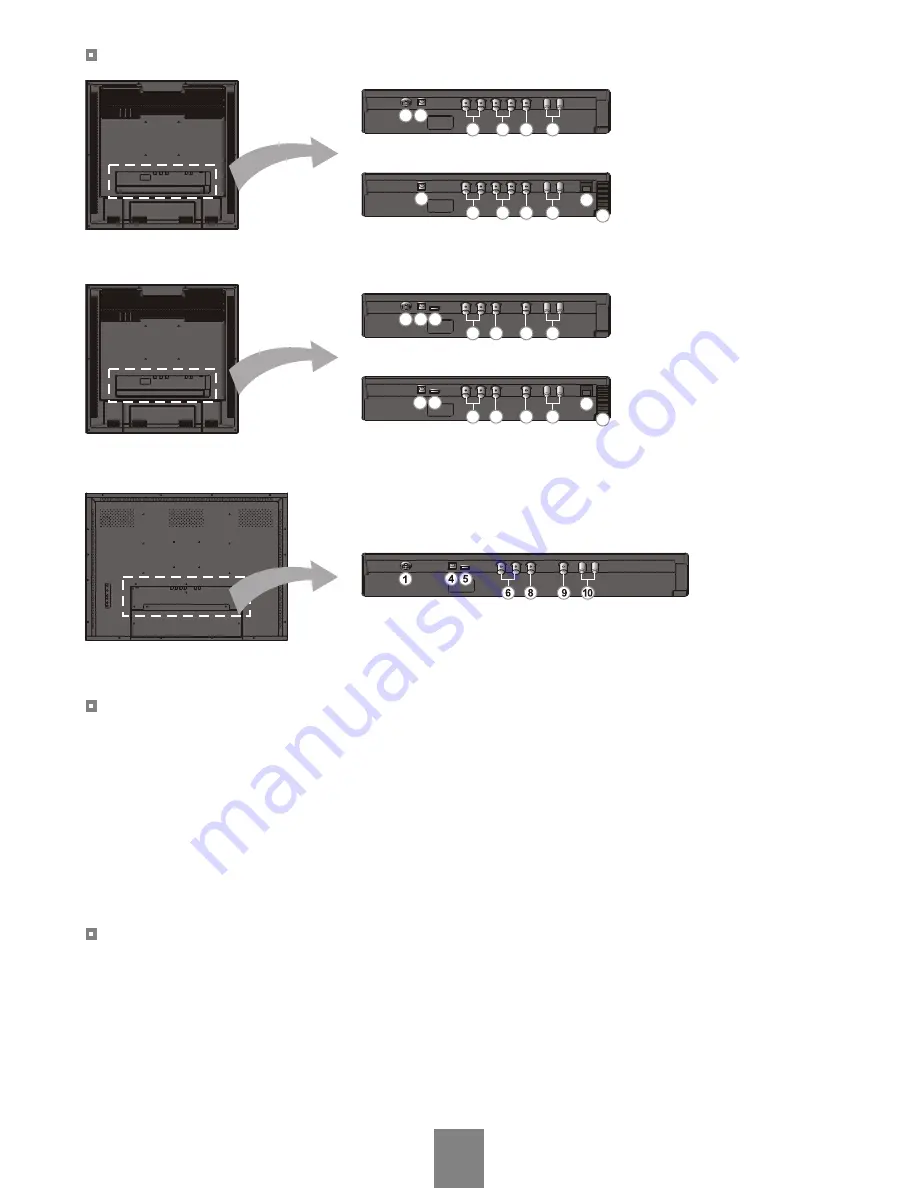
background image

(20.1” Monitor)

THE REAR PANEL

(20.1” PVM)

Connect the adapter jack to the DC power connector on the back of the monitor. 
Used to supply DC12V power to an external camera.(DC12V / 500mA)

Supply AC24 volts power to the monitor using two wires.
CAUTION : Do not use a non-isolated AC 24V power supply.
Switch on to supply AC24V to the monitor.
Used to supply DC12V power to an external camera.(DC12V / 500mA)

Power Connection

5. Integrated Camera
6 & 7. External Cameras

8. INT Out
9. Monitor Out
10. Audio Input

Video and Audio Connection

DC Type

1. DC Jack 
4. DC12V Output

AC Type

2. AC24V Input

3. Power Switch
4. DC12V Output

Video input of the integrated camera.
Video input connectors of external camera video sources.
Either left or right BNC can be input or output.
The connectors have auto-termination internal switches.
Video output connector of the integrated camera.
The Video output connector of the same video as the picture displayed.
Audio Input connectors.

8

DC type

AC type

1 4

6

9

10

7

4

6

9

10

7

3

2

DC type

AC type

1 4

6

9

10

5

8

4

6

9

10

3

2

8

5

(26” & 32” Monitor)

DC type

Summary of Contents for 20.1 inch PVM

Page 1: ...Instruction and Operation M A N U A L Please read this manual thoroughly before use and keep it handy for future reference COLOR TFT LCD MONITOR TFT LCD MONITOR TFT LCD PUBLIC VIEW MONITOR...

Page 2: ...S HOWEVER WE CANNOT ASSUME RESPONSIBILITY FOR ANY CONSEQUENCES RESULTING FROM THE USE THEREOF THE INFORMATION CONTAINED HEREIN IS SUBJECT TO CHANGE WITHOUT NOTICE REVISIONS OR NEW EDITIONS TO THIS PUB...

Page 3: ...ing to be used for several days or more To disconnect the cord pull it out by the plug Never pull the cord itself Allow adequate air circulation to prevent internal heat build up Do not place the unit...

Page 4: ...ANT TO PART 15 OF THE FCC RULES THESE LIMITS ARE DESIGNED TO PROVIDE REASONABLE PROTECTION AGAINST HARMFUL INTERFERENCE WHEN THE EQUIPMENT IS OPERATED IN A COMMERCIAL ENVIRONMENT THIS EQUIPMENT GENERA...

Page 5: ...grounding type power outlet This is a safety feature If you are unable to insert the plug into the outlet contact your electrician to replace your obsolete outlet Do not defeat the safety purpose of t...

Page 6: ...ONT PANEL USER BUTTON CHAPTER 4 SETUP MODE OVERVIEW OSD WINDOW OF MAIN MENU SELECTING SCREEN MODE MOTION SETUP TIME DATE PICTURE ADJUSTMENT CAMERA TITLE CAMERA ADJUSTMENT PIP ADJUSTMENT CONFIGURATION...

Page 7: ...tor image to switch to one or both of the camera images which contains motion The monitor provides four display modes including full screen CAM1 or CAM2 picture in picture PIP mode and picture by pict...

Page 8: ...A Internal camera B IR Sensor Light sensor Detect ambient light C Internal speakers CHAPTER 2 FRONT AND REAR PANEL THE FRONT PANEL 7 A B C 26 32 20 1 B A C...

Page 9: ...6 7 External Cameras 8 INT Out 9 Monitor Out 10 Audio Input Video and Audio Connection DC Type 1 DC Jack 4 DC12V Output AC Type 2 AC24V Input 3 Power Switch 4 DC12V Output Video input of the integrate...

Page 10: ...menu of the selected item 8 Decrease Increase the value of the selected item Decrease Increase the volume of internal speakers 9 Move up down in the menu list 10 SOURCE Changes the picture display mo...

Page 11: ...e the cursor up and down in the OSD Setup menu and are used to adjust the chosen item 26 32 Some functions can be controlled by using user control buttons For more information refer to USER BUTTON in...

Page 12: ...CA1 MODE 2 Full display of the selected camera The screen is switched to the camera which contains motion when the camera MOTION is enabled Main PIP The PIP window appears if motion occurs on the PIP...

Page 13: ...rom the camera to the other camera is 5 seconds when this monitor is operated in MODE 1 It supports up to 99 seconds Dwell Time If there is a motion in the field of view of the CA2 the main screen swi...

Page 14: ...is dependent on the format option Time This field is used to set the time in the 24 hour format Display The Display option on the time and date setup screen allows you to select whether to display th...

Page 15: ...e selected option using or 1 Tint is only activated in NTSC system 14 The Camera Title setup screen allows you to modify the name of each camera This option is also used to select whether or not the s...

Page 16: ...mera Adjust using or and then press the Menu button to display its sub menu Select one of the options in the Camera Adjust menu list Adjust the selected option using or Tint is only activated in NTSC...

Page 17: ...ined defaults Some items do not go to factory default values Auto Power This option is used to turn the monitor on and off automatically at On Time and Off Time Dynamic Contrast Use this option to enh...

Page 18: ...the OSD Menu to adjust the OSD window OSD language and other options can be adjusted in this setup menu ADJUSTING OSD WINDOW OSD MENU Language Blending Time English 3 40 Sec Press the Menu button Sele...

Page 19: ...ge is too light or too dark Adjust the Brightness and Contrast 4 Picture is impropely tinted Check color adjustment 5 Motion not detected or detected too often Adjust sensitivity of motion detection 6...

Page 20: ...Gray NTSC PAL 1Vp p 75 ohm Internal Camera x 1 External Camera x 1 Internal Camera x 1 External Camera x 1 Monitor Output x 1 YES BNC Line Level 2 Terminal RCA x 1 5W x 2 Yes DC24V 5 4A x1 DC 12V 0 5...

Page 21: ...50dB Yes Yes No 1 60 1 100 000 1 50 1 100 000 Items 4 8mm F2 0 360 1 3 480 TVL 1 0 Lux F2 0 50 IRE 50dB Yes Yes Yes 1 60 1 100 000 1 50 1 100 000 2 8 11mm F1 4 360 1 3 480 TVL 1 0 Lux F2 0 50 IRE 50d...

Page 22: ...MEMO...

Page 23: ...MEMO...

Page 24: ...TFT LCD MONITOR TFT LCD PUBLIC VIEW MONITOR 50302352C PRINTED IN KOREA Instruction and Operation M A N U A L...

Reviews: