background image

3

Installation Guide

AT-OMNI-521

The AT-OMNI-521 decoder includes two 

mounting brackets and four mounting screws, 

which can be used to attach the unit to any flat 

surface.

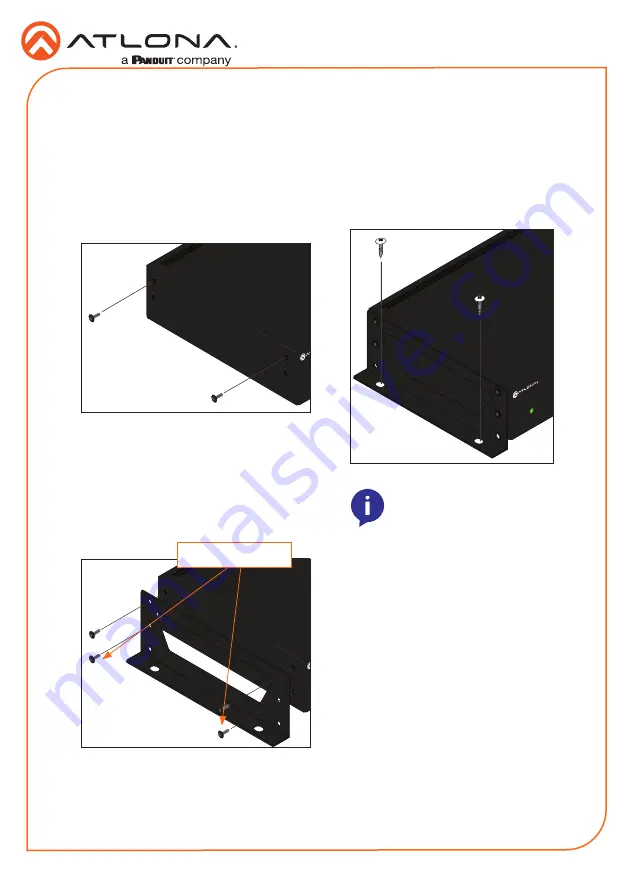
1.  Using a small Phillips screwdriver, remove 

the two screws from the left side of the 

enclosure. 


2.  Position one of the mounting brackets, as 

shown below, aligning the holes on the 

side of the enclosure with one set of holes 

on the mounting bracket.

3.  Use the enclosure screws to secure the 

mounting bracket to the enclosure. 


4.  To provide added stability to the mounting 

bracket, use two of the included screws 

and attach them to the two holes, directly 

below the enclosure screws, as shown 

above.

5.  Repeat steps 1 through 4 to attach the 

second mounting bracket to the opposite 

side of the unit.

6.  Mount the unit using the oval-shaped 

holes, on each mounting bracket.  If using 

a drywall surface, a #6 drywall screw is 

recommended. 


TM

O

MNI

S

TREAM

LINK

PW

R

R

-

T

YPE

ID

TM

O

MNI

S

TREAM

LINK

PW

R

R

-

T

YPE

ID

TM

O

MNI

S

TREAM

LINK

PW

R

R

-

T

YPE

ID

NOTE:

 Mounting brackets can 

 also be inverted to mount the 

 unit under a table or other flat 

surface.

Mounting Instructions


Included screws

Summary of Contents for OmniStream AT-OMNI-521

Page 1: ...ng plus presentation enhancement features such as logo insertion and scrolling on screen text 1 x AT OMNI 521 1 x Push spring connector 6 pin 1 x Wall table mounting brackets 4 x Rubber feet 1 x Installation Guide Package Contents IMPORTANT Visit http www atlona com product AT OMNI 521 for the latest firmware updates and User Manual Operating Notes This product is powered using PoE Power over Ethe...

Page 2: ...to any devices that may be listening AMS 2 Press and hold this button for 30 seconds to perform a factory reset of the unit Refer to the OmniStream R Type Decoder User Manual for more information 4 REBOOT Use a pointed object to press this recessed button and reboot the unit 5 HDMI OUT Connect an HDMI cable from this port to a UHD HD display 6 ETHERNET Connect an Ethernet cable from this port to t...

Page 3: ...mounting bracket to the enclosure 4 To provide added stability to the mounting bracket use two of the included screws and attach them to the two holes directly below the enclosure screws as shown above 5 Repeat steps 1 through 4 to attach the second mounting bracket to the opposite side of the unit 6 Mount the unit using the oval shaped holes on each mounting bracket If using a drywall surface a 6...

Page 4: ... 3 If using RS 232 and or IR connect the included 6 pin captive screw connector to the RS 232 IR port on the decoder 4 The PWR indicator on the front panel display the power status of the decoder When the decoder is powered using either PoE or the optional 48V DC power supply not included the LED initially turns red After a few moments it will turn amber and finally green Installation IMPORTANT If...

Page 5: ...desired wiring diagram below NOTE Typical DB9 connectors use pin 2 for TX pin 3 for RX and pin 5 for ground On some devices the function of pins 2 and 3 are reversed Push tab to unlock IR extender configuration IR emitter configuration GND RX TX GND black IR emitter SIGNAL white black RX TX GND GND black SIGNAL white black Control System TX out GND RX TX GND RS 232 IR IMPORTANT The IR emitter must...

Page 6: ...anual for more information on these topics If a DHCP server is not found within 60 seconds the decoder will be placed in Auto IP mode and assigned an IP address within the range of 169 254 xxx xxx If this occurs configure the network interface of the computer that is running AMS located on the same subnet 169 254 xxx xxx subnet mask 255 255 0 0 Refer to User Manual for more information If no OmniS...

Page 7: ...sired decoder from the Unassigned device list or from under the Device List column Once the unit is selected the Velocity with Integrated AMS interface for the decoder will be displayed Refer to the User Manual for more information on the interface ...

Page 8: ... to the same network where the OmniStream encoders decoders are connected 3 Locate the IP address matching it with the MAC address of the device using an IP scanner or ARP 4 Launch the desired web browser and enter the IP address of the decoder in the address bar 5 Enter the username and password Note that the password field will always be masked The default credentials are Username admin Password...

Page 9: ...9 Installation Guide AT OMNI 521 6 The System Information screen will be displayed Refer to the User Manual for more information on the web server interface 7 The login process is complete ...

Page 10: ...tion Verify that AMS and the decoder are on the same network If a DHCP server is not found within 60 seconds the decoder will be placed in Auto IP mode and assigned an IP address within the range of 169 254 xxx xxx To access the decoder configure a static IP on the PC within the same IP range then connect the PC directly to the decoder and configure a static IP address for the decoder This static ...

Page 11: ...11 Installation Guide AT OMNI 521 Notes ...

Page 12: ... Actual products product images and online product images may vary from images shown here Toll free US International atlona com 877 536 3976 41 43 508 4321 English Declaration of Conformity Chinese Declaration of Conformity 中国RoHS合格声明 The English version can be found under the resources tab at https atlona com product at omni 521 由SKU列出於 https atlona com about us china rohs The terms HDMI HDMI Hig...

Reviews: