background image

5

Installation Guide

AT-OME-ST31A

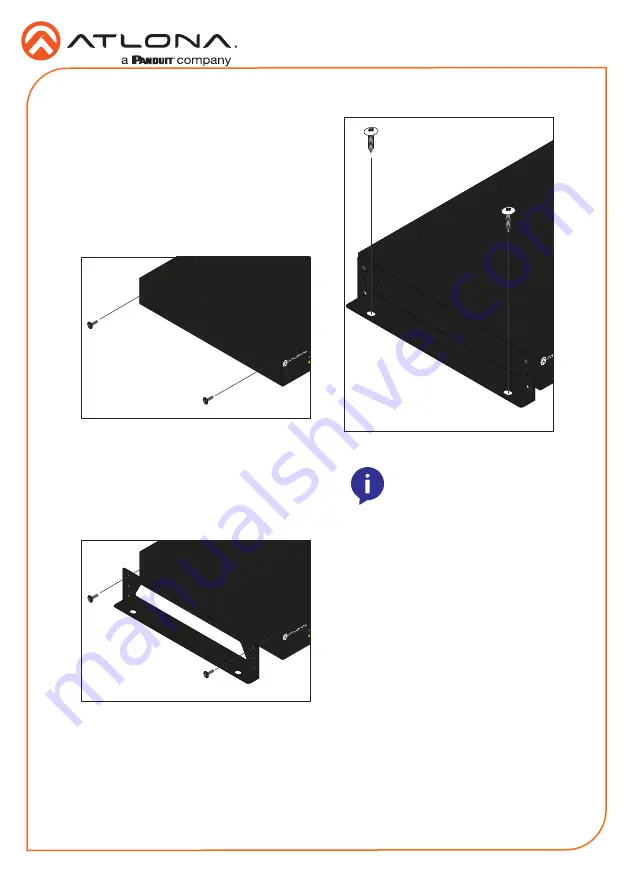
The AT-OME-ST31A includes two mounting 

brackets, which can be used to attach the unit 

to any flat surface.  Use the two enclosure 

screws, on the sides of the unit to attach the 

mounting brackets.

1.  Using a small Phillips screwdriver, remove 

the two screws from the left side of the 

enclosure. 


2.  Position one of the mounting brackets, as 

shown below, aligning the holes on the 

side of the enclosure with one set of holes 

on the mounting bracket.

3.  Use the screws from Step 1 to attach the 

mounting bracket. 


4.  Repeat steps 1 and 2 to attach the 

second mounting bracket to the opposite 

side of the unit.

5. 

Mount the unit to a flat surface using the 

oval-shaped holes, on each mounting 

bracket.  If using a drywall surface, a #6 

drywall screw is recommended. 


OMEGA

TM

PWR

LINK

FW

1
2
3

INPUT

TEST

AT-OME-ST31A

OMEGA

TM

PWR

LINK

FW

1
2
3

INPUT

TEST

AT-OME-ST31A

OMEGA

TM

PWR

LINK

FW

1
2
3

INPUT

TEST

AT-OME-ST31A

NOTE:

 Mounting brackets can 

 also be inverted to mount the 

 unit under a table or other flat 

surface.

Mounting Instructions


Summary of Contents for Omega AT-OME-ST31A

Page 1: ... tablets Video signals up to 4K 60 4 2 0 can be transmitted over HDBaseT up to 330 feet 100 meters All inputs and the local HDMI output support 4K HDR and 4K 60 4 4 4 at HDMI data rates up to 18 Gbps Additionally 4K downscaling to 1080p is available for the HDMI output when connected to an HD sink The OME ST31A is designed for use with Omega Series receivers and switchers select HDVS Series receiv...

Page 2: ...r more information 8 INPUT ports Connect a USB C cable from a video source to INPUT 1 Connect HDMI cables from HD UHD sources to INPUT 2 and INPUT 3 9 OUTPUT Connect an HDMI from the HDMI port to a display or other sink device Connect a category cable CAT 5e or better from the HDBaseT port to a compatible HDBaseT receiver These ports are mirrored 10 AUDIO OUT Connect a 5 pin captive screw connecto...

Page 3: ... TX and GND wires 3 Insert the TX RX and GND wires into correct terminal using the included 3 pin captive screw connector Audio Output Connector The AUDIO OUT connector on the AT OME ST31A provides the ability to de embed audio to an audio output device Connect either balanced or unbalanced audio inputs as shown below using the included 5 pin captive screw connector block Balanced audio connection...

Page 4: ...seT by a PoE receiver unit If a PoE HDBaseT receiver is not used then the AT OME ST31A must be powered using the external 24 V DC power supply not included When used with the external power supply the AT OME ST31A can provide power to the connected USB C device This power supply can be purchased from Atlona Optional power supply is available from Atlona Part no AT PS 245 D4 Refer to the tables bel...

Page 5: ... the enclosure with one set of holes on the mounting bracket 3 Use the screws from Step 1 to attach the mounting bracket 4 Repeat steps 1 and 2 to attach the second mounting bracket to the opposite side of the unit 5 Mount the unit to a flat surface using the oval shaped holes on each mounting bracket If using a drywall surface a 6 drywall screw is recommended OMEGA TM PW R LINK FW 1 2 3 INPU T TE...

Page 6: ...on Four DHCP mode Two Factory Static IP mode IP address set to 192 168 1 254 Auto IP mode If the AT OME ST31A is unable to detect a DHCP server within 15 seconds then the unit will use a self assigned IP address within the range of 169 254 xxx xxx If this occurs connect the AT OME ST31A to a computer running Microsoft Windows and follow the procedure below 1 Click Start Settings Control Panel Netw...

Page 7: ...P address of AMS 2 0 View the AMS 2 0 installation instructions on how to find the IP address of the software if necessary 2 Enter the login information on the AMS 2 0 web page then click the Login button 3 View the AT OME ST31A manual for more information AMS 2 0 Displaying the IP Address Web GUI The AT OME ST31A includes a built in web GUI which allows easy management and control of all features...

Page 8: ... HDBaseT OUTPUT port and a PoE compatible receiver Off Unit is not powered LINK Description Solid yellow An HDBaseT link is established between the transmitter and the receiver Off The link integrity between the AT OME ST31A and the PoE compatible receiver is compromised 1 2 3 Description Solid green The input is the currently selected input Off The input is not selected Toggling Display Power Pre...

Page 9: ...9 Installation Guide AT OME ST31A Notes ...

Page 10: ...10 Installation Guide AT OME ST31A Notes ...

Page 11: ...11 Installation Guide AT OME ST31A Notes ...

Page 12: ...ona Inc All other brand names and trademarks or registered trademarks are the property of their respective owners Pricing specifications and availability subject to change without notice Actual products product images and online product images may vary from images shown here Toll free US International atlona com 877 536 3976 41 43 508 4321 ...

Reviews: