background image

2

Installation Guide

AT-OME-TX21-WP-E

AT-OME-TX21-WP-E

HDMI

USB-C

INPUT

USB-C LINK

HDMI PWR AUTO

OMEGA

TM

RESET

IP

TEST

FW

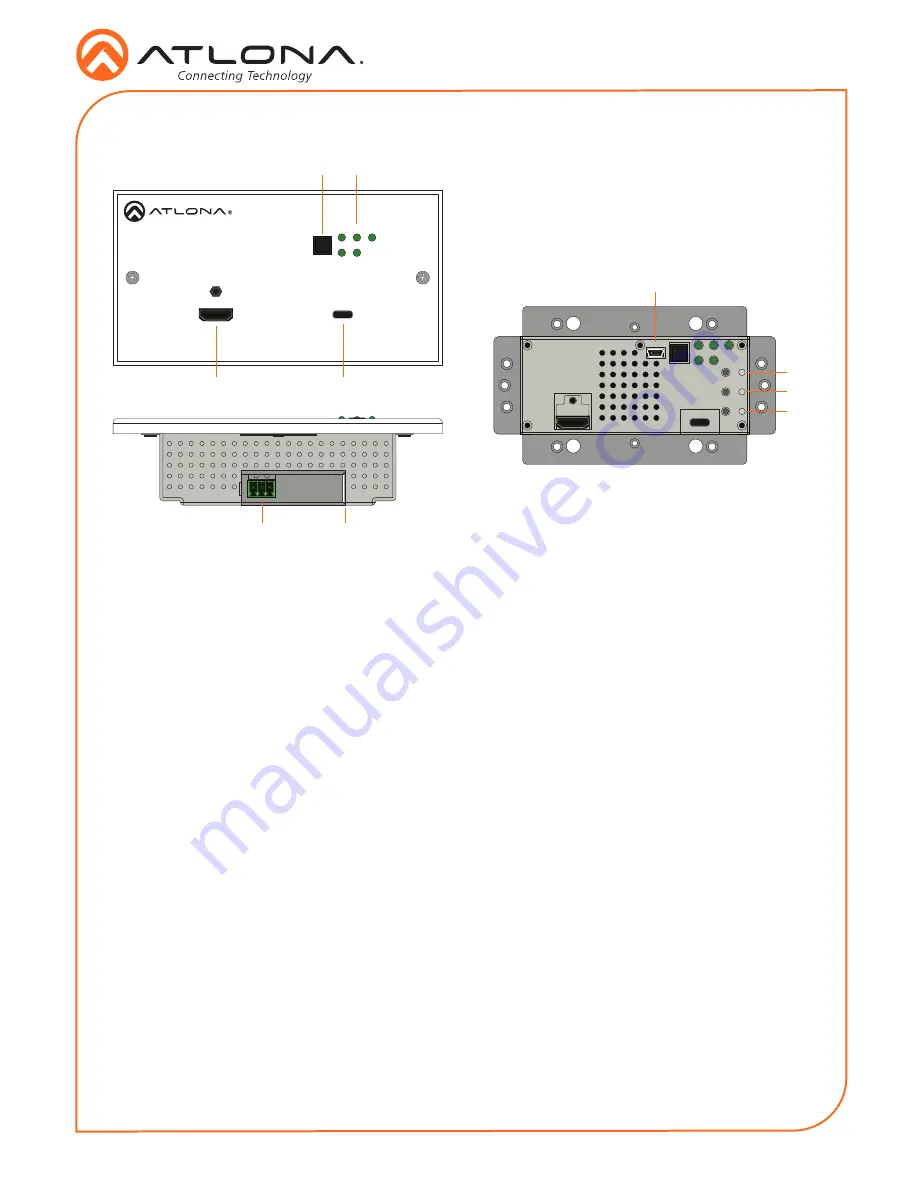
Panel Descriptions

1

3

5

2

4

6

7

8

9

10

INPUT button


Use this button to manually select 

between the HDMI and USB-C inputs.

LED Indicators


Indicator lights for power, sources, 

switching, and link.

HDMI - 

This LED indicator glows solid 

green when a source is connected to the 

HDMI

 port. 

PWR

 - Will illuminate green when the unit 

is powered on.

AUTO - 

When illuminated, auto switching 

is enabled.

USB-C - 

This LED indicator glows solid 

green when a USB-C device is connected 

to the USB-C port.

LINK - 

This will illuminate green to 

indicate A/V signal.

HDMI


Connect an HDMI source to this port.

USB-C


Connect a USB-C cable from this port to 

a USB-C source.

FW Port


Connect a mini-USB to USB-A type cable 

from this port to a computer, to update 

firmware.

RESET button and LED


Press and hold this button for 10 seconds 

to factory reset the unit. LED will flash 

while the reset processes.

IP button and LED


Press and hold this button for 10 seconds 

to switch the unit between DHCP and 

static IP. LED will blink 4 times when 

switching to DHCP mode and 2 times for 

static IP mode.

TEST button and LED


This button is for future use.

RS-232 port


Control the unit using a control system or 

PC connected to this port.

10  HDBaseT OUT


Connect an Ethernet cable from this port 

to a locally-powered HDBaseT receiver 

such as the AT-HDVS-200-RX or AT-UHD-

EX-100CE-RX-PSE.

Summary of Contents for AT-OME-TX21-WP-E

Page 1: ...itted up to 330 feet 100 meters The OME TX21 WP E is HDCP 2 2 compliant It is designed for use with select HDVS Series receivers and scalers as well as the AT UHD EX 100CE RX PSE receiver and Atlona switchers with HDBaseT inputs This transmitter can serve as an integral component of a fully automated AV system with the convenience of automatic input selection and display control It is remotely pow...

Page 2: ...n to indicate A V signal 3 HDMI Connect an HDMI source to this port 4 USB C Connect a USB C cable from this port to a USB C source 5 FW Port Connect a mini USB to USB A type cable from this port to a computer to update firmware 6 RESET button and LED Press and hold this button for 10 seconds to factory reset the unit LED will flash while the reset processes 7 IP button and LED Press and hold this ...

Page 3: ...e signal quality when using each type of cable Higher quality signals are represented by more bars Cable Recommendation Guidelines Core Shielding CAT5e CAT6 CAT6a CAT7 Solid UTP unshielded N A STP shielded Performance Rating MHz 350 500 600 800 Use of a TIA EIA 568B termination is recommended for optimal performance Cable Max Distance 4K Max Distance 1080p CAT5e 295 feet 90 meters 330 feet 100 met...

Page 4: ...HDMI source to the HDMI port 1 Remove the two screws on the front of the faceplate 2 Remove the locking connector of the HDMI port 3 Pull the faceplate off the unit 4 Place the unit into the already installed back box or mudring making sure the holes line up with the mounting holes 5 Use the back box screws to secure the wallplate to the back box 6 Replace the face plate securing it with the two f...

Page 5: ...the Local Area Network LAN it will automatically be assigned an IP address by the DHCP server If the unit has been placed into static IP mode press and hold the IP button located beneath the faceplate for 10 seconds The LED next to the IP button will flash 4 times as it switches to DHCP mode 1 Remove the two screws on the front of the faceplate 2 Remove the locking connector of the HDMI port 3 Pul...

Page 6: ...nnection Diagram AT OME TX21 W P E HDMI USB C INPU T USB C LINK HDMI PW R AUTO OMEGA TM AT HDVS 200 RX H D B a s e T H D M I U S B C H D M I C o n t r o l Laptop AT OME TX21 WP E Display Laptop DC 48V LA N HDBase T IN HDM I OUT FW C1 C2 CO M ...

Page 7: ...ommands The AT OME TX21 WP E is not powering The AT OME TX21 WP E receives power from the receiver through HDBaseT Make sure that the receiver such as the AT HDVS 200 RX or the AT UHD EX 100CE RX PSE is PoE compatible and is connected to the HDBaseT OUT port using an Ethernet cable Both the PWR and LINK LEDs will be illuminated on the front of the AT HDVS 210U TX WP when operating correctly Check ...

Page 8: ...of Atlona Inc All other brand names and trademarks or registered trademarks are the property of their respective owners Pricing specifications and availability subject to change without notice Actual products product images and online product images may vary from images shown here atlona com 408 962 0515 877 536 3976 Version 2 ...

Reviews: