Atlona AT-HDVS-200-RX Installation Manual Download Page 8

8

Troubleshooting

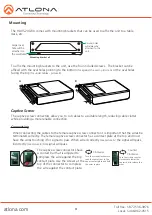
1. The Auto-Switch feature isn’t working.  How do I enable it?
 

You can enable Auto-switching by using the AutoSW command, via TCP/IP or RS-232. 


Auto-switching can also be enabled through the On-Screen Display (OSD) or the webGUI.

2. I want to pass only analog audio without video.  How do I do this?
 

Place the unit in “standalone” mode.  This mode can be enabled using the FreeRun on 


command via TCP/IP or RS-232, or  through the webGUI.

3. How do I update the firmware?
 

The firmware can be updated using the USB port or through the webGUI.

4. How do I find the IP address?
 

Run the IPCFG command using either RS-232 or TCP/IP.  You can also get the IP address 


through the webGUI and AMS.

5. How do I switch between DHCP and Static IP modes?
 

For the AT-HDVS-200-TX, DHCP can be turned on/off by pressing the INPUT button for 15 


seconds. For the AT-HDVS-200-RX, DHCP can be turned on/off by pressing the AUTO button 


for 15 seconds. You can also toggle between DHCP and Static IP modes using the IPDHCP 


command via TCP/IP or RS-232, or by using the webGUI or AMS.

6. What is the default IP address?
 

The default static IP address is 192.168.1.254.  Please note that the default static IP for both 


the transmitter (HDVS-200-TX) and the receiver (HDVS-200-RX) are the same.

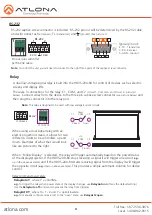
7. I can’t control my display.  What’s wrong?
 

First, check that the desired control method is selected (TCP/IP, RS-232, or CEC).  If you are 


using RS-232, make sure that the baud rate for RXZone 1 (found under the webGUI) 


matches your display settings.  The baud rate can be set through the webGUI or by using the  


RxRSparaZ1 command via TCP/IP or RS-232.  When using the RxRSparaZ1 command, use the   


following syntax:  RxRSparaZ1[baudrate,data-bits,parity,stop-bits]. 


Example:  RxRSparaZ1[115200,8,0,1] 

atlona.com

Toll free: 1-877-536-3976

Local: 1-408-962-0515

Summary of Contents for AT-HDVS-200-RX

Page 1: ...es up to 328 feet 100 meters The switcher scaler pair enables automatic display control automatic input selection volume adjustment or optional third party control The AT HDVS 200 RX supplies power to the AT HDVS 200 TX switcher via Power over Ethernet and together they create a standalone A V switching and control system with scaling for classrooms and huddle rooms 1 x AT HDVS 200 RX 4 x Captive ...

Page 2: ...rol 4 HDBaseT OUT blue port Connect to an HDBaseT PoE transmitter e g AT HDVS 200 TX AT UHD SW 52ED or UHD CLSO series switchers e g AT UHD CLSO 824 Note Switchers with internal scalers are not recommended for use with HDVS 200 RX as it may cause artifacts due to double scaling of the signal e g AT UHD CLSO 601 5 FW port Firmware update port connect a mini USB to USB A cable to a computer Note Fir...

Page 3: ...necting The captive screw connectors have a contact bar that is adjusted to compress the wire against the top contact plate Use the screws at the top of the connector to compress the wire against the contact plate When connecting the cables to the female captive screw connector it is important that the wires be terminated correctly The female captive screw connector has a contact plate at the top ...

Page 4: ...relay port When using a dual signal relay with an electric projection screen it allows for two different circuits to be controlled up and down Examples of what that would look like are pictured to the right When Follow Display is selected the relay will trigger automatically based on the power status of the display projector If the HDVS 200 RX stops receiving a signal it will trigger one circuit e...

Page 5: ... following command IPDHCP off Once disabled set the IP address using the IPStatic command e g IPStatic 192 168 1 56 webGUI The HDVS 200 RX provides a built in webGUI for easy setup and control To find the IP address of the HDVS 200 RX connect the HDVS 200 RX to a terminal using an RS 232 cable and use the following settings baud rate 115200 data bits 8 flow control None stop bits 1 Use the IPCFG c...

Page 6: ...ISPLAY INPUT VOL FW RS 232 AT HDVS 200 TX RX TX FW RELAY AT HDVS 200 RX C1 C2 COM HDBaseT IN LAN HDMI OUT L 1 R 2 RX RX TX TX AUDIO RS 232 MENU AUTO PW LINK DC 48V ROUTER 2 4 5 1 2 3 4 i AT HDVS 200 TX Media Player Laptop AT PA100 G2 Drop down projector screen contact closure controlled Document Camera AT HDVS 200 RX Router Projector Dry CC Audio HDBaseT Video Control Ethernet Video Audio Video Vi...

Page 7: ...X C1 C2 COM HDBaseT IN LAN HDMI OUT L 1 R 2 RX RX TX TX AUDIO RS 232 MENU AUTO PW LINK DC 48V FW RELAY AT HDVS 200 RX C1 C2 COM HDBaseT IN LAN HDMI OUT L 1 R 2 RX RX TX TX AUDIO RS 232 MENU AUTO PW LINK DC 48V ROUTER 2 4 5 1 2 3 4 i ROUTER 2 4 5 1 2 3 4 i AT PA100 G2 Drop down projector screen contact closure controlled AT HDVS 200 RX AT UHD CLSO 824 AT HDVS 200 RX Router Router Projector Display ...

Page 8: ...ing the INPUT button for 15 seconds For the AT HDVS 200 RX DHCP can be turned on off by pressing the AUTO button for 15 seconds You can also toggle between DHCP and Static IP modes using the IPDHCP command via TCP IP or RS 232 or by using the webGUI or AMS 6 What is the default IP address The default static IP address is 192 168 1 254 Please note that the default static IP for both the transmitter...

Reviews: