background image


2

Open: Open the COM port after scan to establish the 

connection between PC and the matrix..

Close: Release the COM port after scan.

Quick Setup Buttons: Provide the fast setup between inputs 

and outputs of the matrix.

“Default” button makes input 1, 2, 3, 4, 5 mapped to output 1, 2, 3, 4, 5 respectively.

“Channel 1” makes all outputs see input1. Same to the rest of the buttons.

Output Channel Setup: Click on this button, a quick selection table of inputs will show 

up. Users can therefore easily select the input video for each output.

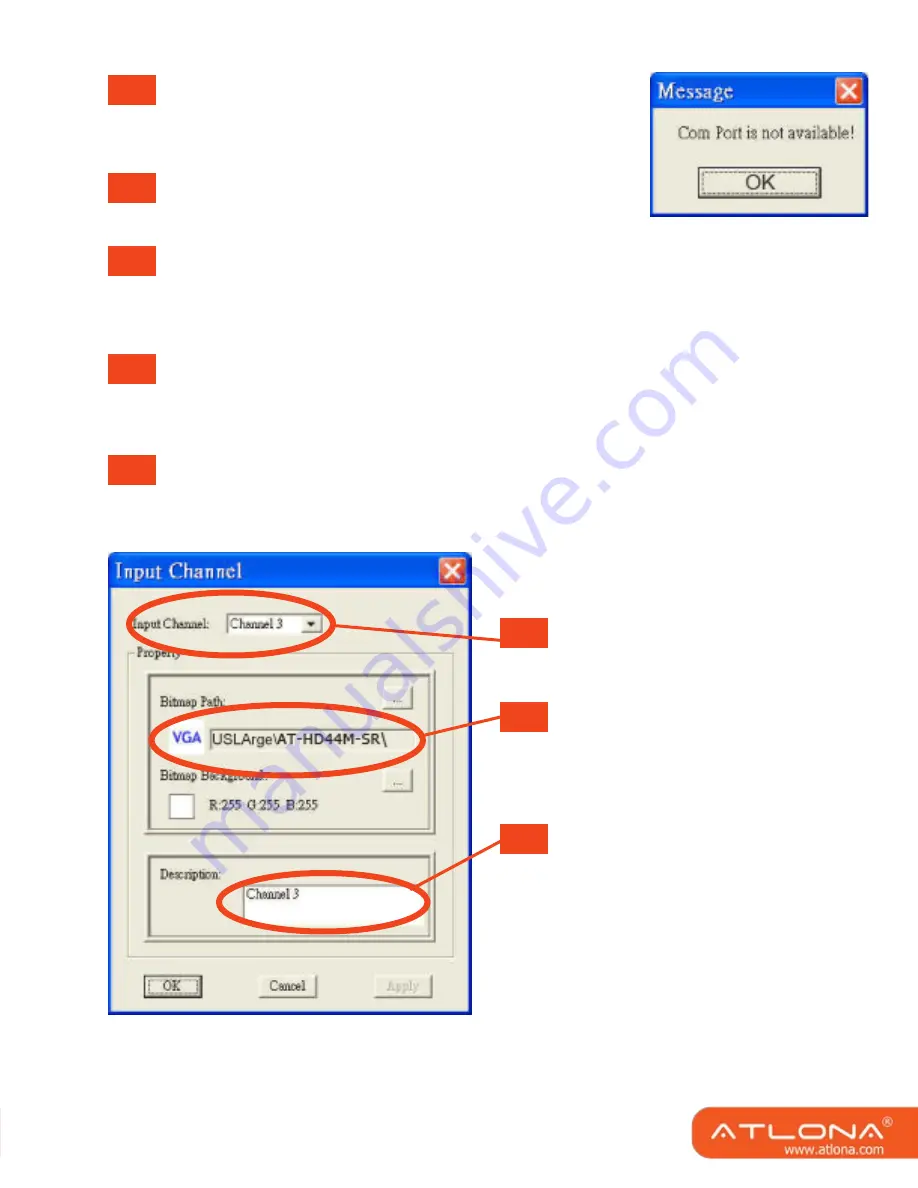
Input Channel Setup: The button will bring up the setup window for the inputs as below.


3


4


5


6


A


B


C

Input Channel: Select the input channel 

to do bitmap and label change.

Bitmap Path: Select the figure for each 

channel. Notice that only pictures in 

BMP format are supported.

Description: Channel description.

8                                                   

9                                                   

Summary of Contents for AT-HD44M-SR

Page 1: ...AtlonA 4x4 HDMI over CAT5 Matrix Switcher with IR Control AT HD44M SR User Manual...

Page 2: ...ents 2 4 Technical Specifications and Package Content 2 5 Panel Descriptions 3 5 1 Front Panel 3 5 2 Rear Panel 3 7 Hardware Installation 5 8 Operation and IR Control 6 9 IR codes 7 10 RS 232 Serial P...

Page 3: ...emote displays at the same time Through low cost CAT 5 LAN cables not only high quality video and audio can be transmitted to the display sites but also users can switch among 4 HDMI sources using the...

Page 4: ...over CAT 5e at 1080p Each display s input source can be switched with IR remote control or push button through control line at remote receiver Easy installation Technical Specifications and Package Co...

Page 5: ...utput channel 5 Input source channels mapping LED for each output channel 6 Push button for selecting input channel 7 5V DC power jack 8 RS 232 control port 9 DIP switches 10 HDMI Inputs 11 IR extende...

Page 6: ...Select input source channel 2 Push button Select input source channel 3 HDMI Output Connect to HDTV 4 IR Extender For IR receiver extension cable plug in 6 5V DC power jack 7 RJ 45 Input TMDS 8 RJ 45...

Page 7: ...the AT HD44M S and direct the IR emitter to the build in IR receiver of the sources 5 Connect the 5V6A DC power supply to the AT HD44M S 6 Power on the AT HD44M S 1 Connect each HDMI output to HDMI di...

Page 8: ...orrect the corresponding LED will flash If not please press output port select button or repeat step a and b F1 HDMI output 1 F2 HDMI output 2 F3 HDMI output 3 F4 HDMI output 4 c Use or keys to select...

Page 9: ...IR codes 14H 16H 19H 0FH 05H 18H 0DH 1CH 1FH 1BH 1EH 13H 0CH 06H 7...

Page 10: ...over all the available COM ports 1 255 If the matrix is detected the message window below will show up Otherwise an error message as following shows up to indicate there is no legal device found Noti...

Page 11: ...outputs see input1 Same to the rest of the buttons Output Channel Setup Click on this button a quick selection table of inputs will show up Users can therefore easily select the input video for each o...

Page 12: ...ct input source Left button to switch channels in increasing order 1 2 3 4 1 Right button to switch channels in decreasing order 1 4 3 2 1 Method C Switch This method will fix the input channel for th...

Page 13: ...it 2 Channel 6 Bit 3 Channel 5 Bit 4 Channel 4 Bit 5 Channel 3 Bit 6 Channel 2 Bit 7 Channel 1 1 0 w wo signals Command code Response Description DATA CHECK SUM ACK SET 0x07 0x4d 0x41 0x51 0x44 0x05 0...

Page 14: ...g the device and plug it back in Protect and route power cords so they will not be stepped on or pinched by anything placed on or against them Be especially careful of plug ins or cord exit points fro...

Page 15: ...OF THE THEORY OF LIABILITY ARISING OUT OF OR RELATED TO THE USE OF OR INABILITY TO USE THE PRODUCT EVEN IF ATLONA HAS BEEN ADVISED OF THE POSSIBILITY OF SUCH DAMAGES IN NO EVENT ATLONA S LIABILITY TO...

Reviews: