background image

3

Installation

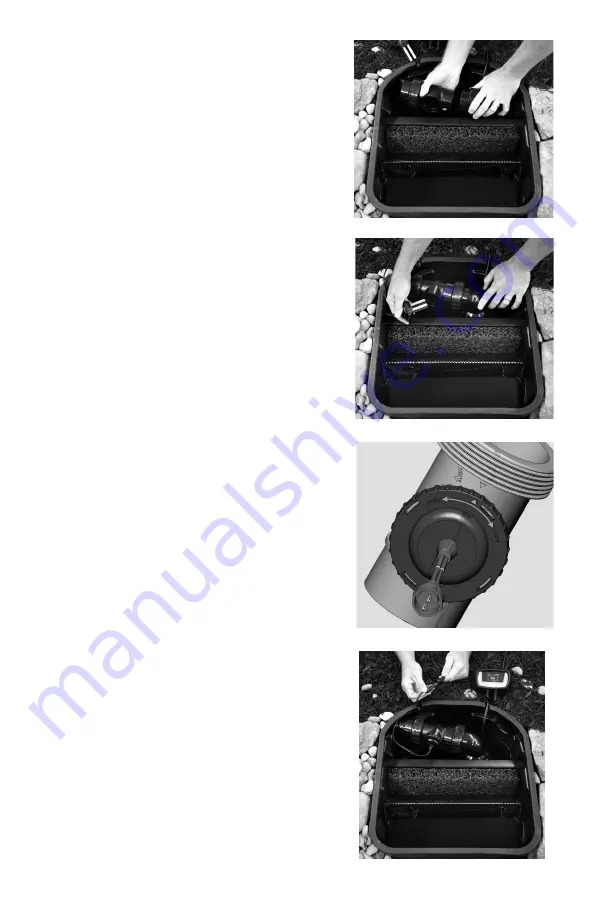
TRION3 with Triton TR215CV Check Valve:

Install the TR215CV Triton Check Valve at the  
appropriate discharge height by following the  
instructions included with the product. Install  
the union nut and 2” outlet fitting in accordance  
to the Triton Check Valve instructions. 

Attach the 2” outlet fitting on the Triton Check  
Valve to the 2” spigot end of the electrode  
chamber using PVC glue and cleaner to make  
the connection. The Triton Ionizer can operate  
with the electrodes facing in a vertical (up or down)  
or horizontal direction and can be adjusted at any  
time by loosening the union nut, twisting the  
electrode chamber and re-tightening the  
union nut. (Figure 1)

Attach the waterfall feed line to the 2” outlet of  
the Triton Ionizer. If the waterfall feed line is 1½“  
or smaller, replace the 2” outlet fitting on the  
Triton Ionizer with the 1½” outlet fitting or stepped  
adapter included with the Triton Check Valve. Use  
PVC glue and cleaner to make the connection. 

Install the electrodes into the electrode chamber.  
The electrode body has a double O-ring to ensure  
a watertight seal. Please inspect the electrodes  
before installation to verify that both O-rings are  
in place. (Figure 2)

Align the arrow on the top of the electrodes with  
the word “align” on the electrode housing. Push  
downward on the electrodes and turn in the “close”  
or clockwise direction until the arrows align with 
the electrode arrow pointing directly down the center  
line of the Ionizer outlet. (Figure 3)

Mount the control panel in the desired location.  
The control panel is weatherproof, but should be  
mounted above the ground on a wall or post.   
Ensure that the power cord is within reach of a  
properly grounded GFCI outlet, and that the outlet  
cord can reach the electrodes. Connect the outlet  
cord to the electrodes and the power cord to the  
supplied 12 volt AC transformer using the  
quick-connect attachments. (Figure 4)

Figure 1

Figure 2

Figure 3

Figure 4

Summary of Contents for 74005

Page 1: ...005 Product Manual Manuel du Produit Manual del Producto 1 330 274 8317 www ATLANTICWATERGARDENS com M Telecharger dans l App Store Consiguelo en el App Store Disponible sur Google Play Disponible en Google Play ...

Page 2: ... Alkalinity before you start so you have a base reading for comparison during treatment Note For large bodies of water it is best to have multiple outlets for the copper ions to disperse evenly If the body of water requires more than one Triton Ionizer they should be plumbed through a manifold This ensures that each unit is releasing the full amount of copper ions evenly Water Parameters for Optim...

Page 3: ...ng or stepped adapter included with the Triton Check Valve Use PVC glue and cleaner to make the connection Install the electrodes into the electrode chamber The electrode body has a double O ring to ensure a watertight seal Please inspect the electrodes before installation to verify that both O rings are in place Figure 2 Align the arrow on the top of the electrodes with the word align on the elec...

Page 4: ...s at the cut lines indicated below Figure 6 Operation The Triton Ionizer must have water flowing through the electrode housing at all times when the unit is turned on During operation ions jump from one electrode to the other and are swept away by the flowing water The Control Panel reverses polarity regularly to ensure even consumption of the electrodes Operating the Ionizer without a strong flow...

Page 5: ...artial water change will also aid in reducing copper levels Maintenance and Inspection During normal operation the power indicator on the control panel will illuminate as a solid green color and the ionization indicator will illuminate as solid blue This indicates that the unit is operating correctly and no maintenance is required If either indicator light is flashing please refer to the trouble s...

Page 6: ...ctrodes must remain installed Water must run through the electrode chamber continuously to prevent freezing Warranty The Triton Ionizer carries a three year limited warranty This limited warranty is extended solely to the original purchaser commencing from the date of original purchase receipt The following apply Manufacturer will replace parts found to be defective including control panel electro...

Page 7: ...ctrodes are fully depleted Replace depleted electrodes with TRION2 RA replacement The number displayed on the control panel is lower than the selected level The water is not conductive enough to support the selected ionization level Refer to Water Conductivity on page 5 Electrode are almost depleted Replace depleted electrodes with TRION2 RA replacement Low copper level after 7 10 days of operatio...

Page 8: ...on De lourdes charges organiques ou une accumulation de débris réduiront sensiblement l efficacité de l Ioniseur Si vous installez l appareil dans un bassin existant un net toyage de ce dernier est conseillé avant de le faire fonctionner S il y a des quantités excessives de débris il faudra plus longtemps pour élever le niveau minéral de l eau et atteindre les résul tats voulus Testez toujours le ...

Page 9: ... sortie 2 sur le clapet anti retour de Triton à l extrémité mâle de 2 de la chambre d électrodes en utilisant une colle et un nettoyant pour PVC afin de réaliser la connexion L Ioniseur Triton peut fonctionner avec les électrodes orientées dans la direction verticale vers le haut ou le bas ou horizontale et elles peuvent être ajustées à tout moment en desserrant l écrou de jonction en tournant la ...

Page 10: ... utiliser un dispositif de contournement de plomberie Cette configuration de plomberie permet à une partie du débit d eau d être déviée dans le boîtier de l électrode sans faire augmenter la contre pression à la pompe Figure 5 Pour l installation dans des lignes d approvisionnement de diamètre supérieur à 2 51mm on recommande d utiliser un dispositif de contournement de plomberie Cette configurati...

Page 11: ...on cependant en quittant le mode de programmation l affichage change pour passer de 10 à 7 C est du au fait que le niveau minéral de l eau conductivité ne peut support qu un niveau 7 d ionisation On peut augmenter la conductivité en ajoutant du sel marin au système au taux de 125 à 250 ml à 1 tasse par 379 litres 100 gallons d eau Remarque Le volume d eau l alcalinité totale et la quantité de débr...

Page 12: ...re locale de l autre côté Enlevez le logement d électrodes égouttez le et entreposez le Si vous le souhaitez l appareil peut être laissé sur place avec ses deux raccords union ouverts dans la mesure où vous ferez le nécessaire pour éviter que de l eau ne s accumule dans le logement d électrodes Si l installation d eau continue de fonctionner durant les mois d hiver sur une installation en ligne le...

Page 13: ...rifiez le flux d eau dans le boîtier de l électrode et assurez vous que le boîtier est plein d eau Les électrodes sont entièrement épuisées Remplacez les électrodes épuisées avec des pièces de rechange TRION RA Le nombre affiché sur le panneau de commande est inférieur au niveau sélectionné L eau n est pas suffisamment conductrice pour le niveau d ionisation sélectionné Consultez la section Conduc...

Page 14: ...mente la efectividad del Ionizer Si instala el Ionizer en un estanque existente se recomienda realizar en el mismo una limpieza a fondo antes de poner a funcionar el equipo Si hay presencia de cantidades excesivas de desperdicios tomará mucho más tiempo elevar el nivel mineral del agua y lograr los resultados deseados Pruebe siempre el pH y la alcalinidad del agua antes de comenzar de modo de tene...

Page 15: ... o abajo u horizontal y puede ajustarse en cualquier momento Para ello se debe aflojar la tuerca de unión girar la cámara de electrodos y volver a apretar la tuerca de unión Figure 1 Fije la línea de suministro de la cascada a la salida de 2 del Triton Ionizer Si la línea de suministro de la cascada es de 1 o menor reemplace la conexión de salida de 2 del Triton Ionizer por la conexión de salida d...

Page 16: ...s escalonados a la carcasa de electrodos con adhesivo y limpiador para PVC para realizar la conexión Instale el ionizador y asegure la tubería con abrazaderas de manguera de acero inoxidable no incluidas Si se usa tubería de 1 o 1 el ajuste para inserción deberá ser cortado para proporcionar el diámetro de salida adecuado para un flujo de agua máximo Utilice una sierra o serrucho de PVC para corta...

Page 17: ...idad al agregar agua salada al sistema a una tasa de a 1 taza por 100 galones 3500 litros de agua Nota El volumen de agua la alcalinidad total y la cantidad de desperdicios en un estanque son los factores que pueden afectar la rapidez con que se elevan los niveles de cobre Tenga en cuenta que pueden ser necesarias varias semanas de operación para que los niveles de cobre resulten detectables Suele...

Page 18: ... con las uniones abiertas siempre que cuide de evitar que se acumule agua en el alojamiento de electrodos del Ionizer Si la instalación acuática va a funcionar durante los meses de invierno instalación en línea el alojamiento de electrodos y los electrodos deben quedar instalados El agua pasará continuamente por la cámara de electrodos para evitar el congelamiento Garantía El Triton Ionizer tiene ...

Page 19: ...flujo de agua a través de la carcasa de electrodos y verifique que la carcasa esté llena de agua Los electrodos están total mente agotados Reemplace los electrodos agotados con TRION RA de reemplazo El número que se muestra en el panel de control es inferior al nivel seleccionado El agua no es lo suficientemente conductiva como para soportar el nivel de ionización seleccionado Consulte Conductivid...

Page 20: ...1 330 274 8317 www ATLANTICWATERGARDENS com ...

Reviews: