Atid AT870N Manual For Customer Download Page 51

51

Chapter 4.  

Optional module

Bixolon SPP-R200 Printer Demo 

SPP-R200 is typical Mobile Printer of the Bixolon, you can using its App which get from Bixolon website to perform print through Bluetooth.

erent from homepage contents 

according to the Bixolon policy.

1. Download “SPP-R200 Windows SDK” from the Bixolon homepage (

www.bixolon.com

2. Bluetooth Power ON.

3. Executing “Bluetooth Device Properties” programs which located in Control Panel.

4. SPP-R200 printer power ON.

5. Setting the SPP-R200 printer to be in the status of pairing. (Please refer to the User Guide of SPP-R200 Printer)

6. Press “Scan Device” button to searching printer device nearby.

7. In the status of pairing, the factory setting password is “0000” usually.

ssage.)

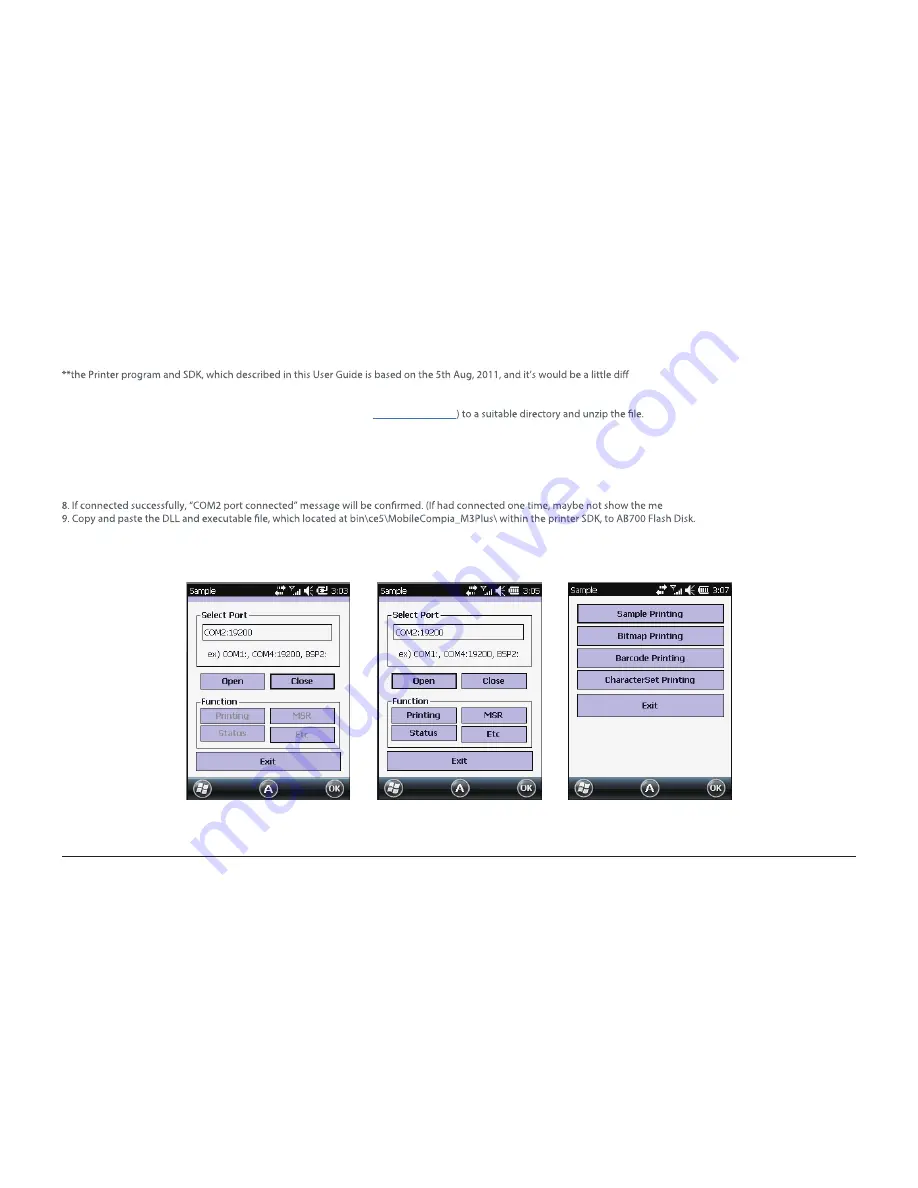
10. Executing the Sample.exe program in the AB700 Flash Disk.

11. Change the COM8 to COM2, then press “Open” button to testing printer.

12. Please check to click Printing button and sample printing button. it is working well or not

COM8 -> COM2

Select Open and then select Printing

Select Sample Printing 

Summary of Contents for AT870N

Page 1: ...Guide for Customer AT870N ...

Page 2: ...aries ATID Owners of ATID products are hereby granted a non exclusive revocable license to reproduce and transmit this documentation for the purchaser s own internal business purposes Purchaser shall not remove or alter any proprietary notices including copyright notices contained in this documentation and shall ensure that all notices appear on any reproductions of the documentation Should future...

Page 3: ...h part 10 3 Function of each part 22 16 LOCK Chapter 3 Basic function 11 1 Switch On Backup Battery 12 2 Attaching and Detaching the battery 13 3 Charging battery 13 15 5 Checking Battery Gauge 16 6 Backup Battery 16 7 Battery replacement 17 8 Soft Reset 17 9 Hard Reset 18 10 Initializing System 19 11 Attaching Micro SD card 20 12 Attaching SIM Card 21 13 Shortcuts setting 21 14 Set up phone passw...

Page 4: ...1D or 2D barcode scanner 40 2 Barcode emulator setting 44 3 Barcode scanning 45 4 Wifi Power On Off 45 5 Wifi function On Off 46 6 How to connect AP 1 47 7 How to connect AP 2 24 23 Screen adjustment 26 24 Volume and sounds setting 27 25 Sounds and notification 26 Set up the Clock and Alarms 28 27 Wireless Manager 28 28 Using keypad 28 27 29 Inputting Data 30 Using Fun Button 29 31 Use of stylus 3...

Page 5: ...54 16 How to search a contact information 55 17 Add to contact list 56 18 How to use Text Message 56 19 Sending Message 57 20 Receiving Message 57 21 Replying Message 58 22 GPS demo application execution 59 23 Use of camera 60 24 HF13 56 demo application execution 60 25 Mifare tag recognition 61 26 ISO15693 tag recognition 61 27 SmartCard demo application execution 62 52 28 UHF 900Mhz demo applica...

Page 6: ...instruction prior to operating this unit Safety information Your safety is extremely important Read and follow all warnings and cautions in this document before you handle and operate ATID equipment If you do not follow the safety warnings and cautions you might be seriously injured and the equipment and data also might be damaged WARNIING A warning requires you must pay attention to the operating...

Page 7: ...l in accordance with loss of battery and use time In this case please contact us You have to use provided adaptor when charging the device Turn o the device properly then detach or replace the battery Caution when using AT870N separately If you habe a problem on product do not try to repair or disassemble it by yourself please contact our customer service center r Please note that using the device...

Page 8: ... changed 5 3 Standard battery 6 Hand strap 2 Power Adapter and AC cable 1 AT870N main body 4 USB sync cable 7 Stylus pen AT870NisbaseduponMicrosoftwindowMobile6 5 Asthestateoftheartproduct itisequippedwithbarcodescanner RFIDTagreader MSRcardreader printer smartcardreader MODEM CameraandsoonanditcanbeappliedtoIndustry Enterprise Logisticsandsoon canbeused ...

Page 9: ...le Connector Phone receiver WLAN LED option Internal HF Charge LED Touch Screen Keypad Reset button Microphone UHF Scan button F7 F8 Gun handle 1D 2D Scanner option 9 Chapter 2 Product composition Name of each part Battery latch Hand strap hole Battery Volume button UHF Connecting port ...

Page 10: ...programsviatotouchthescreen Touch screen EnableyoutoperformawarmReset Press Power buttonsimultaneously Enable youtoperformahardReset Reset button DisplayswhetherthewirelessWLANpowersupply WLAN LED option Laserbeamemittedthroughthiswindow Pleasebecarefultheforeignsubstancesandpreventingfromthedamage Warning Donotlookatthelaserbeamdirectly 1D 2D Scanner option Internal HF HF13 56MhzEmbeddedmodulemou...

Page 11: ...e product Note Please press the POWER button a couple of seconds for shortening the charging time in case of that window screen has shown The image as below shows the status of battery compartment on the rear of body Please slide the switch of backup battery to right for switching on the device If the switch turns on the power of battery will supply to the system Please attach the main battery on ...

Page 12: ... to UNLOCK and then lift the main battery to detach the main battery after grapping the laver at the bottom Battery attachment Please put the top of the battery into the above gap of device and then push the bottom of battery into the below gap of device and then slide the lever to right Direction to LOCK Above gap for attachment top of battery Battery Latch Both Side of the Gap ...

Page 13: ...s provided when you bought Red light is lit on LED when it starts charging It will be changed with green light in case of full Chapter 3 Basic Function In case that there is window screen as below or you don t use the system in the status of running other program the device is able to enter the low power mode Sleep mode If you want to use it again please press the POWER button Start button Taskbar...

Page 14: ...utton 1 When the system is in booting status press Power button for 2 3 seconds then the screen Power On Note and these programs will be recovered in case of power on If both main battery and backup battery are in the discharge state the RAM data will disappear and the system will be re starting if the power is charged again User can enter the above screen in case of double clicking the icon of Po...

Page 15: ...e Power button the system will not be turned on In this case you should charge the main battery or connect the adaptor to the adaptor connecting jack of main body then press the Power button to turn on the system Checking Battery Gauge Note In general you can use the device from 6 hours to 12 hours after 2200 mA battery is fully charged Checking Battery Gauge Start button setting Power Battery 15 ...

Page 16: ...be restore to previous state but rebooting system after start charging A backup battery could safely keep the RAM data even the main battery discharged completely Battery replacement Warning Please dispose the used batteries in a designated place You need to purchase a new one if the battery damaged or reached its end of life Low Power Warning If the system is unavailable for low battery caution s...

Page 17: ...ely te that time date will be initialized Therefore please do reset the time if user uses the hard rest Please use hard reset if it is impossible to recover the system despite of soft reset System will be restarting OS will be restarted Screen will be reshown 17 Soft Reset When do you need to perform Soft Reset There is a Hang up which means that the system receives no response in case of running ...

Page 18: ...s RESET button simultaneously Boot Menu is came out at the screen after 2 3 seconds as below Boot Menu 0 SD Image Update 1 Clean On Exit No 2 Factory Reset 3 Exit Menu Select Enter No SD Image Update It is for the image BOOT OS update by SD Card Clean On Exit No My Device and Registry area recover as shipped Factory Reset My Device Registry and Flash Disk area recover as shipped Exit Finish the Bo...

Page 19: ...p Do lock the slot cover by sliding it left side and then turn on the device after installing the battery Attaching Micro SD card Micro SD card slot SIM card slot Below image shows the back side of device when separating the main battery from device There are 1EA SIM Card Slot 3EA SAM Card Slot and 1EA Micro SD Card Slot Chapter 3 Basic Function 19 ...

Page 20: ...Attaching SIM Card Chapter 3 Basic Function Below image shows the state of equipping the SIM CARD with device Please do insert it in accordance with card shape and edge shape Start File explorer 20 ...

Page 21: ...ur digit password and select the key Enter Caution PIN Code is 0000 for protecting USIM card information You can change to own your password It will be on the USIM card s envelope or the body Entered incorrectly 10 times in a row when not able to use the USIM card please note Change the PIN number Use the password Start button setting Personal Button Select the button you want to assign as the sho...

Page 22: ...tes Owner information LOCK User can set up the device as lock status for protecting data from device Device is converted with lock status for a predetermined time and user has to input the password for unlocking the device Start button setting LOCK LOCK screen Input the password Start button setting personal owner information 22 ...

Page 23: ...ms currently being used and the Amount of memory you have Start button setting System Memory Main memory Usage and remaining capacity can check Storage card it can check Flash area or SD care capacity Start button setting system Task manager You can be stopped by selecting the program You are using form the list 23 ...

Page 24: ...y a list of programs installed in addition to the Preinstalled programs Start button setting system Remove program It can be removed from the list select the program you want to Remove Start button System GPS Do not need to be set separately because it is set by default to the port terminals are used in GPS 24 ...

Page 25: ...se it can be set up suit the user s needs Set screen brightness Screen brightness is set to the factory in approximately 70 Start button Setting system Backlight Start button setting system Contrast Brightness you can adjust the brightness of the screen 25 ...

Page 26: ...place where you touched with stylus you need to reset the coordinate calibration values Volume and sounds setting You can set up the Volume and sounds Set up the volume s ICON You can adjust the volume with products left volume button hardware 26 Chapter 3 Basic Function ...

Page 27: ...the Clock and Alarms Set up the date time and Alarms Vibration Set the vibration amplitude set Start button setting Clock and Alarms Time Set the Date and Time Alarms Set the Alarms 27 Chapter 3 Basic Function ...

Page 28: ... the taskbar to change to the Lowercase or Uppercase and directly press alphabets or special symbols on the keypad Each button has 2 3 letters or symbols Pre press twice continuously then the second letter or symbol will be inputted and the third letter or symbol need to press button three times continuously Keypad enables you to input numbers alphabets and special symbols And can also execute oth...

Page 29: ...age UP DOWN 3 9 2 4 5 6 8 Del 7 Use of stylus User is able to use stylus pen that has same function with computer mouse and it can be used in connection with hand strap hole located on back bottom side of PDA Caution There is a danger of getting damaged if you use any other sharp objects except for provided stylus pen since it is very sensitive one It uses for sound control Left side of It inputs ...

Page 30: ...d so on Caution To synchronize via ActiveSync Microsoft ActiveSync 3 7 or later version must be used Clickthe Next Button Selectthelicenseagreementandthen click the Next Button Inputthenameofuserandgroupandthen clicktheNextButton Selectthelicenseagreementandthen click the Next Button LinkforDownload http www microsoft com downloads ActiveSync WindowsXP WindowsMobileDeviceCenter6 1 64bit WindowsXPo...

Page 31: ...31 Chapter 3 Basic Function Click the Installation button ActiveSync are installing Press End button for termination of installation ...

Page 32: ...32 Chapter 3 Basic Function SettingPC Start button Programs Microsoft ActiveSync Fileconnectionsettings Clickthebutton WindowsXp Win7 Vista Clickontheinstallbutton ...

Page 33: ...Kbutton WindowsXp Win7 Vista Start buttons setting connect USB PC Even connect to PC synchronization is not good Please select the Enable advanced network functionality To use a VPN you can connect your computer to your device Using the RNDIS Enable advanced network functionality ...

Page 34: ...ime setting Please click the time and then adjust by using rudder Time zone setting If you select the exact time zone user easily can adjust the time setting by selecting the time zone on regional movement from the next time ...

Page 35: ...35 Chapter 3 Basic Function File directory device s screen WindowsXP Data transfer screen ...

Page 36: ...refer to the explanation of optional module Chapter 4 Optional module Various optional modules for AT870N 1 Barcode reader 1D Laser Barcode Scanner 2D Imager Barcode Scanner 2 Wireless LAN 802 11 a b g n Option 3 Bluetooth 4 HF13 56 Reader 5 UHF 900MHz RFID GEN2 ISO IEC 18000 6C 6 GPS Module 7 Camera ...

Page 37: ...ble to equip with a compact image engine which could recognize all the 1D and 2D barcodes Using 1D or 2D barcode scanner Chapter 4 Optional module Running application Start Button DEMO_BarcodeScan performing ...

Page 38: ... Microsoft ActiveSync Please install the program at the PC after downloading the latest version of Microsoft Windows CE ActiveSync Windows Xp Windows Mobile Device Center 6 1 64bit Windows Xp or above Link for Download http www microsoft com downloads CAUTION User has to use Microsoft ActiveSync 3 77 or above if you want to synchronize by using ActiveSync Click the Next Button Select the license a...

Page 39: ...Success the Barcode scanner beep sound output Vibrator Success the Barcode scanner working vibrator Enable SCAN key Enable SCAN key Enable F7 key on right side Enable F7 key Enable F8 key on right side Enable F9 key Enable trigger Enable Gun Trigger key RAW Data To set the scan results in the form of raw data 2D scanners only support ...

Page 40: ...39 AT870N User Guide Press End button for termination of installation ...

Page 41: ...d output Key Setup set up the start barcode scan key Terminator select barcode value to be added to the special Character Result Type select how to output barcode value Application run complete Once the run is complete the barcode icon on the bottom right of the screen is registered and can be scan When user clidk the barcode icon pop up the main menu and Can change the settings ...

Page 42: ...space at the end of the barcode value Tab Add the tap character at the end of the barcode value Key Setup Below keys can set multiple F1 Set up for starting when the F1 key is pressed F2 Set up for starting when the F2 key is pressed F7 Set up for starting when the F7 key is pressed F8 Set up for starting when the F8 key is pressed SCAN Set up for starting when the SCAN key is pressed Gun Trigger ...

Page 43: ...the type of the one of the following types Keyboard Event Output barcode value on the screen by using Keyboard Event Copy and Paste Copy to clipboard and then copy to screen Warning Please do not look directly into the laser beam of barcode or it may do harm to your vision ...

Page 44: ...nce according to the size of barcode Correct barcode reading Incorrect barcode reading to scan barcode please try to adjust scan angle and distance The laser beam is a red thick line when scanning a barcode The laser beam must across the barcode It will couldn t scan barcode if the laser beam across only a fraction of barcode 2 1 1 2 ...

Page 45: ...45 Chapter 4 Optional module Start button Setting System WiFi POWER Wi Fi On turns on WiFi function Start button Setting System WiFi POWER ON WiFi ON OFF WiFi OFF First WiFi power needs to be on ...

Page 46: ...l module Input the network key When you turn on Wi Fi AP list up automatically How to connect AP 1 Click for connecting Choose the AP what you want to use and click If it connect well you will be able to see mark as screen ...

Page 47: ...an connect using the wireless AP management program How to connect AP 2 Click as picture AP or Router captured automatically Click on the appropriate device form the list You will be able to see connect Wireless Start button Setting Connections Network cards ...

Page 48: ...ion of COM2 and COM7 is maximum limit Start button Setting Bluetooth MODE 1 Start Bluetooth function Checking Bluetooth connection and termination Chapter 4 Optional module Turn on the Bluetooth Depends on checking check box user can control the Bluetooth power Select Bluetooth On Set up for searching this device by other devices Depends on checking check box user can set up for Bluetooth Select A...

Page 49: ... its function properly Press the Add new device for searching devices which could paring Choose the devices on searching list for paring and click the next Depending on the situation maybe need to input password for some devices then could Input the PIN code and click the next button Basically SPP R200 s printer pin code is 0000 Click the SPP R200 on the list ...

Page 50: ...er that it is possible to transmission and reception of data by COM2 port when you add a new device the equipment information is not normally displayed Please try again Password that should be used to Pairing authentication code the unit can be set by mutual After the paring is normally achieved User can use SDK for Bluetooth service The SDK should be by manufacture of the Bluetooth devices ...

Page 51: ...which located in Control Panel 4 SPP R200 printer power ON 5 Setting the SPP R200 printer to be in the status of pairing Please refer to the User Guide of SPP R200 Printer 6 Press Scan Device button to searching printer device nearby 7 In the status of pairing the factory setting password is 0000 usually ssage 10 Executing the Sample exe program in the AB700 Flash Disk 11 Change the COM8 to COM2 t...

Page 52: ... Speed Dial number for a while to make phone call when you the speed dial number has been already registered Function Key Descriptions Deletenumberonebyone After input phone number press Talk button to dialing Enableadd edit delete speeddialnumberandmakephonecall Savemaximum98easpeeddialnumbers Enable to looking for recent Call History ...

Page 53: ...ding phone call to active status Mutemicrophoneduringaphonecall Function Key Descriptions Pressthisbuttontoreceiveincomingphonecall Pressthisbuttontorejectaphonecall Switch active phone call on holding status End a phone call Enable to Search add delete contacts Enable to add a phone call while looking for contacts ...

Page 54: ...54 Chapter 4 Optional module Contact List How to search a contact information 1 Home Contacts Enter the contacts number or name into the searching box ...

Page 55: ...tact information type Select items which will add new contact information Enable to add name and company information Enable to add mobile phone number Enable to add new Email information Except for mobile number Enable to add other phone number Except for basic e mail address enable to add other e mail information ...

Page 56: ...56 Chapter 4 Optional module How to use Text Message Sending Message 1 Home Text Message 2 Start Button Text Message Press this button to make a new message Press this button to send a message ...

Page 57: ...e Replying Message Press Reply Forward R button and then choose Reply R item Press this button to send replly message after done text Press this button to check new message Check message in detail Click the relevant message in received message box ...

Page 58: ...te through 802 11 b g radio AT870N supports the TCP IP network protocol and AT870N directly uses the TCP IP and host computer at this protocol Device will be started as OFF state at the beginning 2 1 WiFi Connection and Termination Start Program Wireless Lan Click the Wireless Lan Select the ON and then click the OK button ...

Page 59: ...so on functions Start Button Pictures Videos Camera Use of camera Main Window button description Thumb end the main window and switch to Pictures Videos screen Menu main Manu list press Enter button to save current screen picture Execute Camera Application ...

Page 60: ...SO Standards and in the case of Mifare tag the reading distance around between 1 3 5cm Mifare tag recognition Mifare Open Open HF device Close Close HF device Antenna Stop emit antenna power Perform Send command which selected from above combo box ISO Switch ISO 15693 command screen Block Block number which will be accessed Key Type Key type of block which will be accessed Key Set Key set of block...

Page 61: ...ck which will be accessed Read Count number of block which be accessed Main window button description Slot Status check card status whether inserted into sloct PowerOn power on IC Card reader module SetParam set or change Card reader s protocol type clock rate bit rate and so on data GetParam get Card reader s protocol type clock rate bit rate and so on data Default initialize Card reader s set va...

Page 62: ...18000 6C Protocol performance frequency CE 865 868MHz FCC 902 928MHz Start Button DEMO_UHF UHF 900Mhz demo application execution Demo Main window button description Select a tag that will perform Access command Start press Start button to perform Inventory and button changed into Stop icon Clear delete all tag values on the screen Menu Main Manu ...

Page 63: ...t set as masking pattern Kill Pwd Access Pwd Read Write tag s Kill password access EPC length Read Write Tag s EPC length Even though using 128bits tag but if EPC length set as 96bits then only identify 96bits if performance Inventory command Read Write Read Write tag to designated Memory Bank MemBank read write의 target memory bank Seconds read write time seconds Format read write data format Demo...

Page 64: ...ad Write window and used as masking pattern while performing Lock Kill tag It means even there are a great many of tags around the reader Lock Kill tag command only apply those tag that set as masking pattern Kill Pwd Access Pwd Read Write tag s Kill password access password EPC length Read Write Tag s EPC length Even though using 128bits tag but if EPC length set as 96bits then only identify 96bi...

Page 65: ...er 4 Optional module Version Window button description Demo app Ver Demo application Version Protocol Ver UHF module library Version Hopping Mode UHF module country Version Max Tx Pwr UHF module maximum output ...

Page 66: ...ry Lithium Polymer 3 7V 80mAh Rechargeable Backup Battery Vibrator and LED Speaker BATTERY SUPPLY PERFORMANCE CHARACTERISTICS Marvell PXA320 806Mhz Processor Windows CE 5 0 Windows Embedded handheld 6 5 Operating System ROM 512MB RAM 512MB Memory 3 5 QVGA with Backlight TFT LCD 240 X 320Pixel 262K Color Display Speaker Ear Jack Microphone Audio USB 1 1 Client USB Host Serial RS 232 via gender cabl...

Page 67: ...UHF 900MHZ RFID READER WRITER CE 865MHz 868MHz Frequency FCC 902MHz 928MHz 0M 5M According to Tag Environment Reading range 0M 0 5M According to Tag Environment Writing range 1W MAX RF output GEN2 ISO IEC 18000 6C Protocol Anti Collision Special function HF 13 56MHZ RFID READER WRITER ISO15693 MIFARE ISO14443 A B Applied RFID Tag According to Tag 0Cm 5Cm Internal or External Reading range ACCESSOR...

Reviews: