background image

 Chapter 4. Browser Operation

47

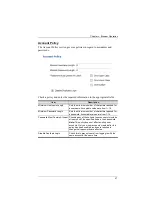
Account Policy

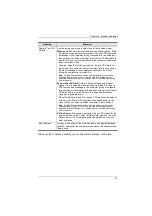
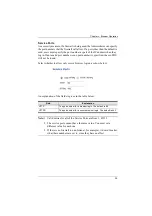
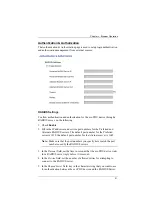
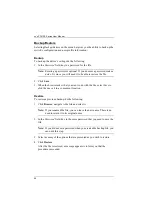
The Account Policy section governs policies in regard to usernames and 
passwords. 

Check a policy and enter the required information in the appropriate fields.

Item

Description

Minimum Username Length

Sets the minimum number of characters required for 
a username. Acceptable values are from 1–16.

Minimum Password Length

Sets the minimum number of characters required for 
a password. Acceptable values are from 1–16.

Password Must Contain At Least Checking any of these items requires users to include 

at least one of the specified items in their password.

Note: 

This policy does not affect existing user 

accounts. Only new user accounts created after this 
policy has been enabled, and users required to 
change their passwords are affected.

Disable Duplicate Login

Check this to prevent users from logging in with the 
same account at the same time.

Summary of Contents for NRGence PE5-8108

Page 1: ...User Manual ATEN NRGence PE5 8108 PE5 8208 8 Outlet 1U Metered eco PDU ...

Page 2: ...ipment in a residential area is likely to cause harmful interference in which case the user will be required to correct the interference at his own expense The device complies with Part 15 of the FCC Rules Operation is subject to the following two conditions 1 this device may not cause harmful interference and 2 this device must accept any interference received including interference that may caus...

Page 3: ... Dispose of used batteries according to the relevant instructions Installez sur le circuit du bâtiment des disjoncteurs permettant d assurer la protection maximale autorisée en respectant le courant nominal spécifié sur la plaque signalétique Veuillez respecter l ensemble des réglementations nationales en vigueur et des codes de sécurité ainsi que les déviations recommandèes pour les disjoncteurs ...

Page 4: ...DU system its purpose features and benefits with its front and back panel components described Chapter 2 Hardware Setup provides step by step instructions for setting up the eco PDU Chapter 3 Basic Operation and First time Setup explains the basic operations of the eco PDU and the necessary configurations for first time setup Chapter 4 Browser Operation explains how to log into the eco PDU remotel...

Page 5: ...key If keys need to be chorded they appear together in the same bracket with a plus sign between them Ctrl Alt 1 Numbered lists represent procedures with sequential steps Bullet lists provide information but do not involve sequential steps Indicates selecting consecutive options such as on a menu or dialog box For example Start Run means to open the Start menu and then select Run Indicates critica...

Page 6: ...es may have been added to the eco PDU since this manual was released Please visit our website to download the most up to date version Check to make sure that all of the components are present and in working condition If you encounter any problems contact your dealer Read this manual thoroughly and follow the installation and operation procedures carefully to prevent any damage to the unit or to an...

Page 7: ... locations and telephone numbers User Information Online Registration Be sure to register your product at our online support center Telephone Support For telephone support call this number International http www aten com North America http www aten usa com International http eservice aten com International 886 2 8692 6959 China 86 400 810 0 810 Japan 81 3 5615 5811 Korea 82 2 467 6789 North Americ...

Page 8: ... and any incidental or consequential damages resulting from any defect in the software The manufacturer of this system is not responsible for any radio and or TV interference caused by unauthorized modifications to this device It is the responsibility of the user to correct such interference The manufacturer is not responsible for any damage incurred in the operation of this system if the correct ...

Page 9: ...5108A PE7108A Front View 8 PE5208A PE7208A Front View 8 PE5108A PE5208A PE7108A PE7208A Rear View 8 PE5108A PE5208A PE7108A PE7208A Readout Section 9 PE5108B PE5108G PE7108B PE7108G Front View 10 PE5208B PE5208G PE7208B PE7208G Front View 10 PE5108B PE5108G PE5208B PE5208G PE7108B PE7108G PE7208B PE7208G Rear View 10 PE5108B PE5108G PE5208B PE5208G PE7108B PE7108G PE7208B PE7208G Readout Section 1...

Page 10: ...Network Configuration 23 Changing the Administrator Login 24 Moving On 24 Chapter 4 Browser Operation Logging In 25 The eco PDU Main Page 26 Page Components 27 Energy 28 Connections 28 Configuration 31 User 34 Administrator Information 34 User Information 35 Log 36 The System Log Event List 36 Notification Settings 37 Setup 38 Device Configuration 38 Date Time 44 Security 46 Login Failures 46 Work...

Page 11: ...ale de l unité d alimentation éco 64 Fixation des câbles d alimentation 64 Technical Support 66 International 66 North America 66 IP Address Determination 67 Specifications 69 PE5108A PE5208A PE7108A PE7208A 69 PE5108B PE5208B PE7108B PE7208B 70 PE5108G PE5208G PE7108G PE7208G 71 PE6108A PE6208A PE8108A PE8208A 72 PE6108B PE6208B PE8108B PE8208B 73 PE6108G PE6208G PE8108G PE8208G 74 Administrator ...

Page 12: ...eco PDU PE Series User Manual xii This Page Intentionally Left Blank ...

Page 13: ...t level from practically any location via a TCP IP connection The power status of each outlet can be set individually allowing users to switch each device on off The eco PDU also offers comprehensive power analysis reports that can be separated by departments and or locations providing precise measurements of the current voltage power and watt hour in real time Installation and operation is fast a...

Page 14: ...overload With its advanced security features and ease of operation the eco PDU is the most convenient reliable and cost effective way to remotely manage power access for multiple computer installations and allocate power resources efficiently Note Sensors are optional accessories A sensor enabled installation is required to generate a more complete energy efficient data and chart Higher sensor ins...

Page 15: ...MA 6 15P IEC C13 PDU 12A 12A PE6108G IEC C14 IEC C13 PDU 10A 10A PE6208A NEMA 5 20P NEMA 5 20R PDU 16A 16A PE6208B NEMA 6 20P IEC C13 C19 PDU 12A 16A 16A PE6208G IEC C20 IEC C13 C19 PDU 10A 16A 16A PE7108A NEMA 5 15P NEMA 5 15R Outlet 12A 12A PE7108B NEMA 6 15P IEC C13 Outlet 12A 12A PE7108G IEC C14 IEC C13 Outlet 10A 10A PE7208A NEMA 5 20P NEMA 5 20R Outlet 16A 16A PE7208B NEMA 6 20P IEC C13 C19 ...

Page 16: ...CP IP UDP HTTP HTTPS SSL SMTP DHCP NTP DNS 10 Base T 100 Base TX auto sense Ping eco PDU Power Management software eco Sensors SNMP v3 Manager support Operation Remote power outlet control On Off Power Cycle by individual outlets Power on sequencing users can set the power on sequence and delay time for each port to allow equipment to be turned on in the proper order Easy setup and operation via a...

Page 17: ...lert sounds an alarm and sends SNMP trap or e mail alerts when a circuit breaker trips Current and voltage threshold setting Outlet naming support User outlet access assignment on an outlet by outlet basis Event logging and Syslog server support Upgradable firmware Multilanguage support English Traditional Chinese Simplified Chinese Japanese German Italian Spanish and French Security Two level pas...

Page 18: ... booting of attached computers the computer s BIOS must support Wake on LAN or System after AC Back For Safe Shutdown The computer must be running Windows Windows 2000 or above or Linux The Safe Shutdown program available by download from our website or on the software CD included must be installed and running on the computer ...

Page 19: ...to generate more accurate data Available sensors are shown in the table below Sensor Management Sensors can be managed via the eco PDU s built in graphical user interface GUI or with the NRGence eco Sensors software that can be downloaded from the ATEN website The download link can be found on the software CD provided with the eco PDU package Cable Holders Cable holders are optional accessories Fo...

Page 20: ...eco PDU PE Series User Manual 8 Components PE5108A PE7108A Front View PE5208A PE7208A Front View PE5108A PE5208A PE7108A PE7208A Rear View 1 2 3 4 5 6 1 2 3 4 5 6 9 8 7 ...

Page 21: ...items 4 power LED The LED lights when the eco PDU is ready to operate 5 LAN port and LEDs The cable that connects the eco PDU to the LAN plugs in here The Link and LAN LEDs are built into the LAN port Link Lights GREEN to indicate that a connection via the eco PDU s RJ 45 Ethernet port has been established Flashes to indicate data is being transmitted LAN Lights ORANGE to indicate 10 Mbps data tra...

Page 22: ... Series User Manual 10 PE5108B PE5108G PE7108B PE7108G Front View PE5208B PE5208G PE7208B PE7208G Front View PE5108B PE5108G PE5208B PE5208G PE7108B PE7108G PE7208B PE7208G Rear View 6 1 2 3 4 5 1 2 3 4 5 6 9 8 7 ...

Page 23: ...e selection among the items 4 power LED The LED lights when the eco PDU is ready to operate 5 LAN port and LEDs The cable that connects the eco PDU to the LAN plugs in here The Link and LAN LEDs are built into the LAN port Link Lights GREEN to indicate that a connection via the eco PDU s RJ 45 Ethernet port has been established Flashes to indicate data is being transmitted LAN Lights ORANGE to ind...

Page 24: ...eco PDU PE Series User Manual 12 PE6108A PE8108A Front View PE6208A PE8208A Front View PE6108A PE6208A PE8108A PE8208A Rear View 6 1 2 3 4 5 6 1 2 3 4 5 8 9 7 ...

Page 25: ... power LED The LED lights when the eco PDU is ready to operate 5 LAN port and LEDs The cable that connects the eco PDU to the LAN plugs in here The Link and LAN LEDs are built into the LAN port Link Lights GREEN to indicate that a connection via the eco PDU s RJ 45 Ethernet port has been established Flashes to indicate data is being transmitted LAN Lights ORANGE to indicate 10 Mbps data transmissi...

Page 26: ... Series User Manual 14 PE6108B PE6108G PE8108B PE8108G Front View PE6208B PE6208G PE8208B PE8208G Front View PE6108B PE6108G PE6208B PE6208G PE8108B PE8108G PE8208B PE8208G Rear View 6 1 2 3 4 5 6 1 2 3 4 5 8 9 7 ...

Page 27: ...among the items 4 power LED Lights when the unit is powered up and ready to operate 5 LAN port and LEDs The cable that connects the eco PDU to the LAN plugs in here The Link and LAN LEDs are built into the LAN port Link Lights GREEN to indicate that a connection via the eco PDU s RJ 45 Ethernet port has been established Flashes to indicate data is being transmitted LAN Lights ORANGE to indicate 10...

Page 28: ...eco PDU PE Series User Manual 16 This Page Intentionally Left Blank ...

Page 29: ...s device is provided on page 57 Please review it before proceeding 2 Make sure that power to all the devices you will be connecting have been turned off You must unplug the power cords of any computers that have the Keyboard Power On function 1 Vous trouverez des informations de sécurité importantes concernant le positionnement de l unité à la page 57 Veuillez les lire attentivement avant d aller ...

Page 30: ...n the eco PDU 3 Plug the cable that connects the eco PDU to the LAN into the eco PDU s LAN port 4 If you are using sensors in your eco PDU installation connect them to the sensor ports on the unit s rear side panel Note Sensors are optional Please see Optional Accessories page 7 and the detailed sensor installation diagrams later in this chapter for further information 5 Connect the eco PDU s powe...

Page 31: ...it Secure the cable holders using the specially designed holes around the individual power outlets as shown below Note 1 Cable holders are an optional accessory See Cable Holders page 7 2 Use only the ATEN Lok U Plug cable holders that have been specifically designed to work with the eco PDU Using any other kind of cable securing device could be highly dangerous 1 3 2 4 5 ...

Page 32: ...e a tie wrap to secure the sensor tighten the tie wrap over the recessed channel on the sensor as shown in the following diagram Note 1 The sensors shown in the above diagram are for reference purposes only The sensors for the eco PDU may look slightly different 2 Depending on the model and type of sensor sensor mounts tie wraps and adhesive cable tie holders may or may not be provided in the pack...

Page 33: ...owser from any platform See First Time Setup page 22 and the following sections in this chapter for full details eco Sensors The eco PDU supports NRGence eco Sensors eco PDU Manager Software NRGence eco Sensors provides you with an easy method for managing multiple devices offering an intuitive and user friendly Graphical User Interface that allows you to configure a PDU device and monitor power s...

Page 34: ... 1 Since this is the first time you are logging in use the default Username administrator and the default Password password For security purposes we recommend changing them to something unique see Changing the Administrator Login page 24 2 For remote methods of getting logged in to the network see IP Address Determination page 67 After you successfully log in the eco PDU Energy Connections page ap...

Page 35: ...figuration To set up the network do the following 1 Click the Setup tab 2 The interface displays the Device Configuration page A screen similar to the one below appears 3 Fill in the fields according to the information provided under Device Configuration page 38 ...

Page 36: ... reset the name and password fields to something unique then click Save at the bottom of the page Note If you forget the Administrator s name or password short the mainboard jumper to restore the default Administrator account See see Administrator Login Failure page 75 in the Appendix for full details Moving On After setting up the network and changing the default Administrator username and passwo...

Page 37: ...tion bar Note You can get the IP address from the eco PDU administrator or see IP Address Determination page 67 for information about setting it up yourself 2 If a Security Alert dialog box appears accept the certificate it can be trusted The Login page appears 3 Provide a valid Username and Password set by the eco PDU administrator and select your language Options are English default Traditional ...

Page 38: ... Main Page After you have successfully logged in the eco PDU Main Page comes up with the Energy Connections page displayed Note The screen depicts anAdministrator s page Depending on a user s type and permissions not all of these elements appear ...

Page 39: ... that pertain to the item selected in the tab bar The items that appear in the menu bar are determined by the user s type and the authorization options that were selected when the user s account was created 3 Sidebar The Sidebar provides a tree view listing of outlets that relate to the various tab bar and menu bar selections 4 Help Connects to on line help at the ATEN website for the device s con...

Page 40: ...Connections menu The contents of the PDU Status and Outlet Status sections are displayed in the main panel Note Only enabled eco PDU models will display the Outlet Status submenu section Other models provide only PDU Status monitoring See PE Series eco PDU Comparison Chart page 3 for which models support PDU and Outlet Status or PDU Status only monitoring ...

Page 41: ...he maximum setting an alarm is triggered Breaker status ON OFF displays here Voltage Frequency is displayed here in Hz On Off Reboot You can manually turn the device On and Off from this page by clicking the radio buttons If you wish to reboot the device check the Reboot checkbox and click the Off button beside the checkbox Sensor 1 Sensor 2 If you have sensors installed in your installation use t...

Page 42: ...shold Settings These fields are used to set the maximum minimum and fluctuation threshold settings for Current Voltage Power and Power Dissipation If a range falls below the minimum setting or exceeds the maximum setting an alarm is triggered On Off Reboot You can manually turn the outlet On and Off from this page by clicking the radio buttons To Reboot the outlet enable the Reboot checkbox and cl...

Page 43: ...on POP feature Effective on all non critical outlets this added safety feature automatically powers off outlets in the user defined sequence when a current overload occurs in protecting the powered devices Enable POP Mode by clicking the radio button Make your selection for the POP Threshold options are Same as Bank Maximum Current or User Defined Enter a value in the field Note This feature is av...

Page 44: ...m a power operation before it is performed If it is disabled there is no check in the checkbox the operation is performed without confirmation Power ON Delay Sets the amount of time the eco PDU waits after the Power Button is clicked see Outlet Status page 30 before it turns on the power to the outlet You must check the Enable Power On Time Schedule Setting box for this setting to take effect See ...

Page 45: ...unning on the computer System after AC Back This is a Safe Shutdown and Restart option If this is selected when an Outlet is turned Off the eco PDU first sends a message to the computer telling it to prepare for a shutdown it then waits for the amount time set in the Power Off Delay field to give the OS time to close down before the computer is powered down When the Outlet is turned On the eco PDU...

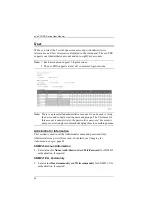
Page 46: ...set up the device and to begin creating users and groups The Username for this account is administrator the password is password For security purposes we strongly recommend changing these to something unique Administrator Information This section is used to set the Administrator name and password Only Administrators can view this section For details see Changing the Administrator Login page 24 SNM...

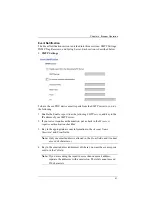
Page 47: ...ement The Management field allows you to Enable or Disable a user s account Enable stores the user account see User Information page 35 Disable disables the user account Name From 1 to 16 characters are allowed depending on the Account Policy settings See Account Policy page 47 Password From 1 to 16 characters are allowed depending on the Account Policy settings See Account Policy page 47 Outlet T...

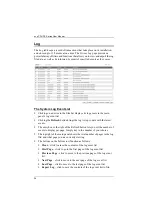
Page 48: ...ate with the latest events The entry box to the right of the Refresh button lets you set the number of events to display per page Simply key in the number of your choice The top right of the main panel shows the total number of pages in the log file and what page you are currently viewing The buttons on the bottom row function as follows Clear click to erase the contents of the log event list Firs...

Page 49: ...ory item rows have a white background Click the checkboxes under the column headings to select which component s will receive notification of the log events Clicking on a main category heading s row automatically selects all the sub category items nested below it If you only want to set notification for some of the sub category events don t put a check in the main category row Instead drop down th...

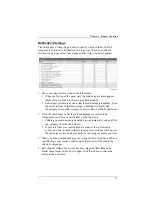
Page 50: ...vice as described in the following sections General Item Meaning PDU Name This field lets you give the device a unique name Simply delete whatever is in the text box and key in the name of your choice Click Save located at the bottom of the page to save the new name MAC Address This item displays the eco PDU s MAC address Firmware Version This item displays the current firmware version number You ...

Page 51: ... not be found Select whether to allow only secure browser logins as show below An explanation of the fields is given in the table below Note 1 Valid entries for all of the Service Ports are from 1 65535 2 The service ports cannot have the same value You must set a different value for each one 3 If there is no firewall on an Intranet for example it doesn t matter what these numbers are set to since...

Page 52: ...ain DNS Server address automatically radio button To specify the DNS Server address manually select the Set DNS server address manually radio button and fill in the addresses for the Preferred and Alternate DNS servers with values appropriate for your network Note 1 If you choose Obtain IP address automatically when the device starts up it waits to get its IP address from the DHCP server If it has...

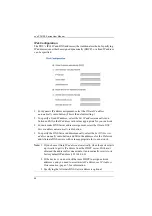
Page 53: ...n the IP address of your SMTP server 2 If your server requires authentication put a check in the My server requires authentication checkbox 3 Key in the appropriate account information in the Account Name Password and From fields Note Only one email address is allowed in the From fields and it cannot exceed 64 characters 4 Key in the email address addresses of where you want the event reports sent...

Page 54: ...to use 3 Key in the IP address es and the service port number s of the computer s to be notified of SNMP trap events The valid port range is 1 65535 The default port number is 162 Note Make sure that the port number you specify here matches the port number used by the SNMP receiver computer 4 Key in the community value s if required for the SNMP version 5 Key in the auth privacy password s that co...

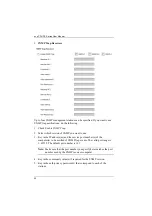
Page 55: ...he events that take place on eco PDU devices and write them to the eco PDU Syslog server do the following 1 Check Enable Syslog Server 2 Key in the IP address and the port number of the Syslog server The valid port range is 1 65535 The default port number is 514 ...

Page 56: ...PDU time parameters Time Zone To establish the time zone that the eco PDU is located in drop down the Time Zone list and choose the city that most closely corresponds to where it is at If your country or region employs Daylight Saving Time Summer Time check the corresponding checkbox ...

Page 57: ...te and time settings from the locally connected PC Network Time To have the time automatically synchronized to a network time server do the following 1 Check the Enable auto adjustment checkbox 2 Drop down the time server list to select your preferred time server or Check the Preferred custom server IP checkbox and key in the IP address of the time server of your choice 3 If you want to configure ...

Page 58: ...hat are permitted from a remote user Timeout sets the amount of time a remote user must wait before attempting to login again after exceeding the number of allowed failures Working Mode If ICMP is enabled the eco PDU device can be pinged If it is not enabled the device cannot be pinged The default is Enabled When you have finished making your settings on this page click Save ...

Page 59: ...nimum Password Length Sets the minimum number of characters required for a password Acceptable values are from 1 16 Password Must Contain At Least Checking any of these items requires users to include at least one of the specified items in their password Note This policy does not affect existing user accounts Only new user accounts created after this policy has been enabled and users required to c...

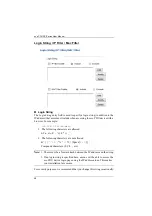
Page 60: ...168 0 126 abcdefg The following characters are allowed 0 9 a z A Z _ The following characters are not allowed Space Compound characters É Ç ñ etc Note 1 There must be a forward slash between the IP address and the string 2 If no login string is specified here anyone will be able to access the eco PDU device login page using the IP address alone This makes your installation less secure For security...

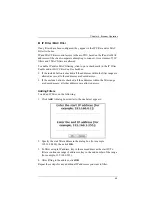
Page 61: ...s within the filter range are allowed access all other addresses are denied access If the exclude button is checked all the addresses within the filter range are denied access all other addresses are allowed access Adding Filters To add an IP filter do the following 1 Click Add A dialog box similar to the one below appears 2 Specify the start filter address in the dialog box for example 192 168 0 ...

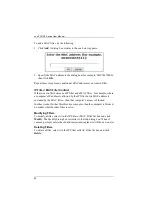
Page 62: ...ter s IP address is allowed by the IP filter but its MAC address is excluded by the MAC filter then that computer s access is blocked In other words if either filter blocks a computer then the computer is blocked no matter what the other filter is set to Modifying Filters To modify a filter select it in the IP Filter or MAC Filter list box and click Modify The Modify dialog box is similar to the A...

Page 63: ...te RADIUS servers The default port number for the Preferred server is 1812 the default port number for the Alternate server is 1645 Note Make sure that the port numbers you specify here match the port numbers used by the RADIUS servers 3 In the Timeout field set the time in seconds that the eco PDU device waits for a RADIUS server reply before it times out 4 In the Retries field set the number of ...

Page 64: ... to use your own private encryption key and signed certificate rather than the default ATEN certificate There are two methods for establishing your private certificate generating a self signed certificate and importing a third party certificate authority CA signed certificate Generating a Self Signed Certificate If you wish to create your own self signed certificate a free utility openssl exe is a...

Page 65: ...ted and select it 2 Click Browse to the right of Certificate browse to where your certificate file is located and select it 3 Click Upload to complete the procedure Note 1 Clicking Restore Default returns the device to using the default ATEN certificate 2 Both the private encryption key and the signed certificate must be imported at the same time When you have finished making your settings on this...

Page 66: ...ware level is compared with that of the upgrade file If the current version is equal to or higher than the upgrade version a popup message appears to inform you of the situation and stops the upgrade procedure Name Lists all of the eco PDU devices Click to put a check in the checkbox of the device s whose firmware you want to upgrade F W Version Displays the eco PDU s current firmware version File...

Page 67: ...o inform you of the situation and stops the upgrade procedure If you didn t enable Check Main Firmware Version the upgrade file is installed without checking what its level is Once the upgrade completes successfully the switch resets itself 4 Log in again and check the firmware version to be sure it is the new one Firmware Upgrade Recovery Should the eco PDU s firmware upgrade procedure fail and t...

Page 68: ... asks what you want to do with the file select Save to disk then save it in a convenient location Restore To restore a previous backup do the following 1 Click Browse navigate to the file and select it Note If you renamed the file you can leave the new name There is no need to return it to its original name 2 In the Password field key in the same password that you used to save the file Note If you...

Page 69: ...ice should not be placed in a built in enclosure unless adequate ventilation has been provided Never spill liquid of any kind on the device Unplug the device from the wall outlet before cleaning Do not use liquid or aerosol cleaners Use a damp cloth for cleaning The device should be operated from the type of power source indicated on the marking label If you are not sure of the type of power avail...

Page 70: ... hot pluggable power supplies observe the following guidelines Install the power supply before connecting the power cable to the power supply Unplug the power cable before removing the power supply If the system has multiple sources of power disconnect power from the system by unplugging all power cables from the power supplies Never push objects of any kind into or through cabinet slots They may ...

Page 71: ...overed in the operating instructions Improper adjustment of other controls may result in damage that will require extensive work by a qualified technician to repair Do not connect the RJ 11 connector marked Sensor to a public telecommunication network ...

Page 72: ...tures de ventilation se trouveraient bloquées De même l unité ne doit pas être placée dans un meuble fermé à moins qu une ventilation adaptée ne soit assurée Ne renversez jamais de liquides de quelque sorte que ce soit sur l unité Débranchez l unité de la prise murale avant de la nettoyer N utilisez pas de produits de nettoyage liquide ou sous forme d aérosol Utilisez un chiffon humide pour le net...

Page 73: ...anchez le câble d alimentation avant de retirer le bloc d alimentation Si le système présente plusieurs sources d alimentation déconnectez le système de l alimentation en débranchant tous les câbles d alimentation des blocs d alimentation N insérez jamais d objets de quelque sorte que ce soit dans ou à travers les fentes du boîtier Ils pourraient entrer en contact avec des points de tension danger...

Page 74: ...mode d emploi Le réglage incorrect d autres commandes peut être à l origine de dommages qui nécessiteront beaucoup de travail pour qu un technicien qualifié puisse réparer l unité Ne connectez pas le connecteur RJ 11 portant la marque Sensor Capteur à un réseau de télécommunication public ...

Page 75: ... rack load should not exceed 80 percent of the branch circuit rating Make sure that all equipment used on the rack including power strips and other electrical connectors is properly grounded Ensure that proper airflow is provided to devices in the rack Ensure that the operating ambient temperature of the rack environment does not exceed the maximum ambient temperature specified for the equipment b...

Page 76: ... circuit de l alimentation CA qui alimente le bâti La charge totale du bâti ne doit pas dépasser 80 de la capacité du circuit Assurez vous que tous les équipements utilisés sur le bâti y compris les multiprises et autres connecteurs électriques sont correctement mis à la terre Assurez vous que les unités présentes dans le bâti bénéficie d une circulation d air suffisante Assurez vous que la tempér...

Page 77: ...limentation éco L utilisation de tout autre type système de fixation de câble pourrait s avérer très dangereuse Veuillez contacter votre revendeur ATEN pour plus d informations sur le support de câble ATEN Lok U Plug ...

Page 78: ...orehand Product model number serial number and date of purchase Your computer configuration including operating system revision level expansion cards and software Any error messages displayed at the time the error occurred The sequence of operations that led up to the error Any other information you feel may be of help Email Support support aten usa com Online Technical Support Troubleshooting Doc...

Page 79: ...ress See Notification Settings page 37 Method 1 For computers running Windows an IP address can be determined and or assigned with the IP Installer utility The utility can be obtained from the Download area of our web site or from the software CD Look under Driver SW and the model of your device After downloading the utility to your computer do the following 1 Unzip the contents of IPInstaller zip...

Page 80: ...rogram Method 2 1 Set your computer s IP address to 192 168 0 XXX Where XXX represents any number or numbers except 60 192 168 0 60 is the default address of the eco PDU 2 Specify the device s default IP address 192 168 0 60 in your browser and you will be able to connect 3 Assign a fixed IP address for the device see IPv4 Configuration page 40 that is suitable for the network segment that it resi...

Page 81: ...s 3 digit 7 segment Orange Power 1 Blue LAN 10 100M 1 Orange Green Link 1 Green Sensor 2 Green Switches Reset 1 x Semi recessed Pushbutton Power 1 x Non fuse Breaker I P Rating 100 120V 50 60Hz 12A 100 120V 50 60Hz 16A Load Capacity 1440W 1920W O P Rating Per Port 100 120V 50 60Hz 12A 100 120V 50 60Hz 16A Total 100 120V 50 60Hz 12A 100 120V 50 60Hz 16A Environment Operating Temperature 0 50oC Stor...

Page 82: ... IP Address 3 digit 7 segment Orange Power 1 Blue LAN 10 100M 1 Orange Green Link 1 Green Sensor 2 Green Switches Reset 1 x Semi recessed Pushbutton Power 1 x Non fuse Breaker I P Rating 100 240V 50 60Hz 12A 100 240V 50 60Hz 16A Load Capacity 2880W 3840W O P Rating Per Port C13 100 240V 50 60Hz 12A C19 N A 100 240V 50 60Hz 16A Total 100 240V 50 60Hz 12A 100 240V 50 60Hz 16A Environment Operating T...

Page 83: ...s 3 digit 7 segment Orange Power 1 Blue LAN 10 100M 1 Orange Green Link 1 Green Sensor 2 Green Switches Reset 1 x Semi recessed Pushbutton Power 1 x Non fuse Breaker I P Rating 100 240V 50 60Hz 10A 100 240V 50 60Hz 16A Load Capacity 2400W 3840W O P Rating Per Port C13 100 240V 50 60Hz 10A C19 N A 100 240V 50 60Hz 16A Total 100 240V 50 60Hz 10A 100 240V 50 60Hz 16A Environment Operating Temperature...

Page 84: ...Address 3 digit 7 segment Orange Power 1 Blue LAN 10 100M 1 Orange Green Link 1 Green Sensor 2 Green Switches Reset 1 x Semi recessed Pushbutton Power 1 x Non fuse Breaker I P Rating 100 120V 50 60Hz 12A 100 120V 50 60Hz 16A Load Capacity 1440W 1920W O P Rating Per Port 100 120V 50 60Hz 12A 100 120V 50 60Hz 16A Total 100 120V 50 60Hz 12A 100 120V 50 60Hz 16A Environment Operating Temperature 0 50o...

Page 85: ...IP Address 3 digit 7 segment Orange Power 1 Blue LAN 10 100M 1 Orange Green Link 1 Green Sensor 2 Green Switches Reset 1 x Semi recessed Pushbutton Power 1 x Non fuse Breaker I P Rating 100 240V 50 60Hz 12A 100 240V 50 60Hz 16A Load Capacity 2880W 3840W O P Rating Per Port C13 100 240V 50 60Hz 12A C19 NA 100 240V 50 60Hz 16A Total 100 240V 50 60Hz 12A 100 240V 50 60Hz 16A Environment Operating Tem...

Page 86: ... Green Current IP Address 3 digit 7 segment Orange Power 1 Blue Link 1 Green LAN 1 Orange Green Sensor 2 Green Switches Reset 1 x Semi recessed Pushbutton Power 1 x Non fuse Breaker I P Rating 100 240V 50 60Hz 10A 100 240V 50 60Hz 16A Load Capacity 2400W 3840W O P Rating Per Port C13 100 240V 50 60Hz 10A C19 NA 100 240V 50 60Hz 16A Total 100 240V 50 60Hz 10A 100 240V 50 60Hz 16A Environment Operat...

Page 87: ...le you can clear the login information with the following procedure 1 Power off the eco PDU and remove its housing 2 Short the jumper labeled J6 PIN10 and PIN9 3 Power on the eco PDU 4 When the 1 digit 7 segment display shows P power off the switch 5 Remove the jumper cap from J6 6 Close the housing and start the eco PDU After you start you can use the default Username and Password to log in ...

Page 88: ...n have the option to 1 repair said product with new or repaired components or 2 replace the entire product with an identical product or with a similar product which fulfills the same function as the defective product Replaced products assume the warranty of the original product for the remaining period or a period of 90 days whichever is longer When the products or components are replaced the repl...

Reviews: