background image

Appendix

35

(Continued from previous page.)

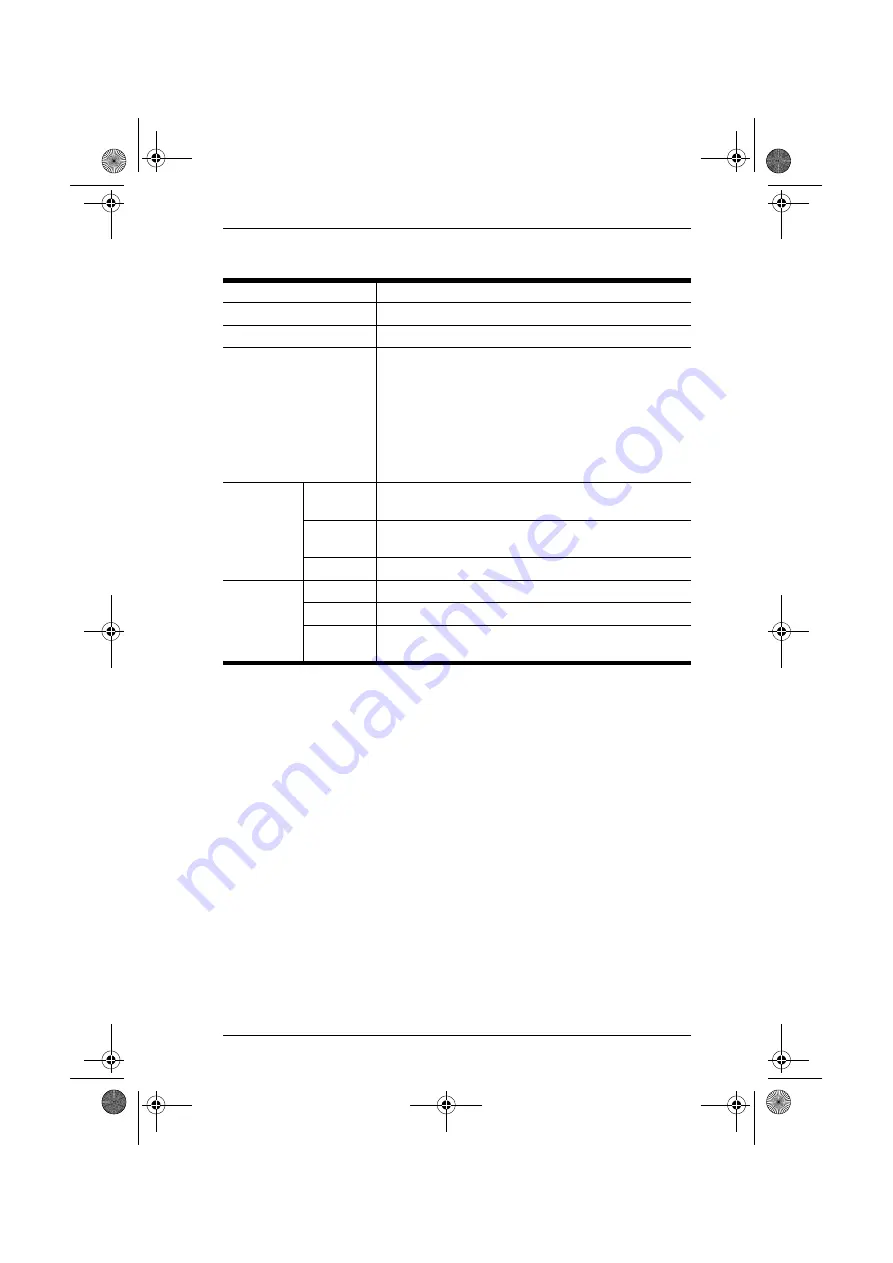
Power Consumption

DC 5.3V, 4.8W

Scan Interval

1–99 secs. (5 secs. default)

KB / Mouse Emulation

USB

Video

DVI-D: 

Š

2560 x 1600 @ 60Hz (Dual Link); 

Š

supports Apple 20”, 23”, 30” Cinema Display; 

Š

supports ViewSonic 22” LCD monitor VP2290b up to 
3840 x 2400 @ 13Hz (Single Link).

DVI-A: 

Š

2048 x 1536; DDC2B

Environment

Operating 
Temp.

0–50ºC

Storage 
Temp.

-20–60ºC

Humidity

0–80% RH, Non-condensing

Physical 
Properties

Housing

Metal

Weight

0.94 kg

Dimensions 
(L x W x H)

27.00 x 8.70 x 5.50 cm

cs1782.book  Page 35  Thursday, June 12, 2008  2:28 PM

Summary of Contents for CS1782

Page 1: ...USB 2 0 DVI KVMP Switch CS1782 User Manual www aten com cs1782 book Page i Thursday June 12 2008 2 28 PM...

Page 2: ...ce will not occur in a particular installation If this equipment does cause harmful interference to radio or television reception which can be determined by turning the equipment off and on the user i...

Page 3: ...and not the manufacturer its distributor or its dealer assumes the entire cost of all necessary servicing repair and any incidental or consequential damages resulting from any defect in the software T...

Page 4: ...and follow the installation and operation procedures carefully to prevent any damage to the unit and or any of the devices connected to it Features may have been added to the CS1782 since this manual...

Page 5: ...dware Setup Cable Connections 7 Standard 2 1 Channel Surround Sound Audio Installation 9 7 1 Channel Surround Sound Audio Installation 10 3 Basic Operation Manual Switching 11 Hot Plugging 11 Powering...

Page 6: ...ection Settings 20 Mouse Emulation Control 20 Other OS Mode 20 HSM Summary Table 21 5 Keyboard Emulation Mac Keyboard 23 Sun Keyboard 24 6 The Firmware Upgrade Utility Before you Begin 25 Starting the...

Page 7: ...grams showing the necessary steps are provided Chapter 3 Basic Operation explains the fundamental concepts involved in operating the CS1782 Chapter 4 Keyboard Port Operation details all of the concept...

Page 8: ...nter means to press the Enter key If keys need to be chorded they appear together in the same bracket with a plus sign between them Ctrl Alt 1 Numbered lists represent procedures with sequential steps...

Page 9: ...VI Digital Visual Interface connectors and the transfer of keyboard and mouse data to the computers via a fast reliable USB connection DVI supports both digital video input flat panel displays data pr...

Page 10: ...rts widescreen resolutions Computer selection via front panel pushbuttons and hotkeys Multiplatform support Windows 2000 XP Vista Linux2 Mac and Sun Console mouse port emulation bypass feature support...

Page 11: ...isplay is affected by the quality of the DVI display card For best results we recommend you purchase a high quality product USB Type A port Audio ports optional Cables Two 1 8m custom DVI D KVM cable...

Page 12: ...nel 2 6 and higher OS Version Windows 2000 and higher Linux RedHat 9 0 and higher Fedora Core 4 and higher SuSE 9 0 and higher UNIX AIX 4 3 and higher FreeBSD 4 2 and higher Sun Solaris 9 and higher N...

Page 13: ...ORANGE to indicate that the computer attached to the corresponding port is up and running On Line Changes to BRIGHT ORANGE to indicate that the computer attached to its corresponding port is the one...

Page 14: ...Port Section The cables from your monitor microphone and speakers plug in here Each connector is marked with an appropriate icon to indicate itself 4 CPU Port Section The cables that link the switch t...

Page 15: ...le DVI socket in the CPU Port section of the switch then plug the accompanying USB microphone and speaker connectors into their corresponding USB microphone and speaker sockets If you are using 7 1 ch...

Page 16: ...tilize the 7 1 channel surround sound function in addition to 4a above also use the extra custom audio cable set provided Attach the cables to the corresponding colored audio jacks on the motherboard...

Page 17: ...2 Hardware Setup 9 Standard 2 1 Channel Surround Sound Audio Installation 3 2a 5 6 4a 1 5 2 cs1782 book Page 9 Thursday June 12 2008 2 28 PM...

Page 18: ...CS1782 User Manual 10 7 1 Channel Surround Sound Audio Installation 2 4b DVI KVM Cable Set 4b 7 1 Channel Surround Sound Audio Cable Set 2 3 3 cs1782 book Page 10 Thursday June 12 2008 2 28 PM...

Page 19: ...bring the audio focus to the computer attached to its corresponding port Press and hold a port selection pushbutton for more than 2 seconds to bring the KVM focus plus the USB and Audio focus to the c...

Page 20: ...D is used to specify which computer gets the KVM USB peripheral and audio focus with the Hotkey port selection method see page 11 for details Alternative Manual Port Selection Settings When Hotkey Set...

Page 21: ...rnate Port Switching page 15 for details Cycling Through the Ports Hotkey Action Scroll Lock Scroll Lock Enter Brings the KVM USB hub and audio focus from the port that currently has the KVM focus to...

Page 22: ...gs only the USB hub focus to the computer attached to the specified port The KVM and audio focus remain where they are Scroll Lock Scroll Lock n S Enter Brings only the audio focus to the computer att...

Page 23: ...While Auto Scan Mode is in effect ordinary keyboard and mouse functions are suspended only Auto Scan Mode compliant keystrokes and mouse clicks can be input You must exit Auto Scan Mode in order to re...

Page 24: ...tails When HSM is active the Caps Lock and Scroll Lock LEDs flash in succession to indicate that HSM is in effect They stop flashing and revert to normal status when you exit HSM Ordinary keyboard and...

Page 25: ...etween the two methods To revert back to the original HSM invocation keys invoke HSM then press and release the H key again Alternate Port Switching Keys The port switching activation keys can be chan...

Page 26: ...see table below After completing this procedure you automatically exit HSM List Hotkey Settings To see a listing of the current hotkey settings do the following 1 Invoke HSM see page 14 2 Press and r...

Page 27: ...ng Keys To disable the Port Switching Keys Scroll Lock Scroll Lock Ctrl Ctrl do the following 1 Invoke HSM see page 14 2 Press X Enter Note This procedure is a toggle To enable the Port Switching keys...

Page 28: ...ive Manual Port Selection Settings To toggle between the default and the alternative front panel pushbutton manual port selection settings do the following 1 Invoke HSM see page 14 2 Press S See Alter...

Page 29: ...F4 Lists the current hotkey settings via the Paste function of a text editor F5 Performs a USB keyboard and mouse reset B Toggles the beeper On and Off X Enter Enables Disables the Port Switching key...

Page 30: ...CS1782 User Manual 22 This Page Intentionally Left Blank cs1782 book Page 22 Thursday June 12 2008 2 28 PM...

Page 31: ...listed in the table below Note When using key combinations press and release the first key Ctrl then press and release the activation key PC Keyboard Mac Keyboard Shift Shift Ctrl Ctrl Ctrl 1 Ctrl 2...

Page 32: ...nctions are shown in the table below Note When using key combinations press and release the first key Ctrl then press and release the activation key PC Keyboard Sun Keyboard Ctrl T Stop Ctrl F2 Again...

Page 33: ...to them http www aten com Before you Begin To prepare for the firmware upgrade do the following 1 From a computer that is not part of your KVM installation go to our Internet support site and choose t...

Page 34: ...or by opening a command line and entering the full path to it The Firmware Upgrade Utility Welcome screen appears Note The screens shown in this section are for reference only The wording and layout...

Page 35: ...upgraded by the package are listed in the Device List panel As you select a device in the list its description appears in the Device Description panel 4 After you have made your device selection s Cl...

Page 36: ...e option to Continue or Cancel If you didn t enable Check Firmware Version the Utility installs the upgrade files without checking whether they are a higher level or not As the Upgrade proceeds status...

Page 37: ...ppears to inform you that the procedure was successful Click Finish to close the Firmware Upgrade Utility After a successful completion the switches exit Firmware Upgrade Mode and reset themselves CS1...

Page 38: ...ng a jumper cap short the jumper on the mainboard labeled J17 The diagram below indicates the jumper location on the CS1782 board 3 Power on the CS1782 It will now work with the factory default firmwa...

Page 39: ...Unplug the device from the wall outlet before cleaning Do not use liquid or aerosol cleaners Use a damp cloth for cleaning The device should be operated from the type of power source indicated on the...

Page 40: ...unplug the device from the wall outlet and bring it to qualified service personnel for repair The power cord or plug has become damaged or frayed Liquid has been spilled into the device The device ha...

Page 41: ...tions that led up to the error Any other information you feel may be of help Email Support support aten com Online Support Technical Support http support aten com Troubleshooting Documentation Softwar...

Page 42: ...y Rear Speaker Out Port 1 x Mini Stereo Jack F black Center Subwoofer Port 1 x Mini Stereo Jack F orange Computer Connectors KB Mouse 2 x USB Type B F white Video 2 x DVI I F white Audio Line Out Port...

Page 43: ...k supports Apple 20 23 30 Cinema Display supports ViewSonic 22 LCD monitor VP2290b up to 3840 x 2400 13Hz Single Link DVI A 2048 x 1536 DDC2B Environment Operating Temp 0 50 C Storage Temp 20 60 C Hum...

Page 44: ...hub so will not support PCs or OS that do not support USB 2 0 For OS that do not support USB 2 0 keyboard and mouse functions can be reset using the F1 hotkey function See the note under Mouse Emulati...

Page 45: ...epresentation expressed implied or statutory with respect to the contents or use of this documentation and especially disclaims its quality performance merchantability or fitness for any particular pu...

Reviews: