Advanced Security Installation Addendum
Step 1. Purchase M4 Fasteners
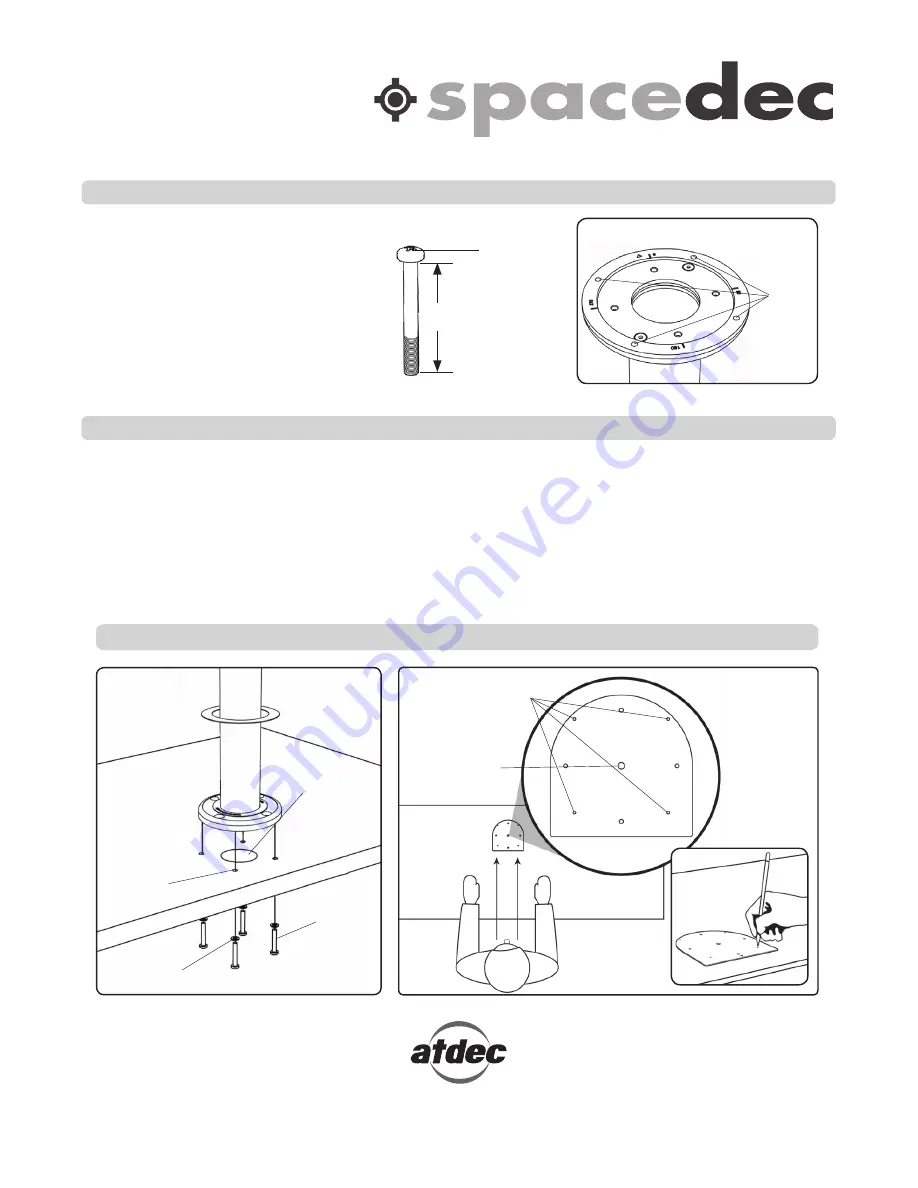
Using the M4 Security Holes, your POS
Multi can be secured from beneath the
work surface for greater security.
Determine the length of Screw
you require using the formula shown,
and purchase 4x M4 Screws and
Washers, with your chosen drive type.
Screw Length Formula
Security Holes
A.
Position the Installation Template in the desired location on your work surface. Ensure the straight edge sits
perpendicular with the User’s line of sight. Mark the center points of each of the Security Holes, and Cable Access
Hole onto the work surface with a pencil.
B.
Drill 4 x 5mm (0.18”) holes through the work surface
(Take care to drill perpendicular to the
work surface).
Use a 45mm (1.77”) hole saw to drill the Cable Access Hole in the work surface.
C.
Reposition POS Multi with the “Direction Arrow” pointing in the direction required for your chosen rotation.
(Refer to the Mounting Options in POS Multi Installation Instructions) Secure the POS to the Desktop using the
purchased M4 fasteners (x4).
Step 2. Locate and Secure your POS Multi
No portion of this document or any artwork contained herein should be reproduced in any way without the express written consent of Atdec Pty Ltd.
Due to continuing product development, the manufacturer reserves the right to alter specifications without notice. Published: 23.07.09 ©
NOTE: Return to POS Multi or Back-to-Back Installation Instructions to finish Installation
Work Surface
+
Washer
Thickness
+
5mm (0.18”)
Length =
M4
Thread
M4
Security
Holes
4 x Security Hole
Centre Point
Centre for
45mm (1.77”) Cable
Access Hole
Ø45mm(1.77”)
Cable Access
Hole
M4 Screws
NOT
Provided
M4 Washers
Ø5mm (0.18”)
Mounting
Holes (x4)
Drive Type
INSTALLATION
TEMPLATE
USER
Display | POS Multi
SD-POS-VBM
SD-POS-VBM-B2B
SD-POS-HA
SD-POS-HA-B2B


