K1, K3 series chillers
–
Installation and Operation manual
Issue 10.24
Page 8
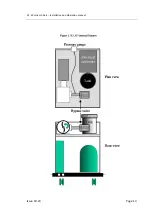
On the K3 Chiller the voltage selector switch can be found under the access port in the top
of the chiller, mounted on the rear of the electrical box. Access is gained by removing the
assess port to expose the selector switch. Always replace the port for normal
operation.
Having ensured that the system is correctly connected, with the inlets and outlets having the
correct orientation relative to your application, all joints tight and leak free, and with the
unit isolated from the electrical supply, prepare to fill the unit with Hexid fluid.
Hexid fluids are the preferred coolant choice as they provide excellent corrosion
protection, freeze protection, algae inhibition and good heat transfer properties.
Caution:
Always use ATC recommended fluids in your K series chiller. Never use other anti-
freeze mixtures, as they may corrode your application and will damage the K series pump
seals.
Filling procedure
1.
Check all valves are open, including solenoid valves located in your application.
2.
Remove the filler access door in the top cover, then remove cover from the tank
3.
Fill with Hexid to just below the rim of the tank neck.
4.
Switch the unit on.
5.
Wait while the fluid level drops in the tank.
6.
Switch the unit off.
7.
Repeat steps 3 to 5 until all the air has been purged from the system.
8.
Top up to 30mm below the rim of the tank neck to ensure the level switch is made.
9.
Check the system carefully for leaks, including the inside of your application. The
system is now ready to be run.
Warning:
Always isolate the chiller from the electrical supply when filling the tank.
Summary of Contents for K-Series
Page 2: ......
Page 16: ...K1 K3 series chillers Installation and Operation manual Issue 10 24 Page 14 ...
Page 21: ......


