background image

EN 3

CONTENTS

Your hob

Introduction 4

Description 5

Use

Control switch 

6

Pans  

7

Maintenance

Cleaning 8

Installation

What you need to consider 

9

Built-in dimensions 

10

Mounting 10

Technical details 

10

Wiring diagrams 

11

Environmental aspects

Disposal of packaging and appliance 

12

Summary of Contents for HE6011B

Page 1: ...Houd wanneer u contact opneemt met de serviceafdeling het complete typenummer bij de hand When contacting the service department have the complete type number to hand Adressen en telefoonnummers van...

Page 2: ...NL Handleiding NL 3 NL 12 EN Manual EN 3 EN 12 Gebruikte pictogrammen Pictograms used Belangrijk om te weten Important information Tip Tips NL BE IE GB...

Page 3: ...eschrijving 5 Gebruik Regelknop 6 Pannen 7 Onderhoud Reinigen 8 Installatie Waar u op moet letten 9 Inbouwmaten 10 zaagmaat nismaat 10 Montage 10 Technische gegevens 10 Elektrische aasluiting 11 Milie...

Page 4: ...el in gebruik neemt Lees eerst de gebruiksaanwijzing geheel en aandachtig door voordat u het apparaat gaat gebruiken en bewaar deze zorgvuldig voor latere raadpleging De handleiding dient bovendien al...

Page 5: ...eningsknop kookzone 145 mm rechtsachter 2 Bedieningsknop kookzone 180 mm linksachter 3 Bedieningsknop kookzone 180 mm linksvoor 4 Bedieningsknop kookzone 145 mm rechtsvoor 5 Kontrolelampjes kookzone s...

Page 6: ...en speciale roestwerende laag Als de kookplaat voor de eerste maal sterk verhit wordt zult u een schroeilucht waarnemen Dit is normaal Vocht op de kookelementen kan roest veroorzaken Regelknop De elek...

Page 7: ...3 mm De diameter van de panbodem moet de kookzone volledig bedekken De bodem van de koude pan moet enigszins naar binnen getrokken zijn want bij verhitting van de pan volgt uitzetting van de bodem en...

Page 8: ...ndelen met b v Vim Ata of Scotch Brite wel goed afnemen met schoon water De roestvrijstalen rand kunt u reinigen met een vloeibaar schuurmiddel Na het schoonmaken de zeepresten verwijderen vooral tuss...

Page 9: ...aat wordt ingebouwd moet vlak zijn De wanden en het werkblad rondom het toestel moeten minimaal tot 100 C hittebestendig zijn Schade ontstaan door verkeerd aansluiten verkeerd inbouwen of verkeerd geb...

Page 10: ...geplakt te worden Zet de kookplaat vast met behulp van de bijgeleverde klemmen Sluit het toestel aan op het elektriciteitsnet Het toestel is nu gebruiksklaar Controleer de werking Indien het toestel...

Page 11: ...re gelijkwaardige of betere kabels Aansluitschema s Aan de onderzijde van het toestel bevindt zich een etiket met daarop de aansluit schema s In geval van een 5 aderige kabel bij een 3 fasen aansluiti...

Page 12: ...ekruiste vuilnisbak aangebracht Dit betekent dat het apparaat aan het einde van zijn levensduur niet bij het gewone huisvuil mag worden gevoegd Het toestel moet naar een speciaal centrum voor gescheid...

Page 13: ...scription 5 Use Control switch 6 Pans 7 Maintenance Cleaning 8 Installation What you need to consider 9 Built in dimensions 10 Mounting 10 Technical details 10 Wiring diagrams 11 Environmental aspects...

Page 14: ...g the appliance and store these instructions in a safe place for future reference Read the separate safety instructions before using the device The manual also serves as reference material for service...

Page 15: ...Switch right rear zone 145 mm fast plate 2 Switch left rear zone 180 mm fast plate 3 Switch left front zone 145 mm fast plate 4 Switch right front zone 180 mm fast plate 5 Control light cooking zones...

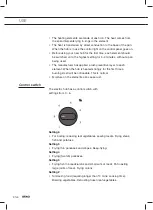
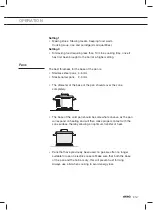
Page 16: ...e layer to each element When the hob is heated strongly for the first time a burning smell will be noticeable This is normal Moisture on the elements can cause rust Control switch The electric hob has...

Page 17: ...amel pans 2 3 mm The diameter of the base of the pan should cover the zone completely The base of the cold pan should be somewhat concave as the pan will expand on heating and will then make proper co...

Page 18: ...eel Stubborn residue can be treated with Vim Ata Scotch Brite etc rinse well with clean water The stainless steel edge can be cleaned with a liquid abrasive Remove any detergent left after cleaning es...

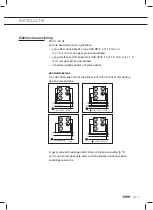
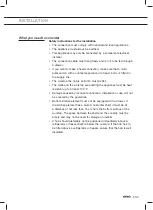
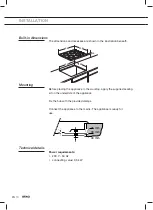
Page 19: ...he walls and the worktop surrounding the appliance must be heat resistant up to at least 100 C Damage caused by incorrect connection installation or use will not be covered by the guarantee Bottom kit...

Page 20: ...e appliance in the worktop apply the supplied sealing kit on the underside of the appliance Fix the hob with the provided clamps Connect the appliance to the mains The appliance is ready for use Techn...

Page 21: ...x1 5 with yellow green earthing cable or any other suitable cables There is a label showing the wiring diagrams on the underside of the appliance With a 5 wire cable and a 3 phase supply 3 1N AC the...

Page 22: ...ct is marked with the symbol of a crossed out wheeled dustbin This means that at the end of its working life the product must not be disposed of as urban waste It must be taken to a special local auth...

Reviews: