11
NT2508 / NT2504 / NT1308 / NT1304 / NT4004
English
Global Settings
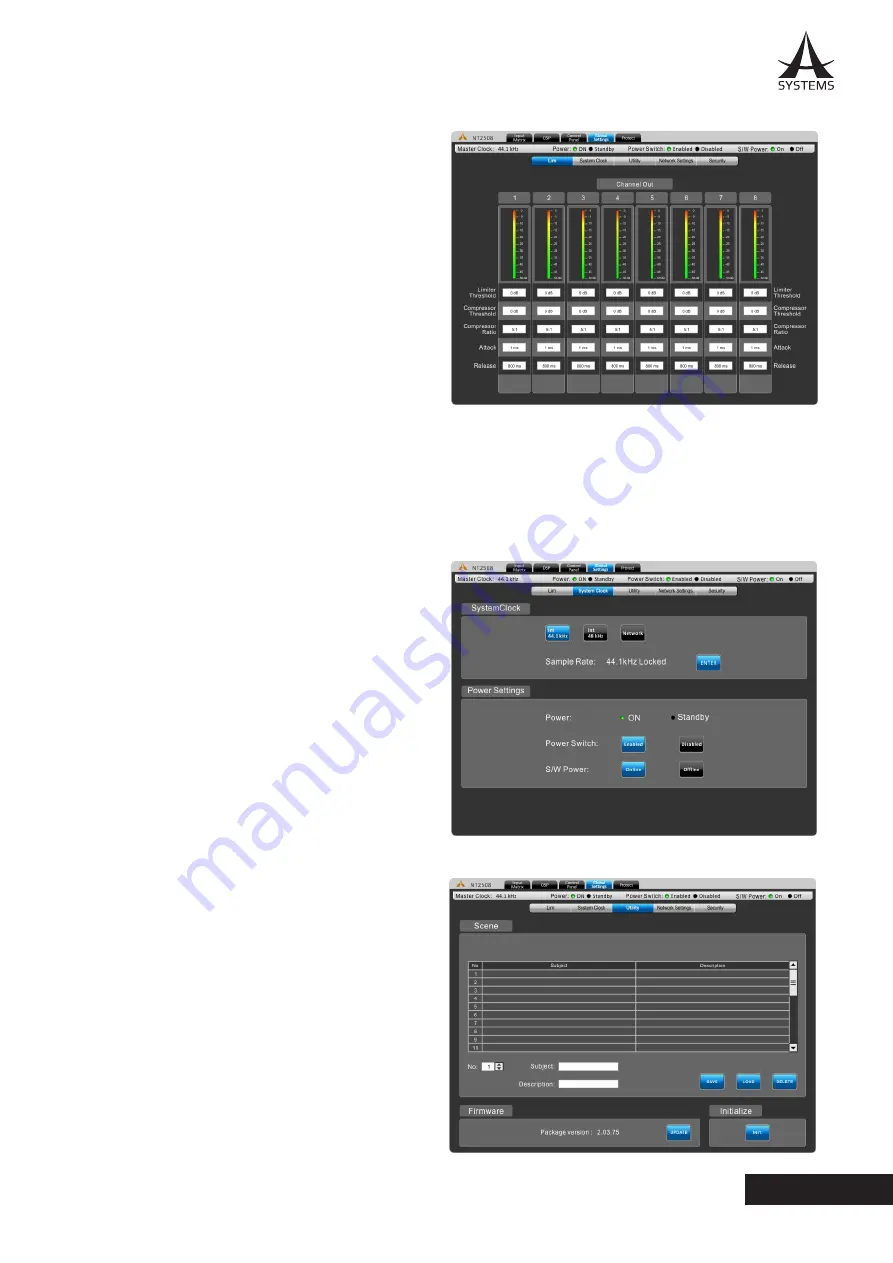
LIM - Limiter/Compressor Settings
This menu allows compressors and limiters to be applied to
channel outputs�
Limiter Threshold:
This control determines the threshold
for the limiter function� This means that no signal will surpass
the selected threshold, being ‘compressed’ at a ratio of
infinity:1.
Compressor Threshold:
Use this control to set the threshold
of the compressor function� Any signals that surpass the
selected threshold will be compressed at the selected ratio.
Compressor Ratio:
This control can be used to set
the ratio for the compressor. The ratio is expressed as
<input>:<output>.
Compressor Attack:
This control adjusts the attack time of the compressor, essentially determining the time taken for the
compressor to kick in after it passes the selected threshold�
Compressor Release:
The release control determines the time the NT will wait before disengaging the compressor when
the signal bypasses the selected threshold.
System Clock
System Clock:
This menu allows you to select a master
clock source for digital devices. Selecting 44.1 or 48 kHz
will set the NT as the master clock source and determine
the sampling rate. Selecting AES/EBU, Network, or Word
Clock will set these as the master clock� Whenever a
new clock source is selected, the ENTER button must be
pushed to confirm.
Power Settings:
There are three power settings on the NT�
The software power can be turned on and off, essentially
enabling the NT to be turned on and off via the software
– including event scheduling� The hardware power can
be selected on and off, essentially allow the unit to be
activated and deactivated using the hardwired switch on
the front of the NT�
Utility
All of the DSP processes can have their settings saved
for later use. While there are a number of factory presets
available, users are always encouraged to find their own
settings and save them for later use. The NT has onboard
storage for a number of settings to be saved, or users can
connect USB flash drives to save settings.
Also available in the Utility menu is a firmware update
button. When a new version of firmware is available it can
be installed using the “Update” button. Place the firmware
update file on a formatted USB flash drive and insert it into
a USB port. The “Update” button should take care of the
rest�
After the firmware is updated, the initialize button can
be selected to reset the device. Save any settings (or
“scenes”) before initializing the system.
Summary of Contents for NT1304
Page 19: ......
Page 20: ...18 NT2508 NT2504 NT1308 NT1304 NT4004 Español ...
Page 21: ...19 NT2508 NT2504 NT1308 NT1304 NT4004 Español ...
Page 22: ...20 NT2508 NT2504 NT1308 NT1304 NT4004 Español ...
Page 23: ...21 NT2508 NT2504 NT1308 NT1304 NT4004 Español ...
Page 24: ...22 NT2508 NT2504 NT1308 NT1304 NT4004 Español ...
Page 25: ...23 NT2508 NT2504 NT1308 NT1304 NT4004 Español ...
Page 26: ...24 NT2508 NT2504 NT1308 NT1304 NT4004 Español ...
Page 27: ...25 NT2508 NT2504 NT1308 NT1304 NT4004 Español ...
Page 28: ...26 NT2508 NT2504 NT1308 NT1304 NT4004 Español ...
Page 29: ...27 NT2508 NT2504 NT1308 NT1304 NT4004 Español ...
Page 30: ...28 NT2508 NT2504 NT1308 NT1304 NT4004 Español ...
Page 31: ...29 NT2508 NT2504 NT1308 NT1304 NT4004 Español ...
Page 32: ...30 NT2508 NT2504 NT1308 NT1304 NT4004 Español ...
Page 33: ...31 NT2508 NT2504 NT1308 NT1304 NT4004 Español ...
Page 34: ...32 NT2508 NT2504 NT1308 NT1304 NT4004 Español ...
Page 35: ...33 NT2508 NT2504 NT1308 NT1304 NT4004 Español ...
Page 37: ...35 NT2508 NT2504 NT1308 NT1304 NT4004 Español PARAMETROS ...
Page 38: ...www asystems sys com ...


