background image

33

Guida all’installazione rapida di ASUS Xonar DX

Italiano

1.2 

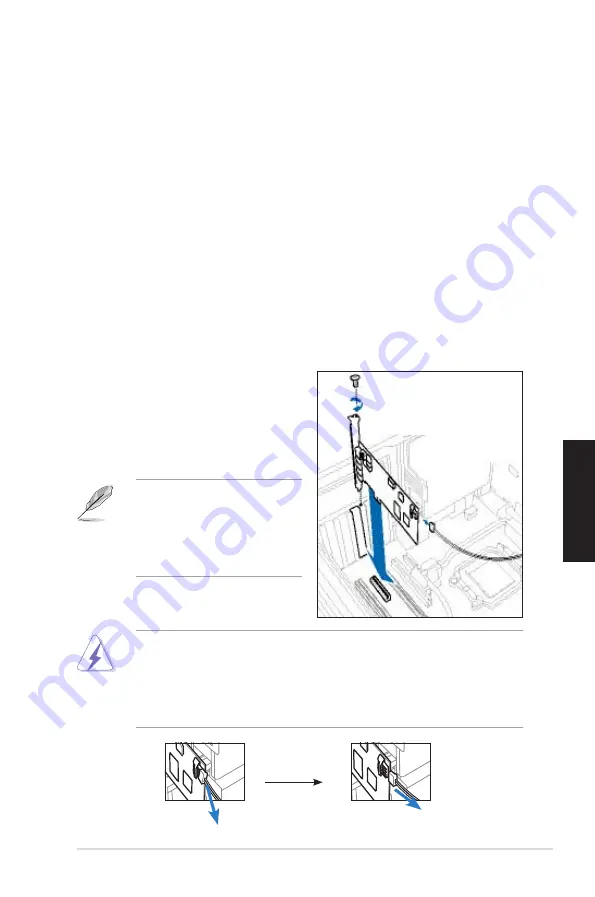
Installazione della scheda

Per installare la scheda audio Xonar DX:
.  Toccare la staffa metallica o i pannelli laterali del computer per scaricare 

l’elettricità statica.

.  Spegnere il computer, il monitor e tutte le altre periferiche collegate al computer.

3.  Scollegare il cavo d’alimentazione dal computer e dalla presa di corrente.

4.  Rimuovere la copertura del telaio.
5.  Individuale un alloggio PCIE vuoto sulla scheda madre.

6.  Collegare il cavo d’alimentazione dell’alimentatore al connettore 

d’alimentazione della scheda audio.

7.  Allineare ed inserire la scheda audio nell’alloggio PCIE finché è introdotta 

completamente. Assicurarsi che i contatti dorati della scheda siano inseriti 

completamente nell’alloggio.

8.  Fissare le viti che fissano la scheda audio. Fare riferimento all’immagine che 

segue per il rimando ai fori della staffa.

9.  Rimettere la copertura del telaio.
0.  Ricollegare tutti i cavi.

11.  Collegare il cavo d’alimentazione al 

computer ed alla presa di corrente.

.  Accendere il computer.

Quando si rimuove il cavo d’alimentazione dalla scheda audio Xonar DX, 

assicurarsi di estrarre prima il collettore a 4 pin, poi scollegarlo dal connettore 

d’alimentazione come mostrato nelle immagini che seguono. Non esercitare 

forza quando si rimuove il collettore dal connettore d’alimentazione, 

diversamente si può staccare il connettore d’alimentazione dalla scheda audio 

e causare danni!

3

3

La scheda PCI Express ad alta 

qualità richiede ulteriore corrente 

elettrica dal computer. Se il cavo 

d’alimentazione non è collegato 

n modo appropriato, la scheda 

audio non funzionerà.

Summary of Contents for XONAR DX

Page 1: ... ASUS Xonar DX Quick Installation Guide English Xonar DX PCI Express Audio Card Quick Installation Guide ...

Page 2: ... CPU or faster CPU 256 MB DRAM system memory 60 MB available HDD space for driver installation package CD ROM drive or DVD ROM drive for software installation High quality headphones powered analog speakers or digital speakers with Dolby Digital decoder to enjoy the Ultra High Fidelity sounds of the card Before the installation check your ASUS Xonar DX audio card package for the following items AS...

Page 3: ...ake sure the goldfingers are properly inserted to the slot 8 Secure the bracket screw that holds the audio card in place Refer to the picture below for the bracket screw hole 9 Put back the chassis cover 10 Reconnect all cables 11 Plug the power cord to the computer and to a power outlet 12 Power ON the computer The PCI Express high quality audio card requires additional power from your computer I...

Page 4: ...l drive If autorun is enabled the ASUS Xonar Card Driver screen appears automatically Go to step 5 If Autorun is not enabled in your computer perform step 3 3 Click My Computer on your desktop and double click the optical drive icon 4 Double click the setup exe icon located on the optical drive 5 Follow the on screen instructions to complete the installation Read the END USER LICENSE AGREEMENT in ...

Page 5: ... DX Quick Installation Guide English 1 4 Connecting audio device 1 4 2 Connecting analog speakers 2 Speakers 1 4 1 Back ports Front Out Side Surround Center Subwoofer Back Surround Line Mic In SPDIF Out Front Out ...

Page 6: ... ASUS Xonar DX Quick Installation Guide English 4 Speakers 2 1 Speakers Front Out Front Out Side Surround ...

Page 7: ... ASUS Xonar DX Quick Installation Guide English 5 1 Speakers 4 1 Speakers Front Out Side Surround Front Out Side Surround Center Subwoofer ...

Page 8: ... ASUS Xonar DX Quick Installation Guide English 7 1 Speakers 6 1 Speakers Front Out Side Surround Center Subwoofer Back Surround Front Out Side Surround Center Subwoofer Back Surround ...

Page 9: ... 3 Connecting digital speakers SPDIF Out Plug the optical TOSLINK adaptor into the S PDIF Out port Then connect your decoder s S PDIF in port to the optical adaptor with the TOSLINK optical cable 1 4 4 Connecting Line In audio sources SPDIF Out Line In ...

Page 10: ...10 ASUS Xonar DX Quick Installation Guide English 1 4 5 Connecting headphone microphone ...

Page 11: ...11 ASUS Xonar DX Guide d installation rapide Français Xonar DX Carte son PCI Express Guide d installation rapide ...

Page 12: ...256 Mo Plus de 60 Mo d espace disque disponible pour l installation des pilotes Un lecteur de CD ROM ou DVD ROM pour l installation des logiciels Des écouteurs de haute qualité des haut parleurs analogiques ou numériques intégrant un décodeur Dolby Digital pour profiter pleinement de la qualité audio délivrée par la carte son Avant l installation vérifiez que la boîte de votre carte son ASUS Xonar...

Page 13: ...ien en place Assurez vous que les connecteurs dorés sont correctement insérés dans le slot 8 Sécurisez la carte son au châssis à l aide d une vis Référez vous à l illustration ci dessous pour localiser le pas de vis 8 Replacez le panneau latéral du châssis 9 Reconnectez tous les câbles 10 Branchez une extrémité du cordon d alimentation au bloc d alimentation de votre ordinateur puis l autre extrém...

Page 14: ... son ASUS Xonar DX dans votre lecteur optique Si l Exécution automatique est activée l écran d installation du pilote ASUS Xonar Card Driver apparaît automatiquement Passez directement à l étape 5 Si l Exécution automatique n est pas activée sur votre PC passez à l étape 3 3 Cliquez sur Poste de travail et double cliquez sur l icône de votre lecteur optique 4 Double cliquez sur l icône setup exe d...

Page 15: ...hérique audio 1 4 2 Connecter des haut parleurs analogiques Configuration à 2 haut parleurs 1 4 1 Ports arrières Sortie avant Haut parleur Surround latérale Haut parleur central caisson de basses Haut parleur Surround arrière Entrée audio Entrée micro Sortie SPDIF Sortie avant ...

Page 16: ...16 ASUS Xonar DX Guide d installation rapide Français Configuration à 4 haut parleurs Configuration 2 1 Sortie avant Sortie avant Haut parleur Surround latérale ...

Page 17: ... Xonar DX Guide d installation rapide Français Configuration 5 1 Configuration 4 1 Sortie avant Haut parleur Surround latérale Sortie avant Haut parleur Surround latérale Haut parleur central caisson de basses ...

Page 18: ... rapide Français Configuration 7 1 Configuration 6 1 Sortie avant Haut parleur Surround latérale Haut parleur central caisson de basses Haut parleur Surround arrière Sortie avant Haut parleur Surround latérale Haut parleur Surround arrière ...

Page 19: ...ut parleurs numériques Sortie SPDIF Branchez l adaptateur TOSLINK optique sur le connecteur S PDIF Out Puis connectez le port d entrée S PDIF de votre lecteur MD CD DVD à l adaptateur optique du câble TOSLINK 1 4 4 Connexion de sources audio entrantes Sortie SPDIF Entrée audio ...

Page 20: ...20 ASUS Xonar DX Guide d installation rapide Français 1 4 5 Connexion d un casque microphone ...

Page 21: ...21 ASUS Xonar DX Schnellinstallationsanleitung Deutsch Xonar DX PCI Express Audio Karte Schnellinstallationsanleitung ...

Page 22: ...Prozessor oder höher 256 MB DRAM Systemspeicher 60 MB freier Festplattenspeicherplatz für die Treiberinstallationspack CD DVD ROM Laufwerk für Software Installation Hochqualitative Kopfhörer aktive Analoglautsprecher oder digitale Lautsprecher mit Dolby Digital Dekoder um den Ultra HiFi Sound dieser Karte zu erleben Vor der Installation überprüfen Sie Ihre ASUS Xonar DX Audio Kartenverpackung auf ...

Page 23: ...ewissern Sie sich dass die Goldkontakte richtig im Steckplatz stecken 8 Sichern Sie die Karte mit einer Schraube siehe rechte Abbildung 9 Schließen Sie die Gehäusabdeckung 10 Schließen Sie alle Kabel wieder an 11 Stecken Sie das Netzkabel wieder in die Steckdose und in den Computer 12 Schalten Sie den Computer ein Die PCI Express High Quality Adio Karte benötigt eine zusätzliche Stromversorgung vo...

Page 24: ...Fenster für die ASUS Xonar Kartentreiber automatisch und Sie können mit Schritt 5 fortfahren Wenn Autorun nicht aktiviert ist fahren Sie mit Schritt 3 fort 3 Klicken Sie auf Ihrem Bildschirm auf Arbeitsplatz und doppelklicken Sie auf das Symbol Ihres optischen Laufwerks 4 Doppelklicken Sie auf das Symbol setup exe welches Sie auf der CD finden 5 Folgen Sie den Bildschirmanweisungen um die Installa...

Page 25: ...eitung Deutsch 1 4 Audio Gerät anschließen 1 4 2 Analoge Lautsprecher anschließen 2 Lautsprecher 1 4 1 Rückseitige Anschlüsse Front Ausgang Surround seitlich Mitte Subwoofer Surround hinten Line In Mikrofoneingang SPDIF Ausgang Front Ausgang ...

Page 26: ...26 ASUS Xonar DX Schnellinstallationsanleitung Deutsch 4 Lautsprecher 2 1 Lautsprecher Front Ausgang Front Ausgang Surround seitlich ...

Page 27: ...27 ASUS Xonar DX Schnellinstallationsanleitung Deutsch 5 1 Lautsprecher 4 1 Lautsprecher Front Ausgang Surround seitlich Front Ausgang Surround seitlich Mitte Subwoofer ...

Page 28: ... Xonar DX Schnellinstallationsanleitung Deutsch 7 1 Lautsprecher 6 1 Lautsprecher Front Ausgang Surround seitlich Mitte Subwoofer Surround hinten Front Ausgang Surround seitlich Mitte Subwoofer Surround hinten ...

Page 29: ...le Lautsprecher anschließen SPDIF Ausgang Stecken Sie den optischen TOSLINK Adapter in den S PDIF Ausgang Verbinden Sie dann den S PDIF Eingang Ihres Decoders mit dem TOSLINK Kabel mit dem optischen Adapter 1 4 4 Line In Audio Quellen anschließen SPDIF Ausgang Line In ...

Page 30: ...30 ASUS Xonar DX Schnellinstallationsanleitung Deutsch 1 4 5 Anschluß von Kopfhörern Mikrofon ...

Page 31: ...31 Guida all installazione rapida di ASUS Xonar DX Italiano Xonar DX Scheda Audio PCI Express Guida all installazione rapida ...

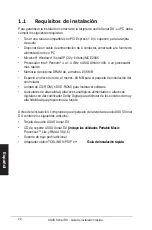
Page 32: ...CPU o CPU più potente 256 MB di memoria di sistema DRAM 60 MB di spazio disponibile su HDD per l installazione del pacchetto driver Unità CD ROM o DVD ROM per l installazione del driver Cuffie di alta qualità con altoparlanti analogici o digitali e decodificatore Dolby Digital per un ottima riproduzione del suono Prima dell installazione controllare che la confezione della scheda audioASUS Xonar D...

Page 33: ... della scheda siano inseriti completamente nell alloggio 8 Fissare le viti che fissano la scheda audio Fare riferimento all immagine che segue per il rimando ai fori della staffa 9 Rimettere la copertura del telaio 10 Ricollegare tutti i cavi 11 Collegare il cavo d alimentazione al computer ed alla presa di corrente 12 Accendere il computer Quando si rimuove il cavo d alimentazione dalla scheda au...

Page 34: ... ottica Se la funzione d esecuzione automatica è abilitata la schermata ASUS Xonar Card Driver appare automaticamente Andare al punto 5 Se sul computer non è attivata la funzione d esecuzione automatica eseguire le istruzioni del punto 3 3 Fare doppio clic sull icona del desktop Risorse del Computer e fare doppio clic sull icona dell unità ottica 4 Fare doppio clic sull icona setup exe dell unità ...

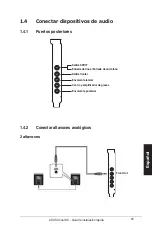
Page 35: ...ano 1 4 Connessione dei Dispositivi Audio 1 4 2 Connessione degli Altoparlanti Analogici 2 Casse 1 4 1 Porte Posteriori Uscita frontale Surround laterale Centrale e Subwoofer Surround posteriore Ingresso linea Ingresso microfono Uscita SPDIF Uscita frontale ...

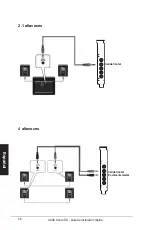
Page 36: ...36 Guida all installazione rapida di ASUS Xonar DX Italiano 4 Casse 2 1 Casse Uscita frontale Uscita frontale Surround laterale ...

Page 37: ...37 Guida all installazione rapida di ASUS Xonar DX Italiano 5 1 Casse 4 1 Casse Uscita frontale Surround laterale Uscita frontale Surround laterale Centrale e Subwoofer ...

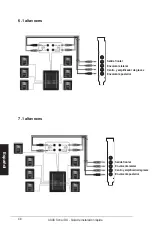
Page 38: ...nstallazione rapida di ASUS Xonar DX Italiano 7 1 Casse 6 1 Casse Uscita frontale Surround laterale Centrale e Subwoofer Surround posteriore Uscita frontale Surround laterale Centrale e Subwoofer Surround posteriore ...

Page 39: ...i Altoparlanti Digitali Uscita SPDIF Collegare l adattatore ottico TOSLINK alla porta uscita S PDIF Poi collegare la porta ingresso S PDIF del decodificatore all adattatore ottico usando un cavo ottico TOSLINK 1 4 4 Connessione delle Sorgenti Audio Line In Uscita SPDIF Ingresso linea ...

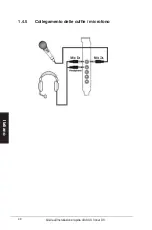
Page 40: ...40 Guida all installazione rapida di ASUS Xonar DX Italiano 1 4 5 Collegamento delle cuffie microfono ...

Page 41: ...41 ASUS Xonar DX Guía de instalación rápida Español Xonar DX Tarjeta de audio PCI Express Guía de instalación rápida ...

Page 42: ...moria de sistema DRAM de al menos 256 MB Espacio en disco duro de al menos 60 MB para el paquete de instalación del controlador Unidad de CD ROM o DVD ROM para instalar el software Auriculares de alta calidad altavoces analógicos alimentados o altavoces digitales con descodificador Dolby Digital para disfrutar de los sonidos de muy alta fidelidad que proporciona la tarjeta Antes de la instalación ...

Page 43: ...te asentados en la ranura 8 Asegure el tornillo del soporte que sujeta la tarjeta de audio en su lugar Consulte la imagen siguiente para ver la ubicación del orificio del tornillo del soporte 9 Vuelva a colocar la tapa del chasis 10 Conecte de nuevo todos los cables 11 Enchufe el cable de alimentación a su PC y a una toma de corriente eléctrica 12 ENCIENDA el equipo La tarjeta de audio de alta cal...

Page 44: ... de ejecución automática está habilitada aparecerá automáticamente la pantalla del controlador de la tarjeta ASUS Xonar Siga con el paso 5 Si la función de ejecución automática no está habilitada en el equipo continúe con el paso 3 3 Haga clic en Mi PC en el escritorio y a continuación doble clic en el icono de la unidad óptica 4 Haga doble clic en el icono setup exe ubicado en la unidad óptica 5 ...

Page 45: ... 4 Conectar dispositivos de audio 1 4 2 Conectar altavoces analógicos 2 altavoces 1 4 1 Puertos posteriores Salida frontal Envolvente lateral Centro y amplificador de graves Envolvente posterior Entrada de línea Entrada de micrófono Salida SPDIF Front Out ...

Page 46: ...46 ASUS Xonar DX Guía de instalación rápida Español 4 altavoces 2 1 altavoces Salida frontal Salida frontal Envolvente lateral ...

Page 47: ...47 ASUS Xonar DX Guía de instalación rápida Español 5 1 altavoces 4 1 altavoces Salida frontal Envolvente lateral Salida frontal Envolvente lateral Centro y amplificador de graves ...

Page 48: ...nstalación rápida Español 7 1 altavoces 6 1 altavoces Salida frontal Envolvente lateral Centro y amplificador de graves Envolvente posterior Salida frontal Envolvente lateral Centro y amplificador de graves Envolvente posterior ...

Page 49: ...s Salida SPDIF Enchufe el adaptador TOSLINK óptico en el puerto de Salida S PDIF A continuación conecte el puerto de entrada S PDIF del descodificador al adaptador óptico con el cable óptico TOSLINK 1 4 4 Conectar las fuentes de audio a la Entrada de línea Salida SPDIF Entrada de línea ...

Page 50: ...50 ASUS Xonar DX Guía de instalación rápida Español 1 4 5 Conectar los auriculares y el micrófono ...

Page 51: ...51 Guia de instalação da placa de áudio Xonar DX da ASUS Português Xonar DX Placa de áudio PCI Express Guia de instalação rápida ...

Page 52: ...ma 256 MB de memória DRAM 60 MB de espaço disponível no disco rígido para instalação do controlador Unidade de CD ROM ou de DVD ROM para instalação do software Auscultadores de alta qualidade altifalantes analógicos ou digitais com descodificadores Dolby Digital para poder desfrutar de um som de ultra alta fidelidade Antes da instalação verifique se os itens seguintes constam da embalagem da placa...

Page 53: ...a Certifique se de que os módulos do tipo gold fingers são devidamente introduzidos na ranhura 8 Aperte o parafuso do suporte da placa de áudio para que esta fique devidamente posicionada Consulte a imagem seguinte para saber onde fica o orifício do parafuso do suporte da placa 9 Reponha a tampa do computador 10 Volte a ligar todos os cabos 11 Ligue o cabo de alimentação ao computador e à tomada e...

Page 54: ...Controlador da placa Xonar da ASUS é apresentado automaticamente Passe para a etapa 5 Se o modo de execução automática não estiver activado no computador execute o procedimento descrito na etapa 3 3 Clique sobre o ícone O meu computador existente no ambiente de trabalho e faça um duplo clique sobre o ícone da unidade óptica 4 Faça um duplo clique sobre o ícone do ficheiro setup exe na unidade ópti...

Page 55: ...4 Ligação do dispositivo de áudio 1 4 2 Ligação dos altifalantes analógicos Altifalantes de canal 2 1 4 1 Portas traseiras Saída frontal Som envolvente Central e altifalante de graves Som envolvente traseiro Entrada de linha Entrada do microfone Saída SPDIF Saída frontal ...

Page 56: ...56 Guia de instalação da placa de áudio Xonar DX da ASUS Português Altifalantes de canal 4 Altifalantes de canal 2 1 Saída frontal Saída frontal Som envolvente ...

Page 57: ...Guia de instalação da placa de áudio Xonar DX da ASUS Português Altifalantes de canal 5 1 Altifalantes de canal 4 1 Saída frontal Som envolvente Saída frontal Som envolvente Central e altifalante de graves ...

Page 58: ...ar DX da ASUS Português Altifalantes de canal 7 1 Altifalantes de canal 6 1 Saída frontal Som envolvente Central e altifalante de graves Som envolvente traseiro Saída frontal Som envolvente Central e altifalante de graves Som envolvente traseiro ...

Page 59: ...ão dos altifalantes digitais Saída SPDIF Ligue o adaptador óptico TOSLINK a porta de saída S PDIF Depois faça a ligação entre a porta de entrada S PDIF e o adaptador óptico utilizando o cabo óptico TOSLINK 1 4 4 Ligação das origens de entrada de áudio Saída SPDIF Entrada de linha ...

Page 60: ...60 Guia de instalação da placa de áudio Xonar DX da ASUS Português 1 4 5 Ligação dos auscultadores do microfone ...

Page 61: ...61 ASUS Xonar DX руководство по установке Русский Xonar DX PCI Express аудиокарта Руководство по установке ...

Page 62: ... или AMD K7 1400 или более быстрый Память более 256 Мб Более 60 Мб свободного дискового пространства для установки драйверов CD ROM DVD ROM привод для установки программного обеспечения Высококачественные наушники мощные аналоговые колонки или цифровые колонки с декодером Dolby Digital для прослушивания звука Перед установкой проверьте комплектность ASUS Xonar D2 Аудиокарта ASUS Xonar DX Компакт д...

Page 63: ...емом и надавите пока карта не встанет на место Убедитесь что карта надежно вставлена в слот 8 Закрутите винт крепящий аудиокарту Xonar D2 Для нахождения отверстия винта обратитесь к рисунку внизу 9 Закройте крышку корпуса 10 Подключите все кабели 11 Подключите шнур питания к компьютеру и розетке 12 Включите компьютер PCI Express аудиокарте требуется дополнительное питание Если кабель питания не по...

Page 64: ...еский привод Если автозапуск включен автоматически появится экран ASUS Xonar Card Driver Перейдите к шагу 5 Если автозапуск отключен на вашем компьютере выполните шаг 3 3 На рабочем столе щелкните My Computer и дважды щелкните на иконке оптического привода 4 Дважды щелкните на файле setup exe на компакт диске 5 Следуйте инструкциям на экране для завершения установки В процессе установки прочитайте...

Page 65: ...о установке Русский 1 4 Подключение аудиоустройств 1 4 2 Подключение аналоговых колонок 2 колонки 1 4 1 Порты Передние каналы Боковые каналы Центральный канал сабвуфер Задние каналы Линейный вход Mикрофон Выход SPDIF Передние каналы ...

Page 66: ...66 ASUS Xonar DX руководство по установке Русский 4 колонки 2 1 колонки Передние каналы Передние каналы Боковые каналы ...

Page 67: ...67 ASUS Xonar DX руководство по установке Русский 5 1 колонок 4 1 колонки Передние каналы Боковые каналы Передние каналы Боковые каналы Центральный канал сабвуфер ...

Page 68: ...Xonar DX руководство по установке Русский 7 1 колонок 6 1 колонок Передние каналы Боковые каналы Центральный канал сабвуфер Задние каналы Передние каналы Боковые каналы Центральный канал сабвуфер Задние каналы ...

Page 69: ...фровых колонок SPDIF Out Подключите оптический адаптер TOSLINK к разъему S PDIF Out Затем подключите разъем S PDIF In вашего декодера к оптическому адаптеру TOSLINK с помощью оптического кабеля 1 4 4 Подключение источника звука к линейному входу Выход SPDIF Линейный вход ...

Page 70: ...70 ASUS Xonar DX руководство по установке Русский 1 4 5 Подключение наушников микрофона ...

Page 71: ...Xonar DX PCI Express zvučna kar tica Vodič za brzu instalaciju ...

Page 72: ...M memorije sustava 60 MB dostupnog prostora tvrdog diska za instalaciju paketa upravljačkih programa CD ROM pogon ili DVD ROM pogon za instalaciju softvera Visokokvalitetne slušalice analogni zvučnici s napajanjem ili digitalni zvučnici s Dolby Digital dekoderom za uživanje u zvucima kartice ultra visoke vjernosti 1 2 Sadržaj pakiranja Provjerite sadrži li pakiranje ASUS Xonar DX zvučne kartice sl...

Page 73: ...i budu ispravno umetnuti u utor 8 Pričvrstite vijak nosača kojim je pričvršćena zvučna kartica Na sljedećoj slici pogledajte gdje se nalazi otvor za vijak nosača 9 Vratite poklopac kućišta 10 Ponovno spojite sve kabele 11 Priključite kabel napajanja u računalo i u električnu utičnicu 12 Uključite računalo PCI Express visokokvalitetna zvučna kartica traži dodatno napajanje s računala Ako kabel napa...

Page 74: ... Ako je automatsko pokretanje omogućeno zaslon ASUS Xonar Card Driver upravljački program ASUS Xonar kartice pojavit će se automatski Idite na korak 5 Ako automatsko pokretanje nije omogućeno na računalu provedite korak 3 3 Kliknite My Computer Moje računalo na radnoj površini i dvaput kliknite ikonu optičkog diska 4 Dvaput kliknite ikonu setup exe koja se nalazi na optičkom pogonu 5 Slijedite upu...

Page 75: ...a brzu instalaciju Hrvatski 1 4 Spajanje uređaja za zvuk 1 4 2 Spajanje analognih zvučnika 2 zvučnika 1 4 1 Priključci na stražnjoj strani Front Out Side Surround Center Subwoofer Back Surround Line Mic In SPDIF Out Front Out ...

Page 76: ...76 ASUS Xonar DX Vodič za brzu instalaciju Hrvatski 4 zvučnika 2 1 zvučnika Front Out Front Out Side Surround ...

Page 77: ...77 ASUS Xonar DX Vodič za brzu instalaciju Hrvatski 5 1 zvučnika 4 1 zvučnika Front Out Side Surround Front Out Side Surround Center Subwoofer ...

Page 78: ...78 ASUS Xonar DX Vodič za brzu instalaciju Hrvatski 7 1 zvučnika 6 1 zvučnika Front Out Side Surround Center Subwoofer Back Surround Front Out Side Surround Center Subwoofer Back Surround ...

Page 79: ...je digitalnih zvučnika SPDIF izlaz Priključite optički TOSLINK adapter u priključak S PDIF izlaza Zatim spojite priključak S PDIF ulaza dekodera na optički adapter pomoću TOSLINK optičkog kabela 1 4 4 Spajanje izvora zvuka na Line In linijski ulaz SPDIF Out Line In ...

Page 80: ...80 ASUS Xonar DX Vodič za brzu instalaciju Hrvatski 1 4 5 Spajanje slušalica mikrofona ...

Reviews: