background image

6

•  Before installing the ThunderboltEX II card in your motherboard, ensure 

that you have an available PCIE 2.0 x16 slot connected to the platform 

controller hub (PCH). For more information on the correct PCIE 2.0 

slot to use, refer to the section 

ThunderboltEX II card recommended 

configuration

 of this user guide.

•  The following illustrations are for reference only. The motherboard layout 

may vary with models, but the installation steps remain the same.

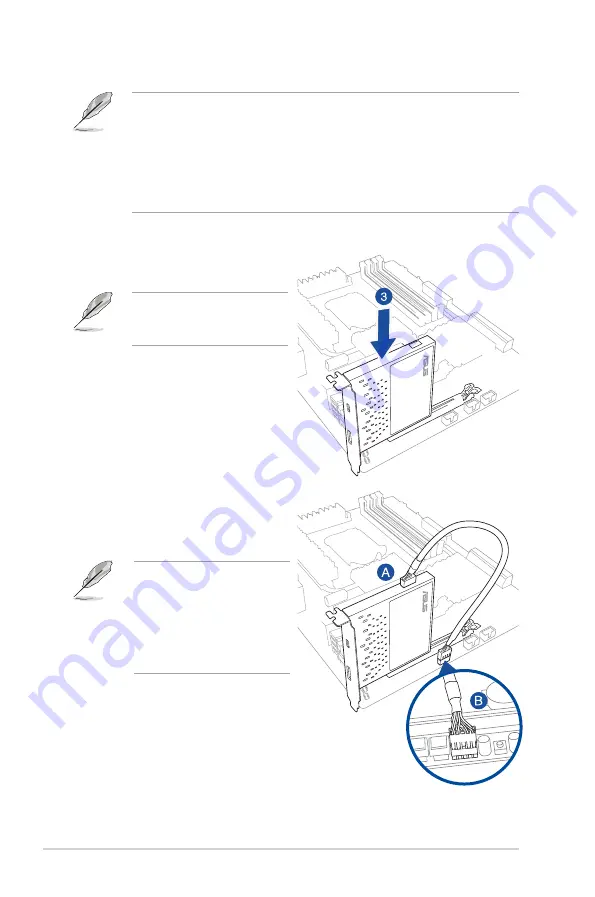
Installing the ThunderboltEX II card

To install the ThunderboltEX II card:

Ensure that no cables or 

peripherals are blocking the 

PCIE 2.0 slot.

When the red LED on the 

ThunderboltEX II card is on, 

it indicates that a cable is 

disconnected. Refer to the 

section 

ThunderboltEX II card 

layout 

of this user guide for the 

location of the LED indicator. 

1. 

Shut down your PC. 

2. 

Open the chassis.

3. 

Align and insert the ThunderboltEX 

II card into a PCIE 2.0 slot until it is 

securely seated in place.

4. 

Connect the ASUS TB_Header cable 

to the ThunderboltEX II card (A) 

and to the TB_Header port on the 

motherboard (B).

Summary of Contents for ThunderboltEX II

Page 1: ...ThunderboltEX II 15060 35300000 User Guide ...

Page 2: ...ness loss of use or data interruption of business and the like even if ASUS has been advised of the possibility of such damages arising from any defect or error in this manual or product Specifications and information contained in this manual ae furnished for informational use only and are subject to change at any time without notice and should not be construed as a commitment by ASUS ASUS assumes...

Page 3: ...ratulations and thank you for buying an ASUS ThunderboltEX II card The ASUS ThunderboltEX II card provides Thunderbolt connection to other Thunderbolt enabled devices Use this card to quickly transfer native PCIe and DisplayPort protocols between a PC and Thunderbolt devices Features Your ASUS ThunderboltEX II card features a Thunderbolt 2 port that supports Thunderbolt 2 technology and a DisplayP...

Page 4: ...x DisplayPort cable 1 x mini DisplayPort cable 1 x ASUS TB_Header cable 1 x Support CD Provides link from the motherboard s DisplayPort or mini DisplayPort to the DisplayPort 1 2 IN port on the ThunderboltEX II card Use the bundled DisplayPort or mini DIsplayPort cable depending on the available DisplayPort connector on your motherboard Provides link from TB_Header of the motherboard to the Thunde...

Page 5: ...dicator TB_Header To install the driver place the Support DVD into the optical drive then follow on screen instructions to finish the installation Installing the ThunderboltEX II driver We highly recommend that you install the Thunderbolt 2 driver first before installing the ThunderboltEX II card ...

Page 6: ...on steps remain the same Installing the ThunderboltEX II card To install the ThunderboltEX II card Ensure that no cables or peripherals are blocking the PCIE 2 0 slot When the red LED on the ThunderboltEX II card is on it indicates that a cable is disconnected Refer to the section ThunderboltEX II card layout of this user guide for the location of the LED indicator 1 Shut down your PC 2 Open the c...

Page 7: ...ce to the Thunderbolt 2 port on the ThunderboltEX II card The Thunderbolt cable is not bundled with the ThunderboltEX II package Use the Thunderbolt cable that came with your Thunderbolt enabled device when connecting to the Thunderbolt 2 port on your ThunderboltEX II card The Thunderbolt 2 port of the ThunderboltEX II card is backward compatible with the previous Thunderbolt technology For the re...

Page 8: ...PCIe 2 0 x16_3 Dark Brown D M x2 mode 10 Gb s 1702 or later Z87 A NFC EXPRESS EDITION PCIe 2 0 x16_3 Dark Brown D M x2 mode 10 Gb s 1702 or later Update the BIOS of your motherboard and the VGA driver to the latest version Go to www asus com for more information Set the mode of your motherboard s PCIe 2 0 x16_3 from x1 to x4 to maximize the performance of your ThunderboltEX II card When you adjust...

Page 9: ...nal devices Before connecting any Thunderbolt enabled devices in a daisy chain configuration ensure that it is equipped with one Thunderbolt IN port and one Thunderbolt OUT port Six Thunderbolt devices Six Thunderbolt devices three DisplayPort 1 2 displays Five Thunderbolt devices one native Thunderbolt monitor ...

Page 10: ...om that to which the receiver is connected Consult the dealer or an experienced radio TV technician for help The use of shielded cables for connection of the monitor to the graphics card is required to assure compliance with FCC regulations Changes or modifications to this unit not expressly approved by the party responsible for compliance could void the user s authority to operate this equipment ...

Page 11: ...This product has been designed to enable proper reuse of parts and recycling This symbol of the crossed out wheeled bin indicates that the product electrical and electronic equipment should not be placed in municipal waste Check local regulations for disposal of electronic products DO NOT throw the mercury containing button cell battery in municipal waste This symbol of the crossed out wheeled bin...

Page 12: ...ica Address 800 Corporate Way Fremont CA 94539 USA Telephone 1 510 739 3777 Fax 1 510 608 4555 Web site http usa asus com Technical Support Telephone 1 812 284 0883 Support fax 1 812 282 2787 Online support http support asus com techserv techserv aspx ASUS COMPUTER GmbH Germany and Austria Address Harkort Str 21 23 40880 Ratingen Germany Fax 49 2102 959931 Web site http www asus com de Online cont...

Page 13: ...24 V1 5 1 2010 09 EN 302 326 2 V1 2 2 2007 06 EN 302 326 3 V1 3 1 2007 09 EN 301 357 2 V1 4 1 2008 11 EN 302 291 1 V1 1 1 2005 07 EN 302 291 2 V1 1 1 2005 07 2006 95 EC LVD Directive EN 60950 1 A12 2011 EN 60065 2002 A12 2011 2009 125 EC ErP Directive Regulation EC No 1275 2008 Regulation EC No 642 2009 Regulation EC No 278 2009 Regulation EC No 617 2013 2011 65 EU RoHS Directive Ver 130816 CE mar...

Page 14: ......

Reviews: