


32
Notebook PC E-Manual
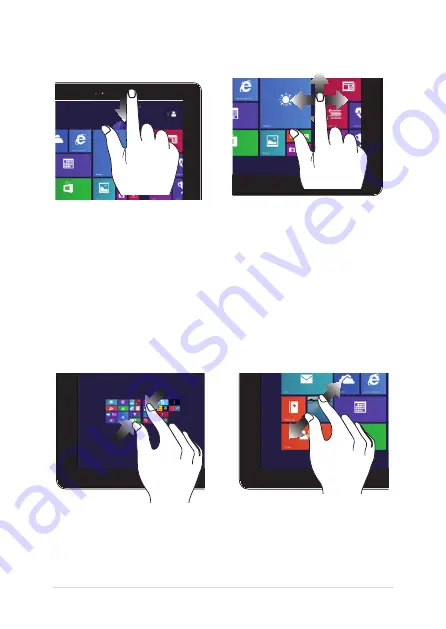
Top edge swipe
Finger slide
•
In the Start screen, swipe
from the top edge of
the screen to view the
Customize
bar.
•
In a running app, swipe from
the top edge of the screen to
view its menu.
Slide your finger to scroll up and
down and slide your finger to
pan the screen left or right.
Zoom out
Zoom in
Bring together your two fingers on
the touch panel.
Spread apart your two fingers
on the touch panel.
Summary of Contents for R751J
Page 1: ...Notebook PC E Manual First Edition July 2014 E9330 ...
Page 13: ...Notebook PC E Manual 13 Chapter 1 Hardware Setup ...
Page 27: ...Notebook PC E Manual 27 Chapter 2 Using your Notebook PC ...
Page 30: ...30 Notebook PC E Manual Lift to open the display panel Press the power button ...
Page 49: ...Notebook PC E Manual 49 Chapter 3 Working with Windows 8 1 ...
Page 79: ...Notebook PC E Manual 79 Chapter 4 Power On Self Test POST ...
Page 95: ...Notebook PC E Manual 95 Chapter 5 Upgrading your Notebook PC ...
Page 98: ...98 Notebook PC E Manual C Remove the screws securing the HDD bay to the compartment HDD bay ...
Page 100: ...100 Notebook PC E Manual E Use the flap on the HDD bay to pull it out of the compartment flap ...
Page 104: ...104 Notebook PC E Manual J Secure the HDD bay with the screws you removed earlier ...
Page 114: ...114 Notebook PC E Manual ...
Page 115: ...Notebook PC E Manual 115 Tips and FAQs ...
Page 122: ...122 Notebook PC E Manual ...
Page 123: ...Notebook PC E Manual 123 Appendices ...
Page 141: ...Notebook PC E Manual 141 German Greek Italian Portuguese Spanish Swedish ...
Page 145: ...Notebook PC E Manual 145 ...