background image

ESP

AÑOL

5

S

Instalar el soporte (suministrado)

¡PRECAUCIÓN!

•  Desconecte todos los cables del monitor.
•  Apriete firmemente los tornillos de fijación (suministrados) 

con la llave Allen (suministrada).

•  Asegúrese de que dispone de suficiente espacio para 

trabajar.

n

Unir el soporte

Retire todos los materiales de embalaje antes de comenzar a 
trabajar.
Para que la base del soporte no estropee la mesa (etc.), 
extienda un tejido grueso y suave (manta, etc.) y trabaje sobre 
el tejido.

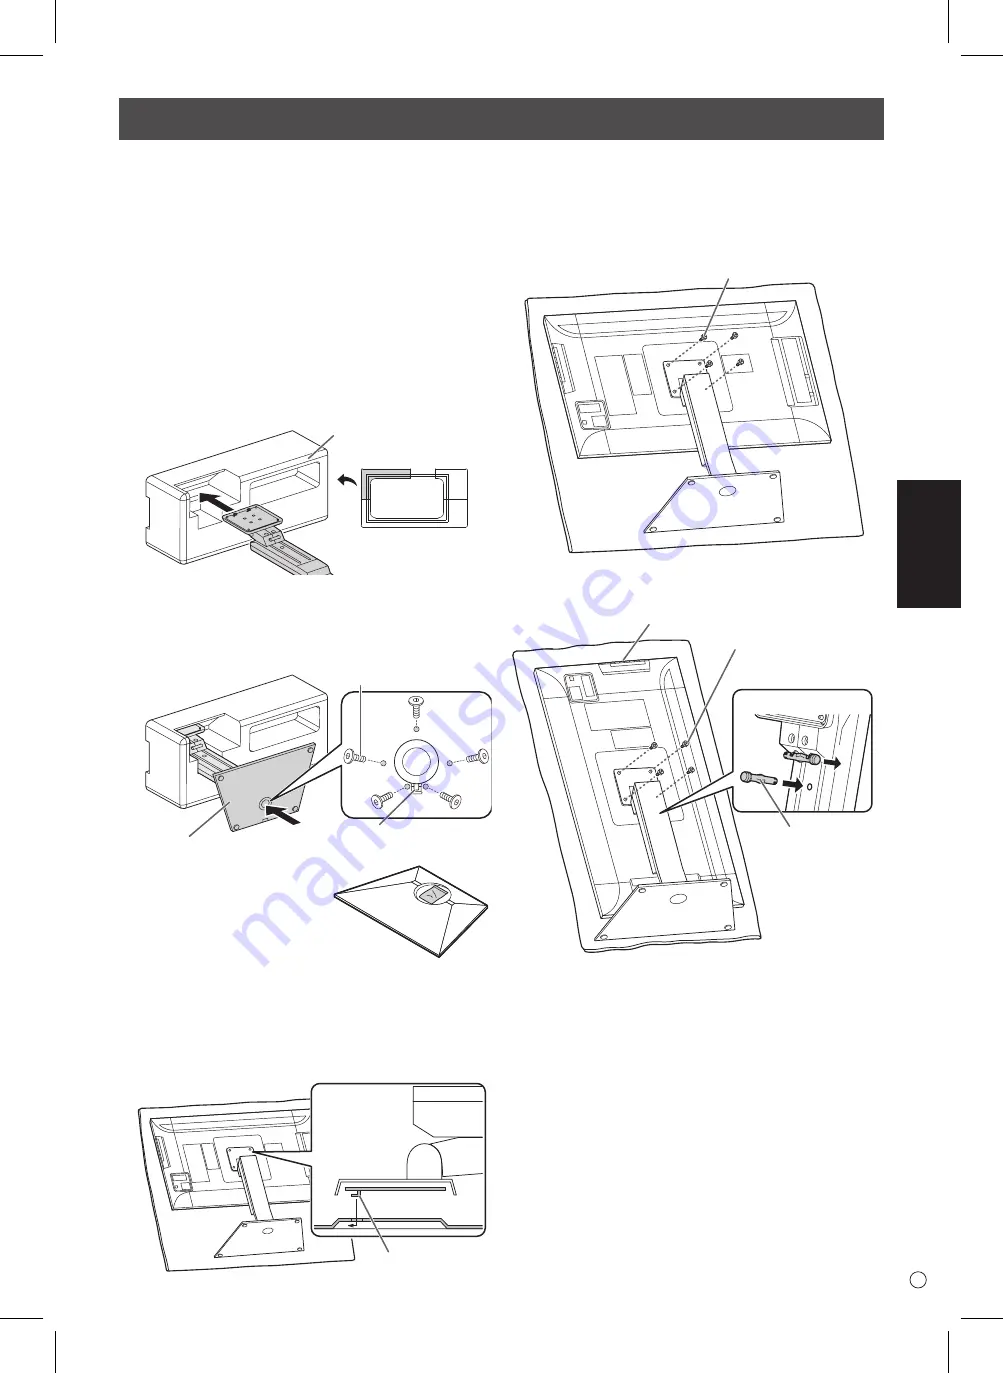
1.  Inserte la columna en el material de embalaje (superior 

izquierdo) como se ilustra.

Front

Packing material 

(upper left)

2.  Mientras sostiene la base del soporte con la mano, 

fíjela a la columna con los tornillos avellanados 
suministrados (M4 x 6 sin arandelas) (x5).

Utilice la llave Allen suministrada.

Countersunk screw 

(M4 x 6 without washers)

Insert by hooking the tab

Pedestal

*  En el agujero redondeado 

de la base del soporte hay 
una bolsa con los tornillos 
(suministrados) y la llave Allen 
(suministrada).

3.  Extienda un tejido grueso y suave (manta, etc.), para que 

no se deteriore el panel LCD, sobre una superficie plana 

donde quepa todo el monitor y coloque el monitor con el 

panel LCD orientado hacia abajo encima del tejido.

4.  Coloque el soporte en el monitor.

Enganche la pestaña del soporte por debajo de la placa de 
unión (preinstalada en el monitor).

Tab

5.  Fije el soporte al monitor con los tornillos (M4 x 10 con 

arandelas) suministrados (x4).

Utilice la llave Allen suministrada.

• Horizontal

Screw

(M4 x 10 with washers)

• Vertical

2

1

Operation buttons

Screw

(M4 x 10 with washers)

Front

Fixing pin

*  Si va a utilizar el monitor con la orientación vertical, tire 

del pasador de fijación (1), e insértelo en el agujero (2) 
como se ilustra arriba.

*  Para retirar el soporte, coloque el monitor y el soporte 

como se ilustra arriba y retire los tornillos.

¡PRECAUCIÓN!

•  Respete lo siguiente cuando instale el monitor en 

orientación vertical. El incumplimiento de las siguientes 
medidas podría provocar malfuncionamientos.

 -

Instale el monitor de modo que los botones de 
funcionamiento queden arriba.

  -  Establezca la opción MONITOR del menú MONITOR en 

PORTRAIT <MODO VERTICAL>. (Véase el MANUAL DE 
INSTRUCCIONES.)

Summary of Contents for PQ321 Series

Page 1: ...LCD Monitor Setup Manual PQ321 Series ENGLISH ENGLISH FRANÇAIS ESPAÑOL DEUTSCH РУССКИЙ ITALIANO ...

Page 2: ... aid reporting in case of loss or theft please record the product s model and serial numbers in the space provided The numbers are located in the rear of the product Model No Serial No U8461 May 2013 First Edition ...

Page 3: ...ce of uninsulated dangerous voltage within the product s enclosure that may be of sufficient magnitude to constitute a risk of electric shock to persons The exclamation point within a triangle is intended to alert the user to the presence of important operating and maintenance servicing instructions in the literature accompanying the product IMPORTANT INFORMATION Contents ENGLISH IMPORTANT INFORMA...

Page 4: ...Overloading can cause fire or electric shock 12 Entering of objects and liquids Never insert an object into the product through vents or openings High voltage flows in the product and inserting an object can cause electric shock and or short internal parts For the same reason do not spill water or liquid on the product 13 Servicing Do not attempt to service the product yourself Removing covers can...

Page 5: ...nds Doing so could result in electric shock Unplug the power cord if it is not used for a long time Do not attempt to repair the power cord if it is broken or malfunctioning Refer the servicing to the service representative Do not stay in contact with the parts of the product and the AC adapter that become hot for long periods of time Doing so may result in low temperature burns Do not fasten the ...

Page 6: ...or on a wall the monitor emits heat during operation please be aware that this heat may discolor or alter the wall If it is difficult to provide sufficient space for any reason such as the installation of the monitor inside a housing or if the ambient temperature may be outside of the range of 32 F 0 C to 104 F 40 C install a fan or take other measures to keep the ambient temperature within the re...

Page 7: ...destal 3 Spread a thick soft cloth blanket etc that will prevent damage to the LCD panel on a stable flat surface where the entire monitor can be placed and place the monitor with the LCD panel face down on the cloth 4 Place the stand on the monitor Hook the tab on the stand under the mounting plate pre installed on monitor Tab 5 Fasten the stand to the monitor with the supplied screws M4 x 10 wit...

Page 8: ...er outlet 2 3 4 5 6 7 1 Set the audio input terminal used for each input mode in AUDIO SELECT on the SETUP menu The factory settings are shown below Input mode Audio input terminal Factory setting DisplayPort DisplayPort input terminal The cables connected to the terminals on the rear of the monitor can be fastened with the cable clamp Attach the cable clamps to the attachment parts on the back of...

Page 9: ... off the monitor cannot be turned on If the monitor is in the input signal standby mode and you press the power button the monitor enters standby mode Turn on the monitor first before turning on the PC or playback device Turning on the main power Main power switch The main power must be turned on off with the main power switch Do not connect disconnect the power cord or turn the breaker on off whi...

Page 10: ...cations When installing removing or moving the monitor ensure that this is carried out by at least 2 people Be sure to use a wall mount bracket designed or designated for mounting the monitor This monitor is designed to be installed on a concrete wall or pillar Reinforced work might be necessary for some materials such as plaster thin plastic board wood before starting installation This monitor an...

Page 11: ...est placé pour alerter l utilisateur de la présence d une tension dangereuse non isolée à l intérieur du produit Cette tension peut avoir une valeur suffisante pour constituer un risque d électrocution à toute personne Le point d exclamation à l intérieur d un triangle est placé pour alerter l utilisateur de la présence d une procédure particulière ou d une procédure de maintenance entretien impor...

Page 12: ...z à ne pas vous blesser par les éclats de verre si le panneau LCD devait être brisé 11 Surcharge Ne surchargez pas les prises de courant ou les rallonges car ceci peut entraîner un risque d incendie ou d électrocution 12 Insertion de solides ou de liquides N introduisez jamais des objets par les orifices de cet appareil car ils pourraient provoquer une électrocution et ou un court circuit en touch...

Page 13: ...la chute du moniteur ou le culbuter peut l endommager N utilisez pas le moniteur à proximité d un appareil de chauffage ou dans des endroits où la température est élevée car cela pourrait conduire à un dégagement excessif de chaleur et provoquer un début d incendie N utilisez pas le moniteur dans des endroits exposés directement à la lumière du soleil La prise de secteur doit être installée près d...

Page 14: ...oniteur au mur le moniteur émet de la chaleur pendant son fonctionnement cette chaleur peut décolorer ou altérer le mur S il est difficile de laisser un espace suffisant pour une raison ou pour une autre installation du moniteur dans une enceinte par exemple ou si la température ambiante est susceptible de dépasser la plage de valeurs prévue de 0 à 40 C installez un ventilateur ou prenez d autres ...

Page 15: ...u LCD étendez un tissu épais et doux couverture etc sur une surface plane et stable sur laquelle le moniteur tout entier peut être placé et placez le moniteur en orientant le panneau LCD vers le bas sur ce tissu 4 Placez le support sur le moniteur Accrochez la patte sur le support sous la plaque de fixation pré installée sur le moniteur Patte 5 Fixez le support au moniteur avec les vis M4 x 10 ave...

Page 16: ... 4 5 6 7 2 3 1 1 Interrupteur principal 2 Borne d entrée secteur 3 Cordon d alimentation fourni 4 Borne d entrée RS 232C 5 Borne d entrée DisplayPort 6 Borne d entrée audio 7 Borne des écouteurs REMARQUE Sélectionnez la borne d entrée audio à utiliser dans AUDIO SELECT SÉLECTION ENTRÉE AUDIO du menu SETUP INSTALLATION Les réglages par défaut sont indiqués ci dessous Mode d entrée Borne d entrée au...

Page 17: ...ez la fiche principale de la prise Mise sous tension et hors tension Mise sous hors tension Appuyez sur la bouton POWER ou sur l interrupteur d alimentation pour mettre sous hors tension Bouton POWER Diode d alimentation État du témoin d alimentation État du moniteur Allumé en vert Power en position marche Éteint Power en position arrêt modeVeille Allumé en orange Mode attente du signal d entrée A...

Page 18: ...unité Ne saisissez pas le panneau LCD ou les angles Ceci pourrait causer une panne un dysfonctionnement ou une blessure N utilisez pas de trous de vis autres que les trous standard VESA pour l installation Caractéristiques Précautionspourlemontage Modèle PQ321QE Alimentation CA 100 V 240 V 50 60 Hz en utilisant l adaptateur secteur fourni Température de fonctionnement 0 C à 40 C Hygrométrie de fon...

Page 19: ...ulo está concebido para avisar al usuario de la presencia de tensión peligrosa sin aislamiento en el interior del producto que podría ser de magnitud suficiente para constituir un riesgo de descargas eléctricas a las personas El símbolo de exclamación dentro de un triángulo está concebido para avisar al usuario de la presencia de instrucciones importantes de uso y mantenimiento servicio en la docu...

Page 20: ...ocar incendios o descargas eléctricas 12 Introducción de objetos y líquidos No inserte nunca objetos en el producto a través de los respiraderos o las ranuras de ventilación El producto tiene altas tensiones en su interior y la inserción de objetos podría provocar descargas eléctricas y o cortocircuitar los componentes internos Por la misma razón no derrame agua o líquidos sobre el producto 13 Ser...

Page 21: ...ija eléctrica con las manos mojadas De lo contrario podría sufrir un choque eléctrico Desenchufe el cable de alimentación si no va a usarse durante mucho tiempo No intente reparar el cable de alimentación eléctrica si se rompe o funciona mal Para cualquier reparación contacte con el representante de servicio técnico No tenga contacto con las partes del producto o el adaptador de corriente que perm...

Page 22: ...nstala el monitor en una pared el monitor emite calor durante el funcionamiento por lo que podría decolorar o alterar la pared Si fuera difícil proporcionar suficiente espacio por cualquier razón como puede ser la instalación del monitor dentro de una carcasa o si la temperatura ambiente pudiera estar fuera del rango de 0 a 40 C instale un ventilador o adopte otras medidas para mantener la tempera...

Page 23: ...enda un tejido grueso y suave manta etc para que no se deteriore el panel LCD sobre una superficie plana donde quepa todo el monitor y coloque el monitor con el panel LCD orientado hacia abajo encima del tejido 4 Coloque el soporte en el monitor Enganche la pestaña del soporte por debajo de la placa de unión preinstalada en el monitor Tab 5 Fije el soporte al monitor con los tornillos M4 x 10 con ...

Page 24: ...cs Standards Association 1 Interruptor primario 2 Terminal de entrada de corriente 3 Cable de alimentación suministrado 4 Terminal de entrada RS 232C 5 Terminal de entrada DisplayPort 6 Terminal de entrada de audio 7 Terminal del auricular PRECAUCIÓN Asegúrese de apagar el interruptor primario y desconectar el enchufe de la toma de corriente antes de conectar desconectar los cables Asimismo lea el...

Page 25: ... completa desconecte el enchufe principal Encendido apagado Pulse el botón de encendido para encender o apagar el aparato Power LED Power button Estado del piloto de alimentación Estado del monitor Encendido de verde Alimentación encendida Apagado Alimentación apagada modo de reposo Encendido de naranja Modo de espera de señal de entrada PRECAUCIÓN Cuando apague el interruptor primario o el botón ...

Page 26: ...r el panel de LCD o las esquinas Esto podría provocar daños en el producto fallos o lesiones No utilice orificios de tornillos que no sean orificios VESA para la instalación Especificaciones Precauciones de montaje Modelo PQ321QE Requisitos de alimentación 100 V 240 V ca 50 60 Hz al usar el adaptador CA suministrado Temperatura de funcionamiento 0 C a 40 C Humedad de funcionamiento 20 al 80 sin co...

Page 27: ...t isolierter gefährlicher Spannung im Geräteinneren hin die ausreichend groß ist um einen Elektroschock hervorzurufen Das Ausrufezeichen innerhalb eines Dreiecks weist den Benutzer auf wichtige Betriebs und Wartungs bzw Serviceanweisungen in der Produktdokumentation hin Inhalt DEUTSCH WICHTIGE INFORMATIONEN WICHTIGE INFORMATIONEN 1 SICHERHEITSVORKEHRUNGEN 2 SICHERHEITSANLEITUNG 3 WICHTIGE HINWEISE...

Page 28: ...nd Stromschlaggefahr 12 Eindringen von Gegenständen und Flüssigkeiten Schieben Sie niemals irgendwelche Gegenstände durch die Gehäuseöffnungen in das Innere des Geräts Im Produkt liegen hohe Spannungen vor Durch das Einschieben von Gegenständen besteht Stromschlaggefahr bzw die Gefahr von Kurzschlüssen zwischen den Bauteilen Aus demselben Grunde dürfen auch keine Flüssigkeiten auf das Gerät versch...

Page 29: ... Die Folge könnte ein Brand oder Stromschlag sein Stellen Sie den Monitor nicht auf instabile Gegenstände oder an andere unsichere Stellen Setzen Sie den Monitor keinen starken Stößen oder Erschütterungen aus Wenn der Monitor hinunterfällt oder umkippt könnte er Schaden nehmen Stellen Sie den Monitor nicht in der Nähe von Heizungen oder an anderen Stellen auf an denen hohe Temperaturen auftreten d...

Page 30: ...die Wand verfärben oder verändern kann Wenn es aus irgendeinem Grund schwierig ist ausreichend Platz frei zu lassen etwa weil der Monitor in ein Gehäuse eingebaut wird oder wenn die Umgebungstemperatur außerhalb des zulässigen Bereichs von 0 C bis 40 C liegen könnte so müssen Sie ein Gebläse installieren oder andere Maßnahmen ergreifen um die Umgebungstemperatur innerhalb des vorgeschriebenen Bere...

Page 31: ... Decke auf einer stabilen ebenen Fläche aus auf welcher der gesamte Monitor abgelegt werden kann und legen Sie den Monitor mit dem LCD Panel nach unten gerichtet auf das Tuch 4 Legen Sie den Ständer auf den Monitor Haken Sie den Zapfen des Ständers an der Befestigungsplatte am Monitor vormontiert ein Zapfen 5 Befestigen Sie den Ständer mit den mitgelieferten Schrauben M4 x 10 mit Unterlegscheiben ...

Page 32: ...Einstellungen bei der Auslieferung sind nachstehend gezeigt Eingangsmodus Audioeingangsanschluss Werkseinstellung DisplayPort DisplayPort Eingangsanschluss Die auf der Rückseite des Monitors mit den Anschlüssen verbundenen Kabel können mithilfe des Kabelbinders gebündelt und befestigt werden Befestigen Sie die Kabelbinder an den Befestigungsteilen auf der Rückseite des Monitors und des Ständers un...

Page 33: ...alten Drücken Sie die Ein Aus Taste um die Stromversorgung ein oder auszuschalten Ein Aus Taste Betriebs LED Status der Betriebsleuchte Betriebszustand des Monitors Leuchtet grün Monitor eingeschaltet Aus Monitor ausgeschaltet Standby Modus Leuchtet orange Eingangssignal Wartemodus Warten Sie zwischen dem Ein und Ausschalten des Hauptnetzschalters oder der Ein Aus Taste immer mindestens 5 Sekunden...

Page 34: ...ansportieren des Monitors müssen mindestens 2 Personen zur Verfügung stehen Verwenden Sie dazu eine Wandhalterung die für die Befestigung des Monitors geeignet sind Dieser Monitor wurde für die Befestigung an einer Betonwand oder an einer Betonsäule gebaut Vor der Aufstellung des Monitors kann es notwendig sein Wände die aus bestimmten Materialien z B Gips dünnem Kunststoff usw bestehen entspreche...

Page 35: ...корпуса неизолированного опасного напряжения такой величины что оно представляет угрозу поражения электрическим током для людей Восклицательный знак внутри треугольника предупреждает пользователя о наличии важных инструкций по эксплуатации и использованию сервису в литературе которая поставляется в комплекте с изделием ОПАСНОСТЬ ПОРАЖЕНИЯ ЭЛЕКТРИЧЕСКИМ ТОКОМ НЕ ОТКРЫВАТЬ ВАЖНАЯ ИНФОРМАЦИЯ 1 УВАЖАЕ...

Page 36: ...онят или нанесут по нему удар Проявляйте осторожность чтобы вас не повредили осколки разбитого стекла в случае если ЖК панель будет разбита 11 Перегрузка Запрещается перегружать розетку переменного тока и или удлинительные кабели Перегрузка может привести к пожару или поражению электрическим током 12 Попадание внутрь корпуса предметов и жидкостей Категорически запрещается вставлять какие либо пред...

Page 37: ...ь с помощью следующих простых мер предосторожности использование настенных кронштейнов или опор рекомендованных производителем монитора использование только тех предметов мебели которые могут выдержать вес монитора монитор не должен нависать над краем предмета мебели на котором он установлен монитор не следует устанавливать на высокие предметы например шкафы или стеллажи без соответствующего крепл...

Page 38: ...ор устанавливается внутри кожуха или из за того что температура окружающей среды выходит за диапазон от 0 C до 40 C установите вентилятор или примите другие меры для того чтобы температура окружающей среды находилась в пределах требуемого диапазона Запрещается блокировать вентиляционные отверстия монитора Рост температуры внутри корпуса монитора может привести к его неправильному функционированию ...

Page 39: ...е отверстие 3 Расстелите толстую мягкую ткань например одеяло которая предотвратит повреждение ЖК панели на плоской поверхности на которой помещается весь монитор и положите монитор на ткань ЖК панелью вниз 4 Поместите подставку на монитор Введите ушко на подставке в зацепление с соединительной пластиной предварительно установленной на мониторе Ушко 5 Прикрепите подставку к монитору с помощью пост...

Page 40: ...ТЬ АУДИОВХОД меню SETUP УСТАНОВКА Указанные ниже параметры настройки устанавливаются на заводе Режим ввода Входной разъем аудио настройка по умолчанию DisplayPort Входной разъем DisplayPort Кабели подсоединенные к разъемам на задней панели монитора могут быть скреплены с помощью кабельного зажима Прикрепите зажимы для кабеля к креплениям расположенным на задней поверхности монитора и на подставке ...

Page 41: ...те шнур питания Включение выключение питания Чтобы включить выключить питание нажмите кнопку питания Кнопка питания LED индикатор питания Состояние индикатора питания Статус монитора Зеленое свечение Питание вкл Выкл Питание выкл Режим ожидания Оранжевое свечение Pежим ожидания входного сигнала Между выключением питания сетевым выключателем или кнопкой питания и повторным включением всегда делайте...

Page 42: ... держите монитор за ЖК панель или углы Это может привести к повреждению изделия его неисправности или к травмированию людей Запрещается использовать какие либо другие отверстия для крепежных винтов за исключением отверстий VESA Модель PQ321QE Требование к электропитанию AC 100 В 240 В 50 60 Гц при использовании поставляемого в комплекте блока питания Рабочая температура 0 C 40 C Рабочая влажность ...

Page 43: ...dell apparecchio che potrebbe essere sufficientemente elevato da provocare un rischio di scosse elettriche o shock nei confronti delle persone Il punto esclamativo in un triangolo equilatero indica la presenza di importanti istruzioni sul funzionamento e la manutenzione del dispositivo nella documentazione in dotazione con il prodotto INFORMAZIONI IMPORTANTI Indice ITALIANO INFORMAZIONI IMPORTANTI...

Page 44: ...alimentazione Un sovraccarico potrebbe generare incendi o shock elettrici 12 Oggetti e liquidi estranei Non inserite oggetti nel prodotto attraverso le prese d aria e le fessure Nel prodotto c è alta tensione e inserendo oggetti all interno potreste causare shock o cortocircuiti interni Per la stessa ragione non versate acqua o altri liquidi all interno del prodotto 13 Assistenza Non provate a rip...

Page 45: ...treste generare shock elettrici Scollegate il cavo di alimentazione se pensate di non usare il prodotto per molto tempo Non provate a riparare il cavo di alimentazione se è rotto o malfunzionante In questo caso richiedete assistenza Non restate in contatto con parti del prodotto dell adattatore AC che si scaldano o restano calde per lungo tempo Ciò potrebbe provocare ustioni a bassa temperatura No...

Page 46: ...rete la stessa parete potrebbe perdere colore o modificarsi visibilmente Se per qualunque ragione non fosse possibile fornire sufficiente spazio al monitor o se la temperatura fosse all esterno dell intervallo raccomandato 0 C 32 F e i 40 C 104 F sarà necessario dotarsi di misure adeguate per assicurarsi che il monitor non sia soggetto a temperature troppo alte o troppo basse Non bloccate le prese...

Page 47: ...i e la chiave esagonale 3 Posizionate un panno morbido ad es una coperta su una superficie stabile e omogenea per evitare di danneggiare il pannello LCD e posizionate il monitor a faccia in giù su di esso 4 Attaccate il piedistallo al monitor Agganciate la fessura del supporto sul monitor alla linguetta del piedistallo Tab 5 Assicurate il piedistallo al monitor con le 4 viti in dotazione M4 x 10 c...

Page 48: ... 3 4 5 6 7 1 Selezionate l ingresso audio che volete usare per ciascuna modalità di input nella sezione AUDIO SELECT del menu SETUP Di seguito le impostazioni predefinite di fabbrica Ingresso video Ingresso audio predefinito DisplayPort Ingresso DisplayPort I cavi collegati al retro del monitor possono essere ordinati con un serracavi Fissate il serracavi agli appositi ganci che trovate nella part...

Page 49: ...accensione spegnimento Quando il monitor è in attesa del segnale in ingresso e premete il pulsante di accensione spegnimento il monitor entrerà in standby Accendete il monitor prima di accendere il PC o il dispositivo di riproduzione Attivare l alimentazione principale Main power switch L alimentazione principale può essere attivata disattivata tramite il relativo interruttore Non collegate scolle...

Page 50: ...ione smontaggio o spostamento del monitor assicuratevi che questo sia trasportato da almeno 2 persone Accertatevi di usare una staffa per il montaggio a parete adeguata a sostenere il vostro monitor Questo monitor è stato pensato per essere installato ad una parete di cemento o ad una colonna Se la vostra parete è in cartongesso plastica legno potrebbero essere necessari lavori di rinforzo prima d...

Page 51: ......

Page 52: ...www asus com ...

Reviews: