background image

1-2

Chapter 1: Product introduction

1.2.2 

Layout contents

1.2 

Motherboard overview

1.2.1 

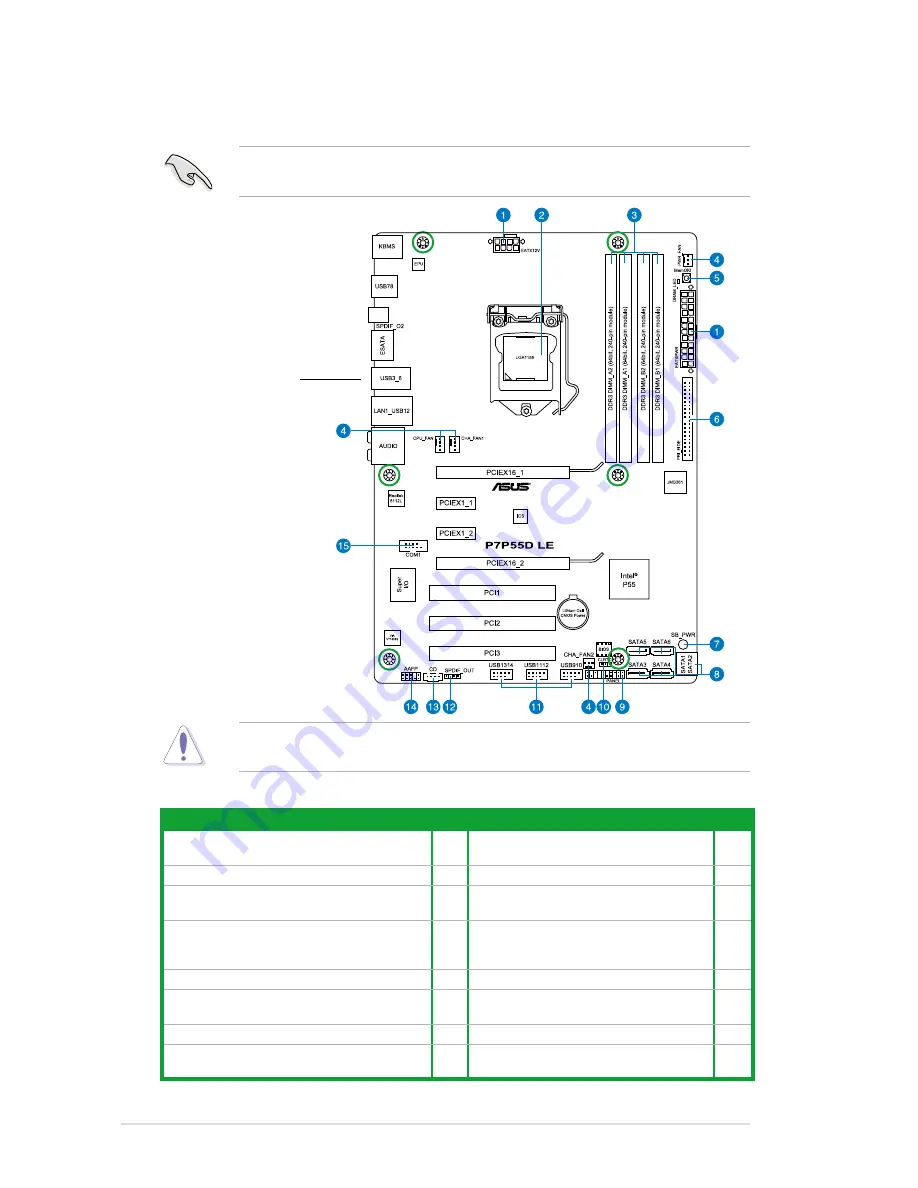
Motherboard layout

Place six screws into the holes indicated by circles to secure the motherboard to the 

chassis. DO NOT overtighten the screws! Doing so can damage the motherboard.

Ensure that you install the motherboard into the chassis in the correct orientation. The edge 

with external ports goes to the rear part of the chassis.

Place this side towards 

the rear of the chassis.

Connectors/Jumpers/Slots/LED

Page

Connectors/Jumpers/Slots/LED

Page

1.  ATX power connectors (24-pin EATXPWR, 8-pin 

EATX12V)

1-20 9.

System panel connector (20-8 pin PANEL)

1-22

2.

LGA1156 CPU Socket

1-3

10. Clear RTC RAM (3-pin CLRTC)

1-17

3.  DDR3 DIMM slots

1-

8

11. USB connectors (10-1 pin USB910, 

USB1112, USB1314)

1-23

4. 

CPU, chassis, and power fan connectors (4-pin 

CPU_FAN, 4-pin CHA_FAN1, 3-pin CHA_FAN2, 

3-pin PWR_FAN)

1-20 12. Digital audio connector (4-1 pin 

SPDIF_OUT)

1-24

5.  MemOK! switch

1-18 13. Optical drive audio connector (4-pin CD)

1-24

6.

JMicron

®

 JMB361 IDE Connector (40-1 pin 

PRI_IDE [Blue])

1-25 14. Front panel audio connector (10-1 pin 

AAFP)

1-21

7.

Onboard LED

1-1

15. Serial port connector (10-1 pin COM1)

1-23

8.

Intel

®

 P55 Serial ATA connectors (7-pin SATA 

1-6)

1-21

* Optional

Summary of Contents for P7P55D LE

Page 1: ...Motherboard P7P55D LE ...

Page 2: ...ERCHANTABILITY OR FITNESS FOR A PARTICULAR PURPOSE IN NO EVENT SHALL ASUS ITS DIRECTORS OFFICERS EMPLOYEES OR AGENTS BE LIABLE FOR ANY INDIRECT SPECIAL INCIDENTAL OR CONSEQUENTIAL DAMAGES INCLUDING DAMAGES FOR LOSS OF PROFITS LOSS OF BUSINESS LOSS OF USE OR DATA INTERRUPTION OF BUSINESS AND THE LIKE EVEN IF ASUS HAS BEEN ADVISED OF THE POSSIBILITY OF SUCH DAMAGES ARISING FROM ANY DEFECT OR ERROR I...

Page 3: ... 16 1 5 1 Installing an expansion card 1 16 1 5 2 Configuring an expansion card 1 16 1 5 3 PCI slots 1 16 1 6 Jumpers 1 17 1 7 MemOK switches 1 18 1 8 Connectors 1 19 1 8 1 Rear panel connectors 1 19 1 8 2 Internal connectors 1 20 1 9 Installing an operating system 1 26 1 10 Support DVD information 1 26 1 10 1 Running the support DVD 1 26 Chapter 2 BIOS setup 2 1 2 1 Managing and updating your BIO...

Page 4: ...2 4 9 CPU Differential Amplitude 2 13 2 4 10 CPU Clock Skew 2 13 2 4 11 CPU Voltage Mode 2 13 2 4 12 IMC Voltage 2 14 2 4 13 DRAM Voltage 2 14 2 4 14 CPU PLL Voltage 2 14 2 4 15 PCH Voltage 2 14 2 4 16 DRAM DATA REF Voltage on CHA B 2 14 2 4 17 Load Line Calibration 2 15 2 4 18 CPU Spread Spectrum 2 15 2 4 19 PCIE Spread Spectrum 2 15 2 5 Advanced menu 2 16 2 5 1 CPU Configuration 2 16 2 5 2 North...

Page 5: ...2 2 6 6 APM Configuration 2 22 2 6 7 Hardware Monitor 2 24 2 7 Boot menu 2 25 2 7 1 Boot Device Priority 2 25 2 7 2 Boot Settings Configuration 2 26 2 7 3 Security 2 26 2 8 Tools menu 2 28 2 8 1 ASUS O C Profile 2 28 2 8 2 AI NET 2 2 29 2 8 3 Express Gate 2 29 2 9 Exit menu 2 30 ...

Page 6: ...t from that to which the receiver is connected Consult the dealer or an experienced radio TV technician for help Canadian Department of Communications Statement This digital apparatus does not exceed the Class B limits for radio noise emissions from digital apparatus set out in the Radio Interference Regulations of the Canadian Department of Communications This class B digital apparatus complies w...

Page 7: ...be included in your motherboard and is defined as a CLASS 1 LASER PRODUCT INVISIBLE LASER RADIATION AVOID EXPOSURE TO BEAM RISK OF EXPLOSION IF BATTERY IS REPLACED BY AN INCORRECT TYPE DISPOSE OF USED BATTERIES ACCORDING TO THE ABOVE BATTERY RELATED INSTRUCTIONS Operation safety Before installing the motherboard and adding devices on it carefully read all the manuals that came with the package Bef...

Page 8: ... include optional documentation such as warranty flyers that may have been added by your dealer These documents are not part of the standard package Conventions used in this guide To make sure that you perform certain tasks properly take note of the following symbols used throughout this manual DANGER WARNING Information to prevent injury to yourself when trying to complete a task CAUTION Informat...

Page 9: ...2 0 x16 slot single at x16 1 x PCI Express 2 0 x16 slot at x4 mode 2 5GT s 2 x PCI Express 2 0 x1 slots 2 5GT s 3 x PCI slots Multi GPU Support Supports ATI Quad GPU CrossFireX Technology Storage Intel P55 Express Chipset 6 x SATA 3 0 Gb s ports Intel Matrix Storage supporting SATA RAID 0 1 5 and 10 JMicron JMB361 controller 1 x External SATA 3 0 Gb s port at rear panel 1 x Ultra DMA 133 100 66 fo...

Page 10: ...i language BIOS ASUS Exclusive Overclocking Features Precision Tweaker vCore Adjustable CPU voltage at 0 00625V increment vIMC Adjustable IMC voltage at 0 05V increment vDRAM Bus 8 step DRAM voltage control vPCH 2 step chipset voltage control vCPU PLL 4 step reference voltage control SFS Stepless Frequency Selection Internal Base Clock tuning from 80 MHz up to 500 MHz at 1MHz increment PCI Express...

Page 11: ...nector 1 x System Panel Q Connector 1 x MemOK button 1 x COM connector BIOS Features 16 Mb Flash ROM AMI BIOS PnP DMI2 0 WfM2 0 SM BIOS 2 5 ACPI 2 0a Multi language BIOS ASUS EZ Flash 2 ASUS CrashFree BIOS 3 Manageability WfM 2 0 DMI 2 0 WOL by PME WOR by PME PXE Accessories 1 x UltraDMA 133 100 cable 2 x Serial ATA 3 0Gb s cables ASUS Q Shield User s manual 2 in 1 Q connector Support DVD Contents...

Page 12: ...xii ...

Page 13: ... came with the component Before you install or remove any component ensure that the ATX power supply is switched off or the power cord is detached from the power supply Failure to do so may cause severe damage to the motherboard peripherals or components Onboard LED The motherboard comes with a standby power LED that lights up to indicate that the system is ON in sleep mode or in soft off mode Thi...

Page 14: ...Jumpers Slots LED Page 1 ATX power connectors 24 pin EATXPWR 8 pin EATX12V 1 20 9 System panel connector 20 8 pin PANEL 1 22 2 LGA1156 CPU Socket 1 3 10 Clear RTC RAM 3 pin CLRTC 1 17 3 DDR3 DIMM slots 1 8 11 USB connectors 10 1 pin USB910 USB1112 USB1314 1 23 4 CPU chassis and power fan connectors 4 pin CPU_FAN 4 pin CHA_FAN1 3 pin CHA_FAN2 3 pin PWR_FAN 1 20 12 Digital audio connector 4 1 pin SP...

Page 15: ... cost of repair only if the damage is shipment transit related Keep the cap after installing the motherboard ASUS will process Return Merchandise Authorization RMA requests only if the motherboard comes with the cap on the LGA1156 socket The product warranty does not cover damage to the socket contacts resulting from incorrect CPU installation removal or misplacement loss incorrect removal of the ...

Page 16: ...ket PnP cap The CPU fits in only one correct orientation DO NOT force the CPU into the socket to prevent bending the connectors on the socket and damaging the CPU Gold triangle mark Alignment keys CPU notches 5 Position the CPU over the socket ensuring that the gold triangle is on the bottom left corner of the socket and then fit the socket alignment keys into the CPU notches ...

Page 17: ... tab 6 Apply some Thermal Interface Material to the exposed area of the CPU that the heatsink will be in contact with ensuring that it is spread in an even thin layer Some heatsinks come with pre applied thermal paste If so skip this step The Thermal Interface Material is toxic and inedible DO NOT eat it If it gets into your eyes or touches your skin wash it off immediately and seek professional m...

Page 18: ...1156 socket is incompatible with the LGA775 and LGA1366 sockets in size and dimension Orient the heatsink and fan assembly such that the CPU fan cable is closest to the CPU fan connector To install the CPU heatsink and fan 1 Place the heatsink on top of the installed CPU making sure that the four fasteners match the holes on the motherboard 2 Push down two fasteners at a time in a diagonal sequenc...

Page 19: ... connector 1 3 3 Uninstalling the CPU heatsink and fan To uninstall the CPU heatsink and fan 1 Disconnect the CPU fan cable from the connector on the motherboard 2 Rotate each fastener counterclockwise 3 Pull up two fasteners at a time in a diagonal sequence to disengage the heatsink and fan assembly from the motherboard A A B B 4 Carefully remove the heatsink and fan assembly from the motherboard...

Page 20: ...s a DDR2 DIMM but is notched differently to prevent installation on a DDR2 DIMM socket DDR3 modules are developed for better performance with less power consumption The figure illustrates the location of the DDR3 DIMM sockets Recommended memory configurations One DIMM Install one memory module in slot A1 or B1 first as a single channel operation Two DIMMs dual channel operation Four DIMMs dual cha...

Page 21: ...ported for one DIMM per channel only According to Intel CPU spec DIMM voltage below 1 65V is recommended to protect the CPU According to Intel CPU spec CPUs with a core frequency of 2 66G support the maximum DIMM frequency of up to DDR3 1333 To use DIMMs of a higher frequency with a 2 66G CPU enable the DRAM O C Profile feature in BIOS Refer to section 2 4 Ai Overclock Tuner for details Always ins...

Page 22: ...AZ 1G1F1 2048MB DS MICRON 8ZF22 D9KPV 7 1066 7 7 7 20 MICRON MT16JTF25664AZ 1G1F1 2048MB DS MICRON D9KPT 7 1066 7 7 7 20 MICRON MT18JSF25672AZ 1G1F1 2048MB DS MICRON D9KPT ECC 7 1066 7 7 7 20 SAMSUNG M378B5273BH1 CF8 4096MB DS SAMSUNG K4B2G0846B HCF8 8 7 7 7 20 1 5 Transcend TS256MLK64V1U 2048MB DS ELPIDA J1108BABG AE E 7 1066 7 7 7 20 Asint SLY3128M8 EAE 1024MB SS Asint DDRIII1208 AE 7 7 7 20 Asi...

Page 23: ... 3 SS N A Heat Sink Package 9 9 9 1066 7 7 7 20 1 65 OCZ OCZ3P1333LV3GK 3072MB Kit of 3 SS N A Heat Sink Package 7 7 7 1066 7 7 7 16 1 65 OCZ OCZ3P13332GK 1024MB DS N A Heat Sink Package 7 7 7 20 1333 9 9 9 24 OCZ OCZ3P13334GK 4096MB Kit of 2 DS N A Heat Sink Package 7 1333 7 7 7 20 1 8 OCZ OCZ3G1333LV6GK 6144MB Kit of 3 DS N A Heat Sink Package 9 9 9 1066 7 7 7 20 1 65 OCZ OCZ3P1333LV6GK 6144MB K...

Page 24: ...B Kit of 3 SS N A Heat Sink Package 1600 8 8 8 20 1 65 KINGSTON KHX12800D3K2 4G 4096MB Kit of 2 DS N A Heat Sink Package 9 1333 9 9 9 24 1 9 KINGSTON KHX12800D3LLK3 6GX XMP 6144MB Kit of 3 DS N A Heat Sink Package 1066 8 8 8 20 1 65 OCZ OCZ3P1600EB1G 1024MB SS N A Heat Sink Package 7 6 6 24 1333 7 7 7 20 OCZ OCZ3G1600LV3GK 3072MB Kit of 3 SS N A Heat Sink Package 8 8 8 1066 7 7 7 20 1 65 OCZ OCZ3P...

Page 25: ... EPP 2GB Kit of 2 SS N A Heat Sink Package 1 9 KINGSTON KHX14400D3K3 3GX XMP 3GB Kit of 3 SS N A Heat Sink Package 1800 9 9 9 27 1 65 OCZ OCZ3P18002GK 2GB Kit of 2 SS N A Heat Sink Package 8 OCZ OCZ3P18004GK 4GB Kit of 2 DS N A Heat Sink Package 8 1 9 Transcend TX1800KLU 2GK XMP 2GB Kit of 2 SS N A Heat Sink Package 8 Patriot PVS32G1800LLKN EPP 2GB Kit of 2 SS N A Heat Sink Package 8 8 8 20 1066 7...

Page 26: ... 3 SS N A Heat Sink Package 9 9 9 24 1866 9 9 9 24 1 65 CORSAIR TR3X6G1866C9D 6GB Kit of 3 DS N A Heat Sink Package 9 9 9 24 1866 9 9 9 24 1 65 KINGSTON KHX14900D3K3 3GX XMP 3GB SS N A Heat Sink Package 9 1333 9 9 9 24 1 65 OCZ OCZ3RPR1866C9LV3GK 3GB Kit of 3 SS N A Heat Sink Package 9 9 9 1066 7 7 7 20 1 65 OCZ OCZ3RPR1866C9LV6GK 6GB Kit of 3 DS N A Heat Sink Package 9 9 9 1066 7 7 7 20 1 65 Supe...

Page 27: ...Kit of 2 SS N A Heat Sink Package 9 8 8 1066 8 7 7 20 1 8 Gingle 9CAASS37AZZ01D1 2GB DS N A Heat Sink Package 9 9 9 24 Patriot PVS32G2000LLKN 2GB Kit of 2 SS N A Heat Sink Package 9 9 9 24 1066 7 7 7 20 2 Vendor Part No Size SS DS Chip Brand Chip NO Timing Dimm Bios Voltage DIMM socket support Optional A B C G SKILL F3 17066CL9T 6GB T 6GB Kit of 3 DS N A Heat Sink Package 9 9 9 24 1066 8 7 7 20 1 ...

Page 28: ...fter installing the expansion card configure it by adjusting the software settings 1 Turn on the system and change the necessary BIOS settings if any See Chapter 2 for information on BIOS setup 2 Assign an IRQ to the card 3 Install the software drivers for the expansion card 1 5 3 PCI slots The PCI slots support cards such as a LAN card SCSI card USB card and other cards that comply with PCI speci...

Page 29: ...ep the cap on pins 2 3 for about 5 10 seconds then move the cap back to pins 1 2 3 Plug the power cord and turn ON the computer 4 Hold down the Del key during the boot process and enter BIOS setup to re enter data If the steps above do not help remove the onboard battery and move the jumper again to clear the CMOS RTC RAM data After the CMOS clearance reinstall the battery You do not need to clear...

Page 30: ... and replace DIMMs during the tuning process the system continues memory tuning after turning on the computer To stop memory tuning turn off the computer and unplog the power cord for about 5 10 seconds If your system fail to boot due to BIOS overclocking press the MemOK switch to boot and load BIOS default settings A messgae will appear during POST reminding you that the BIOS has been restored to...

Page 31: ...3 4 5 and 6 These four 4 pin Universal Serial Bus USB ports connect to USB 2 0 1 1 devices 8 USB 2 0 ports 7 and 8 These two 4 pin Universal Serial Bus USB ports connect to USB 2 0 1 1 devices 9 8 channel audio ports These ports connects to a multi speaker audio system Audio 2 4 6 or 8 channel configuration Port Headset 2 channel 4 channel 6 channel 8 channel Light Blue Line In Line In Line In Lin...

Page 32: ...pport asus com PowerSupplyCalculator PSCalculator aspx SLanguage en us for details 1 8 2 Internal connectors Do not forget to connect the fan cables to the fan connectors Insufficient air flow inside the system may damage the motherboard components These are not jumpers Do not place jumper caps on the fan connectors 2 CPU chassis and power fan connectors 4 pin CPU_FAN 4 pin CHA_FAN1 3 pin CHA_FAN2...

Page 33: ...apability If you want to connect a high definition front panel audio module to this connector set the Front Panel Type item in the BIOS setup to HD Audio If you want to connect an AC 97 front panel audio module to this connector set the item to AC97 By default this connector is set to HD Audio 4 Serial ATA connectors 7 pin SATA1 6 These connectors are for the Serial ATA signal cables for Serial AT...

Page 34: ...button turns the system on or puts the system in sleep or soft off mode depending on the BIOS settings Pressing the power switch for more than four seconds while the system is ON turns the system OFF Reset button 2 pin RESET This 2 pin connector is for the chassis mounted reset button for system reboot without turning off the system power These connectors are set to Standard IDE mode by default In...

Page 35: ...ect the front panel USB cable to the ASUS Q Connector USB blue first and then install the Q Connector USB to the USB connector onboard if your chassis supports front panel USB ports Never connect a 1394 cable to the USB connectors Doing so will damage the motherboard 7 Serial port connector 10 1 pin COM1 This connector is for a serial COM port Connect the serial port module cable to this connector...

Page 36: ...ace S PDIF port s Connect the S PDIF Out module cable to this connector then install the module to a slot opening at the back of the system chassis The S PDIF module is purchased separately 9 Optical drive audio connector 4 pin CD This connector allows you to receive stereo audio input from sound sources such as a CD ROM TV tuner or MPEG card ...

Page 37: ...onfigure your device Drive jumper setting Mode of device s Cable connector Single device Cable Select or Master Black Two devices Cable Select Master Black Slave Gray Master Master Black or gray Slave Slave Pin 20 on the IDE connector is removed to match the covered hole on the Ultra DMA cable connector This prevents incorrect insertion when you connect the IDE cable Use the 80 conductor IDE cable...

Page 38: ...XP 64 bit XP Vista 64 bit Vista 7 64 bit 7 operating systems OS Always install the latest OS version and corresponding updates to maximize the features of your hardware 1 10 Support DVD information The support DVD that comes with the motherboard package contains the drivers software applications and utilities that you can install to avail all motherboard features 1 10 1 Running the support DVD Pla...

Page 39: ... the support DVD in the optical drive 2 From the Main menu click the Utilities tab and then click Install ASUS Update VX XX XX 3 The ASUS Update utility is copied to your system Quit all Windows applications before you update the BIOS using this utility Updating the BIOS To update the BIOS 1 From the Windows desktop click Start Programs ASUS ASUSUpdate ASUSUpdate to launch the ASUS Update utility ...

Page 40: ...ile is found ASUSTek EZ Flash 2 BIOS ROM Utility V3 36 Current ROM Update ROM A Note FLASH TYPE WOINBOND W25X80 PATH A BOARD P7P55D LE VER 0212 H 00 B 06 DATE 06 11 2009 BOARD Unknown VER Unknown DATE Unknown Enter Select or Load Tab Switch V Drive Info Up Down Home End Move B Backup ESC Exit Updating from a BIOS file a Select Update BIOS from a file then click Next b Locate the BIOS file from the...

Page 41: ...d support DVD may be older than the BIOS file published on the ASUS official website If you want to use the newer BIOS file download the file at support asus com and save it to a USB flash drive Recovering the BIOS To recover the BIOS 1 Turn on the system 2 Insert the motherboard support DVD to the optical drive or the USB flash drive containing the BIOS file to the USB port 3 The utility automati...

Page 42: ...y for most conditions to ensure optimum performance If the system becomes unstable after changing any BIOS settings load the default settings to ensure system compatibility and stability Select the Load Setups Default item under the Exit Menu See section 2 9 Exit menu The BIOS setup screens shown in this section are for reference purposes only and may not exactly match what you see on your screen ...

Page 43: ...A Ultra DMA and SMART monitoring These values are not user configurable These items show N A if no IDE device is installed in the system Type Auto Allows you to select the type of SATA drive installed Not Installed Select this option if no SATA drive is installed Auto Allows automatic selection of the appropriate SATA device type CDROM Select this option if you are specifically configuring a CD RO...

Page 44: ...ables the S M A R T feature Disabled Disables the S M A R T feature 32Bit Data Transfer Enabled Enabled Sets the IDE controller to combine two 16 bit reads from the hard disk into a single 32 bit double word transfer to the processor This makes more efficient use of the PCI bus as fewer transactions are needed for the transfer of a particular amount of data Disabled Disables this function 2 3 2 St...

Page 45: ... you want to create a RAID 0 RAID 1 RAID 5 RAID 10 or the Intel Matrix Storage Technology configuration from the Serial ATA hard disk drives set this item to RAID Hard Disk Write Protect Disabled Disables or enables device write protection This will be effective only if the device is accessed through BIOS Configuration option Disabled Enabled IDE Detect Time Out Sec 35 Selects the time out value f...

Page 46: ...ion of SATA devices BIOS SETUP UTILITY Main SATA Port1 Device Not Detected SATA Port1 Auto SMART Monitoring Enabled Sele ct the t ype of devices connected to the system 2 3 4 System Information This menu gives you an overview of the general system specifications The BIOS automatically detects the BIOS information CPU specification and system memory in this menu BIOS SETUP UTILITY Main BIOS Informa...

Page 47: ...ty to Tuner BCLK Select Screen Select Item Enter Go to Sub Screen F1 General Help F10 Save and Exit ESC Exit Configure System Performance Settings Ai Overclock Tuner Auto CPU Ratio Setting Auto Intel R SpeedStep TM Tech Enabled Intel R TurboMode Tech Enabled Xtreme Phase Full Power Mode Auto DRAM Frequency Auto QPI Frenquency Auto DRAM Timing Control CPU Differential Amplitude Auto CPU Clock Skew ...

Page 48: ...s DDR3 1600MHz DDR3 1800MHz DDR3 1866MHz DDR3 2000MHz DDR3 2133MHz eXtreme Memory Profile Disabled This item appears only when you set the Ai Overclock Tuner item to X M P The configuration options for the following sub item vary depending on the DIMMs you install on the motherboard To obtain the best performance of the X M P DIMM or 1600MHz DIMM install only one DIMM on each memory channel 2 4 2 ...

Page 49: ...cy Auto Allows you to set the DDR3 operating frequency Configuration options Auto DDR3 800MHz DDR3 1066MHz DDR3 1333MHz The DRAM Frequency configuration options vary with the BCLK Frequency item settings Selecting a very high DRAM frequency may cause the system to become unstable If this happens revert to the default setting 2 4 7 QPI Frequency Auto Allows you to set the QPI operating frequency Co...

Page 50: ...iguration options Auto 1 DRAM Clock 18 DRAM Clock DRAM READ to PRE Time Auto Configuration options Auto 1 DRAM Clock 15 DRAM Clock DRAM FOUR ACT WIN Time Auto Configuration options Auto 1 DRAM Clock 63 DRAM Clock 2nd Information 3N 255 255 The values vary depending on your settings of the following sub items DRAM Timing Mode Auto Configuration options Auto 1N 2N 3N DRAM Round Trip Latency on CHA A...

Page 51: ...ity Configuration options Auto 700mV 800mV 900mV 1000mV 2 4 10 CPU Clock Skew Auto Adjusting this item may help enhancing BCLK overclocking ability You may need to adjust the NB Clock Skew item at the same time Configuration options Auto Normal Delay 100ps Delay 1500ps Some of the following items are adjusted by typing the desired values using the numeric keypad and press the Enter key You can als...

Page 52: ...ooling system to work stably under high voltage settings 2 4 16 DRAM DATA REF Voltage on CHA B Auto Allows you to set the DRAM DATA Reference Voltage on Channel A B C The values range from 0 395x to 0 630x with a 0 005x interval Different ratio might enhance DRAM overclocking ability Fixed Voltage Auto This item appears only whne you set the CPU Voltage Mode item to Manual and allows you to set a ...

Page 53: ...d Improve CPU VDroop directly 2 4 18 CPU Spread Spectrum Auto Auto Automatic configuration Disabled Enhances the BCLK overclocking ability Enabled Sets to Enabled for EMI control 2 4 19 PCIE Spread Spectrum Auto Auto Automatic configuration Disabled Enhances the PCIE overclocking ability Enabled Sets to Enabled for EMI control ...

Page 54: ...e following items BIOS SETUP UTILITY Advanced Sets the ratio between CPU Core Clock and the BCLK Frequency NOTE If an invalid ratio is set in CMOS t h e n a c t u a l a n d setpoint values may differ NOTE Please key in ratio numbers directly Select Screen Select Item F1 General Help F10 Save and Exit ESC Exit Configure advanced CPU settings Module Version 01 04 Manufacturer Intel Brand String Inte...

Page 55: ...o enable the L2 cache MLC Spatial Prefetcher for tuning performance of the specific application Disabled Disables this function Max CPUID Value Limit Disabled Enabled Allows legacy operating systems to boot even without support for CPUs with extended CPUID functions Disabled Disables this function Intel R Virtualization Tech Enabled Enabled Allows a hardware platform to run multiple operating syst...

Page 56: ...chnology supported CPU Disabled Disables this function C State package limit setting Auto This item appears only when you set the Intel R C STATE Tech item to Enabled We recommend that you set this item to Auto for BIOS to automatically detect the C State mode supported by your CPU Configuration options Auto C1 C3 C6 2 5 2 North Bridge Configuration The North Bridge Configuration menu allows you t...

Page 57: ...et to IDE Mode when you want to use the Serial ATA hard disk drives as Parallel ATA physical storage devices AHCI Mode Set to AHCI when you want the SATA hard disk drives to use the AHCI Advabced Host Controller Interface The AHCI allows the onboard storage driver to enable advanced Serial ATA features that increases storage performance on random workloads by allowing the drive to internally optim...

Page 58: ...abled Legacy USB Support Auto Disabled Disables the function Enabled Enables the support for USB devices on legacy operating systems OS Auto Allows the system to detect the presence of USB devices at startup If detected the USB controller legacy mode is enabled If no USB device is detected the legacy USB support is disabled BIOS EHCI Hand off Enabled Disabled Disables the function Enabled Enables ...

Page 59: ...IOS SETUP UTILITY Advanced 2 6 Power menu The Power menu items allow you to change the settings for the Advanced Power Management APM Select an item then press Enter to display the configuration options v02 61 C Copyright 1985 2009 American Megatrends Inc BIOS SETUP UTILITY Main Ai Tweaker Advanced Power Boot Tools Exit Select the ACPI state u s e d f o r S y s t e m Suspend Select Screen Select I...

Page 60: ...ed Allows BIOS to switch off some power at S5 state to get system ready for the EuP requirement When set to Enabled power for WOL WO_USB audio and onboard LEDs will be switched off at S5 state 2 6 6 APM Configuration APM Configuration Restore on AC Power Loss Power Off Power On By RTC Alarm Disabled Power On By External Modems Disalbed Power On By PCI Devices Disabled Power On By PCIE Devices Disa...

Page 61: ...rom S5 by PCI devices Enabled Allows you to turn on the system through a PCI LAN or modem card This feature requires an ATX power supply that provides at least 1A on the 5VSB lead Power On By PCIE Devices Disabled Allows you to enable or disable the PCIE devices to generate a wake event Disabled Disables the PCIE devices to generate a wake event Enabled Enables the PCIE devices to generate a wake ...

Page 62: ...e Enabled Enables the CPU Q Fan control feature CPU Fan Profile Standard This item appears only when you enable the CPU Q Fan Control feature and allows you to set the appropriate performance level of the CPU fan Standard Sets to Standard to make the CPU fan automatically adjust depending on the CPU temperature Silent Sets to Silent to minimize the fan speed for quiet CPU fan operation Turbo Set t...

Page 63: ...C Copyright 1985 2009 American Megatrends Inc BIOS SETUP UTILITY Main Ai Tweaker Advanced Power Boot Tools Exit S p e c i f i e s t h e B o o t D e v i c e P r i o r i t y sequence A virtual floppy disk drive Floppy Drive B may appear when you set the CD ROM drive a s t h e f i r s t b o o t device Select Screen S e l e c t I t e m Enter Go to Sub Screen F1 General Help F10 Save and Exit ESC Exit ...

Page 64: ...wer on state of the NumLock to Off On Sets the power on state of the NumLock to On Wait For F1 If Error Enabled Disabled Disables this function Enabled The system waits for the F1 key to be pressed when error occurs Hit DEL Message Display Enabled Disabled Disables this function Enabled The system displays the message Press DEL to run Setup during POST 2 7 3 Security The Security menu items allow ...

Page 65: ... change to any field Limited Allows changes only to selected fields such as Date and Time Full Access Allows viewing and changing all the fields in the Setup utility Change User Password Select this item to set or change the user password The User Password item on top of the screen shows the default Not Installed After you set a password this item shows Installed To set a User Password 1 Select th...

Page 66: ...saved in the BIOS Flash Press Enter and choose a profile to load Start O C Profile Allows you to run the utility to save and load CMOS Press Enter to run the utility Current CMOS Restore CMOS A Note Enter Select or Load Tab Switch V Drive Info Up Down Home End Move B Backup Esc Exit PATH A BOARD P7P55D LE VER 0166 DATE 07 08 2009 BOARD Unknown VER Unknown DATE Unknown ASUSTek O C Profile Utility V...

Page 67: ...setting to the BIOS so that the user data will be cleared the next time you enter the Express Gate User data includes the Express Gate s settings as well as any personal information stored by the web browser such as bookmarks cookies browsing history This is useful in the rare case where corrupt settings prevent the Express Gate environment from launching properly No Set to No to disable the Reset...

Page 68: ...t want to save the changes that you made to the Setup program If you made changes to fields other than System Date System Time and Password the BIOS asks for a confirmation before exiting Discard Changes This option allows you to discard the selections you made and restore the previously saved values After selecting this option a confirmation appears Select Ok to discard any changes and load the p...

Reviews: