background image

10

Support CD

Other Support CD items

[Read Me] 

Text File

Gives you notes concerning this support CD or the Notebook PC.

[Browse this CD] 

Link

Shows you the contents of this support CD using Windows Explorer.

[Technical Support Form] 

Text File

Opens up a Technical Support Request Form so that you will understand what kind of information is needed
if you run into problems and require technical assistance.

[AFLASH2] 

Folder

This utility allows you to upgrade your Notebook PC’s BIOS in DOS mode. You enter DOS mode by
booting to a DOS system on a floppy disk, CD, or USB drive instead of entering the Windows operating
system. AFLASH2.EXE can be found in the Aflash folder of the support CD.

[Exit] 

Link

Closes the support CD autorun screen.

Summary of Contents for M6N

Page 1: ...Notebook PC Drivers and Utilities Product Name Notebook PC Support CD Manual Revision 1 E1435 Release Date December 2003 ...

Page 2: ...eless LAN Driver Setup 18 ASUS WLAN Utility Setup 18 ATKACPI 20 ATKACPI Setup 22 Audio 22 Audio Setup 24 CPU Hotfix 24 CPU Hotfix Setup 1 of 2 26 CPU Hotfix Setup 2 of 2 26 Intel INF Update 27 Intel INF Update Setup 28 LAN 29 LAN Driver Setup 30 Configuring your LAN 31 Modem 34 Modem Setup Automatic 36 Modem Setup Manual 37 ChkMail 40 ChkMail Setup 42 Hotkey 43 Hotkey Setup 44 Hotkey Reference 45 ...

Page 3: ...About Intelligent Update 59 New product registration method 59 About viruses 59 How viruses are created 60 Accessing the Trend Micro Virus Encyclopedia 60 Viewing the Trend Micro Virus list 60 Contacting Technical Support 60 PC cillin 2002 Feature Screens 62 Power4 Gear 62 Power4 Gear Setup 64 Probe2 69 Probe2 Setup 70 Probe2 Reference 71 TouchPad 75 Touchpad Setup 76 Synaptics TouchPad Features 7...

Page 4: ...p 90 Using WINFLASH 91 Memory Reader 92 Memory Reader Driver Setup 94 BIOS Setup 95 Updating your BIOS 96 BIOS Setup Program 96 Main 100 Advanced 101 Advanced sub menu 102 Security 105 Power 108 Boot 109 Boot sub menu 110 Boot 111 Exit 112 ...

Page 5: ...ations after installation The following are contents of a typical support CD Variations may be found for each territory or language If the autorun menu does not appear double clicking the CD ROM disc drive icon in My Computer may be the D drive or E drive on hard drives with two partitions or running SETUP EXE through Start menu Run located in the root of the support CD will bring up the autorun m...

Page 6: ...optional internal wireless LAN you need to install this driver If you did not purchase the optional internal wireless LAN you cannot install this driver This device is shown under Windows Device Manager Network Adapters ATKACPI ATK0100 ACPI UTILITY Utility This utility is required for special utilities provided in the support CD This installs drivers for the Notebook PC sAdvancedConfigurationandPo...

Page 7: ...ssignments canbemadetorunaprogramorscript Thisprogramcannotbeusedtochangedefaultkeysorkeycombinations used by other software operating systems or by the Notebook PC s hardware LiveUpdate Utility This utility helps you easily upgrade your Notebook PC s BIOS through an Internet connection PC cillin 2002 Utility Installs Trend s PC cillin 2002 a world class anti virus protection software for the new ...

Page 8: ...owever theprovideddevicedriverwillprovideenhancementsandfeaturestotheTouchPadtoincreasethefunctionality of the TouchPad For detailed information see the Software Reference in the next section To access help right click the TouchPad icon on the taskbar and select Help WinFlash Utility Installs a BIOS update utility for Windows so that you can conveniently update your Notebook PC s BIOS without havi...

Page 9: ...Already supported in Windows XP SP1 Windows 2000 SP4 This driver is provided by Microsoft in its Windows operating system The support CD also includes a version of this driver for Windows 98 SE or Windows ME This driver is not required for Windows 2000 or Windows XP and installation will not be possible This device is shown under Windows Device Manager Universal Serial Bus controllers SteepStep Al...

Page 10: ...ort Request Form so that you will understand what kind of information is needed if you run into problems and require technical assistance AFLASH2 Folder This utility allows you to upgrade your Notebook PC s BIOS in DOS mode You enter DOS mode by booting to a DOS system on a floppy disk CD or USB drive instead of entering the Windows operating system AFLASH2 EXE can be found in the Aflash folder of...

Page 11: ...stall the VGA driver first in order to see other setup screens in their proper sizes Topics Covered VGA Driver Setup Display Settings for Windows XP ATI Taskbar Icon Screens will vary depending on your operating system but the contents should be the same ...

Page 12: ...greement screen click Yes after reading the message On the Select Components screen click Express to begin installation Click Continue Anyway because this driver has been tested to work with Windows XP On the Setup Complete screen click Finish Restarting now will help enlarge the screen area to view other setup items more comfortably ...

Page 13: ... area In this case you can lower the resolu tion By right clicking your desktop and selecting Properties you can view your display properties ATi Display Properties ATi display properties can be accessed through the advanced button or through the ATi icon on the taskbar For advanced graphics controller settings click the Advanced button Displays This page allows you to enable or disable display ou...

Page 14: ...iles for colors gamma brightness and contrast Direct3D This page allows you to adjust quality and per formance for applications using Direct3D OpenGL This page allows you to adjust quality and per formance for applications using OpenGL Display Settings for Windows XP Cont ...

Page 15: ...tions This page allows you to enable or disable ATi quick access desktop and taskbar menus Overlay This page allows you to adjust brightness con trast saturation hue and gamma for videos Display Settings for Windows XP Cont ...

Page 16: ...You can quickly launch display related property windows using theATi taskbar If you cannot see this icon you may have to Show hidden icons by clicking on Right click the ATi icon for many quick access menus Left click the ATi icon for quick display resolution changing Display Settings for Windows XP Cont ...

Page 17: ...s ASUS Wireless LAN Required Driver Topics Covered Wireless LAN Driver Setup ASUS WLAN Utility Setup ASUS WLAN Utility Quick Start Screens will vary depending on your operating system but the contents should be the same ...

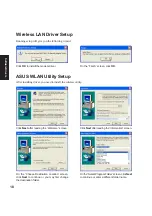
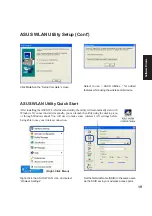
Page 18: ...Utility Setup After installing driver you need to install the wireless utility Click Next after reading the Welcome screen On the Choose Destination Location screen click Next to continue or you may first change the destination folder On the Select Program Folder screen clickNext to continue or enter a different folder name Click Next after reading the Information screen ...

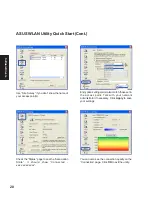
Page 19: ...rough Windows start You will need to make some wireless LAN settings before being able to use your wireless connection Right click the ASUS WLAN icon and select Wireless Settings Set the Network Name SSID to the same name as the SSID set in your wireless access point Click Finish on the Setup Complete screen Select to use ASUS Utilities for added features while using the wireless LAN device Right ...

Page 20: ...to exit the utility Check the Status page to see the Association State It should show Connected xx xx xx xx xx xx Use Site Survey if you don t know the name of your access point s Encryption settings must also match those set in the access point Talk with your network administrator if necessary Click Apply to save your settings ...

Page 21: ...21 Software Drivers ATKACPI Required Utility Topics Covered ATKACPI Setup Screens will vary depending on your operating system but the contents should be the same ...

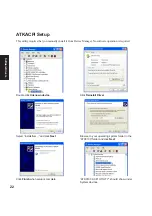
Page 22: ... click Next Browse to your operating system folder in the ATK0100 folder and click Next Click Finish when setup is complete ATK0100 ACPI UTILITY should show under System devices ATKACPI Setup This utility requires that you manually install it from Device Manager No software operation is required ...

Page 23: ...23 Software Drivers Audio Required Driver Topics Covered Audio Setup Screens will vary depending on your operating system but the contents should be the same ...

Page 24: ...er as follows Normally you will get a Found New Hardware Wizard as shown on the next step If not double click theAudio controller with a question mark Select Install from and click Next Browse to the folder shown here and click Next Click ContinueAnyway because this driver has been tested to work with Windows XP Click Finish Restarting Windows will start the USB Controller Click Close to close the...

Page 25: ...25 Software Drivers CPU Hotfix Required Driver Topics Covered CPU Hotfix Setup 1 CPU Hotfix Setup 2 Screens will vary depending on your operating system but the contents should be the same ...

Page 26: ... to utilize advanced features in Intel s latest mobile processor The first file will extract to a separate folder Read hotfix for setup instructions CPU Hotfix Setup 2 of 2 The second file has a setup wizard as follows Click Next on the welcome screen Click Next after selecting I Agree on the License Agreement Wait while setup is in progress Click Finish after setup is complete ...

Page 27: ...27 Software Drivers Intel INF Update Required Driver Topics Covered Intel INF Update Setup Screens will vary depending on your operating system but the contents should be the same ...

Page 28: ...her configurations are necessary On the Welcome screen click Next after reading the message On the Readme screen click Next after reading the message On the License Agreement screen click Yes after reading the message Setup is now complete select No and click Finish in order to install other items ...

Page 29: ...29 Software Drivers LAN Required Driver Topics Covered LAN Driver Setup Configuring your LAN Screens will vary depending on your operating system but the contents should be the same ...

Page 30: ...l the driver as follows Normally you will get a Found New Hardware Wizard as shown on the next step If not double click the Network Controller with a question mark in Device Manager Select Install from and click Next Browse to the appropriate folder and click Next Click Finish when setup is complete Click Close to close the properties window The driver when properly setup will appear as the above ...

Page 31: ...y Computer 2 Click View system information You cannot use spaces or symbols in the computername Intheexamplehere awarning is given when trying to use Notebook PC You can use the single word Notebook instead 3 Your computer name workgroup or domain information is shown here Click Change to view options ...

Page 32: ...b Workgroup If your network does not have a domain or you are not authorized to join a domain select Workgroup and type in an existing name or create your own by typing an unused workgroup name Administrator Name or Password not accepted You cannot login with the Administrator name and use one password then use theAdministrator name with another password to add to a domain You must login using ano...

Page 33: ... After you restart your computer you should see some contents through Entire Network 6 Clickingon My Network Places willdisplay networkswhichyouhaveinstalledprotocols for Clicking a network protocol such as MS WindowsNetwork willdisplayalltheservers available under that protocol ...

Page 34: ...34 Software Drivers ...

Page 35: ... Software Drivers Modem Required Driver Topics Covered Modem Setup Automatic Modem Setup Manual Modem Configuration Screens will vary depending on your operating system but the contents should be the same ...

Page 36: ...36 Software Drivers Modem Setup Automatic Running setup will give you the following wizard Click OK to install the modem driver After setup is complete click OK to close the wizard ...

Page 37: ...an manually install the driver as follows Normally you will get a Found New Hardware Wizard as shown on the next step If not double click the Network Controller with a question mark in Device Manager Select Install from and click Next Browse to the your Windows version under the modem folder and click Next Click Finish when setup is complete ...

Page 38: ... my connection manually and click Next Select Connect using a dial up modem and click Next Modem Configuration Use New Connection Wizard in Network Connections to start the configuration wizard to your modem The New Connection Wizard also allows configuration for other communication devices if available such as LAN ISDN ADSL or Bluetooth ...

Page 39: ...oftware Drivers Modem Configuration Cont Select your modem and click Next Enter any name to represent your ISP Enter the dial up number for your ISP Selection one of the security preferences and click Next ...

Page 40: ...r your ISP account name and password and click Next Select Add a shortcut and click Finish When you click on the link the connection window will show Click Dial to connect to your ISP Connect a telephone cable from your Notebook PC to a telephone jack ...

Page 41: ...41 Software Utilities ChkMail Optional Utility Topics Covered ChkMail Setup Screens will vary depending on your operating system but the contents should be the same ...

Page 42: ...ter reading the message On the Choose Destination Location screen click Next to continue or you may first change the destination folder On the Select Program Folder screen click Next to continue or enter a different folder name On the Setup Complete screen click Finish You must install ATK0100 before running this utility ...

Page 43: ...re Utilities Hotkey Required Utility Topics Covered Setup Screens Hotkey Reference Hotkey Actions Adding a Program to Run Screens will vary depending on your operating system but the contents should be the same ...

Page 44: ...ick Next after reading the message On the Choose Destination Location screen click Next to continue or you may first change the destination folder On the Start Copying Files screen click Next after checking the current settings On the Setup Complete screen click Finish You can select to launch the utility now ...

Page 45: ... you don t use the two preset you can delete them for your own applications When you choose to add a hotkey you can specify a key by pressing that key or key combination in the Hotkey box the Fn key cannot be entered and will be automatically added to the Notebook Fn Hotkey category The available Hotkey actions for assignment are shown in the Hotkey Action pull down Add a Hotkey Delete a Hotkey Ed...

Page 46: ... all Hotkeys by placing check marks in front of the Hotkeys in the current category Actions Descriptions Examples of action None Performs no action Move Window To Left Moves the active window left between 1 50 steps Move Window To Up Moves the active window up between 1 50 steps Move Window To Right Moves the active window right between 1 50 steps Hotkey Actions ...

Page 47: ...nd Window From Right Stretches the active window right between 1 50 steps Extend Window From Below Stretches the active window down between 1 50 steps Shrink Window from Left Shrinks the active window from the left between 1 50 steps Shrink Window from Up Shrinks the active window from the top between 1 50 steps Shrink Window From Right Shrinks the active window from the right between 1 50 steps S...

Page 48: ...dow in normal size user adjustable Restore Restores a minimized window to its previous size Log Off Logs the current user OFF from the current Windows session and any connected networks Shut Down Exits from Windows and turns OFF the Notebook PC Reboot Restarts the Notebook PC Run Explorer Runs Windows Explorer Run Browser Runs the Internet Browser Run Program Runs a user defined program ...

Page 49: ... 4 Choose an executable file using explorer 5 Verify your Hotkey and make sure that it is enabled 3 Choose Run Program in this pull down menu 2 Type a key or key combination here Add a Hotkey Delete a Hotkey Edit Hotkey Enable all Hotkeys Disable all Hotkeys Delete all Hotkeys 1 ClickAddaHotkey button ...

Page 50: ...50 Software Utilities ...

Page 51: ...51 Software Utilities LiveUpdate Recommended Utility Topics Covered LiveUpdate Setup Using LiveUpdate Screens will vary depending on your operating system but the contents should be the same ...

Page 52: ...tion screen click Next to continue or you may first change the destination folder On the Setup Complete screen click Finish On the Select Program Folder screen clickNext to continue or enter a different folder name If you don t have ATK0100 installed you will get this message You must ATK0100 before using this utility ...

Page 53: ...l be shown Check the items to update or select Check all Click OK to download and install the update When update is complete click OK to exit Using LiveUpdate You may be instructed to reset your BIOS It entails pressing F2 on bootup to enter BIOS setup and selecting Load Setup Defaults and then Exit Saving Changes on the Exit menu ...

Page 54: ...54 Software Utilities ...

Page 55: ...C cillin 2002 Recommended Utility Topics Covered PC cillin 2002 Features About Viruses Technical Support PC cillin 2002 Feature Screens Screens will vary depending on your operating system but the contents should be the same ...

Page 56: ...ses every time you open copy move or save a file Protects against downloading infected files from the Internet or FTP sites Guards against malicious Java applets and Microsoft ActiveX controls while surfing the Web Detects and cleans live Trojans installed on your system Monitors your Microsoft Word and Microsoft Excel sessions for macro viruses using MacroTrap Scans and cleans all files on your h...

Page 57: ...ic the firewall prevents malicious programs or files from entering your computer The firewall protects against attacks hackers commonly use including Ping of Death IP conflict SYN flooding and others Trojan Backdoor Blocking If a hacker has already broken into your system he or she could have installed a Trojan small hidden program onto your computer unlike viruses Trojans do not replicate themsel...

Page 58: ...ed threats Using the following processes ScriptTrap automatically scans for scripting viruses based on what they do rather than how they are written lexical analysis divides the script s source code into components called tokens based on punctuation and other keys semantic parsing attempts to determine the meaning of each component Emergency Lock PC cillin also includes an Internet Emergency Lock ...

Page 59: ...to all registered users after which you must purchase renewal maintenance About viruses A computer virus is a program that replicates To do so it needs to attach itself to other program files for example exe com dll and execute whenever the host program executes Beyond simple replication a virus almost always seeks to fulfill another purpose to cause damage Called the damage routine or payload the...

Page 60: ...PC cillin includes access to the online Trend Micro virus encyclopedia organized by name and virus type Use it to find out about tens of thousands of individual viruses including the typical symptoms of a given virus its infection procedure and the damage routine With the growing prevalence of Macro viruses we have bolstered the number of Macro virus descriptions included in the encyclopedia to we...

Page 61: ...to reproduce the problem Before Contacting Technical Support While our technical support staff is always pleased to handle your inquiries there are a couple things you can do to quickly find the answer you are seeking Check the documentation the manual and online help provide comprehensive information about PC cillin Search both documents to see if they contain your solution Visit our technical su...

Page 62: ...features to protect you from Virus threats Use the Help for more information The Emergency Lock is activated All incoming and outgoing Internet traffic is halted Real time Status Select Real time Status by right clicking on the PC cillin icon and you will bring up information on your virus pattern version last scanned file and network activity Stop Network Activity Click the large button with a co...

Page 63: ...tilities Power4 Gear Topics Covered Power4 Gear Setup Benefits of Power4 Gear Power4 Gear Interface Power4 Gear Configuration Screens will vary depending on your operating system but the contents should be the same ...

Page 64: ...e or enter a different folder name On the Setup Complete screen click Finish On the Select Program Folder screen clickNext to continue or enter a different folder name Power4 Gear Setup Running setup will give you the following wizard If you don t have ATK0100 installed you will get this message You must ATK0100 before using this utility ...

Page 65: ...ar icon Power4 Gear can also be automatically activated when AC power is removed Power4 Gear Interface Understanding the Power4 Gear buttons Press the Power4 Gear button above the taskbar to shift between the four gears as labeled below The icon may vary depending on your Notebook PC model Super Performance High Performance Game Performance DVD Movie Performance Email Office Performance Presentati...

Page 66: ... are using an AC adapter the Power4 Gear button will allow switching between three modes as shown above When you remove the AC adapter the Power4 Gear button will allow switching between seven modes as shown above When you remove or apply theAC adapter Power4 Gear will automatically shift you up or down into the proper mode segment AC Mode Segment Battery Mode Segment ...

Page 67: ...t Save Configuration form the File pull down menu If you did not save you will be prompted to when you exit Renaming Settings You can rename the power saving levels as you like using the same method to rename files or folders in Windows In the example on the right the brightness level is decreased to 13 and the name is changed to Max Battery Time ...

Page 68: ...aving Details Double click an item to view possible settings Some power saving items are only available under certain modes Display Panel Brightness System Standby Timer CPU Performance Display Panel Off Timer Hard Drive Off Timer ...

Page 69: ... Utilities Probe2 Topics Covered Probe2 Setup Probe2 Reference Starting Probe2 Using Probe2 Monitoring Probe2 Task Bar Icon Screens will vary depending on your operating system but the contents should be the same ...

Page 70: ...n Choose Destination Location click Next to continue or enter another destination folder On the Select Program Folder screen clickNext to continue or enter a different folder name On the Setup Complete screen click Finish Probe2 Setup Running setup will give you the following wizard ...

Page 71: ...be2 icon magnifying glass is not shown on the taskbar see below click the Windows Start button point to Programs and then ASUS Utility and then click Probe VX XX When Probe2 starts a splash screen appears allowing you to select whether to show the screen again when you open Probe2 or not To bypass this startup screen clear the Show up in next execution check box The Probe2 icon will appear on the ...

Page 72: ...Settings Letsyousetthresholdlevelsandpollingintervals or refresh times of the PC s temperature fan rotation and voltages History Lets you record the temperature monitoring activity by date time and target history Click the record button and select a date To view a previous recording simply choose that date Using Probe2 Monitoring ...

Page 73: ... icon will bring up a menu to open or exit Probe2 and pause or re sume all system monitoring When the Probe2 senses a problem with your PC portions of the Probe2 icon changes to red and audio alerts will be heard from the speaker Hard Drives Shows the used and free space of the PC s hard disk drives and the file allocation table or file systemused Informationonotherharddrivescan beaccessedbyclicki...

Page 74: ...74 Software Utilities ...

Page 75: ... should be the same TouchPad Recommended Utility Topics Covered TouchPad Setup Overview of the TouchPad Scrolling Properties Page Tap Zones Properties Page More Features Properties Page Button Actions Properties Page Touch Properties Page Edge Motion Properties Page Frequently Asked Questions ...

Page 76: ...een click Next after checking the current settings On the Setup Complete screen select No and click Finish On the Information screen click Next after reading the message On the Choose Setup Language screen select a language and click OK to continue Touchpad Setup Running setup will give you the following wizard ...

Page 77: ...o hold the mouse or TouchPad button down while moving the pointer to move an icon or window around the screen for example This action is called dragging Just like clicking and double clicking you can also drag without using the button To move or drag an object equivalent to pressing and holding the left TouchPad button 1 Position the pointer over the object and tap twice down up down leaving your ...

Page 78: ... For additional convenience you can configure the top right corner tap zone of theTouchPad to produce right clicks Looking at theTouchPad surface in the picture below taps in the top right corner the red shaded area will produce right clicks but tapping anywhere else on the TouchPad the solid gray area produces left clicks An Example TouchPad There are many different actions that you can assign to...

Page 79: ...om your work By simply sliding your finger up and down the right edge of the TouchPad the contents of the current window will scroll vertically Similarly by sliding your finger left and right along the bottom edge of the TouchPad the contents will scroll horizontally You no longer need to laboriously maneuver the pointer to the small scroll bar elements you can scroll no matter where the pointer h...

Page 80: ...ludedtwofunapplicationprogramsthatdemonstratesomeofthecapabilitiesoftheTouchPad Pressure Graph and The Incomparable Mysterious Synaptics MoodPad To run these applications click once on the Synaptics TouchPad Icon in the Taskbar go to the Accessories menu and select the desired application More About the TouchPad The TouchPad detects your finger by capacitive sensing it is not sensitive to heat or ...

Page 81: ...Under Pointer Customizing Scroll Zone Sizes This page includes a small map of the TouchPad with the scroll zones shaded in red See the Scroll Zone TouchPad Map for a more detailed description You can adjust the size of each zone by dragging one of the black resize handles on the TouchPad map If you are having trouble activating the Virtual Scrolling feature you might want to try making the scroll ...

Page 82: ... zone to mean right clicks Then when you tap your finger on the upper right corner of your TouchPad it is as if you are clicking the right mouse or TouchPad button This page includes a small map of the TouchPad with the active tap zones shaded in red Next to each zone is a text box specifying the action for that zone To Customize 1 To activate the corner tap zones check the box next to the text En...

Page 83: ...re accuracy when pointing with the TouchPad such as in a drawing program Thespeedofthepointercanmakethistypeofaccuracydifficulttoobtain Toslowdownthepointermovement you can specify a slow motion key Then for slow pointer movement press and hold this key as you move the pointer Constrained Pointer Key At times you may want to restrict the pointer to move only horizontally or only vertically You can...

Page 84: ...ween the left and right buttons Customizing Button Assignments You can customize the TouchPad buttons in the same way that you customize the tap zones To Customize Each button has a text box that displays the current action for example it might say Left which means the left click or primary click action To display a list of possible actions click on the down arrow button located to the right of th...

Page 85: ...vity Use the Touch Sensitivity slider to control how much finger pressure you must apply before the TouchPad responds See Adjust the Overall Touch Sensitivity Palm Check The Palm Check slider controls the TouchPad s detection of accidental and unwanted pointing movement In addition to detecting palm contact with the TouchPad the TouchPad can ignore much of the accidental andunwantedpointermovement...

Page 86: ... TouchPad with the edge zones shaded in red See the Edge Zone TouchPad Map for a more detailed description You can adjust the size of each zone by dragging one of the black resize handles on the TouchPad map If you are having trouble activating the Edge Motion feature you might want to try making the edge zones wider Customizing Edge Motion Speed During Edge Motion the speed at which the pointer o...

Page 87: ...ication which owns that win dow Some applications smooth scroll while others wait until you release the scroll bar before updating their contents Virtual Scrolling knows about many common applications and window types and uses this knowledge to trick many windows into smooth scrolling Microsoft Word document windows for example do not normally smooth scroll but they do when you use Vir tual Scroll...

Page 88: ...for zooming in and out on a spread sheet in Mi crosoft Excel These keys can also be used for special pointer movement such as for slowing the pointer down or for constraining the pointer to move only horizontally or only vertically For ex ample you can assign the left shift key to be the Slow Motion Key Then when you press and hold the left shift key the pointer motion will be slower than usual No...

Page 89: ...89 Software Utilities WinFlash Recommended Utility Topics Covered WinFlash Setup Using WinFlash Screens will vary depending on your operating system but the contents should be the same ...

Page 90: ... Destination Location screen click Next to continue or you may first change the destination folder On the Select Program Folder screen click Next to continue or enter a different folder name On the Setup Complete screen click Finish WINFLASH Setup Running setup will give you the following wizard ...

Page 91: ...his is correct click Flash to write the new BIOS to your Notebook PC You need to restart your Notebook PC and reset your BIOS See instructions on the next page Do not update your BIOS for no reason You will be warned that you should only update your BIOS if you know it will solve a specific problem IfyouupdateyourBIOSusingthewrong BIOS file your Notebook PC may not boot up Example Only You may be ...

Page 92: ...92 Software Utilities ...

Page 93: ...93 Additional Drivers Memory Reader Additional Driver Topics Covered Memory Reader Driver Setup Screens will vary depending on your operating system but the contents should be the same ...

Page 94: ...various memory types See the hardware manual for information on supported memory types Memory Reader Driver Setup Depending on your operating system version and drivers installed you may or may not require this driver If the built in flash memory card does not work Try installing this driver Running setup will give you the following wizard MMC SD MS Pro On the Setup Complete screen click Finish ...

Page 95: ...95 BIOS Setup BIOS Setup Updating your BIOS 96 BIOS Setup Program 96 Main 100 Advanced 101 Advanced sub menu 102 Security 105 Power 108 Boot 109 Boot sub menu 110 Boot 111 Exit 112 ...

Page 96: ...book PC for the first time reconfiguring your system or prompted to Run Setup during bootup This section describes how to configure your system using this utility Even if you are not prompted to use the Setup program at some time in the future you may want to change the configuration of your Notebook PC For example you may want to enable the Security Password Feature or make changes to the power m...

Page 97: ...o the advanced features such as IDE devices and internal pointing device DISPLAY Use this page to make changes to the Notebook PC s internal and external display features SECURITY Use this page to set passwords and control access to the BIOS setup utility and hard disk drive POWER Use this page to configure power performance management features BOOT Use this page to configure storage devices used ...

Page 98: ... for those that have them or keypad arrow Selects the menu item to the left or right or keypad arrows Moves the highlight up or down between fields F1 Displays a general help screen from anywhere in the BIOS Setup F9 Load optimal default settings confirmation will be asked F10 Saves changes and exit confirmation will be asked Esc Jumps to the Exit menu or returns to the main menu from a sub menu H...

Page 99: ...er indicates that a sub menu can be launched from this field A sub menu contains additional options for a field parameter To call up a sub menu simply move the highlight to the field and press Enter The sub menu will then immediately appear Use the legend keys to enter values and move from field to field within a sub menu just as you would within a menu Use the Esc key to return to the main menu T...

Page 100: ...eld Shows the amount of usable memory available to your operating system System Time 00 00 00 display field Sets your system to the time that you specify usually the current time The format is hour minute second Use the Tab or Shift Tab keys to move between the fields System Date Tue 00 00 0000 display field Sets your system to the date that you specify usually the current date The format is Day o...

Page 101: ...n touchpad Some external pointing devices have extra functions that may not function without turning OFF the Notebook PC s touchpad The configuration options are Enabled Disabled Internal Numeric Pad Lock Enabled This allows you to turn ON or OFF the Notebook PC s Numeric Keypad function The configuration options are Enabled Disabled Advanced Selecting this item from the previous menu displays the...

Page 102: ...ny IDE device connected here Press Enter to edit device informa tion Editing device information is only used for troubleshooting by technical computer experts and should never be edited by users ATAPI CDROM This item automatically detects any IDE optical drive connected here Press Enter to edit device information Editing device information is only used for troubleshooting by technical computer ex ...

Page 103: ... disk drive make sure you have the con figuration information supplied by the manufacturer of the drive Incorrect settings may cause your system to not recognize the installed hard disk To allow the BIOS to detect the drive type automatically select AUTO ATAPI CDROM Secondary IDE Slave No Device ...

Page 104: ... transfer modes PIO Modes Different speeds are supported by different genera tions of IDE devices The configuration options are Auto 0 1 2 3 4 DMA Mode Auto When enabled this option speeds up communication between the system and the IDE controller by using DMA capability for improved transfer speeds and data integrity Different speeds are supported by different generations of IDE devices SW Single...

Page 105: ...during system startup The passwords are not case sensitive In other words it makes no difference whether you enter a password using upper or lowercase letters The BIOS Setup program allows you to specify two separate passwords a Supervisor password and a User password When disabled anyone may access all BIOS Setup program functions When en abled the Supervisor password is required for entering the...

Page 106: ... User Password The system password protects the BIOS settings When Enabled you will be prompted for a pass word after you press F2 to enter BIOS setup To set a password 1 Select Change Password and press Enter type a password up to 8 letters numbers and press Enter 2 Type the same password again and press Enter to confirm You can type up to eight alphanumeric characters Symbols and other keys are ...

Page 107: ...d press Enter 2 Type the same password again and press Enter to confirm You can type up to eight alphanumeric characters Symbols and other keys are ignored A message will be shown in BIOS when successful Password installed Future system bootup will display Hard Drive Locked enter password If you enter the wrong password you will see Primary Master Hard Disk Error Press F1 to Resume Pressing F1 wil...

Page 108: ... are Disabled Enabled CPU Power Saving Enabled This allows you to set the performance versus battery optimization method when AC power is applied or removed Enabled will decrease the CPU speed when using battery power The configuration options are Disabled Enabled Start Battery Calibration This function will start a software program to remove memory effects in the battery and recalibrate the batte...

Page 109: ...work device s boot ROM When enabled you can select LAN as a boot device Configuration options are Disabled or Enabled Device Explanations Removable Device refer to the floppy disk used in the internal or USB floppy disk drive IDE Hard Drive refers to the internal built in hard disk drive ATAPI CD ROM refers to either the built in CD ROM drive or DVD ROM drive Other Boot Device currently refers to ...

Page 110: ...ot Enabled When enabled BIOS will skip certain tests while booting This will decrease the time needed to bootup the system The configuration options are Disabled Enabled Quiet Boot Enabled When disabled BIOS will display normal POST messages When enabled BIOS will display a splash screen instead The configuration options are Disabled Enabled ...

Page 111: ...vailable devices A device enclosed in parenthesis has been disabled in the corresponding type menu The configuration examples are Removable Dev MITSUMI USB FDD PM IC25N040ATMR04 ATAPI CDROM Disabled The configuration options de pend on Hard Disk Drives in the previous menu 2nd Boot Device PM IC25N040ATMR04 your model may differ 3rd Boot Device SM TOSHIBA DVD ROM your model may differ ...

Page 112: ... the Notebook PC is turned OFF Once this option is selected a confir mation is asked Select Yes to save changes and exit Discard Changes and Exit This option should only be used if you do not want to save the changes you have made to the Setup program If you have made changes to the fields other than system date system time and password the system will ask for confirmation before exiting Discard C...

Page 113: ...Exit or make other changes before saving the values Load Failsafe Defaults This option allows you to load the Safest values for each of the parameters on the Setup menus This option is for troubleshooting purposes only and will decrease performance as well as disable some of the Notebook PC s functions When this option is selected a confirmation is requested Select Yes to load default values progr...

Page 114: ......
Reviews: