background image

A-7

Appendix    

A

2.  Select each item and 

press [Enter] to select a 

device. 

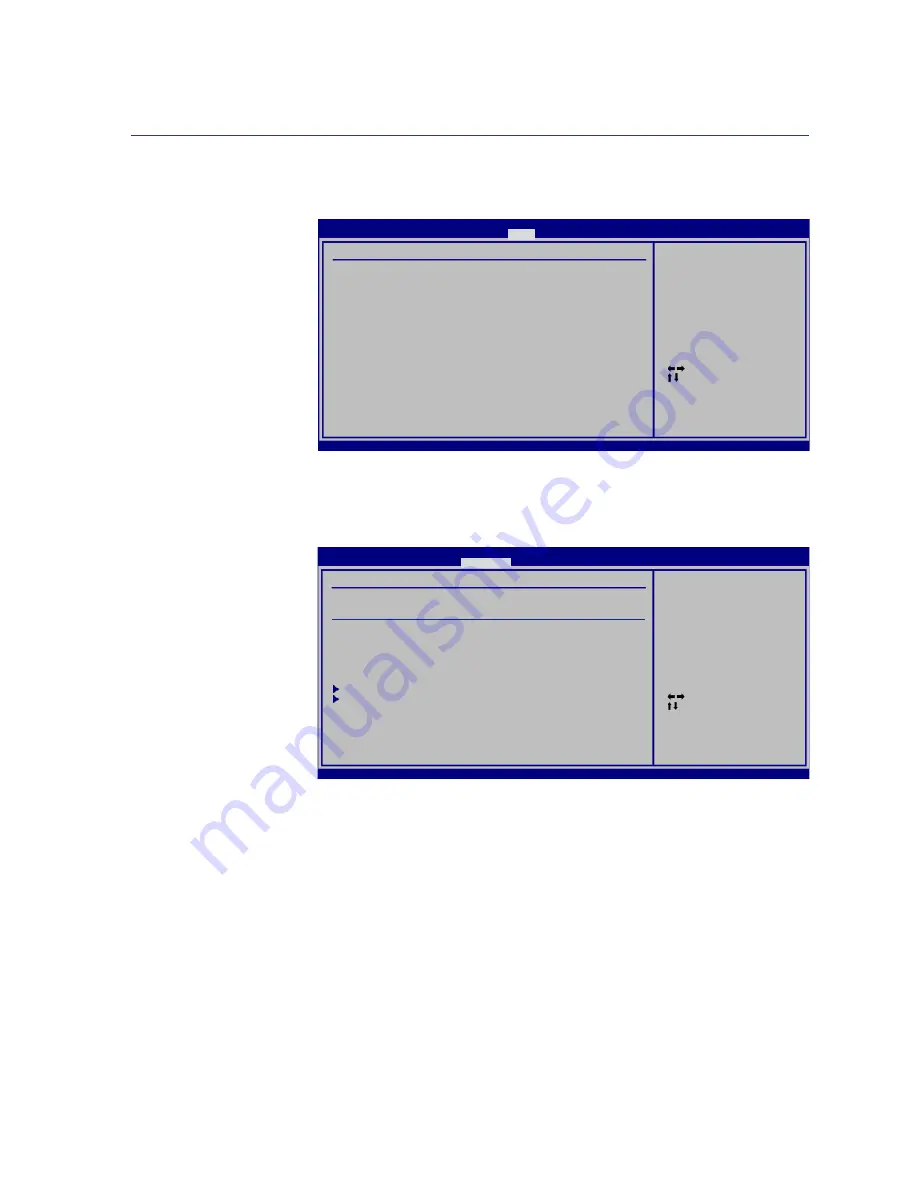
Security Setting

To set the password:


1.  On the 

Security

 screen, 

select 

Change Supervi-

sor

 or 

Change User 

Password

.

2.  Type in a password and 

press [Enter].

3.  Re-type to confirm the 

password and press 

[Enter].

4.  Password is then set.

   Select Screen

    Select Item

+-

   Change Option

F1    General Help

F10   Save and Exit

ESC   Exit

v02.61 (C)Copyright 1985-2006, American Megatrends, Inc.

BIOS SETUP UTILITY


Boot

Boot Device Priority

1st Boot Device 

[Network]

2nd Boot Device 

[CD/DVD]

3rd Boot Device 

[Removable Device]

4th Boot Device 

[Hard Drive]

Specifies the boot 

sequence from the 

availabe devices.

A device enclosed 

in parenthesis has 

been disabled in the 

corresponding type menu.

   Select Screen

    Select Item

Enter Change

F1    General Help

F10   Save and Exit

ESC   Exit

v02.61 (C)Copyright 1985-2006, American Megatrends, Inc.

BIOS SETUP UTILITY


Security

Security Settings

Supervisor Password   : Not Installed

User Password         : Not Installed

Change Supervisor Password

Change User Password


Boot Sector Virus Protection 

[Disabled]


  Hard Disk Security Setting

  I/O Interface Security

<Enter> to change

password.

<Enter> again to 

disabled password.

System BIOS Settings (cont.)

To clear the password:


1.  Leave the password field blank and press [Enter].

2.  Password is then cleared.

Summary of Contents for F70SL

Page 1: ...Notebook PC Hardware User s Manual E4248 October 2008 ...

Page 2: ...6 Using AC Power 26 Using Battery Power 27 Battery Care 28 Powering ON the Notebook PC 29 The Power On Self Test POST 29 Checking Battery Power 30 Charging the Battery Pack 30 Power Options 31 Power Management Modes 32 Sleep and Hibernate 32 Thermal Power Control 32 Special Keyboard Functions 33 Colored Hot Keys 33 Microsoft Windows Keys 35 Extended Keyboard 35 Switches and Status Indicators 36 Sw...

Page 3: ... 47 Memory RAM 49 Connections 50 Network Connection 50 Wireless LAN Connection on selected models 51 Windows Wireless Network Connection 52 Bluetooth Wireless Connection on selected models 53 Appendix Optional Accessories A 2 Optional Connections A 3 Bluetooth Mouse Setup optional A 4 Operating System and Software A 6 System BIOS Settings A 6 Common Problems and Solutions A 9 Windows Vista Softwar...

Page 4: ... Contents ...

Page 5: ...ons Preparing your Notebook PC Photos and icons in this manual are used for artistic purposes only and do not show what is actually used in the product itself There may be differences between your Notebook PC and the drawings shown in this manual Please accept your Notebook PC as being correct ...

Page 6: ...PC s components 5 Appendix Introduces you to optional accessories and gives additional information Notes For This Manual A few notes and warnings in bold are used throughout this guide that you should be aware of in order to complete certain tasks safely and completely These notes have different degrees of importance as described below NOTE Tips and information for special situations TIP Tips and ...

Page 7: ...strong magnetic or electrical fields DO NOT place on uneven or unsta ble work surfaces Seek servicing if the casing has been damaged DO NOT place or drop objects on top and do not shove any foreign objects into the Notebook PC DO NOT press or touch the display panel Do not place together with small items that may scratch or enter the Notebook PC DO NOT leave the Notebook PC on your lap or any part...

Page 8: ...PC is in use Airplane Precautions Contact your airline if you want to use the Notebook PC on the airplane Most airlines will have restrictions for using electronic devices Most airlines will allow electronic use only between and not during takeoffs and landings Transportation Precautions To prepare the Notebook PC for transport you should turn it OFF and disconnect all external pe ripherals to pre...

Page 9: ...ng DO NOT force the display panel down to the table or else the hinges may break Never lift the Notebook PC by the display panel 1 3 Open the Display Panel 4 Turn ON the Notebook PC The power switch turns ON and OFF the Note book PC or putting the Notebook PC into sleep or hibernation modes Actual behavior of the power switch can be customized in Windows Control Panel Power Options System Set ting...

Page 10: ...10 1 Introducing the Notebook PC ...

Page 11: ...os and icons in this manual are used for artistic purposes only and do not show what is actually used in the product itself There may be differences between your Notebook PC and the drawings shown in this manual Please accept your Notebook PC as being correct ...

Page 12: ...12 4 5 7 6 8 2 9 1 3 Top Side Refer to the illustration below to identify the components on this side of the Notebook PC The keyboard differs for each territory 2 Knowing the Parts ...

Page 13: ... Can be used with video conferencing and other interactive applications Camera Indicator The camera indicator shows when the built in camera is in use The camera may be auto activated by supported software Microphone Built in The built in mono microphone can be used for video conferencing voice narrations or simple audio recordings 1 Power Switch The power switch turns ON and OFF the Notebook PC o...

Page 14: ... as a desktop mouse A software controlled scrolling function is available after setting up the included touchpad utility to allow easy Windows or web navigation Status Indicators front Status indicators represent various hardware software conditions See indicator details in sec tion 3 2 Knowing the Parts 8 9 ...

Page 15: ... while it is in operation or recently been in operation High temperatures are normal during charging or operation Do not use on soft surfaces such as beds or sofas which may block the vents DO NOT PUT THE NOTEBOOK PC ON YOUR LAP OR OTHER PARTS OF THE BODY TO AVOID INJURY FROM THE HEAT The bottom side may vary in appearance depending on model The battery pack size varies depending on model Knowing ...

Page 16: ...d reliability 1 2 Secondary Hard Disk Drive Compartment Optional The hard disk drive is secured in a compartment Visit an authorized service center or retailer for information on hard disk drive upgrades for your Notebook PC Only purchase hard disk drives from authorized retailers of this Notebook PC to ensure maximum compat ibility and reliability The secondary hard disk drive is optional This ha...

Page 17: ...osition Battery Pack The battery pack is automatically charged when the Notebook PC is connected to an AC power source and maintains power to the Notebook PC when AC power is not connected This allows use when moving temporarily between locations Battery time varies by usage and by the specifications for this Notebook PC The battery pack cannot be disassembled and must be purchased as a single uni...

Page 18: ... eject the optical drive tray through any software player or by right clicking the optical drive in Windows Computer and selecting Eject This eject also functions as the optical drive activity indicator which shows when data is being transferred by the optical disk drive This indicator will light in proportion to the data size transferred Flash Memory Slot Normally an external memory card reader m...

Page 19: ... wireless status indicator will light Windows software settings are neces sary before use SPDIF Output Jack This jack provides connection to SPDIF Sony Philips Digital Interface compliant de vices for digital audio output Use this feature to turn the Notebook PC into a hi fi home entertainment system Headphone Output Jack The stereo headphone jack 1 8 inch is used to connect the Notebook PC s audi...

Page 20: ...e USB Universal Serial Bus port is compatible with USB 2 0 or USB 1 1 devices such as keyboards pointing devices cameras hard disk drives printers and scanners connected in a series up to 12Mbits sec USB 1 1 and 480Mbits sec USB 2 0 USB allows many devices to run simultaneously on a single computer with some peripherals acting as additional plug in sites or hubs USB supports hot swapping of device...

Page 21: ...To prevent damage to the Notebook PC and battery pack always use the supplied power adapter CAUTION MAY BECOME WARM TO HOT WHEN IN USE BE SURE NOT TO COVER THE ADAPTER AND KEEP IT AWAY FROM YOUR BODY 2 0 USB Port 2 0 1 1 The USB Universal Serial Bus port is compatible with USB 2 0 or USB 1 1 devices such as keyboards pointing devices cameras hard disk drives printers and scanners connected in a se...

Page 22: ...ort with eight pins is larger than the RJ 11 modem port and supports a standard Ethernet cable for connection to a local network The built in connector al lows convenient use without additional adapters Display Monitor Output The 15 pin D sub monitor port supports a standard VGA compatible device such as a moni tor or projector to allow viewing on a larger external display Kensington Lock Port The...

Page 23: ...this side of the Notebook PC 1 WARNING When opening do not force the display panel down to the table or else the hinges may break Never lift the Notebook PC by the display panel Display Panel Button Press the display panel button to open the display panel Knowing the Parts 2 1 ...

Page 24: ...24 2 Knowing the Parts ...

Page 25: ...agement Modes Special Keyboard Functions Switches and Status Indicators Photos and icons in this manual are used for artistic purposes only and do not show what is actually used in the product itself There may be differences between your Notebook PC and the drawings shown in this manual Please accept your Notebook PC as being correct ...

Page 26: ...3 HDMI Power System Using AC Power The Notebook PC power is comprised of two parts the power adapter and the battery power system The power adapter converts AC power from a wall outlet to the DC power required by the Notebook PC Your Notebook PC comes with a universal AC DC adapter That means that you may con nect the power cord to any 100V 120V as well as 220V 240V outlets without setting switche...

Page 27: ...The Notebook PC is designed to work with a removable battery pack The battery pack consists of a set of battery cells housed together A fully charged pack will provide several hours of battery life which can be further extended by using power management features through the BIOS setup Addi tional battery packs are optional and can be purchased separately through a Notebook PC retailer Installing a...

Page 28: ...ill depend on your environment temperature humidity and how your Notebook PC is used It is ideal that the battery be used in a temperature range between 10 C and 35 C 50 F and 95 F You must also take into account that the Notebook PC s internal temperature is higher than the outside temperature Any temperatures above or below this range will shorten the life of the battery But in any case the batt...

Page 29: ... called the Power On Self Test POST The software that controls the POST is installed as a permanent part of the Notebook PC s architecture The POST includes a record of the Notebook PC s hardware configuration which is used to make a diagnostic check of the system This record is created by using the BIOS Setup program If the POST discovers a difference between the record and the existing hardware ...

Page 30: ...con without power adapter Pointer over the battery icon with power adapter Right click the battery icon WARNING DO NOT leave the battery pack discharged The battery pack will dis charge over time If not using a battery pack it must continued to be charged every three months to extend recovery capacity or else it may fail to charge in the future The battery stops charging if the temperature is too ...

Page 31: ...ptions The power switch turns ON and OFF the Notebook PC or putting the Notebook PC into sleep or hibernation modes Actual behavior of the power switch can be customized in Windows Control Panel Power Options For other options such as Switch User Restart Sleep or Shut Down click the arrowhead next to the lock icon Restarting or Rebooting After making changes to your operating system you may be pro...

Page 32: ...on the hard disk drive By doing this RAM does not have to be periodically refreshed and power consumption is greatly reduced but not completely eliminated because certain wake up components like LAN needs to remain powered Hibernate saves more power compared to Sleep Click the Start button and the arrowhead next to the lock icon to see this option Recover by pressing the power button NOTE The powe...

Page 33: ...models stretch es the screen area to fill the entire display when using low resolution modes LCD Monitor Icons F8 Toggles between the Notebook PC s LCD display and an external monitor in this series LCD Only CRT Only External Monitor LCD CRT Clone LCD CRT Extend This function does not work in 256 Colors select High Color in Display Property Settings NOTE Must connect an external monitor before boo...

Page 34: ... This key toggles power savings between various power saving modes The power saving modes control many aspects of the Notebook PC to maximize performance versus battery time Applying or removing the power adapter will automatically switch the system between AC mode and battery mode You can see the current mode through the on screen display OSD Fn V Toggles Life Frame software application Scr Lk Nu...

Page 35: ... The pointer direction keys are for navigation between fields or cells such as those in a spreadsheet or table Getting Started 3 The other key that looks like a Windows menu with a small pointer activates the properties menu and is equivalent to pressing the right mouse button on a Windows object There are two special Windows keys on the keyboard as described below The key with the Windows Logo ac...

Page 36: ...ointing device To unlock enable the touchpad simply press this button again Splendid Key on selected models Toggles Splendid Video Intelligent Technology function ON and OFF This allows switching between different display color enhancement modes in order to improve contrast brightness skin tone and color saturation for red green and blue independently The selected mode is shown on the display Powe...

Page 37: ... power is less than 10 and the AC power is not connected Power Indicator The power indicator lights when the Notebook PC is turned ON and blinks slowly when the Notebook PC is in the Suspend to RAM Sleep mode This indicator is OFF when the Note book PC is turned OFF or in the Suspend to Disk Hibernation mode Wireless Indicator This is only applicable on models with built in wireless LAN When the b...

Page 38: ...volume Fn Up Speaker Icon F12 Increases the audio volume Multimedia Control Keys on selected models The multimedia control keys allows for convenient controlling of the multimedia application The fol lowing defines the meaning of each multimedia control key on the Notebook PC CD Skip to Previous Track Rewind Audio Volume Down During CD play this button has two functions Track The first push will r...

Page 39: ...nnection Wireless LAN Connection on selected models Bluetooth Wireless Connection on selected models Photos and icons in this manual are used for artistic purposes only and do not show what is actually used in the product itself There may be differences between your Notebook PC and the drawings shown in this manual Please accept your Notebook PC as being correct ...

Page 40: ... tip of your finger is all that is required to operate the touchpad Because the touchpad is electrostatic sensitive objects cannot be used in place of your fingers The touchpad s primary function is to move the pointer around or select items displayed on the screen with the use of your fingertip instead of a standard desktop mouse The following illustrations demonstrate proper use of the touchpad ...

Page 41: ...ointer over an item press the left button or use your fingertip to touch the touchpad lightly keeping your finger on the touchpad until the item is selected The selected item will change color The following 2 examples produce the same results Clicking Tapping Double Clicking Double Tapping Touchpad Usage Illustrations Dragging Dragging means to pick up an item and place it anywhere on the screen y...

Page 42: ... or wet Do not rest heavy objects on the touchpad or the touchpad buttons Do not scratch the touchpad with your finger nails or any hard objects Automatic Touchpad Disabling Synaptics Windows can automatically disable the Notebook PC s touchpad when an external USB mouse is at tached This feature is normally OFF to turn ON this feature 4 Using the Notebook PC 1 Select the option in Windows Control...

Page 43: ...ng the Notebook PC 4 Be sure the ExpressCard is level when inserting Inserting an Expansion Card 1 If there is an ExpressCard socket protector remove it using the Removing an ExpressCard instructions below 2 Insert the ExpressCard with the connector side first and label side up Standard ExpressCards will be flush with the Notebook PC when fully inserted 3 Carefully connect any cables or adapters n...

Page 44: ...y get jammed under the drive s tray 3 Hold the disc by the edge and face the disc s printed side up Push down on both sides of the disc s center until the disc snaps onto the hub The hub should be higher than the disc when correctly mounted 4 Slowly push the drive s tray back in The drive will begin reading the table of contents TOC on the disc When the drive stops the disc is ready to be used It ...

Page 45: ...nced CDs or CD print To decrease vibration use the Notebook PC on an even surface and do not place labels on the CD Listening to Audio CD The optical drives can play audio CDs but only the DVD ROM drive can play DVD audio Insert the audio CD and Windows automatically opens an audio player and begins playing Depending on the DVD audio disc and installed software it may require that you open a DVD p...

Page 46: ...l and flash memory card specifications Flash memory card specifications constantly change so compatibility may change without warning Flash Memory Card Examples IMPORTANT Never remove cards while or immediately after reading copying for matting or deleting data on the card or else data loss may occur MS MS Pro SD MMC Memory Stick Duo Pro Duo Pro MG with MS adapater Memory Stick MS Memory Stick Mag...

Page 47: ...ard disk drive Handle the Notebook PC gently and keep it away from static electricity and strong vibrations or impact The hard disk drive is the most delicate component and will likely be the first or only component that is damaged if the Notebook PC is dropped Removing the hard disk drive 1 WARNING Disconnect all the con nected peripherals any telephone or telecommunication lines and power connec...

Page 48: ...48 Installing the hard disk drive 4 Using the Notebook PC 1 2 ...

Page 49: ...tailers of this Notebook PC to ensure maximum compatibility and reliability The BIOS automatically detects the amount of memory in the system and configures CMOS accord ingly during the POST Power On Self Test process There is no hardware or software including BIOS setup required after the memory is installed This is only an example WARNING Disconnect all the connected peripherals any telephone or...

Page 50: ...10Base T use category 3 4 or 5 twisted pair wiring 10 100 Mbps Full Duplex is supported on this Notebook PC but requires connection to a network switching hub with duplex enabled The software default is to use the fastest setting so no user intervention is required 1000BASE T or Gigabit is only supported on selected models Twisted Pair Cable The cable used to connect the Ethernet card to a host ge...

Page 51: ...g or future wireless network configurations for distances up to 40 meters between the client and the access point To provide efficient security to your wireless communication the optional built in wireless LAN comes with a 64 bit 128 bit Wired Equivalent Privacy WEP encryption and Wi Fi Protected Access WPA features Ad hoc mode The Ad hoc mode allows the Notebook PC to con nect to another wireless...

Page 52: ...ct Show Wireless if you have many networks in your area 6 Select the wireless network you want to connect to 7 When connecting you may have to enter a password 8 After connection has been established Connected will be shown 2b Or double click the Wireless Console icon on the taskbar and select either the Wireless LAN Bluetooth or just the Bluetooth 1 Switch ON the Wireless function if necessary fo...

Page 53: ... may also use it for SMS messaging Bluetooth enabled computers or PDAs You can wireless connect to another computer or PDA and exchange files share peripherals or share Internet or network connections You may also make use of Bluetooth enabled wireless keyboard or mouse 2b Or double click the Wireless Console icon on the taskbar and select either the Wireless LAN Bluetooth or just the Bluetooth 3 ...

Page 54: ...54 4 Using the Notebook PC ...

Page 55: ... Recovery Glossary Declarations and Safety Statements Notebook PC Information Photos and icons in this manual are used for artistic purposes only and do not show what is actually used in the product itself There may be differences between your Notebook PC and the drawings shown in this manual Please accept your Notebook PC as being correct ...

Page 56: ...g systems no drivers are necessary USB Hub Optional Attaching an optional USB hub will increase your USB ports and allow you to quickly connect or disconnect many USB peripherals through a single cable USB Floppy Disk Drive An optional USB interface floppy disk drive can accept a standard 1 44MB or 720KB 3 5 inch floppy diskette WARNING To prevent system failures use Windows Safely Remove Hardware...

Page 57: ...ard will allow data entry to be more comfortable Attaching an external USB mouse will allow Windows navigation to be more comfortable Both the external USB keyboard and mouse will work simultaneously with the Notebook PC s built in keyboard and touchpad Printer Connection One or more USB printers can be simultaneously used on any USB port or USB hub ...

Page 58: ...om the Control Panel click Add from this screen 1 Switch ON the Wireless function if necessary for your model see switches in Section 3 2b Or double click the Wireless Console icon on the taskbar and select either the Wireless LAN Bluetooth or just the Bluetooth 3b Or Launch Bluetooth Devices from the Win dows Control Panel 2 Press FN F2 repeatedly until Bluetooth ON or WLAN Bluetooth ON is shown ...

Page 59: ... 6 The pairing starts 7 The Bluetooth mouse has been successfully paired with the Notebook PC Click Close to fin ish the setup R E S E T OFF ON 4 Prepare the Bluetooth mouse Install two AA batteries Turn ON the power switch on the bottom of the mouse The bottom sensor should glow red Push the RESET button on the bottom of the Bluetooth mouse ...

Page 60: ... original working state provided that your hard disk drive is in good working order Contact your retailer if you require such a solution Some of the Notebook PC s components and features may not work until the device drivers and utilities are installed Operating System and Software This Notebook PC may offer depending on territory its customers the choice of a pre installed Microsoft Windows opera...

Page 61: ...movable Device 4th Boot Device Hard Drive Specifies the boot sequence from the availabe devices A device enclosed in parenthesis has been disabled in the corresponding type menu Select Screen Select Item Enter Change F1 General Help F10 Save and Exit ESC Exit v02 61 C Copyright 1985 2006 American Megatrends Inc BIOS SETUP UTILITY Security Security Settings Supervisor Password Not Installed User Pa...

Page 62: ...ord Check Setup Setup Check password while invoking setup Always Check password while invoking setup as well as on each boot Options Setup Always Select Screen Select Item Enter Change F1 General Help F10 Save and Exit ESC Exit v02 61 C Copyright 1985 2006 American Megatrends Inc BIOS SETUP UTILITY Security Security Settings Supervisor Password Installed User Password Installed Change Supervisor P...

Page 63: ...l persists try restoring your system using the recovery partition or DVD NOTE You must backup all your data to another location before recovering 4 If the problem still exist contact your local service center and ask an engineer for assistance Hardware Problem Keyboard Hotkey The Hotkey FN is disabled A Reinstall the ATK0100 driver from the driver CD or download it from the ASUS website Hardware P...

Page 64: ...e the battery pack every three months Hardware Problem Power ON OFF Error I cannot power ON the Notebook PC Diagnostics 1 Power On by Battery only Y 2 N 4 2 Able to see BIOS ASUS Logo Y 3 N A 3 Able to load the OS Y B N A 4 Adapter power LED ON Y 5 N C 5 Power ON by Adapter only Y 6 N A 6 Able to see BIOS ASUS Logo Y 7 N A 7 Able to load the OS Y D N A Symptom Solutions A Problem might be in the M...

Page 65: ... backup all your data to another location before recovering CAUTION Do not connect to the Internet before you have installed an anti virus software and Internet firewall to protect yourself from viruses Service Specification function price How to check whether a Notebook PC is equipped with a wireless card A Enter Control Panel Device Manager You will see whether the Notebook PC has a WLAN card un...

Page 66: ...ows or AFLASH in DOS mode These utilities and BIOS files can be downloaded from the ASUS website WARNING Ensure your Notebook PC does not lose power during the BIOS flashing process 5 If problem still cannot be solved use the recovery process to reinstall your entire system IM PORTANT You must backup all your data to another location before recovering CAUTION DO NOT connect to the Internet before ...

Page 67: ...UP UTILITY Main Advanced Security Power Boot Exit Advanced Settings WARNING Setting wrong values in below sections may cause system to malfunction IDE Configuration Start EZ Flash Internal Pointing Device Enabled Internal Numeric Pad Lock Enabled Play POST Sound Yes Speaker Volume 4 Press ENTER to run the utility to select and update BIOS Press Hotkey F4 at POST to invoke the Utility This utility ...

Page 68: ... by using Windows Up date If the problem still exist try 1 Open NIS 200x by clicking on the NIS icon in your system tray 2 Open Norton AntiVirus in Options menu 3 Click on Instant Messenger uncheck MSN Windows Messenger from Which Instant mes sengers to protect 5 NIS is damaged and need reinstalling NIS is located in the provided disc in the NIS200x folder x is the version number 6 The Start firew...

Page 69: ...indows Firewall 1 Click Start and then Control Panel 2 You will have one of two control panels Click on the Security Center icon 3 Click on the Windows Firewall icon beneath the status updates 4 Click Off and then click OK 10 Why is the Privacy Control icon showing x Turn off Privacy Control from Status Settings 11 Insufficient privilege message Many settings including disabling or uninstalling NI...

Page 70: ...ERY The Recovery Partition is created at the factory and cannot be restored by the user if de leted Take your Notebook PC to an authorized ASUS service center if you have problems with the recovery process Using the Recovery Partition 1 Press F9 during bootup requires a Recovery Partition 2 Press Enter to select Windows Setup EMS Enabled 3 Read the ASUS Preload Wizard screen and click Next 4 Selec...

Page 71: ...251 en us for more details Using the Recovery DVD 1 Insert the Recovery DVD into the optical drive Notebook PC needs to be powered ON 2 Restart the Notebook PC and press Esc on bootup and select the optical drive may be labeled as CD DVD using the down cursor and press Enter to boot from the Recovery DVD 3 Select a partition option and click Next Partition options Recover Windows to first partitio...

Page 72: ...s data between computer components such as memory disks and the display adapter The BIOS instructions are built into the computer s read only memory BIOS parameters can be configured by the user through the BIOS Setup program The BIOS can be updated using the provided utility to copy a new BIOS file into the EEPROM Bit Binary Digit Represents the smallest unit of data used by the computer A bit ca...

Page 73: ... parallel bus used in the PC card slot Not compatible with previous PCMCIA cards Hardware Hardware is a general term referring to the physical components of a computer system including peripherals such as printers modems and pointing devices IDE Integrated Drive Electronics IDE devices integrate the drive control circuitry directly on the drive itself eliminating the need for a separate adapter ca...

Page 74: ...ffuse reflections Personnel working with these lasers should wear appropriate protective eye wear during any operation of the laser Class 3B lasers have both admin istrative and physical controls to protect personnel Physical controls include limited access work areas Administrative controls include special warning signs posted outside the entrances to the laser work spaces and lights outside the ...

Page 75: ... provides the ability to the PC or Notebook PC to run applications more secure and to make transactions and communication more trustworthy Twisted Pair Cable The cable used to connect the Ethernet card to a host generally a Hub or Switch is called a straight through Twisted Pair Ethernet TPE The end connectors are called RJ 45 connectors which are not compatible with RJ 11 telephone connectors If ...

Page 76: ... an optional DVD ROM drive or a CD ROM drive In order to view DVD titles you must install your own DVD viewer software Optional DVD viewer software may be purchased with this Notebook PC The DVD ROM drive allows the use of both CD and DVD discs Regional Playback Information Playback of DVD movie titles involves decoding MPEG2 video digital AC3 audio and decryption of CSS protected content CSS some...

Page 77: ...ded is by means of dual tone multifrequency signalling Network Compatibility Declaration Statement to be made by the manufacturer to the Notified Body and the vendor This declaration will indicate the networks with which the equipment is designed to work and any notified networks with which the equipment may have inter working difficulties Network Compatibility Declaration Statement to be made by ...

Page 78: ... Yes No Poland No Not Applicable Portugal No Not Applicable Spain No Not Applicable Sweden Yes No Switzerland Yes No United Kingdom Yes No This information was copied from CETECOM and is supplied without liability For updates to this table you may visit http www cetecom de technologies ctr_21 html 1 National requirements will apply only if the equipment may use pulse dialling manufacturers may sta...

Page 79: ...pment into an outlet on a circuit different from that to which the receiver is con nected Consult the dealer or an experienced radio TV technician for help WARNING The use of a shielded type power cord is required in order to meet FCC emission limits and to prevent interference to the nearby radio and television recep tion It is essential that only the supplied power cord be used Use only shielded...

Page 80: ...n 5 15 GHz and 5 25GHz frequency ranges and is restricted to indoor environments only FCC Caution Any changes or modifications not expressly approved by the party responsible for compliance could void the user s authority to operate this equip ment The manufacturer declares that this device is limited to Channels 1 through 11 in the 2 4GHz frequency by specified firmware controlled in the USA FCC ...

Page 81: ...ich the use of the 2400 2483 5 MHz band is permitted with an EIRP of less than 100mW indoors and less than 10mW outdoors 01 Ain Orientales 02 Aisne 03 Allier 05 Hautes Alpes 08 Ardennes 09 Ariège 11 Aude 12 Aveyron 16 Charente 24 Dordogne 25 Doubs 26 Drôme 32 Gers 36 Indre 37 Indre et Loire 41 Loir et Cher 45 Loiret 50 Manche 55 Meuse 58 Nièvre 59 Nord 60 Oise 61 Orne 63 Puy du Dôme 64 PyrénéesAtl...

Page 82: ...1642 covering primary non rechargeable and secondary rechargeable lithium batteries for use as power sources in products These batteries contain metallic lithium or a lithium alloy or a lithium ion and may consist of a single electrochemical cell or two or more cells connected in series parallel or both that convert chemical energy into electrical energy by an irreversible or reversible chemical r...

Page 83: ...everandøren Danish VARNING Explosionsfara vid felaktigt batteribyte Använd samma batterityp eller en ekvivalent typ som rekommenderas av apparattillverkaren Kassera använt batteri enligt fabrikantens instruktion Swedish VAROITUS Paristo voi räjähtää jos se on virheellisesti asennettu Vaihda paristo ainoastaan laitevalmistajan sousittelemaan tyyppiin Hävitä käytetty paristo valmistagan ohjeiden muk...

Page 84: ...for laser products on August 2 1976 These regulations apply to laser products manufactured from August 1 1976 Compliance is mandatory for products marketed in the United States Macrovision Corporation Product Notice This product incorporates copyright protection technology that is protected by method claims of certain U S A patents and other intellectual property rights owned by Macrovision Corpor...

Page 85: ...A 31 CTR 21 Approval for Notebook PC with built in Modem Danish Dutch English Finnish French German Greek Italian Portuguese Spanish Swedish Appendix A ...

Page 86: ...Accessories _ _________________________________________________________ Software Operating System _ _________Version ____________Serial Number ______________ Software _________________Version ____________Serial Number ______________ Software _________________Version ____________Serial Number ______________ Security Supervisor Name ______________________ Supervisor Password ______________ User Name...

Page 87: ...LD NOT BE CONSTRUEDASACOMMITMENT BYASUS ASUSASSUMES NO RESPONSIBILITYOR LIABILITYFORANYERRORS OR INACCURACIES THAT MAYAPPEAR IN THIS MANUAL INCLUDING THE PRODUCTS AND SOFTWARE DESCRIBED IN IT Copyright 2008 ASUSTeK COMPUTER INC All Rights Reserved Limitation of Liability Circumstances may arise where because of a default on ASUS part or other liability you are entitled to recover damages from ASUS...

Reviews: