background image

3-5

華碩 CS6110

 CS6110

連接多個外接顯示器

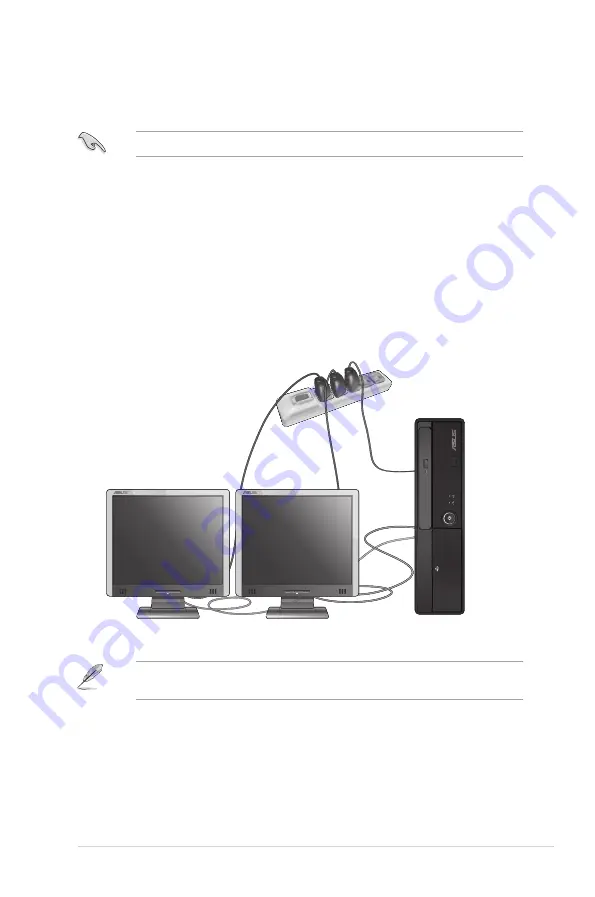
您的台式�視�型配�而定,可能配有  VGA、HDMI、DVI  等接口,允許您連

接多個外接顯示器。

設置多個顯示器(以 windows 7 系統為例)

�您連接多個顯示器后,您可以��顯示模式。您可以讓增�顯示器與主顯示

器顯示相同的內容,或作為主顯示器的�展顯示器以�展 Windows 桌面。 

�按照以下步驟��多個顯示器:

1. 

關閉您的電腦。

2. 

�兩個顯示器與您的電腦相連,並�電源線連接�這兩個顯示器。�參閱�一
章“��您的電腦”獲得更多連接顯示器的方�。

�您的電腦��好顯�后,�顯示器接連�顯��出接口。

對於某些顯�,僅被�為主�顯示的顯示器才能在開���時顯示出來。雙重顯示
功能只可在 Winodws �作系統中運行。

Summary of Contents for CS6110

Page 1: ...華碩桌上型電腦 CS6110 使用手冊 ...

Page 2: ...地仿製 拷 貝 謄抄 轉譯或為其他使用或處分 本使用手冊沒有任何型式的擔保 立 場表達或其它暗示 若有任何因本使用手冊或其所提到之產品的所有資訊 所引起直接或間接的資料流失 利益損失或事業終止 華碩及其所屬員工恕 不為其擔負任何責任 除此之外 本使用手冊所提到的產品規格及資訊僅供 參考 內容亦會隨時更新 恕不另行通知 華碩不負責本使用手冊的任何錯 誤或疏失 本使用手冊中所提及的產品名稱僅做為識別之用 而前述名稱可能是屬 於其他公司的註冊商標或是著作權 關於產品規格最新的升級訊息 請您到華碩的網站瀏覽或是直接與華碩 公司聯絡 版權所有 不得翻印 2010 華碩電腦 ...

Page 3: ...覽 歡迎 1 1 了解您的桌上型電腦 1 1 安裝您的桌上型電腦 1 5 開啟或關閉您的電腦 1 7 第二章 使用 Windows 7 選配 第一次啟動 2 1 使用 Windows 7 桌面 2 2 管理檔案與資料夾 2 7 還原您的系統 2 10 保護您的電腦 2 11 進入 Windows 說明及支援 2 15 第三章 裝置連接 連接 USB 儲存裝置 3 1 連接麥克風與喇叭 3 2 連接多個外接顯示器 3 5 連接一台高清電視機 3 7 第四章 使用您的電腦 使用電腦時的適當姿勢 4 1 使用讀卡機 4 2 使用光碟機 4 3 ...

Page 4: ...iv 第五章 網路連線 有線連接 5 1 第六章 使用應用程式 選配 華碩 AI Manager 6 1 華碩線上更新 ASUS Update 6 7 華碩 MyLogo2 6 8 Nero 9 6 9 使用光碟回復您的系統 僅限預裝 Windows 作業系統的機型 6 13 第七章 疑難解決 華碩桌上型電腦常見問題疑難排除快速指南 7 4 ...

Page 5: ...led and used in accordance with manufacturer s instructions may cause harmful interference to radio communications However there is no guarantee that interference will not occur in a particular installation If this equipment does cause harmful interference to radio or television reception which can be determined by turning the equipment off and on the user is encouraged to try to correct the inter...

Page 6: ...anadian Department of Communications Statement This digital apparatus does not exceed the Class B limits for radio noise emissions from digital apparatus set out in the Radio Interference Regulations of the Canadian Department of Communications This class B digital apparatus complies with Canadian ICES 003 Macrovision 公司產品公告 本產品包含使用 Macrovision 公司的版權保護技術 受美國與其它智慧專利權註 冊保護 使用此保護技術必需經 Macrovision 公司授...

Page 7: ...強大電磁場的環境中 請保持機器在乾燥的環境下使用 雨水 溼氣 液體等含有礦物質將會腐蝕電子 線路 請勿在雷電天氣下使用數據機 電池安全警示 請勿將電池丟入火中 請勿將電池的正負極短路 請勿自行拆解 電池 請在溫度為 0 32 至 35 95 之間的環境中使用本電腦 請勿堵塞個人電腦的通風孔 以避免因散熱不良而導致系統過熱 請勿使用破損的電源線 附件或其他周邊裝置 為了防止電擊風險 在搬動電腦主機之前 請先將電腦電源插頭暫時從電源插座 上移除 在使用變壓器或電源延長線前 我們推薦您先尋求專業人士的協助 這些裝置有 可能會干擾接地的迴路 請確定電源的電壓設定已調整到本國 本區域所使用的電壓標準值 若您不確定您 所屬區域的供應電壓值為何 請就近詢問當地的電力公司人員 如果電源已損壞 請不要嘗試自行修復 請將之交給專業技術服務人員或經銷商 來處理 產品額定值 19V 3 42A 主機板上之 RTC...

Page 8: ...定 注意 提供有助於完成某項工作的訣竅和其他額外的資訊 哪裡可以找到更多的產品資訊 您可以經由下面所提供的兩個管道來獲得您所使用的華碩產品資訊以及軟硬體 的更新資訊等 1 華碩網站 您可以到 http tw asus com 華碩電腦全球資訊網站取得所有關於華碩軟硬體產 品的各項資訊 2 華碩當地技術支援 您可以造訪 http support asus com contact 華碩網站取得您所在地區的技術支援工 程師的聯繫資訊 3 電腦出廠已將啟用電源管理軟體設定為預設值 電源管理功能可使電腦在靜止 一段時間後 切換為低耗能模式 或睡眠模式 藉此減少電力損耗並協助使 用者節省電力費用 其它更多節能資訊可參考華碩CSR網站 http csr asus com english index aspx 37 ...

Page 9: ...tio 桌上型電腦 鍵盤 x1 選配 滑鼠 x1 選配 電源線 x1 選配 AC 變壓器 x1 驅動程式與公用程式 光碟 x1 選配 Installation Guide 還原光碟 x1 選配 安裝指南 x1 華碩保固服務卡 x1 若包裝內容有所損壞或丟失 請與經銷商聯絡 上述圖中所示物品與外觀僅供參考 實際產品規格依不同型號而定 部分地區出貨的機器可能不附贈滑鼠與鍵盤 華碩公司有權替換組件或配件以提供優質服務 包裝內容 ...

Page 10: ... ...

Page 11: ...系統導覽 了解您的桌上型電腦 主機前面板 本手冊中的機殼圖片描述僅供參考 各連接埠及其位置 與外殼顏色均依不同機型 而異 請在安裝您的機殼前先參閱您的華碩保固服務卡 點選號碼以查看相關描述 歡迎 感謝您購買華碩 Essentio CS6110 桌上型電腦 華碩 Essentio CS6110 桌上型電腦擁有一流的效能 超凡的可靠性與以使用者為 中心的應用程式 並安裝在華碩特別設計的機殼中 2 4 5 6 3 1 8 7 9 11 10 ...

Page 12: ...收器 可接收遙控器發出的紅外線訊號 1 3 2 8 9 4 5 6 7 10 11 12 13 4 無線網路 藍牙指示燈 5 硬碟指示燈 6 電源按鈕 按下此按鈕啟動您的電腦 7 MMC SD MS 讀卡器 將 MMC SD MS 卡插入此槽 8 IEEE 1394a 連接埠 此 6 pin IEEE 1394a 連接埠提供高速連接 可連接音訊 視 訊 周邊存儲裝置 PC 或其他可攜帶裝置 9 USB 3 0 連接埠 視出貨機型而定 可連接 USB 3 0 裝置 10 麥克風接頭 此接頭可連接麥克風 11 耳機連接埠 該連接埠可連接耳機或外接音箱 遙控器需另行購買 ...

Page 13: ... 八聲道的喇叭設定模式時 本接頭是作為連接前置主聲道喇叭 之用 9 音效輸入連接埠 淺藍色 您可以將磁帶 CD DVD 播放器等的音效輸出端 連接到此音效輸入連接埠 二 四 六或八聲道音效設定 接頭 耳機 二聲道 喇叭輸出 四聲道 喇叭輸出 六聲道 喇叭輸出 八聲道 喇叭輸出 淺藍色 聲音輸入端 聲音輸入端 聲音輸入端 聲音輸入端 草綠色 聲音輸出端 前置喇叭輸出 前置喇叭輸出 前置喇叭輸出 粉紅色 麥克風輸入端 麥克風輸入端 麥克風輸入端 麥克風輸入端 橘色 中央重低音喇叭輸 出 中央重低音喇叭 輸出 黑色 後置喇叭輸出 後置喇叭輸出 後置喇叭輸出 灰色 側邊喇叭輸出 在 2 4 6 8 聲道音效設定上 音效輸出 音效輸入與麥克風接頭的功能會隨 著聲道音效設定的改變而改變 如下表所示 10 LAN RJ 45 連接埠 透過網路中心連接到一個區域網路 LAN Activity Link 指...

Page 14: ...1 4 第一章 系統導覽 請勿堵住通風孔 並經常為您的電腦通風 11 VGA 連接埠 將您的電腦連接至 VGA 顯示器或其他 VGA 相容裝置 12 Kensington 鎖槽 可使用Kensington 相容防盜鎖將您的桌上型電腦鎖在一個固 定物體上 13 通風孔 提供給機殼內的零組件進行通風 ...

Page 15: ...該章節引導您連接主要硬體裝置 例如外部顯示器 鍵盤 滑鼠以及電源線至 您的電腦 連接一個外部顯示器 將您的顯示器連接至顯示卡的顯示連接埠 如 VGA HDMI 或者 DVI 具體視出 貨機型而定 請依照以下步驟連接一個外部顯示器 1 將您的顯示器連接至顯示卡的顯示連接埠 2 將顯示器插上電源 華碩獨立顯示卡的顯示連接埠分佈視具體機型而定 若您的機殼有獨立顯示卡 請將顯示器連接至獨立顯示卡的顯示連接埠 圖示部份僅供參考 隨機型不同背部連接埠會有不同 ...

Page 16: ...1 6 第一章 系統導覽 連接 USB 鍵盤與滑鼠 將一個 USB 鍵盤與滑鼠連接至後面板的 USB 連接埠 C 連接 AC 變壓器 請依照以下步驟連接 AC 變壓器 1 將 AC 電源線與 AC 變壓器相連 2 將 AC 變壓器連接至電腦後面板上的電源 DC 連接埠 3 將 AC 變壓器連上電源 圖示部份僅供參考 隨機型不同背部連接埠會有不同 ...

Page 17: ...1 7 開啟或關閉您的電腦 本章節引導您在安裝完成后如何開啟或關閉您的電腦 開啟您的電腦 請按照以下步驟開啟您的電腦 1 開啟您的顯示器 2 開啟電源開關 視出貨機型而定 然後按下電源按鈕 關閉您的電腦 Windows 系統 請按照以下步驟關閉您的電腦 1 關閉所有執行中的程式 2 在 Windows 桌面上點選 開始 按鈕 3 點選 關機 按鈕關閉作業系統 4 關閉電源開關 視出貨機型而定 3 等待直至作業系統自動載入 ...

Page 18: ...1 8 第一章 系統導覽 ...

Page 19: ...的電腦 等待幾分鐘直至 設定 Windows 畫面出現 2 在下拉選單中選擇您想要的語言 然後點選 下一步 3 在下拉選單中選擇您的國家或地區 時區 貨幣以及鍵盤佈局 然後點選 下一 步 4 輸入使用者名稱與電腦名稱 然後點選 下一步 5 輸入所需資訊來設定您的密碼 然後點選 下一步 您也可以不輸入任何資訊 點選 下一步 跳過這一步 6 請仔細閱讀許可條款 勾選 我願意接受許可條款 然後點選 下一步 7 選擇 使用推薦設定 或 僅安裝重要更新 來為您的電腦進行安全設定 若您想要 跳過這一步請選擇 以後問我 8 請再次確認您的時區設定 然後點選 下一步 系統開始載入新設定並重新啟 動 您可以開始使用您的電腦 若您想稍後為您的帳戶設定密碼 請參閱本章節 設定使用者帳號及密碼 ...

Page 20: ...區域 工作列 開始功能表 使用開始功能表 開始功能表允許您進入電腦上的程式或其它使用項目 它透過 說明及支援 功能提供您更多 Windows 7 的資訊 從開始功能表進入選項 請參考以下步驟由開始功能表進入選項 1 在 Windows 工作列中點選開始圖示 2 在開始功能表中選擇您想要進入的選項 您可以將您常用的程式釘在開始功能表中成為一個小圖示 更多資訊請參閱本章節 在開始功能表或工作列中新增程式 點選開始圖示 說明及支援 來獲取更多關於 Windows 7 作業系統的資訊 ...

Page 21: ...輸檔案等 幫助您更了解 如何使用 Windows 7 作業系統 請參考以下步驟使用 開始使用 1 在 Windows 工作列中點選開始圖示 進入開始功能表 2 選擇 開始使用 展開一系列任務選項 您也可以點選 開始 控制台 開始使 用 進入作業 3 選擇您想要的任務選項 使用工作列 工作列允許您進入以及管理已安裝在您的電腦上的程式或選項 從工作列進入程式 請參考以下步驟從工作列進入程式 在工作列中點選一個圖示進入此程式 再次點選圖示可隱藏此程式 您可以將您常用的程式釘在開始功能表中成為一個小圖示 更多資訊請參閱本章節 在開始功能表或工作列中新增程式 ...

Page 22: ...在捷徑上 例如您喜愛的網站 經常瀏覽的資 料夾 驅動程式或最近播放的媒體檔案 在捷徑中移除選項 請參考以下步驟在捷徑中移除選項 1 用滑鼠右鍵點選工作列中的一個圖示 2 在捷徑中用滑鼠找到你想要移除的鎖定選項 然後點選其後邊的小圖釘圖標即 可 在開始功能表或工作列中新增程式 1 在 Windows 工作列中點選開始圖示 進入 開始功能表 2 在開始功能表或工作列中用滑鼠右鍵點選你 想要釘入的選項 3 選擇 釘選到工作列 或 釘選到 開始 選單 您也可以用滑鼠右鍵點選工作列中 一個正在執行的程式的圖示 然後 選擇 將此程式釘選到工作列 請參考以下步驟在開始功能表或工作列中新增程式 ...

Page 23: ...中用滑鼠右鍵點選你想要移除的程式 然後選擇 從開始功能表取 消釘選 在工作列中移除程式 請參考以下步驟在工作列中移除程式 1 在工作列中用滑鼠右鍵點選你想要移除的程 式 然後選擇 將此程式從工作列取消釘選 使用通知區域 預設的通知區域顯示以下三種圖示 作業中心通知 點選該圖示顯示所有警示資訊或通知 以及進入 Windows 作業中心 網路連線 該圖示顯示有線 無線網路連線狀態以及訊號強度 音量 點選此圖示調節音量 顯示操作中心通知 請參考以下步驟顯示操作中心通知 點選操作中心通知圖示 然後點選第一行 的 重要訊息 開啟 更多資訊請參閱本章節 Windows 作業中心 ...

Page 24: ...2 6 第二章 使用 Windows 7 個人化圖示與通知 您可以選擇在工作列或通知區域顯示或隱藏圖示與通知 請參考以下步驟個人化圖示或通知 1 在通知區域點選箭頭圖示 2 點選 個人化 3 在下拉選單中選擇您想要個性化的圖示或選項的行為 ...

Page 25: ...s 瀏覽器 Windows 瀏覽器允許您檢視或管理您的檔案與資料夾 進入 Windows 瀏覽器 請參考以下步驟進入 Windows 瀏覽器 1 在工作列中點選開始圖示 進入開始功能表 2 點選 電腦 進入 Windows 瀏覽器 瀏覽檔案與資料夾 請參考以下步驟瀏覽檔案與資料夾 1 進入 Windows 瀏覽器 2 在功能窗格或顯示面板中尋找所需資料的位置 3 在位址列中點選箭頭顯示磁碟機或資料夾 功能窗格 位址列 搜尋方塊 顯示圖示 預覽圖示 工具列 顯示面板 ...

Page 26: ...步驟個人化資料夾預覽方式圖示 1 進入 Windows 瀏覽器 2 在功能窗格中選擇您所需資料的位置 3 在工具列中點選顯示圖示 4 在圖示選單中移動滑塊選擇你想要檢視檔案或資料 夾的方式 您也可以在顯示面板上用滑鼠右 鍵點選任何一處 在展開的選項 中點選 檢視 並選擇您想要檢 視檔案或資料夾的方式 排列您的檔案 在 Windows 媒體櫃資料夾中 請參考以下步驟排列您的檔案 1 進入 Windows 媒體櫃 2 點選 排列方式 顯示下拉選單及選項 3 選擇您想要的排列方式 ...

Page 27: ...s 瀏覽器 2 在顯示面板上用滑鼠右鍵點選任何一 處 3 在出現的選單中選擇 排序方式 然 後選擇您想要的排序方式 將檔案進行分組 請參考以下步驟將檔案進行分組 1 進入 Windows 瀏覽器 2 在顯示面板上用滑鼠右鍵點選任何一 處 3 在出現的選單中選擇 分組方式 然 後選擇您想要的分組方式 新增一個新資料夾 請參考以下步驟新增一個新資料夾 1 進入 Windows 瀏覽器 2 在工具欄中點選 新增 3 輸入新資料夾名稱 您也可以在顯示面板上用滑鼠右 鍵點選任何一處 點選 新增 資料夾 ...

Page 28: ...還原您的系統 Windows 系統還原功能可能會建立還原點 在那裡系統可以在特定時間或日期 儲存設定 此功能允許您還原或撤銷您對系統的更改且不影響您的個人資料 請參考以下步驟還原您的系統 1 關閉所有正在執行的程式 2 點選 所有程式 附件 系統工具 系統還原 3 按照螢幕出現的步驟完成設定 3 選擇備份檔案的目標位置 點選 下一步 4 選擇 讓 Windows 選擇 推薦 或 讓我選擇 若您選擇 讓 Windows 選擇 Windows 將不會備份 1GB 或以上的程式 FAT 格式 檔案 垃圾桶檔案或臨時檔案 5 按照螢幕出現的步驟完成設定 ...

Page 29: ...110 2 11 保護您的電腦 使用 Windows 7 作業中心 Windows 7 作業中心為您提供警示通知 安全資訊 系統維護資訊 自動疑難 解決選項以及修復一些電腦常見問題 您可以自行制定警示通知 更多資訊請參閱本章節的 個性化圖示與通知 進入 Windows 7 作業中心 請參考以下步驟進入Windows 7 作業中心 1 點選通知圖示 再點選 開啟行動 作業中心 2 在作業中心裡點選您想要進行的操作 ...

Page 30: ...章 使用 Windows 7 使用 Windows Update Windows Update 允許您檢查與安裝最近的更新內容 以增強電腦的安全與效 能 進入 Windows Update 請參考以下步驟進入 Windows Update 1 在 Windows 工作列中點選開始圖示 進入開始功能表 2 選擇 所有程式 Windows Update 3 在 Windows Update 畫面中點選您想要進行的操作 ...

Page 31: ...華碩 CS6110 2 13 設定使用者帳戶與密碼 您可以為使用您電腦的使用者設定帳戶與密碼 設定使用者帳戶 請參考以下步驟設定使用者帳戶 1 在 Winodws 工作列中點選 開始使用 新增新使用者 2 選擇 管理其他帳戶 3 選擇 建立一個新帳戶 4 輸入新使用者名稱 5 選擇 標準使用者 或 系統管理員 作為使用者類型 6 完成後點選 建立帳戶 您也可以在 控制台 使用者帳戶 做同樣的作業 ...

Page 32: ...2 14 第二章 使用 Windows 7 設定使用者密碼 請參考以下步驟設定使用者密碼 1 打開 控制台 使用者帳戶 2 選擇 變更您的使用者帳戶 3 輸入密碼並確認 輸入密碼提示 4 完成後點選 變更密碼 ...

Page 33: ...另行購買 在啟動它之後 您將會有一段時間的試用期 通常為 60 天 請參考以下步驟啟動趨勢科技網路安全 Trend Micro Internet Security 1 執行趨勢科技網路安全 Trend Micro Internet Security 應用程式 2 仔細閱讀許可條款 然後點選 同意並啟動 3 輸入您的郵件地址並選擇您的位置 點選 下一步 4 點選 完成 結束啟動 進入 Windows 說明及支援 Windows 說明及支援可以提供您 Windows 7 作業系統中使用應用程式的說明與 解決方法 點選 說明及支援 進入 Windows 說明及支援 請確認您已連接網路以獲得最新 Winows 線上支援 ...

Page 34: ...2 16 第二章 使用 Windows 7 ...

Page 35: ...存裝置 1 在 Windows 通知區域中點選 然後 點選 退 出對應裝置 2 當出現 可以放心移除硬體 資訊後 將 USB 儲 存裝置 從電腦上移除 請勿在資料傳輸過程中移除 USB 儲存裝置 這樣做會導致資料遺失或損壞 USB 儲 存裝置 第三章 裝置連接 連接 USB 儲存裝置 桌上型電腦的前後面板均有 USB 連接埠 USB 連接埠允許您連接 USB 裝置 例 如儲存裝置 欲連接 USB 儲存裝置 請將 USB 儲存裝置 插入您的電腦 前面板 後面板 ...

Page 36: ...3 2 第三章 裝置連接 連接麥克風與喇叭 桌上型電腦的前後面板均有麥克風連接埠與喇叭連接埠 後面板的音效 I O 連接 埠允許您連接二 四 六 八聲道立體聲喇叭 連接耳機與話筒 連接二聲道喇叭 ...

Page 37: ...3 3 華碩 CS6110 連接四聲道喇叭 連接六聲道喇叭 ...

Page 38: ...3 4 第三章 裝置連接 連接八聲道喇叭 ...

Page 39: ...外接顯示器 設定多個顯示器 以 Window 7 為例 當您連接多個顯示器後 您可以設定顯示模式 讓新增顯示器與主顯示器顯示 相同的內容 或作為主顯示器的延伸顯示器以擴充 Windows 桌面 請按照以下步驟設定多個顯示器 1 關閉您的電腦 2 將兩個顯示器與您的電腦相連 並將電源線連接至這兩個顯示器 請參閱第一 章 設定 您的電腦 獲得更多連接 顯示器 的方法 當您的電腦安裝好顯示卡後 將顯示器接連至顯示卡輸出連接埠 對於顯示卡 僅被設為主要顯示的顯示器才能在開機自我檢測時顯示出來 雙重顯 示功能只可在 Winodws 作業系統中運作 ...

Page 40: ... 顯示器 的副 本 延伸這些顯示器 選擇此項將 新增 的 顯示器 作為 延伸顯示器 這將增加您 的電腦使用空間 只在1 2 上顯示桌面 選擇此項將僅在 顯示器 1或 2 上顯示桌面 6 點選 套用 或 確定 然後在確認 訊息 畫面上 點選 保留變更 3 啟動您的電腦 4 請 參考 以下步驟 開啟 螢幕解析度 進行 設定 由於機型不同 系統功能也會 有差異 部分系統的控制台中直接可以看到顯示選項 而沒有個性選項 點選 控制台 個人化 顯示 螢幕解析度 用滑鼠右鍵點選 桌面 在 隨即出現 的 選單 中 點選 個人化 顯示 螢幕解析 度 ...

Page 41: ...3 7 華碩 CS6110 連接一台高清電視機 將一台高解析電視機 HDTV 連接至您電腦的 HDMI 連接埠 您需要一根 HDMI 排線以連接 HDTV 與電腦 HDMI 排線需另行購買 為達到最佳顯示效果 請確認您的 HDMI 排線不長於 15 米 ...

Page 42: ...3 8 第三章 裝置連接 ...

Page 43: ...桌上型電腦 時感到身體不適或受傷 視線與顯示器螢幕頂部相持平 腳蹬 90 度 請參考以下幾項保持適當姿勢 適當放置您的電腦椅 確保您的肘部平行於或略高於鍵盤 使得到舒適的打字 位置 調節座椅的高度 確保您的膝蓋略高於您的臀部 使得您的大腿後側得到放 鬆 如有需要 請使用腳凳抬高您的膝蓋 調節座椅的後側 使其完全支撐您的脊椎並且稍向後傾斜 挺直坐正 使您的膝蓋 肘部以及臀部成約 90 度 將顯示器放在您的正前方 將顯示器頂部與您的視線持平 使您的視線稍向 下 使滑鼠靠近鍵盤 如有需要 請使用肘托以緩解打字時肘部的壓力 請在舒適平整的地方使用您的桌上型電腦 避開光源 如窗或直射陽光 使用一段時間後請稍作休息 ...

Page 44: ...碟 使用讀卡機 視出貨機型而定 數位相機或其他的數位影像裝置 都是採用記憶卡來儲存數位相片或多媒體檔 案 讀卡機讓您可以隨時插入這些記憶卡來讀取 寫入數位檔案 請參考以下步驟使用記憶卡 1 打開主機前側擋板 2 將記憶卡插入卡槽 3 在 自動播放 視窗中選擇一個程式來讀取檔案 若您的電腦沒有自動播放功能 請點選 Windows 7 工作列中的開始按鈕 選擇 電腦 然後雙按記憶卡圖示進行資料讀取 每個卡槽均有自己的磁碟機圖示 並顯示在 電腦 目錄下 當資料被讀取或寫入記憶卡時 讀卡機顯示燈會亮起或閃爍 由於記憶卡上均有缺口設計 因此只能以一個固定方向插入 請勿將卡強制插入 卡槽以免卡受到損傷 您可以使用多張記憶卡 但需逐一使用 請注意一個插槽只能插入一張記憶卡 2 1 ...

Page 45: ... 按下光碟機上的按鈕退出光碟托盤 2 將光碟有印刷圖案的那一面朝上放入 3 將托盤推入光碟機中 4 從 自動播放 選擇程式來讀取檔案 退出光碟 請按照以下步驟退出光碟 1 系統開啟時 按下光碟機上的按鈕退出光碟托盤 按下光碟機上的 退出 按鈕 用滑鼠右鍵點選 電腦 畫面中的 CD DVD 磁碟機圖示 然後點選 退出 2 將光碟從托盤中取出 若您的電腦沒有自動播放功能 請點選 Windows 7 工作列中的開始按鈕 選擇 電腦 然後雙按 CD DVD 磁碟機圖示進行資料讀取 1 2 2 1 ...

Page 46: ...able modem 連接網路 1 設定您的 DSL cable modem 有線連接 使用 RJ 45 網路線將您的電腦與 DSL C able modem 或區域網路相連 LAN 2 將 RJ 45 網路線的一端連接至電腦後面板的 LAN RJ 45 連接埠 另一端連接 至 DSL Cable modem 請參閱您的 DSL Cable modem 手冊 3 開啟 DSL Cable modem與您的電腦 4 進行所需網路連接設定 更多關於網路設定的資訊與支援請洽詢您的網路服務提供商 ISP 數據機 RJ 45 網路線 ...

Page 47: ...5 2 第五章 網路連線 透過區域網路連接網路 LAN 請按照以下步驟透過區域網路連接網路 1 將 RJ 45 網路線的一端連接至電腦後面板的 LAN RJ 45 連接埠 另一端連接 至區域網路 2 啟動您的電腦 3 進行所需網路連接設定 更多關於網路設定的資訊與支援請洽詢您的網路管理員 網路線 ...

Page 48: ...I Manager 檔案 夾裡雙按 setup exe 主程式以開啟此功能 2 點選 Utilities 工具程式 標籤 然後點選 ASUS AI Manager 3 依照畫面的指示 進行安裝 啟用 AI Manager 欲開啟 AI Manager 請從 Windows 系統的桌面左下角點選 開始 程式集 ASUS AI Manager AI Manager 1 xx xx 後 則 AI Manager 會快速啟動並顯示捷徑列 Quick Bar 如下圖 在開啟應用程式後 AI Manager 的小圖示將會顯示在 Windows 桌面下方的工作 列中 如右圖 使用滑鼠右鍵點選這個圖示 可以 在捷徑列與主應用程式之間切換 而且您 也可以透過捷徑列或 Windows 工作列中的 AI Manager 小圖示來啟動 AI Manager 根據軟體版本的不同 軟體安裝介面與使用方法可能略有不同 ...

Page 49: ...間做切換 點選縮到最小鈕 則可以將 AI Manager 保留在桌面下方的工具列中 點選關閉鈕 則會離開 AI Manager 程式 主應用程式 Main 主應用程式畫面中提供以下幾個工具程式 AI Disk AI Security 與 AI Probe 點選主應用程式畫面上的箭頭小圖示來瀏覽主應用程式中的各個工具程式項目 版 本不同工具程式會有不同 AI Disk AI Disk 可讓您很輕鬆地選擇如下圖中的清除網際網路的暫存檔案 清除網 際網路的 Cookies 清除資源回收筒的檔案 清除最近存取的 URL S 清除網站 的瀏覽記錄或清除最近開啟的檔案清單項目 在捷徑列上點選 AI Disk 小圖示開 啟 AI Disk 畫面 您可以在這裡選擇您所要清除的項目 完成時請點選 套用 華碩實用程序 點選此鈕以顯示子項目或 還原現狀 點 選 顯 示 右 邊項目 點選顯示左 邊項目 ...

Page 50: ...置的加密 1 第一次使用 AI Security 時 您會被要求輸入一組新密碼 請輸入一組最多 不超過 20 個字母數字或符號組合而成的密碼 2 再次輸入新密碼 3 輸入新密碼的提示 建議 4 當完成時 請點選 確定 若要將已加密的裝置解除 請依照以下步驟進行 1 請取消勾選已加密的裝置名稱 然後點選 套用 2 輸入您事先已經設定的密碼 然後點選 確定 該裝置就會變成解除加密的 狀態 欲變更密碼 則請依照以下步驟進行 點選 修改密碼 然後依照畫面的指示進行變更 5 選擇您所要進行加密的裝置 然後點選 套用 6 輸入您事先設定的密碼 然後點選 確定 則此一被選擇的裝置就會變成已 加密且無法存取 ...

Page 51: ...Probe AI Probe 會自動偵測並顯示主機板與 CPU 的溫度 CPU 風扇的轉速 以及 輸出的電壓 您也可以在此調整您所需要的數值 點選溫度 電壓或風扇轉速標籤頁 然後選擇其中一項來開啟或變更您所要的 數值 建議使用程式預設值 AI Booting AI Booting 提供您設定開機裝置的優先次序 請依照以下步驟指定開機順序 1 選擇一個裝置 然後點選下方 左邊或右邊的按鈕以排定開機順序 2 當完成 選擇後 請 點選 套用 ...

Page 52: ...至華碩電腦 全球網 站 華碩電腦 線上技術支援網站 華碩電腦 線上檔案下載網站或華碩電腦 聯絡資 訊 我的最愛 在 我的最愛 項目中提供您加入常用的應用程式 保留給您自行從電腦中加入您 所要的應用程式項目 請依照以下步驟加入我的最愛應用程式 1 點選 加入 然後找到您所要增加至 我的最愛 中的應用程式 2 點選 開啟 檔案所在的視窗位置 應用程式將會增加到 我的最愛 中 在該應用程式小圖示上使用滑鼠右鍵點選 則可以進行開啟 移除該應用程 式 或變更名稱 您也可以使用滑鼠左鍵雙按以開啟該程式 ...

Page 53: ...統資訊 點選 系統資訊 選單可以看到關於您的系統 主機板 處理器 BIOS 安裝的裝 置與記憶體的相關資訊 華碩公用程式 視出貨機型而定 CPU Level Up CPU Level Up 允許您在 Windows 系統中根據超頻預設的參數進行立即超 頻 並且免去了進入 BIOS 進行設定這一步驟 請依照以下步驟開啟 CPU Level Up 1 打開 AI Manager 2 點選 華碩公用程式 然後雙按 CPU Level Up ...

Page 54: ...來更新 BIOS 程式之前 請先關閉其他所有的 Windows 應用程式 更新 BIOS 程式 1 點選 開始 程式集 ASUS ASUS Update ASUS Update 執行華碩線上更 新主程式 2 在下拉式選單中點選下列作業之一 使用網路更新 BIOS 程式 a 選擇 Update BIOS from the Internet 然後按下 Next 繼續 b 請選擇離您最近的華碩 FTP 站台可避免網路堵塞 或者您也可以直接選擇 Auto Select 由系統自行決定 按下 Next 繼續 c 接著再選擇您欲下載的 BIOS 版本 按下 Next 繼續 華碩線上更新程式可以自行透過網路下載 BIOS 程式 經常的更新才能得到最新的 功能 使用 BIOS 檔案更新 BIOS 程式 a 在下拉式選單中選擇 Update BIOS from a file 然後按下 Next 繼續 b 在...

Page 55: ... 請參閱 華碩線上更新 一節 2 選擇下拉選單中的選項 然後點選 下一步 3 在更新 BIOS 之前請先執行 MyLogo 來置換系統啟動圖示 4 在下拉選單中選擇 以檔案更新 BIOS 然後點選 下一步 5 按照提示找到新的 BIOS 檔案 然後點選 下一步 華碩 MyLogo 視窗即在螢幕 上出現 6 在視窗的左面板找到您想要用來作為啟動圖示的圖示 點選 下一步 7 在 Ratio 下拉選單中選擇您想要的圖示大小 點選 下一步 8 系統開始更新 BIOS 並載入新的啟動圖示 9 更新完成後 系統將重新啟動 並在開機自我檢測時顯示新圖示 請造訪華碩官網 www asus com 獲取最新 BIOS 檔案 您可以將檔案存成小於 150KB 的 GIF 格式作為啟動圖示 ...

Page 56: ...0 6 9 Nero 9 Nero 允許您建立 複製 燒錄 編輯 分享以及更新不同類型的資料 安裝 Nero 以 Nero 9 為例 請按照以下步驟安裝 Nero 9 1 將 Nero 9 驅動程式光碟插入光碟機 2 若您的電腦有自動播放功能 螢幕上會自動跳出主選單 若您的電腦沒有自動播放功能 請雙按 Nero 9 光碟根目錄下的 Setup exe 安裝檔 案 3 在主選單中點選 Nero 9 Essentials ...

Page 57: ...6 10 第六章 使用應用程式 4 選擇安裝精靈的語言 然後點選 下一步 5 點選 下一步 繼續 6 勾選 我接受授權條款 完成後點選 下一步 ...

Page 58: ...華碩 CS6110 6 11 7 選擇 典型 然後點選 下一步 8 勾選 是 我想傳送匿名應用程式資料給 Nero 協助進行改善 然後點選 下一 步 9 完成後點選 結束 ...

Page 59: ...6 12 第六章 使用應用程式 燒錄檔案 請參考以下步驟燒錄檔案 1 在主選單中點選 資料燒錄 新增 2 選擇您想要燒錄的檔案 點選 新增 ...

Page 60: ...光碟幫助您重灌作業系統並將其還原至預設工作狀 態 在回復過程中所有資料將會丟失 在回復系統前 請確認您已備份所有資料 並記 錄下所有自訂設定 如網路設定 請按照以下步驟回復您的電腦 1 開機時 當顯示 ASUS 標誌 請按下 F8 鍵進入 Please select boot device 選單 2 放入還原 DVD 光碟 然後選擇光碟機為開機裝置 按下 Enter 鍵 然後按任 一鍵繼續 3 等待直至硬碟資訊畫面出現 選擇如何安裝一個新系統 選項有 Recover System to a partition 本選項將會移除以下您所選擇的分割區 Partition 並允許您保留其他的既有 的分割區 以及創建一個新的分割區如磁碟 C 選擇一個分割區後 按 NEXT 繼續 ...

Page 61: ...會顯示請您放入產品的驅動與應用程式 DVD 光碟 請 放入後並按 OK 與重新開機 7 在電腦重新開機後 Windows 7 系統將會開始進行系統設定 請按照畫面上的 指示來完成安裝 然後會再重新開機 華碩個人電腦回復 DVD 光碟僅能使用在本桌上型電腦 請勿任意使用於其他的電腦 上 有關本產品的最新資訊 請上華碩網站 http tw asus com 查詢 快速回復系統 僅限預裝 Windows 作業系統的機器 且隱藏分割區未破壞 1 開啟華碩桌上型電腦 當顯示 ASUS 標誌時 按下 F9 進入 System Recovery 2 此時畫面顯示 Windows is loading files 隨後 Recovery CD DVD 視窗出現 3 按照螢幕上的說明完成回復過程 在系統重新開機後 顯示解析度與系統設定 將回復為預設值 ...

Page 62: ...腦 2 我的電腦當機 請按照以下步驟關閉無回應的程式 1 同時按下 Alt Ctrl Delete 然後點選 起動工作管理員 2 點選 應用程式 3 選擇未響應程式 然後用滑鼠右鍵點選 工作結束 若鍵盤也無回應 請按住機殼頂部的電源按鈕直至電腦關閉 然後再按 下電源按鈕重新啟動電腦 3 我無法使用華碩無線網路卡連接無線網路 選配 請確認您為想要連接的無線網路輸入了正確的網路安全金鑰 將外接天線 選購 連接至華碩無線網路卡上的天線連接埠 並將天線 放置在機殼的頂部以獲得最佳無線效能 4 數字鍵盤區域的方向鍵不起作用 請確認數字鎖定指示燈已關閉 當指示燈亮起時這些數字鍵僅被用於輸 入數字 若您想要使用該區域中的方向鍵 請按下數字鎖定鍵關閉指示 燈 ...

Page 63: ...個顯示器時 僅一個顯示器能顯示 請確認這些顯示器電源已開啟 在開機自我檢測時僅連接至 VGA 連接埠的顯示器可以顯示 雙顯示功 能僅在 Windows 系統中適用 若您的電腦安裝了顯示卡 請確認將顯示器連接至顯示卡的輸出連接 埠 請檢查多個顯示器是否正確設定 更多資訊請參閱第三章 連接多個外 接顯示器 7 我的電腦無法偵測 USB 儲存裝置 當您第一次將 USB 儲存裝置與電腦相連時 Windows 會自動安裝它的 驅動程式 完成後請點選進入 電腦 來檢查是否偵測到 USB 儲存裝置 將您的 USB 儲存裝置連接至另一台電腦來檢測此 USB 儲存裝置是否損 壞 8 我想要還原或撤銷對電腦系統的更改 同時不影響我的個人檔案或 資料 Windows 系統還原功能允許您還原或撤銷對電腦系統的更改 同時不 影響您的個人檔案或資料如文檔或圖片 更多資訊請參閱第二章 還原 您的電腦 ...

Page 64: ...析度 相關資訊請參閱您的高畫質電視的使用手冊 3 點選 套用 或 確定 然後在確認資訊中點選 保留變更 10 我的喇叭沒有聲音 請確認您將您的喇叭連接至前面板或後面板的音效輸出埠 草綠色 請確認您的喇叭是否連接電源並開啟 調整喇叭的音量 請確認您沒有啟動靜音模式 若您啟動靜音 音量圖標將顯示為 若要開啟系統聲音 請點選 通知區域的 然後點選 若沒有啟動靜音 點選 滑動捲軸調整音量 將您的喇叭與另一台電腦相連測試它是否正常運作 11 DVD 光碟機無法讀取光碟 請確認光碟是以標籤面朝上放入光碟機 請確認光碟是否正確放入托盤 尤其是非標準大小的光碟 請檢查光碟是否有所掛上或損壞 12 DVD 光碟機退出按鈕不起作用 1 點選 電腦 2 用滑鼠右鍵點選 然後在選單中點選 離開 ...

Page 65: ... 電源供應器不良 如果具備柝裝電腦能力且備有其他電源 供應器的話 請使用者換電源供應器確認 是否能正常開機 畫面無法顯示 不良現象描述 可能的問題 請使用者確認 開機後無法顯示 任 何 畫 面 黑 屏 訊號線沒有確實接上 要確認顯示卡是外接還是內建的 若是 外接的顯示卡 要請使用者接在外接顯 卡上 訊號線不良 如果有其他訊號線的話 用其他訊號 線試試看 是否有畫面 螢幕不良 如果有其他螢幕的話 用其他螢幕試 試看 是否有畫面 網路相關問題 不良現象描述 可能的問題 請使用者確認 無法上網 網路線沒有正確接上 請確認把網路線接上 網路線不良 確認網路孔燈號是否有亮 請換一條線 測試 與裝置 IP 分享器或 Hub 分 接器 的連接問題 請確認裝置確實連接妥當 網路連線設定問題 請詢問網路業者關於設定資訊 防毒軟體引起的問題 在確認安全狀況下 關閉防毒軟體 驅動程式有誤 請重新安裝網路驅動程式...

Page 66: ... 驅動程式有誤 請重新安裝音效驅動程式 執行速度變慢或當機相關問題 不良現象描述 可能的問題 請使用者確認 作業系統執行速度 變慢 常註程式太多 請關掉某些常註程式測試看看 電腦中毒 使用一段時間後發生的 有可能為電腦 中毒 請掃毒或重灌 使用中電腦常會死 當 主機發出異音 有可能硬碟壞軌 換硬碟測試或送修 記憶體不良 請更換記憶體或把加裝的記憶體拔掉測 試 散熱效果不佳 請移到較為通風環境測試 可能裝了不相容的軟體 請嘗試重灌作業系統 無法啟動微軟金鑰 不良現象描述 可能的問題 請使用者確認 開機後停在啟動金 鑰的畫面 BIOS問題 請確認是否為專用的BIOS並更新到最新 版 金鑰是否輸入錯誤 請輸入正確金鑰 每組5個英文數字 共 5 組 如輸入正確仍無法正常啟動 請去電微 軟客服 請微軟協助啟動金鑰 微軟客 服 0800 008833 ...

Page 67: ...請確認進入作業系統後風扇是否 會降下來 BIOS 可能被更改或重新設定過 請將 BIOS 回復為原廠預設值 BIOS 問題 請確認是否為專用的 BIOS 並更新到 最新版 使用時風扇太吵 CPU 風扇問題 請確認 CPU 風扇規格是否符合要求並 確認風扇葉片有無損壞問題 使用環境為密閉環境 請移到較為通風環境測試 PC 溫度太高 更新 BIOS 若具備基本組裝能力的話 可以試著清理主機內部的灰塵 若上述仍無法排除疑難 請與客服聯絡 客服電話 0800 093 456 網址 http tw asus com 地址 台灣臺北市北投中央南路二段 35 號 6 樓 ...

Page 68: ...華碩台式電腦 CS6110 用戶手冊 ...

Page 69: ...之外 本用戶手冊所提到的 產品規格及信息只作參考 內容亦會隨時更新 恕不另行通知 下列因素導致的產品故障或損壞不在免費保修範圍內 A 因天災 水災 火災 地震 雷擊 颱風等 遇不可抗拒外力或人為之操作使 用不慎造成之損害 B 自行拆裝 修理 或將產品送至非華碩認証之維修點進行檢測維修 C 用戶擅自或請第三人修改 修復 變更規格及安裝 添加 擴充非本公司原廠 銷售 授權或認可之配件所引起之故障與損壞 D 因用戶自行安裝軟件及設置不當所造成之使用問題及故障 E 計算機病毒所造成之問題及故障 F 本公司保修識別標籤撕毀或無法辨認 涂改保修服務卡或與產品不符 G 要求華碩提供軟件安裝服務 用戶需自行提供原版軟件 軟件故障排除或清除 密碼等 H 其它不正常使用所造成之問題及故障 用戶手冊中所談論到的產品名稱僅做識別之用 而這些名稱可能是屬於其他公司 的註冊商標或是版權 關於產品規格最新的升級信息請您...

Page 70: ...1 了解您的台式電腦 1 1 安裝您的台式機 1 5 開啟或關閉您的電腦 1 7 第二章 使用 Windows 7 選配 第一次啟動 2 1 使用 Windows 7 桌面 2 2 管理文件與文件夾 2 7 還原您的系統 2 10 保護您的電腦 2 11 進入 Windows 幫助和支持 2 15 第三章 設備連接 連接 USB 存儲設備 3 1 連接麥克風與喇叭 3 2 連接多個外接顯示器 3 5 連接一臺高清電視機 3 7 第四章 使用您的電腦 使用電腦時的適當姿勢 4 1 使用讀卡器 4 2 使用光驅 4 3 第五章 網絡連接 有線連接 5 1 ...

Page 71: ...iv 第六章 使用應用程序 選配 華碩 AI Manager 6 1 華碩在線升級程序 ASUS Update 6 7 華碩 MyLogo2 6 8 Nero 6 9 使用光盤恢復您的系統 光盤為選配件 僅限預裝 Windows 操作系統 的機器 6 13 第七章 疑難解決 ...

Page 72: ...l interference to radio or television reception which can be determined by turning the equipment off and on the user is encouraged to try to correct the interference by one or more of the following measures Reorient or relocate the receiving antenna Increase the separation between the equipment and receiver Connect the equipment to an outlet on a circuit different from that to which the receiver i...

Page 73: ...ies with Canadian ICES 003 電池警語 注意 若更換了不正確電池可能會有爆炸的危險 請使用製造商推荐的同種或 相同電池 請依照製造商的指示來處理使用過的電池 電子信息產品污染控制標示 圖中之數字為產品之環保使用期 限 僅指電子信息產品中含有的有毒有害物質或元素不致發生外洩或 突變從而對環境造成污染或對人身 財產造成嚴重損害的期限 部件名稱 有害物質或元素 鉛 Pb 汞 Hg 鎘 Cd 六 價 鉻 Cr VI 多 溴 聯 苯 PBB 多 溴 二 苯 醚 PBDE 印刷電路板及 其電子組件 硬盤 光驅 外殼 電源適配器 外部信號連接 頭及線材 散熱設備 中央處理器與 內容 有毒有害物質或元素的名稱及含量說明標示 表示該有毒有害物質在該部件所有均質材料中的含量均在 SJ T 11363 2006 標准規定的 限量要求以下 表示該有毒有害物質至少在該部件的某一均質材料中的含...

Page 74: ... 以避免引起 機件短路或電路損毀 請勿將台式電腦放置於具備強大電磁場的環境中 請保持機器在乾燥的環境下使用 雨水 溼氣 液體等含有礦物質將會腐蝕電子 線路 請勿在雷電天氣下使用調制解調器 電池安全警告 請勿將電池丟入火中 請勿將電池的正負極短路 請勿自行拆解 電池 請在溫度為 0 32 至 35 95 之間的環境中使用本電腦 請勿堵塞台式電腦的通風孔 以避免因散熱不良而導致系統過熱 請勿使用破損的電源線 附件或其他外圍設備 為了防止電擊風險 在搬動電腦主機之前 請先將電腦電源插頭暫時從電源插座 上拔除 在使用電源適配器或電源延長線前 我們推薦您先尋求專業人士的協助 這些設 備有可能會干擾接地的迴路 請確定電源的電壓設置已調整到本國 本區域所使用的電壓標準值 若您不確定 您所屬區域的供應電壓值 請就近詢問當地的電力公司人員 如果電源已損壞 請不要嘗試自行修復 請將其交給專業技術服務人員或經銷...

Page 75: ...意您本身的安全 小心 提醒您在進行某一項工作時要注意勿傷害到電腦主板元件 重要 此符號表示您必須要遵照手冊所描述之方式完成一項或多項軟硬件 的安裝或設置 注意 提供有助於完成某項工作的訣竅和其他額外的信息 哪裡可以找到更多的產品信息 您可以通過下面所提供的兩個渠道來獲得您所使用的華碩產品信息以及軟硬件 的更新信息等 1 華碩網站 您可以到 http www asus com cn 華碩網站取得所有關於華碩軟硬件產品的各 項信息 2 其他文件 在您的產品包裝盒中除了本手冊所列舉的標準配件之外 也有可能會夾帶有其 他的文件 譬如經銷商所附的產品保證單據等 ...

Page 76: ... Essentio 台式電腦 鍵盤 x1 選配 鼠標 x1 選配 電源線 x1 選配 AC 適配器 x1 驅動程序與應用程序 光盤 x1 選配 Installation Guide 恢復光盤 x1 選配 安裝指南 x1 華碩保修服務卡 x1 若包裝內容有所損壞或丟失 請與經銷商聯絡 上述圖中所示物品與外觀僅供參考 實際產品規格依不同型號而定 部分地區出貨的機器可能不附贈鼠標與鍵盤 華碩公司有權替換組件或配件以提供優質服務 ...

Page 77: ... ...

Page 78: ...一章 系統導覽 了解您的台式電腦 主機前面板 本手冊中的機箱圖片描述僅供參考 各接口及其位置 與外殼顏色均依不同機型而 變 請在安裝您的機箱前先參閱您的華碩保修服務卡 歡迎 感謝您購買華碩 Essentio CS6110 台式電腦 華碩 Essentio CS6110 台式電腦擁有一流的性能 超凡的可靠性與以用戶為中 心的應用程序 并安裝在華碩特別設計的機箱中 點擊號碼以查看相關描述 2 4 5 6 3 1 8 7 9 11 10 ...

Page 79: ...接口蓋板 拉開蓋板打開前面板 3 CIR 接收器 可接收遙控器發出的紅外線信號 4 無線網絡 藍牙指示燈 5 硬盤指示燈 6 電源按鈕 按下此按鈕啟動您的電腦 7 MMC SD MS 讀卡器 將 MMC SD MS 卡插入此槽 8 IEEE 1394 接口 可連接 IEEE 1394 設備 9 USB 3 0 接口 視出貨機型而定 可連接 USB 3 0 設備 10 麥克風接頭 此接頭可連接麥克風 11 耳機接口 該接口可連接耳機或外接音箱 遙控器需另行購買 1 3 2 8 9 4 5 6 7 10 11 12 13 ...

Page 80: ...喇叭輸出 六聲道 喇叭輸出 八聲道 喇叭輸出 淺藍色 聲音輸入端 聲音輸入端 聲音輸入端 聲音輸入端 草綠色 聲音輸出端 前置喇叭輸出 前置喇叭輸出 前置喇叭輸出 粉紅色 麥克風輸入端 麥克風輸入端 麥克風輸入端 麥克風輸入端 橘色 中央重低音喇叭輸 出 中央重低音喇叭 輸出 黑色 後置喇叭輸出 後置喇叭輸出 後置喇叭輸出 灰色 側邊喇叭輸出 在 2 4 6 8 聲道音頻設置上 音頻輸出 音頻輸入與麥克風接頭的功能會隨著 聲道音頻設置的改變而改變 如下表所示 1 電源 DC 連接埠 連接 AC 變壓器 2 HDMI 接口 將您的電腦連接至 HDMI 顯示器或其他 HDMI 兼容設備 3 USB 2 0 接口 可連接 USB 2 0 設備如鼠標 打印機 掃描儀 相機 PDA 等 10 LAN RJ 45 接口 通過網絡中心連接到一個局域網 LAN Activity Link 指示燈 速度指示...

Page 81: ...1 4 第一章 系統導覽 13 通風孔 進行空氣流通 請勿堵住通風孔 經常為您的電腦通風 11 VGA 接口 將您的電腦連接至 VGA 顯示器或其他 VGA 兼容設備 12 Kensington 鎖槽 可使用Kensington 兼容防盜鎖將您的台式電腦鎖在一個固 定物體上 ...

Page 82: ... 該章節引導您連接主要硬件設備 例如外部顯示器 鍵盤 鼠標以及電源線至 您的電腦 連接一個外部顯示器 將您的顯示器連接至顯卡的顯示輸出接口 如 VGA HDMI 或者 DVI 具體視 出貨機型而定 請依照以下步驟連接一個外部顯示器 1 將您的顯示器連接至顯卡的顯示輸出接口 2 將顯示器插上電源 華碩獨立顯卡的顯示輸出接口分佈視具體機型而定 若您的機器有獨立顯卡 請將顯示器連接至獨立顯卡的顯示接口 圖示部份僅供參考 隨機性不同背部接口會有不同 ...

Page 83: ...1 6 第一章 系統導覽 連接 USB 鍵盤與鼠標 將一個 USB 鍵盤與鼠標連接至後面板的 USB 接口 C 連接 AC 適配器 請依照以下步驟連接 AC 適配器 1 將 AC 電源線與 AC 適配器相連 2 將 AC 適配器連接至電腦後面板上的電源 DC 接口 3 將 AC 適配器連上電源 圖示部份僅供參考 隨機性不同背部接口會有不同 ...

Page 84: ...1 7 開啟或關閉您的電腦 本章節引導您在安裝完成后如何開啟或關閉您的電腦 開啟您的電腦 請按照以下步驟開啟您的電腦 1 開啟您的顯示器 2 開啟電源開關 視出貨機型而定 然後按下電源按鈕 關閉您的電腦 Windows 系統 請按照以下步驟關閉您的電腦 1 關閉所有運行著的程序 2 在 Windows 桌面上點擊 開始 按鈕 3 點擊 關機 按鈕關閉操作系統 4 關閉電源開關 視出貨機型而定 3 等待直至操作系統自動加載 ...

Page 85: ...1 8 第一章 系統導覽 ...

Page 86: ...電腦 等待幾分鐘直至 設置 Windows 畫面出現 2 在下拉菜單中選擇您想要的語言 然後點擊 下一步 3 在下拉菜單中選擇您的國家或地區 時區 貨幣以及鍵盤佈局 然後點擊 下 一步 4 輸入用戶名與電腦名稱 然後點擊 下一步 5 輸入所需信息來設置您的密碼 然後點擊 下一步 您也可以不輸入任何信 息 點擊 下一步 跳過這一步 6 請仔細閱讀許可條款 勾選 我願意接受許可條款 然後點擊 下一步 7 選擇 使用推薦設置 或 僅安裝重要更新 來為您的電腦進行安全設置 若 您想要跳過這一步請選擇 以後問我 8 請再次檢查一遍您的時區時間設置 然後點擊 下一步 系統開始加載新設 置並重新啟動 您可以開始使用您的電腦 若您想稍後為您的帳戶設置密碼 請參閱本章節 設置用戶帳號及密碼 ...

Page 87: ...面 通知區域 任務欄 開始菜單 使用開始菜單 開始菜單允許您進入電腦上的程序或其它使用項目 它通過 幫助和支持 功 能提供您更多 Windows 7 的信息 從開始菜單進入選項 請參考以下步驟由開始菜單進入選項 1 在 Windows 任務欄中點擊開始圖標 2 在開始菜單中選擇您想要進入的選項 您可以將您常用的程序釘在開始菜單中成為一個小圖標 更多信息請參閱本章節 在開始菜單或任務欄中添加程序 点击开始图标 幫助和支持 來獲取更多关于 Windows 7操作系統的信 息 ...

Page 88: ...一系列任務選 項 您也可以點擊 開始 控 制麵板 入門 進入操作 3 選擇您想要的任務選項 使用任務欄 任務欄允許您進入以及管理已安裝在您的電腦上的程序或選項 從任務欄進入程序 請參考以下步驟從任務欄進入程序 在任務欄中點擊一個圖標進入此程序 再次點擊圖標可隱藏此程序 您可以將您常用的程序釘在開始菜單中成為一個小圖標 更多信息請參閱本章節 在開始菜單或任務欄中添加程序 使用 入門 選項 開始菜單中的 入門 選項包括一些基本任務的信息 例如個性化 Windows 添加新用戶 傳輸文件等 幫助您更瞭解如何使用 Windows 7 操作系統 ...

Page 89: ...選項釘在快捷 方式上 例如您喜愛的網站 經常瀏覽的文件 夾 驅動程序或最近播放的媒體文件 在快捷方式中刪除選項 請參考以下步驟在快捷方式中刪除選項 1 右擊任務欄中的一個圖標 2 在快捷方式中找到你想要刪除的鎖定項目 然後點擊其後面的小圖釘圖標即可 在開始菜單或任務欄中添加程序 1 在 Windows 任務欄中點擊開始圖標 進入 開始菜單 2 在開始菜單或任務欄中右擊你想要釘入的選 項 3 選 擇 鎖 定 到 任 務 欄 或 附 到 開 始 菜 單 您也可以右擊任務欄中一個正在 運行的程序的圖標 然後選擇 將此程序鎖定到任務欄 請參考以下步驟在開始菜單或工作列中新增程式 ...

Page 90: ... 在開始菜單中右擊你想要刪除的程序 然後選擇 從開始菜單解鎖 在任務欄中刪除程序 請參考以下步驟在任務欄中刪除程序 1 在任務欄中右擊你想要刪除的程序 然後 選擇 將此程序從任務欄解鎖 使用通知區域 默認的通知區域顯示以下三種圖標 操作中心通知 點擊該圖標顯示所有警告信息或通知 以及進入 Windows 操作中心 網絡連接 該圖標顯示有線 無線網絡連接狀態以及信號強度 音量 點擊此圖標調節音量 顯示操作中心通知 請參考以下步驟顯示操作中心通知 點擊操作中心通知圖標 然後點擊第一 行的 重要信息 打開 更多信息請參閱本章節 Windows 操作中心 ...

Page 91: ...2 6 第二章 使用 Windows 7 自定義圖標與通知 您可以選擇在任務欄或通知區域顯示或隱藏圖標與通知 請參考以下步驟自定義圖標或通知 1 在通知區域點擊箭頭圖標 2 點擊 自定義 3 在下拉菜單中選擇您想要自定義的圖標或選項的行為 ...

Page 92: ...s 瀏覽器 Windows 瀏覽器允許您查看或管理您的文件與文檔 進入 Windows 瀏覽器 請參考以下步驟進入 Windows 瀏覽器 1 在任務欄中點擊開始圖標 進入開始菜單 2 點擊 計算機 進入 Windows 瀏覽器 瀏覽文件與文件夾 請參考以下步驟瀏覽文件與文件夾 1 進入 Windows 瀏覽器 2 在導航面板或視圖面板中尋找所需數據的位置 3 在地址欄中點擊箭頭顯示磁盤驅動器或文件夾 導航面板 地址欄 搜索欄 視圖圖標 預覽圖標 工具欄 視圖面板 ...

Page 93: ...考以下步驟自定義文件夾預覽方式視圖 1 進入 Windows 瀏覽器 2 在導航面板中選擇您所需數據的位置 3 在工具欄中點擊視圖圖標 4 在視圖菜單中滑動滑塊選擇你想要查看文件或文件夾 的方式 您也可以在視圖面板上右擊任何 一處 在展開的選項中點擊 查 看 并選擇您想要查看文件或 文件夾的方式 排列您的文件 在 Windows 庫文件夾中 請參考以下步驟排列您的文件 1 進入 Windows 庫文件夾 2 點擊 排列方式 顯示下拉菜單及選項 3 選擇您想要的排列方式 ...

Page 94: ...入 Windows 瀏覽器 2 在視圖面板上右擊任何一處 3 在出現的菜單中選擇 排序方式 然後選擇您想要的排序方式 分組您的文件 請參考以下步驟分組您的文件 1 進入 Windows 瀏覽器 2 在視圖面板上右擊任何一處 3 在出現的菜單中選擇 分組依據 然後選擇您想要的分組方式 添加一個新文件夾 請參考以下步驟添加一個新文件夾 1 進入 Windows 瀏覽器 2 在工具欄中點擊 新建文件夾 3 輸入新文件夾名稱 您也可以在視圖面板上右擊任 何一處 點擊 新建 文件 夾 ...

Page 95: ...還原您的系統 Windows 系統還原功能可能會創建還原點 在那裡系統可以在特定時間或日期 存儲設置 此功能允許您還原或撤銷您對系統設置的更改且不影響您的個人數據 請參考以下步驟還原您的系統 1 關閉所有正在運行的程序 2 點擊 所有程序 附件 系統工具 系統還原 3 按照屏幕出現的步驟完成設置 3 選擇備份文件的方位 點擊 下一步 4 選擇 讓 Windows 選擇 推薦 或 讓我選擇 若您選擇 讓 Windows 選擇 Windows 將不會備份 1GB 或以上的程序 FAT 格式文件 回收站文件或臨時文件 5 按照屏幕出現的步驟完成設置 ...

Page 96: ...S6110 2 11 保護您的電腦 使用 Windows 7 操作中心 Windows 7 操作中心為您提供警告通知 安全信息 系統維護信息 自動疑難 解決選項以及修復一些電腦常見問題 您可以自行制定警告通知 更多信息請參閱本章節的 制定圖標與通知 進入 Windows 7 操作中心 請參考以下步驟進入Windows 7 操作中心 1 點擊通知圖標 再點擊 打開操作中 心 2 在操作中心里點擊您想要進行的操作 ...

Page 97: ...二章 使用 Windows 7 使用 Windows Update Windows Update 允許您檢查與安裝最近的更新內容 以增強電腦的安全與性 能 進入 Windows Update 請參考以下步驟進入 Windows Update 1 在 Windows 任務欄中點擊開始圖標 進入開始菜單 2 選擇 所有程序 Windows Update 3 在 Windows Update 畫面中點擊您想要進行的操作 ...

Page 98: ...華碩 CS6110 2 13 設置用戶帳戶與密碼 您可以為使用您電腦的用戶設置帳戶與密碼 設置用戶帳戶 請參考以下步驟設置用戶帳戶 1 在 Winodws 任務欄中點擊 入門 添加新用戶 2 選擇 管理其他帳戶 3 選擇 創建一個新帳戶 4 輸入新用戶名稱 5 選擇 標準用戶 或 管理員 作為用戶類型 6 完成后點擊 創建帳戶 您也可以在 控制面板 用戶帳戶 做同樣的操作 ...

Page 99: ...2 14 第二章 使用 Windows 7 設置用戶密碼 請參考以下步驟設置用戶密碼 1 打開 控制麵板 用戶帳戶 2 選擇 為您的帳戶創建密碼 3 輸入密碼并確認 輸入密碼提示 4 完成后點擊 創建密碼 ...

Page 100: ...請確認您已連接網絡以獲得最新 Winows 在線幫助 激活殺毒軟件 視具體機型而定 部分電腦預裝了趨勢科技網絡安全程序 Trend Micro Internet Security 它 是一個第三方殺毒軟件 保護您的電腦免受病毒侵襲 該軟件需另行購買 在激活它 之後您將會有一段時間的試用期 通常為 60 天 請參考以下步驟激活趨勢科技網絡安全 Trend Micro Internet Security 1 執行趨勢科技網絡安全 Trend Micro Internet Security 應用程序 2 仔細閱讀許可條款 然後點擊 同意并激活 3 輸入您的郵件地址并選擇您的位置 點擊 下一步 4 點擊 完成 結束激活 ...

Page 101: ...2 16 第二章 使用 Windows 7 ...

Page 102: ...SB 存儲設備 1 在 Windows 通知區域中點擊 然後點擊 彈 出對應設備 2 當出現 安全地移除硬件 信息后 將 USB 存 儲設備從電腦上移除 請勿在數據傳輸過程中移除 USB 存儲設備 這樣做會導致數據丟失或損壞 USB 存 儲設備 第三章 設備連接 連接 USB 存儲設備 台式機的前後面板均有 USB 接口 USB 接口允許您連接 USB 設備 例如存儲 設備 欲連接 USB 存儲設備 請將 USB 存儲設備插入您的電腦 前面板 后面板 ...

Page 103: ...3 2 第三章 設備連接 連接麥克風與喇叭 台式機的前後面板均有麥克風接口與喇叭接口 後面板的音頻 I O 接口允許您 連接二 四 六 八聲道立體聲喇叭 連接耳機與話筒 連接二聲道喇叭 ...

Page 104: ...3 3 華碩 CS6110 連接四聲道喇叭 連接六聲道喇叭 ...

Page 105: ...3 4 第三章 設備連接 連接八聲道喇叭 ...

Page 106: ...接顯示器 設置多個顯示器 以 windows 7 系統為例 當您連接多個顯示器后 您可以設置顯示模式 您可以讓增加顯示器與主顯示 器顯示相同的內容 或作為主顯示器的擴展顯示器以擴展 Windows 桌面 請按照以下步驟設置多個顯示器 1 關閉您的電腦 2 將兩個顯示器與您的電腦相連 並將電源線連接至這兩個顯示器 請參閱第一 章 設置您的電腦 獲得更多連接顯示器的方法 當您的電腦安裝好顯卡后 將顯示器接連至顯卡輸出接口 對於某些顯卡 僅被設為主要顯示的顯示器才能在開機自檢時顯示出來 雙重顯示 功能只可在 Winodws 操作系統中運行 ...

Page 107: ...為主顯示器的副本 擴展這些顯示 選擇此項將添加的顯示器作為擴充顯示器 這將增加您的 電腦使用空間 只在1 2 上顯示桌面 選擇此項將僅在顯示器 1或 2 上顯示桌面 6 點擊 應用 或 確定 然後在確認信息畫面上點擊 保留更改 3 啟動您的電腦 4 請參考以下步驟打開 屏幕分辨率 進行設置 由於機型不同 系統功能 也會有差異 部分系統的控制麵板中可直接看到 顯示 選項 而沒有 個性 化 選項 點擊 控制麵板 個性化 顯示 調整屏幕分辨率 右擊桌面 在隨即出現的菜單中點擊 個性化 顯示 調整屏幕分 辨率 ...

Page 108: ...3 7 華碩 CS6110 連接一臺高清電視機 將一臺高清電視機 HDTV 連接至您電腦的 HDMI 接口 您需要一根 HDMI 數據線以連接 HDTV 與電腦 HDMI 數據線需另行購買 為達到最佳顯示效果 請確認您的 HDMI 數據線不長於 15 米 ...

Page 109: ...3 8 第三章 設備連接 ...

Page 110: ...機時感到身體不適或受傷 视线与显示器屏幕顶部相持平 脚凳 90 度 請參考以下幾項保持適當姿勢 適當放置您的電腦椅 確保您的肘部平行於或略高於鍵盤 使得到舒適的打字 位置 調節座椅的高度 確保您的膝蓋略高於您的臀部 使得您的大腿後側得到放 鬆 如有需要 請使用腳凳抬高您的膝蓋 調節座椅的後側 使其完全支撐您的脊椎並且稍向後傾斜 挺直坐正 使您的膝蓋 肘部以及臀部成約 90 度 將顯示器放在您的正前方 將顯示器頂部與您的視線持平 使您的視線稍向 下 使鼠標靠近鍵盤 如有需要 請使用肘托以緩解打字時肘部的壓力 請在舒適平整的地方使用您的台式機 避開光源 如窗或直射陽光 使用一段時間后請稍作休息 ...

Page 111: ...卡器 視出貨機型而定 數碼相機或其他的數碼影像設備 都是採用存儲卡來存儲數碼相片或媒體文 件 讀卡器讓您可以隨時插入這些存儲卡來讀取 寫入數碼文件 請參考以下步驟使用存儲卡 1 打開主機前側擋板 2 將存儲卡插入卡槽 3 在 自動播放 窗口中選擇一個程序來讀取文件 若您的電腦沒有自動播放功能 請點擊 Windows 7 任務欄中的開始按鈕 選擇 計算機 然後雙擊存儲卡圖標進行數據讀取 每個卡槽均有自己的驅動程序圖標 并顯示在 計算機 目錄下 當數據被讀取或寫入存儲卡時 讀卡器顯示燈會亮起或閃爍 由於存儲卡上均有缺口設計 因此只能以一個固定方向插入 請勿將卡強制插入 卡槽以免卡受到損傷 您可以使用多張存儲卡 但需逐一使用 請注意一個插槽只能插入一張存儲卡 2 1 ...

Page 112: ... 按下光驅上的按鈕退出光盤托盤 2 將光盤有印刷圖案的那一面朝上放入 3 將托盤推入光驅中 4 在 自動播放 窗口中選擇一個程序來讀取文件 退出光盤 前參考以下步驟退出光盤 1 系統開啟時 按下光驅上的按鈕退出光盤托盤 按下光驅上的 退出 按鈕 右擊 計算機 畫面中的 CD DVD 驅動程序圖標 然後點擊 彈出 2 將光盤從託盤中取出 若您的電腦沒有自動播放功能 請點擊 Windows 7 任務欄中的開始按鈕 選擇 計算機 然後雙擊 CD DVD 驅動圖標進行數據讀取 2 1 2 1 ...

Page 113: ...SL Cable modem 連接網絡 1 設置您的 DSL Cable modem 有線連接 使用 RJ 45 網絡線將您的電腦與 DSL Cable modem或局域網相連 LAN 2 將 RJ 45 網絡線的一端連接至電腦後面板的 LAN RJ 45 接口 另一端連接 至 DSL Cable modem 請參閱您的 DSL Cable modem 手冊 3 打開 DSL Cable modem 與您的電腦 4 進行所需網絡連接設置 更多關於網絡設置的信息與幫助請洽詢您的網絡服務提供商 ISP RJ 45 網線 ...

Page 114: ...5 2 第五章 網絡連接 通過局域網連接網絡 LAN 請按照以下步驟通過局域網連接網絡 1 將 RJ 45 網絡線的一端連接至電腦後面板的 LAN RJ 45 接口 另一端連接 至局域網 2 啟動您的電腦 3 進行所需網絡連接設置 更多關於網絡設置的信息與幫助請洽詢您的網絡管理員 網線 ...

Page 115: ...您也可以到驅動及應用程序光盤中的 ASUS AI Manager 文件夾裡直接點擊 Setup exe 主程序以開啟菜單窗口 2 點擊 應用程序 標籤 然後點擊 華碩 AI Manager 3 依照畫面的指示 開始安裝 啟用 AI Manager 欲開啟 AI Manager 請從 Windows 系統的桌面左下角點擊 開始 所有程序 ASUS AI Manager AI Manager 1 xx xx 後 則 AI Manager 會快速啟動並 顯示快捷方式欄 Quick Bar 如下圖 使用鼠標右鍵點擊這個圖標 可以在快 捷方式欄與主應用程序之間切換 而且您也 可以通過快捷方式欄或 Windows 任務欄中的 AI Manager 縮略圖來啟動 AI Manager 在開啟應用程序後 AI Manager 的縮略圖將會顯示 在 Windows 桌面下方的任務欄中 如右圖 根據軟件版本的...

Page 116: ...之間做切換 點擊縮到最 小鈕 則可以將 AI Manager 保留在桌面下方的工具欄中 點擊關閉鈕 則會離 開 AI Manager 程序 主應用程序 Main 主應用程序畫面中提供數個工具程序 AI Disk AI Security AI Gear 與 AI Probe 點擊主應用程序畫面上的箭頭縮略圖來瀏覽主應用程序中的各個工具程序項 目 版本不同工具程序會有不同 AI Disk AI Disk 提供您輕鬆地選擇下圖中的清除網際網絡的暫存文件 清除網際 網絡的 Cookies 清除資源回收筒的文件 清除最近存取的 URL s 清除網站 的瀏覽記錄或清除最近開啟的文件列表項目 在快捷方式欄上點擊 AI Disk 縮 略圖開啟 AI Disk 畫面 您可以在這裡選擇您所要進行清除的項目 當完成後 請點擊 應用 華碩實用程序 點擊此鈕以顯示子項目或 還原現狀 點擊顯示右 邊項目 點擊顯示左 ...

Page 117: ...的加密 1 當第一次使用 AI Security 時 您會先被要求輸入一組新密碼 請輸入一組 最多不超過 20 個字母數字或符號組合而成的密碼 2 再次輸入新的密碼 3 輸入新密碼的提示 建議 4 當完成時 請點擊 確定 5 選擇您所要進行加密的設備 然後點擊 應用 6 輸入您事先設置的密碼 然後點擊 確定 該被選擇的設備就會變成已 加密且無法存取 請依照以下步驟將已加密的設備解除 1 取消勾選已加密的設備名稱 然後點擊 應用 2 輸入您事先已經設置的密碼 然後點擊 確定 該被選擇的設備則會變 成解除加密的狀態 欲更改密碼 則請依照以下的步驟進行 點擊 修改密碼 然後依照畫面的指示進行更改 ...

Page 118: ...obe AI Probe 會自動偵測並顯示主板與 CPU 的溫度 CPU 風扇的轉速 以及 輸出的電壓 您也可以在此調整您所需要的數值 點擊 溫度 電壓 或 風扇轉速 標籤頁 然後選擇其中一項來開啟或 變更您所要的數值 建議使用程序預設值 AI Booting AI Booting 提供您設置開機設備的優先次序 欲指定開機順序 請依照以下步驟進行 1 選擇一個設備 然後點擊下方左邊或右邊的按鈕以排定開機順序 2 當完成選擇後 請點擊 應用 ...

Page 119: ...接至華碩電腦 全球網站 華碩電腦 聯機技術支持網站 華碩電腦 聯機文件下載網站或華碩電腦 聯絡信息 我的最愛 在 我的最愛 項目中提供您加入常用的應用程序 保留給您自行從電腦中加 入您所要添加的應用程序項目 請依照以下步驟 進行增加應用程序 1 點擊 加入 然後找到您所要添加至 我的最愛 中的應用程序 2 點擊 開啟 文件所在的窗口位置 應用程序將會添加到 我的最愛 中 在該應用程序圖標上使用鼠標右鍵點擊 則可以進行開啟 刪除該應用程序 或更改名稱 您也可以使用鼠標左鍵雙擊以開啟該程序 ...

Page 120: ...系統信息 點擊 系統信息 菜單可以看到關於您的系統 主板 處理器 BIOS 安裝的 設備與內存的相關信息 華碩實用程序 視出貨機型而定 CPU Level Up CPU Level Up 允許您在 Windows 系統中根據超頻預設的參數進行立即超 頻 並且免去了進入 BIOS 進行設置這一步驟 請依照以下步驟開啟 CPU Level Up 1 打開 AI Manager 2 點擊 華碩實用程序 然後雙擊 CPU Level Up ...

Page 121: ...著再選擇您欲下載的 BIOS 版本 按下 Next 繼續 華碩在線升級程序可以自行通過網絡下載 BIOS 程序 經常更新才能獲得最新的功 能 升級 BIOS 程序 1 點擊 開始 程序 ASUS ASUS Update ASUS Update 運行華碩 在線升級主程序 2 在下拉菜單中選擇下列操作之一 華碩在線升級程序 ASUS Update 華碩在線升級程序是一套可以讓您在 Windows 操作系統下 用來管理 保存與 更新主板 BIOS 文件的應用程序 在使用華碩在線升級程序之前 請先確認您已經通過內部網絡對外連接 或者通 過互聯網服務供應商 ISP 所提供的連接方式連接到互聯網 隨主板附贈的驅動程序與應用程序光盤中包含此應用程序 使用 BIOS 文件升級 BIOS 程序 a 選擇 Update BIOS from a file 然後按下 Next 繼續 b 在 打開 的窗口中選擇 B...

Page 122: ... 請參閱 華碩在線升級 一節 2 選擇下拉菜單中的選項 然後點擊 下一步 3 在升級 BIOS 之前請先運行 MyLogo 來置換系統啟動圖標 4 在下拉菜單中選擇 以文件升級 BIOS 然後點擊 下一步 5 按照提示找到新的 BIOS 文件 然後點擊 下一步 華碩 MyLogo 窗口即在 屏幕上出現 6 在窗口的左面板找到您想要用來作為啟動圖標的圖標 點擊 下一步 7 在 Ratio 下拉菜單中選擇您想要的圖標大小 點擊 下一步 8 系統開始升級 BIOS 并加載新的啟動圖標 9 升級完成后 系統將重新啟動 並在開機自檢時顯示新圖標 請訪問華碩官網 www asus com 獲取最新 BIOS 文件 您可以將文件存成小於 150KB 的 GIF 格式作為啟動圖標 ...

Page 123: ...0 6 9 Nero Nero 允許您建立 複製 刻錄 編輯 共享以及更新不同類型的數據 安裝 Nero 以 Nero 9 為例 請按照以下步驟安裝 Nero 9 1 將 Nero 9 驅動程序光盤插入光驅 2 若您的電腦有自動播放功能 屏幕上會自動跳出主菜單 若您的電腦沒有開啟 自動播放 功能 請雙擊 Nero 9 光盤根目錄下的 Setup exe 安裝文件 3 在主菜單中點擊 Nero 9 Essentials ...

Page 124: ...6 10 第六章 使用應用程序 4 選擇安裝嚮導的語言 然後點擊 下一步 5 點擊 下一步 繼續 6 勾選 我接受許可證條款 完成後點擊 下一步 ...

Page 125: ...華碩 CS6110 6 11 7 選擇 典型 然後點擊 下一步 8 勾選 是 我想通過向 Nero 傳送匿名應用程序數據以提供幫助 然後點擊 下一步 9 完成後點擊 退出 ...

Page 126: ...6 12 第六章 使用應用程序 刻錄文件 請參考以下步驟刻錄文件 1 在主菜單中點擊 數據刻錄 添加 2 選擇您想要刻錄的文件 點擊 添加 ...

Page 127: ...助您重裝操作系統并將其還原至出示工作狀態 在恢復過程中所有數據將會丟失 在恢復系統前 請確認您已備份所有資料 并記 錄下所有自訂設置 如網絡設置 請按照以下步驟恢覆您的電腦 1 開機時 當顯示 ASUS 標題畫面 請點擊 F8 鍵進入 Please select boot device 菜單 2 放入還原 DVD 光盤 然後選擇光驅 CDROM XXX 為開機設備 點擊 Enter 鍵 然後按任一鍵繼續 3 等待直至硬盤信息畫面出現 選擇如何安裝一個新系統 選項有 Recover System to a partition 本選項將會刪除以下您所選擇的分區 Partition 並允許您保留其他的既有 分區 以及創建一個新的分區如磁盤 C 選擇一個分區後 按 NEXT 繼續 ...

Page 128: ...示請您放入產品的驅動與應用程序 DVD 光盤 請放入後並按 OK 與重新開機 7 在電腦重新開機後 Windows 7 系統將會開始進行系統設置 請按照畫面上 的指示來完成安裝 然後會再重新開機 華碩個人電腦還原 DVD 光盤僅能使用在本台式電腦 請勿任意使用於其他的電腦 上 有關本產品的最新信息 請上華碩網站 http www asus com cn 查詢 快速恢復系統 僅限預裝 Windows 操作系統的機器 且隱藏分區未破壞 1 開啟華碩台式電腦 當顯示 ASUS 標題畫面時 按下 F9 進入 System Recovery 2 此時畫面顯示 Windows is loading files 隨後 Recovery CD DVD 窗口出現 3 按照屏幕上的說明完成還原過程 在系統重新開機後 顯示分辨率與系統設置 將還原為默認值 ...

Page 129: ...華碩 CS6110 6 15 ...

Page 130: ...關閉您的電腦 我的電腦死機 請按照以下步驟關閉無響應的程序 1 同時按下 Alt Ctrl Delete 然後點擊 任務管理器 2 點擊 應用程序 選項卡 3 選擇未響應程序 然後右擊並選擇 結束任務 若鍵盤也無響應 請按住電源按鈕直至電腦關閉 然後再按下電源按鈕 重新啟動電腦 我無法使用華碩無線網卡連接無線網絡 僅限指定型號 請確認您為想要連接的無線網絡輸入了正確的網絡安全密鑰 將外接天線 選購 連接至華碩無線網卡上的天線接口 並將天線放置 在機箱的頂部以獲得最佳無線性能 數字鍵區域的方向鍵不起作用 請確認數字鎖定指示燈已關閉 當指示燈亮起時這些數字鍵僅被用於輸 入數字 若您想要使用該區域中的方向鍵 請按下數字鎖定鍵關閉指示 燈 ...

Page 131: ...時 僅一個顯示器能顯示 請確認這些顯示器電源已開啟 在開機自檢時僅連接至 VGA 接口的顯示器可以顯示 雙顯示功能僅在 Windows 系統中適用 若您的電腦安裝了獨立顯卡 請確認將顯示器連接至獨立顯卡的輸出接 口 請檢查多個顯示器是否正確設置 更多信息請參閱第三章 連接多個外 接顯示器 我的電腦無法偵測 USB 存儲設備 當您第一次將 USB 存儲設備與電腦相連時 Windows 會自動安裝它的 驅動程序 完成後請點擊進入 計算機 來檢查是否偵測到 USB 存儲 設備 將您的 USB 存儲設備連接至另一臺電腦來檢測此 USB 存儲設備是否損 壞 我想要恢復或撤銷對電腦系統設置的更改 同時不影響我的個人文件 或數據 Windows 系統還原功能允許您還原或撤銷對電腦系統設置的更改 同 時不影響您的個人文件或數據如文檔或圖片 更多信息請參閱第二章 還原您的電腦 ...

Page 132: ...設置 2 調節分辨率 相關信息請參閱您的高清電視的使用手冊 3 點擊 應用 或 確定 然後在確認信息中點擊 保存更改 我的喇叭沒有聲音 以 Windows 7 為例 請確認您將您的喇叭連接至前面板或後面板的聲音輸出端口 草綠色 請確認您的喇叭是否連接電源并開啟 調節喇叭的音量 請確認您沒有啟動靜音模式 若您啟動靜音 音量圖標將顯示為 若要開啟系統聲音 請點擊通 知區域的 然後點擊 若沒有啟動靜音 點擊 滑動滾軸調節音量 將您的喇叭與另一台電腦相連測試它是否正常運行 DVD 光驅無法讀取光盤 請確認光盤是以標籤面朝上放入光驅 請確認光盤是否正確放入託盤 尤其是非標準大小的光盤 請檢查光盤是否有劃傷或損壞 DVD 光驅退出按鈕不起作用 以 Windows 7 為例 1 點擊 計算機 2 右擊 然後在菜單中點擊 彈出 ...

Page 133: ...線是否有脫落 或改用 其他產品附的電源線接在電腦上 電源供應器不良 如果具備柝裝電腦能力且備有其他電源 供應器的話 請用戶換電源供應器確認是 否能正常開機 畫面無法顯示 不良現象描述 可能的問題 請用戶確認 開機後無法顯示 任何畫面 黑屏 信號線沒有確實接上 要確認顯卡是獨立還是集成的 若是獨 立的顯卡 要請用戶接在獨立顯卡上 信號線不良 如果有其他信號線的話 用其他信號 線試試看 是否有畫面 顯示器不良 如果有其他顯示器的話 用其他顯示 器試試看 是否有畫面 網絡相關問題 不良現象描述 可能的問題 請用戶確認 無法上網 網線沒有正確接上 請確認把網線接上 網線不良 確認網絡孔燈號是否有亮 請換一根網 線測試 與路由器設備的連接問題 請確認連線是否連接妥當 網絡連接設置問題 請詢問網絡運營商關於設置信息 殺毒軟件引起的問題 在確認安全狀況下 關閉殺毒軟件 驅動程序有誤 請重新安裝網絡驅動程...

Page 134: ...統 使用中電腦常會死 機 主機發出異音 有可能硬盤壞軌 換硬盤測試或送修 內存不良 請更換內存或把加裝的內存拔掉測試 散熱效果不佳 請移到較為通風環境測試 可能裝了不兼容的軟件 請嘗試重裝操作系統 CPU 風扇太吵 不良現象描述 可能的問題 請用戶確認 開機後風扇就很吵 開機狀態時風扇很吵 正常狀況 電腦開機時風扇會全速運轉 請確認進入操作系統後風扇是否會降 下來 BIOS 可能被更改或重新設 置過 請將 BIOS 恢復為原廠預設值 BIOS 問題 請確認是否為專用的 BIOS 並更新到最 新版 使用時風扇太吵 CPU 風扇問題 請確認 CPU 風扇規格是否符合要求並 確認風扇葉片有無損壞問題 使用環境是否為密閉環境 請移到較為通風環境測試 PC 溫度太高 更新 BIOS 若具備基本組裝能力的話 可以試著清理主機內部的灰塵 若上述仍無法排除疑難 請與客服聯絡 客服電話 400 600 66...

Page 135: ...ASUS Essentio Desktop PC CS6110 User Manual ...

Page 136: ...RTICULAR PURPOSE IN NO EVENT SHALL ASUS ITS DIRECTORS OFFICERS EMPLOYEES OR AGENTS BE LIABLE FOR ANY INDIRECT SPECIAL INCIDENTAL OR CONSEQUENTIAL DAMAGES INCLUDING DAMAGES FOR LOSS OF PROFITS LOSS OF BUSINESS LOSS OF USE OR DATA INTERRUPTION OF BUSINESS AND THE LIKE EVEN IF ASUS HAS BEEN ADVISED OF THE POSSIBILITY OF SUCH DAMAGES ARISING FROM ANY DEFECT OR ERROR IN THIS MANUAL OR PRODUCT SPECIFICA...

Page 137: ...g Windows 7 desktop 2 2 Managing your files and folders 2 7 Restoring your system 2 10 Protecting your computer 2 11 Getting Windows Help and Support 2 15 Chapter 3 Connecting devices to your computer Connecting a USB storage device 3 1 Connecting microphone and speakers 3 2 Connecting multiple external displays 3 5 Connecting an HDTV 3 7 Chapter 4 Using your computer Proper posture when using you...

Page 138: ...iv Contents Chapter 6 Using the utilities ASUS AI Manager 6 1 ASUS Update 6 7 ASUS MyLogo 6 8 Nero 9 6 9 Recovering your system 6 13 Chapter 7 Troubleshooting Troubleshooting 7 1 ...

Page 139: ...dio frequency energy and if not installed and used in accordance with manufacturer s instructions may cause harmful interference to radio communications However there is no guarantee that interference will not occur in a particular installation If this equipment does cause harmful interference to radio or television reception which can be determined by turning the equipment off and on the user is ...

Page 140: ...erence Regulations of the Canadian Department of Communications This class B digital apparatus complies with Canadian ICES 003 Macrovision Corporation Product Notice This product incorporates copyright protection technology that is protected by method claims of certain U S patents and other intellectual property rights owned by Macrovision Corporation and other rights owners Use of this copyright ...

Page 141: ...attery safety warning DO NOT throw the battery in fire DO NOT short circuit the contacts DO NOT disassemble the battery Use this product in environments with ambient temperatures between 0 C 32 F and 35 C 95 F DO NOT cover the vents on the Desktop PC to prevent the system from overheating DO NOT use damaged power cords accessories or other peripherals To prevent electrical shock hazard disconnect ...

Page 142: ...Tips and additional information to help you complete a task IMPORTANT Instructions that you MUST follow to complete a task Where to find more information Refer to the following sources for additional information and for product and software updates ASUS websites The ASUS website provides updated information on ASUS hardware and software products Refer to the ASUS website www asus com ASUS Local Te...

Page 143: ...e x1 Warranty card x1 Package contents If any of the above items is damaged or missing contact your retailer The illustrated items above are for reference only Actual product specifications may vary with different models Keyboard and mouse may not be included in some regions ASUS reserves the right to replace components or accessories to provide optimal serviceability ...

Page 144: ... ...

Page 145: ...e Thank you for purchasing the ASUS Essentio CS6110 Desktop PC Encased in a compact and portable system casing the ASUS Essentio CS6110 Desktop PC provides you with a high definition 1080p display resolution and supports high quality surround sound technologies Read the ASUS Warranty Card before setting up your ASUS Desktop PC Click the number to view its corresponding description 2 4 5 6 3 1 8 7 ...

Page 146: ... 5 Hard disk drive LED 6 Power button Press this button to turn on your computer 7 MMC SD MS card reader Insert MMC SD MS card into this card slot 8 IEEE 1394a port This 6 pin IEEE 1394a port provides high speed connectivity for audio video devices storage peripherals PCs or portable devices 9 USB 3 0 ports These Universal Serial Bus 3 0 USB 3 0 ports connect to USB 3 0 devices 10 Microphone port ...

Page 147: ...ter scanner camera PDA and others 4 Line Out port lime This port connects to a headphone or speaker In a 4 6 or 8 channel configuration the function of this port becomes Front Speaker Out 5 Microphone port pink This port connects to a microphone 6 Side Speaker Out port gray This port connects to the side speakers in an 8 channel audio configuration 7 Line In port light blue This port connects to a...

Page 148: ...on for your computer 11 VGA port This port allows your computer to connect to a VGA monitor or other VGA compatible devices 12 Kensington Lock port This port allows you to secure your Desktop PC to a fixed object using Kensington compatible security products 13 Air vents These vents allow air ventilation ...

Page 149: ...nnecting an external monitor Using the ASUS Graphics Card Connect your monitor to the display output port on the discrete ASUS Graphics Card To connect an external monitor using the ASUS Graphics Card 1 Connect a monitor to a display output port on the ASUS Graphics Card 2 Plug the monitor to a power source The display output ports on the ASUS Graphics Card may vary with different models ...

Page 150: ... to the USB ports on the rear panel of your computer Connecting the AC adapter To connect the AC adapter 1 Connect the AC power cord to the AC adapter 2 Connect the AC adapter to the DC in port at the back of your computer 3 Connect the AC adapter to a power outlet Keyboard and mouse may not be included in some regions ...

Page 151: ...ter Turning your computer ON To turn your computer ON 1 Turn your monitor ON 2 Press the power button on your computer 3 Wait until the operating system loads automatically Turning your computer OFF To turn your computer OFF 1 Close all running applications 2 Click on the Windows desktop 3 Click to shut down the operating system ...

Page 152: ...1 8 Chapter 1 Getting started ...

Page 153: ...nique names for the user name and computer name Click Next 5 Key in the necessary information to set up your password then click Next You may also click Next to skip this step without entering any information 6 Carefully read the license terms Tick I accept the license terms and click Next 7 Select Use recommended settings or Install important updates only to set up the security settings for your ...

Page 154: ...ough its Help and Support feature Launching items from the Start menu To launch items from the Start menu 1 From the Windows taskbar click the Start icon 2 From the Start menu select the item that you want to launch You may pin programs that you want constantly displayed on the Start menu For more details refer to the section Pinning programs on the Start menu or taskbar on this chapter Click the ...

Page 155: ... Start menu 2 Select Getting Started The list of available tasks appears 3 Select the task that you want to do Using the taskbar The taskbar allows you to launch and manage programs or items installed on your computer Launching a program from the taskbar To launch a program from the taskbar From the Windows taskbar click an icon to launch it Click the icon again to hide the program You may pin pro...

Page 156: ...pin then select Pin to this list Unpinning items from the jumplist To unpin items from the jumplist 1 From the taskbar right click an icon 2 From the jumplist right click the item that you want to remove from the jumplist then select Unpin from this list Pinning programs on the Start menu or taskbar To pin programs on the Start menu or taskbar 1 From the Windows taskbar click the Start icon to lau...

Page 157: ... select Unpin this program from taskbar Using the notification area By default the notification area shows these three icons Action Center notification Click this icon to display all the alert messages notifications and launch the Windows Action Center Network connection This icon displays the connection status and signal strength of the wired or wireless network connection Volume Click this icon ...

Page 158: ...isplay or hide the icons and notifications on the taskbar or on the notification area To customize icons and notifications 1 From the notification area click on the arrow icon 2 Click Customize 3 From the dropdown list select the behaviors for the icons or items that you want customize ...

Page 159: ...taskbar click the Start icon to launch the Start menu 2 Click Computer to launch Windows Explorer Exploring files and folders To explore files and folders 1 Launch Windows Explorer 2 From the navigation or view pane browse for the location of your data 3 From the breadcrumb bar click the arrow to display the contents of the drive or folder Navigation pane Breadcrumb bar Search bar View icon Previe...

Page 160: ... the toolbar click the View icon 4 From the View menu move the slider to select how you want to view the file folder You may also right click anywhere on the View pane click View and select the view type that you want Arranging your files To arrange your files 1 Launch Windows Explorer 2 From the Arrange by field click to display the dropdown list 3 Select your preferred arrangement type ...

Page 161: ...type Grouping your files To group your files 1 Launch Windows Explorer 2 Right click anywhere on the View pane 3 From the menu that appears select Group by then select your preferred grouping type Adding a new folder To add a new folder 1 Launch Windows Explorer 2 From the toolbar click New folder 3 Key in a name for the new folder You may also right click anywhere on the View pane click New Folde...

Page 162: ...o your computer s system settings without affecting your personal data To restore your system 1 Close all running applications 2 Click All Programs Accessories System Tools System Restore 3 Follow the onscreen instructions to complete the process 3 Select your backup destination Click Next 4 Select Let Windows choose recommended or Let me choose as your backup mode If you select Let Windows choose...

Page 163: ...ly troubleshoot and fix some common computer problems You may customize the notifications For more details refer to the previous section Customizing icons and notifications in this chapter Launching Windows 7 Action Center To launch Windows 7 Action Center 1 To launch Windows 7 Action Center click the Notification icon then click Open Action Center 2 From Windows 7 Action Center click the task tha...

Page 164: ...he latest updates to enhance the security and performance of your computer Launching Windows Update To launch Windows Update 1 From the Windows taskbar click the Start icon to launch the Start menu 2 Select All Programs Windows Update 3 From the Windows Update screen click the task that you want to do ...

Page 165: ...e your computer Setting up a user account To set up a user account 1 From the Windows taskbar click Getting Started Add new users 2 Select Manage another account 3 Select Create a new account 4 Key in the name of the new user 5 Select either Standard user or Administrator as the user type 6 When done click Create Account ...

Page 166: ...tting up a user s password To set up a user s password 1 Select the user that you would like to set a password 2 Select Create a password 3 Key in a password and confirm it Key in your password s hint 4 When done click Create password ...

Page 167: ... 1 Run the Trend Micro Internet Security application 2 Carefully read the license terms Click Agree Activate 3 Key in your e mail address and select your location Click Next 4 Click Finish to complete the activation Getting Windows Help and Support Windows Help and Support provides you with guides and answers in using the applications in Windows 7 platform To launch Windows Help and Support click ...

Page 168: ...2 16 Chapter 2 Using Windows 7 ...

Page 169: ...B storage device from your computer DO NOT remove a USB storage device when data transfer is in progress Doing so may cause data loss or damage the USB storage device Connecting a USB storage device This desktop PC provides USB 3 0 USB 2 0 ports on both the front and rear panels The USB ports allow you to connect USB devices such as storage devices To connect a USB storage device Insert the USB st...

Page 170: ...rs This desktop PC comes with microphone ports and speaker ports on both the front and rear panels The audio I O ports located on the rear panel allow you to connect 2 channel 4 channel 6 channel and 8 channel stereo speakers Connecting Headphone and Mic Connecting 2 channel Speakers ...

Page 171: ...ASUS CS6110 3 3 Connecting 4 channel Speakers Connecting 6 channel Speakers ...

Page 172: ...3 4 Chapter 3 Connecting devices to your computer Connecting 8 channel Speakers ...

Page 173: ...enlarge your Windows desktop To set up multiple displays 1 Turn off your computer 2 Connect the two monitors to your computer and connect the power cords to the monitors Refer to Setting up your computer section in Chapter 1 for details on how to connect a monitor to your computer When a graphics card is installed in your computer connect the monitors on the output ports of the graphics card For s...

Page 174: ...top space Show desktop only on 1 2 Select this option to show the desktop only on monitor 1 or monitor 2 Remove this display Select this option to remove the selected display 6 Click Apply or OK then click Keep Changes on the confirmation message 3 Turn on your computer 4 Do any of the following to open the Screen Resolution setting screen Click Control Panel Appearance and Personalization Display...

Page 175: ...a High Definition TV HDTV to the HDMI port of your computer You need an HDMI cable to connect the HDTV and the computer The HDMI cable is purchased separately To get the best display performance ensure that your HDMI cable is less than 15 meters ...

Page 176: ...3 8 Chapter 3 Connecting devices to your computer ...

Page 177: ...elax the backs of your thighs If necessary use a footrest to raise the level of your knees Adjust the back of your chair so that the base of your spine is firmly supported and angled slightly backward Sit upright with your knees elbows and hips at an approximately 90º angle when you are in front of your PC Place the monitor directly in front of you and adjust the top of the monitor screen within y...

Page 178: ...om and write to different memory card drives To use the memory card 1 Open the front I O ports cover 2 Insert the memory card into the card slot 3 Select a program from the AutoPlay window to access your files If AutoPlay is NOT enabled in your computer click Windows 7 Start button on the taskbar click Computer and then double click the memory card icon to access the data on it Each card slot has ...

Page 179: ...the AutoPlay window to access your files Removing an optical disc To remove an optical disc 1 While the system is on do either of the following to eject the tray Press the eject button Right click the CD DVD drive icon on the Computer screen and then click Eject 2 Remove the disc from the disc tray If AutoPlay is NOT enabled in your computer click Windows 7 Start button on the taskbar click Comput...

Page 180: ...4 4 Chapter 4 Using your computer ...

Page 181: ...l area network LAN Modem RJ 45 cable 2 Connect one end of an RJ 45 cable to the LAN RJ 45 port on the rear panel of your computer and the other end to a DSL cable modem Refer to the documentation that came with your DSL cable modem 3 Turn on the DSL cable modem and your computer 4 Configure the necessary Internet connection settings Contact your Internet Service Provider ISP for details or assista...

Page 182: ... 1 Connect one end of an RJ 45 cable to the LAN RJ 45 port on the rear panel of your computer and the other end to your LAN 2 Turn on your computer 3 Configure the necessary Internet connection settings Contact your network administrator for details or assistance in setting up your Internet connection ...

Page 183: ... used applications Installing AI Manager To install AI Manager 1 Place the support DVD in the optical drive If Autorun is enabled the Drivers installation wizard appears If Autorun is disabled double click the setup exe file from the ASUS AI Manager folder in the support DVD 2 Click the Utilities tab then click ASUS AI Manager 3 Follow the onscreen instructions to complete the installation Launchi...

Page 184: ... button to quit the AI Manager Main The Main menu contains five utilities AI Disk AI Security AI Boosting and AI Probe Click the arrow on the Main menu icon to browse through the utilities in the main menu AI Disk AI Disk allows you to easily clear temporary IE files IE cookies IE URLs IE history or the Recycle Bin Click the AI Disk icon on the quick bar to display the full AI Disk window and sele...

Page 185: ...rd with at most 20 alphanumeric characters 2 Confirm the password 3 Key in the password hint recommended 4 When done click Ok 5 Select the device you want to lock then click Apply 6 Key in the password you have set previously then click Ok To unlock the device 1 Deselect the locked device then click Apply 2 Key in the password you have set previously then click Ok To change the password Click Chan...

Page 186: ... click the left right button to specify the boot sequence 2 When done press Apply AI Probe AI Probe automatically detects and displays the motherboard and CPU temperatures CPU fan speed and the voltage output You can adjust the values as you need Click the Temperature Voltage or Fan Speed tab then select an item to enable and change the value by dragging the bar ...

Page 187: ...plication you want to add to My Favorites 2 Click Open on the file location window The application is added to My Favorites list Right click on the application icon to launch delete or rename the selected application You can also double click to launch the selected application Support Click any links on the Support window to go to the ASUS website technical support website download support website...

Page 188: ...your system motherboard CPU BIOS installed device s and memory ASUS Utility CPU Level Up CPU Level Up allows you to overclock immediately with OC profile presets in Windows environment without the hassle of entering the BIOS setup To launch CPU Level Up 1 Launch AI Manager 2 Click Asus Utility then double click CPU Level Up ...

Page 189: ... all Windows applications before you update the BIOS using this utility Updating the BIOS To update the BIOS 1 From the Windows desktop click Start Programs ASUS ASUS Update ASUS Update to launch the ASUS Update utility 2 From the dropdown list select any of the updating process Updating from the Internet a Select Update BIOS from the Internet then click Next b Select the ASUS FTP site nearest you...

Page 190: ...h MyLogo to replace system boot logo before flashing BIOS then click Next 4 Select Update BIOS from file from the drop down menu then click Next 5 When prompted locate the new BIOS file then click Next ASUS MyLogo window appears 6 From the left window pane locate the image that you want to use as your boot logo Click Next 7 From the Ratio dropdown list select your desired size for the boot logo Cl...

Page 191: ...ds of data Installing Nero 9 To install Nero 9 1 Insert the Nero 9 DVD into your optical drive 2 If Autorun is enabled the main menu appears automatically If Autorun is disabled double click the SeupX exe file from the main directory of your Nero 9 DVD 3 From the main menu click Nero 9 Essentials ...

Page 192: ...6 10 Chapter 6 Using the utilities 4 Select the language you want to use for Installation Wizard Click Next 5 Click Next to continue 6 Tick I accept the License Conditions When done click Next ...

Page 193: ...ASUS CS6110 6 11 7 Select Typical then click Next 8 Tick Yes I want to help by sending anonymous application data to Nero then click Next 9 When done click Exit ...

Page 194: ...6 12 Chapter 6 Using the utilities Burning files To burn files 1 From the main menu click Data Burning Add 2 Select the files that you want to burn When done click Add ...

Page 195: ...system 1 Turn on your ASUS Desktop PC When the ASUS logo appears press F8 to enter the Please select boot device menu 2 Insert the recovery DVD into the optical drive and select the optical drive CDROM XXX as the boot device Press Enter and then press any key to continue 3 Wait until the Hard Disk Information screen appears Select where to install a new system Options are Recover system to a parti...

Page 196: ...e system restarts 7 After the system restarts Windows 7 begins its system configurations Follow the onscreen instructions to complete the process and the system automatically restarts Quickly recover your system 1 Turn on your ASUS Desktop PC When the ASUS logo appears press F9 to enter System Recovery 2 Windows is loading files is shown Wait until the Recovery CD DVD window appears 3 Follow the o...

Page 197: ... responding then click End Task If the keyboard is not responding Press and hold the Power button on the top of your chassis until the computer shuts down Then press the Power button to turn it on I cannot connect to a wireless network using the ASUS WLAN Card on selected models only Ensure that you enter the correct network security key for the wireless network you want to connect to Connect the ...

Page 198: ... works only under Windows When a graphics card is installed on your computer ensure that you connect the monitors to the output port on the graphics card Check if the multiple displays settings are correct Refer to section Connecting multiple external displays in Chapter 3 for details My computer cannot detect my USB storage device The first time you connect your USB storage device to your compute...

Page 199: ... Ensure that you connect your speakers to the Line out port lime on the front panel or the rear panel Check if your speak is connected to a electrical source and turned on Adjust your speakers volume Ensure that your computer s system sounds are not Muted If it is muted the volume icon is displayed as To enable the system sounds click from the Windows notification area then click If it is not mute...

Page 200: ...ASUS Essentio Desktop PC CS6110 Benutzerhandbuch ...

Page 201: ...NG UNTER KEINEN UMSTÄNDEN HAFTET ASUS SEINE DIREKTOREN VORSTANDSMITGLIEDER MITARBEITER ODER AGENTEN FÜR INDIREKTE BESONDERE ZUFÄLLIGE ODER SICH ERGEBENDE SCHÄDEN EINSCHLIESSLICH SCHÄDEN AUF GRUND VON PROFITVERLUST GESCHÄFTSVERLUST BEDIENUNGSAUSFALL ODER DATENVERLUST GESCHÄFTSUNTERBRECHUNG UND ÄHNLICHEM AUCH WENN ASUS VON DER WAHRSCHEINLICHKEIT DERARTIGER SCHÄDEN AUF GRUND VON FEHLERN IN DIESEM HAN...

Page 202: ... 2 2 Ihre Dateien und Ordner verwalten 2 7 System wiederherstellen 2 10 Computer schützen 2 11 Windows Hilfe und Support 2 15 Kapitel 3 Anschließen von Geräten an Ihren Computer Anschließen eines USB Datenträgers 3 1 Anschließen von Mikrofon und Lautsprechern 3 2 Anschließen von mehreren externen Anzeigegeräten 3 5 Anschließen eines HDTV 3 7 Kapitel 4 Computer verwenden Richtige Sitzhaltung beim v...

Page 203: ...iv Inhalt Kapitel 6 Verwenden der Hilfsprogramme ASUS AI Manager 6 1 ASUS Update 6 7 ASUS MyLogo 6 8 Nero 9 6 9 Systemwiederherstellung 6 13 Kapitel 7 Problembehandlung Problembehandlung 7 1 ...

Page 204: ...ndet Hochfrequenzenergie und kann wenn es nicht gemäß den Anweisungen des Herstellers installiert und bedient wird den Radio und Fernsehempfang empfindlich stören Es wird jedoch nicht garantiert dass bei einer bestimmten Installation keine Interferenzen auftreten Wenn das Gerät den Radio oder Fernsehempfang empfindlich stört was sich durch Aus und Einschalten des Geräts feststellen lässt ist der B...

Page 205: ...oration Produktanmerkung Dieses Produkt verfügt über Kopierschutztechnologie die durch methodische Anforderungen bestimmter U S A Patente und anderer geistiger Eigentumsrechte der Macrovision Corporation und anderer Parteien geschützt sind Die Verwendung dieser Kopierschutztechnologie muss von Macrovision Corporation genehmigt werden und ist wenn nicht anderweitig von der Macrovision Corporation g...

Page 206: ...chtigkeit Kein Modembetrieb während eines elektrischen Sturms Akku Sicherheitswarnung Batterie nicht in offenes Feuer werfen Kontakte nicht kurzschließen Den Akku nicht auseinandernehmen Dieses Produkt in Umgebungstemperaturen zwischen 0 C 32 F und 35 C 95 F verwenden Die Lufteinlässe des Desktop PCs nicht abdecken um eine Überhitzung des Systems zu vermeiden Keine beschädigten Stromkabel Zubehört...

Page 207: ...ur Erleichterung bei der Ausführung einer Aufgabe WICHTIG Anweisungen die Sie beim Ausführen einer Aufgabe befolgen müssen Weitere Informationsquellen An den folgenden Quellen finden Sie weitere Informationen und Produkt sowie Software Updates ASUS Webseiten ASUS Webseiten enthalten weltweit aktualisierte Informationen über ASUS Hardware und Softwareprodukte ASUS Webseiten sind in den ASUS Kontakt...

Page 208: ...halt Sollten o g Artikel beschädigt oder nicht vorhanden sein wenden Sie sich bitte an Ihren Händler Die oberhalb illustrierten Artikel sind nur zur Referenz gedacht Die tatsächlichen Produktspezifikationen können sich je nach Modell unterscheiden Maus und Tastatur werden nicht in allen Regionen mitgeliefert ASUS behält sich das Recht vor Komponenten oder Zubehör zu verändern um optimale Betriebsf...

Page 209: ...für den Kauf eines ASUS Essentio CS6110 Desktop PCs Umhüllt von einem kompakten und mobilen Systemgehäuse liefert der ASUS Essentio CS6110 Desktop PC High Definition 1080 Anzeigeauflösung und unterstützt hochqualitative Surround Sound Technologien Lesen Sie die ASUS Gewährleistungskarte sorgfältig durch bevor Sie Ihren ASUS Desktop PC in Betrieb nehmen Klicken Sie auf die Nummer um die entsprechen...

Page 210: ...er einzuschalten 7 MMC SD MS Kartenleser Führen Sie MMC SD MS Karten in diesen Kartensteckplatz ein 8 IEEE 1394a Anschluss Dieser 6 pol IEEE 1394a Anschluss bietet Hochgeschwindigkeitsverbindungen für Audio Videogeräte Speicherperipherie PCs oder andere mobile Geräte 9 USB 3 0 Anschlüsse Diese Universal Serial Bus 3 0 USB 3 0 Anschlüsse nehmen USB 3 0 Geräte auf 10 Mikrofonanschluss Dieser Anschlu...

Page 211: ...woofer Lautsprechern 9 Hinterer Lautsprecherausgang schwarz Dieser Anschluss verbindet in einer 4 Kanal 6 Kanal oder 8 Kanal Audiokonfiguration mit den hinteren Lautsprechern Audio 2 4 6 oder 8 Kanalkonfigurationen Anschlüsse Kopfhörer 2 Kanal 4 Kanal 6 Kanal 8 Kanal Hellblau Line In Line In Line In Line In Hellgrün Line Out Front Lautsprecher ausgang Front Lautsprecher ausgang Front Lautsprecher ...

Page 212: ...n Schlossbuchse Dieser Anschluss dient der Sicherung Ihres Desktop Pcs mit einem stabilen Objekt unter der Verwendung der Kensington kompatiblen Sicherheitsprodukten 13 Lüftungsöffnungen Diese Öffnungen dienen der Luftzirkulation Blockieren Sie nicht die Lüftungsöffnungen im Gehäuse Stellen Sie immer adäquate Ventilation für Ihren Computer bereit ...

Page 213: ...externen Monitors Unter Verwendung einer ASUS Grafikkarte Verbinden Sie den Monitor mit dem Anzeigeausgang der aufgesetzten ASUS Grafikkarte So verbinden Sie einen externen Monitor mit der ASUS Grafikkarte 1 Verbinden Sie ein Monitor mit dem Anzeigeausgang der ASUS Grafikkarte 2 Schließen Sie den Monitor an die Stromversorgung an Die Anzeigeausgänge der ASUS Grafikkarten können sich je nach Modell...

Page 214: ...tafel Rückseite Ihres Computers C Maus und Tastatur werden nicht in allen Regionen mitgeliefert Anschließen des Netzteils So schließen Sie das Netzeil an 1 Verbinden Sie das Stromkabel mit dem Netzteil 2 Verbinden Sie das Netzteil mit dem DC Gleichstrom Eingang auf der Rückseite Ihres Computers 3 Schließen Sie das ganze Netzteil an die Stromversorgung an ...

Page 215: ...alten Sie den Computer ein 1 Schalten Sie den Monitor ein 2 Drücken Sie die Einschalttaste Ihres Computers 3 Warten Sie bis das Betriebssystem automatisch hochlädt Computer ausschalten So schalten Sie den Computer aus 1 Schließen Sie alle laufenden Anwendungen 2 Klicken Sie im Windows Desktop auf 3 Klicken Sie auf Herunterfahren um das Betriebssystem herunterzufahren ...

Page 216: ...nen ein um Ihr Kennwort einzurichten und klicken Sie auf Weiter Next Sie können auch auf Weiter Next klicken und diesen Schritt ohne ein Kennwort einzugeben zu überspringen 6 Lesen Sie sorgfältig die Lizenzbedingungen License terms Wählen Sie Ich akzeptiere die Lizenzbedingungen I accept the license terms und klicken Sie auf Weiter Next 7 Wählen Sie zwischen Empfohlene Einstellungen verwenden Use ...

Page 217: ...enü ausführen So führen Sie Elemente im Startmenü aus 1 Klicken Sie in der Windows Taskleiste auf das Startsymbol 2 Wählen Sie im Startmenü das Element welches Sie ausführen möchten Sie können Programme die Sie dauerhaft im Startmenü anzeigen möchten an das Startmenü anheften Für weitere Details beziehen Sie sich auf den Abschnitt Programme an Startmenü oder Taskleiste anheften in diesem Kapitel K...

Page 218: ... Schritte Getting Started Eine Liste möglicher Aufgaben erscheint 3 Wählen Sie die gewünschte Aufgabe Taskleiste verwenden Die Taskleiste ermöglicht das Starten und die Verwaltung der auf Ihrem Computer installierten Programme oder Elemente Ein Programm aus der Taskleiste starten So starten Sie ein Programm aus der Taskleiste Klicken Sie auf ein Symbol in der Windows Taskleiste um es zu auszuführe...

Page 219: ... Pin to this list Elemente von der Sprungliste lösen So lösen Sie Elemente von der Sprungliste 1 Klicken Sie mit der rechten Maustaste ein Symbol in der Taskleiste an 2 Klicken Sie mit der rechten Maustaste auf das gewünschte Element in der Sprungliste und wählen Sie Von dieser Liste lösen Unpin from this list Programme an Startmenü oder Taskleiste anheften So heften Sie Programme ans Startmenü od...

Page 220: ...this program from taskbar Infobereich verwenden In der Standardeinstellung sind folgende Symbole im Infobereich aufgelistet Benachrichtigung für Wartungscenter Hier können Sie durch das Anklicken dieses Symbols Warnnachrichten Benachrichtigungen anzeigen und das Windows Wartungscenter laden Netzwerkverbindung Dieses Symbol zeigt den Verbindungsstatus und Signalstärke der Kabel oder Drahtlos Netzwe...

Page 221: ...gen in der Taskleiste oder im Infobereich wahlweise ein oder ausblenden So passen Sie Symbole und Benachrichtungen an 1 Klicken Sie im Infobreich auf das Pfeilsymbol 2 Klicken Sie auf Anpassen Customize 3 Wählen Sie in der Dropdownliste die gewünschte Verhaltensweise von Symbolen oder Elementen die Sie anpassen möchten ...

Page 222: ...as Startsymbol um das Startmenü zu laden 2 Klicken Sie auf Computer um den Windows Explorer zu öffnen Dateien und Ordner durchsuchen So durchsuchen Sie Dateien und Ordner 1 Öffnen sie Windows Explorer 2 Suchen Sie im Navigations oder Ansichtsbereich nach dem Ort Ihrer Daten 3 Klicken Sie in der Breadcrumb Leiste auf den Pfeil um den Inhalt eines Laufwerks oder Ordners anzuzeigen Navigations bereic...

Page 223: ...mbol Ansicht 4 Bewegen Sie den Auswahlregler im Ansichtsmenü um die Ansicht der Datei oder des Ordners anzupassen Sie können auch mit der rechten Maustaste den Ansichtsbereich irgendwo anklicken Ansicht View wählen und die gewünschte Ansichtsart bestimmen Dateien ordnen So ordnen Sie Dateien 1 Öffnen Sie Windows Explorer 2 Klicken Sie im Feld Anordnen Arrange by um die Dropdownliste anzuzeigen 3 W...

Page 224: ...en 1 Öffnen Sie Windows Explorer 2 Rechtsklicken Sie irgendwo im Ansichtsbereich 3 Wählen Sie im erschienenen Kontextmenü Gruppieren Group by und dann die von Ihnen gewünschte Gruppierungsmethode Neuen Ordner hinzufügen So fügen Sie einen neuen Ordner hinzu 1 Öffnen Sie Windows Explorer 2 Klicken in der Taskleiste auf Neuer Ordner New folder 3 Wählen Sie einen Namen für den neuen Ordner Sie können...

Page 225: ...tersystems ohne dass Ihre persönlichen Daten betroffen werden So stellen Sie das System wieder her 1 Schließen Sie alle laufenden Anwendungen 2 Klicken Sie auf Alle Programme All Programs Zubehör Accessories Systemprogramme System Tools Systemwiederherstellung System Restore 3 Folgen Sie den Bildschirmanweisungen um den Vorgang abzuschließen 3 Wählen Sie einen Zielort für Ihren Backup Klicken Sie ...

Page 226: ...Computerprobleme Sie können die Benachrichtungen selbst anpassen Für weitere Details beziehen Sie sich auf den vorherigen Abschnitt Symbole und Benachrichtigungen anpassen in diesem Kapitel Windows 7 Wartungscenter ausführen So führen Sie Windows 7 Wartungscenter aus 1 Klicken Sie zum Ausführen des Windows 7 Wartungscenter auf das Symbol im Infobereich und dann auf Wartungscenter öffnen Open Actio...

Page 227: ...um die Sicherheit und Leistung Ihres Computers zu verbessern Windows Update ausführen So führen Sie Windows Update aus 1 Klicken Sie in der Windows Taskleiste auf das Startsymbol um das Startmenü zu laden 2 Wählen Sie Alle Programme All Programs Windows Update 3 Klicken Sie im Windows Update Fenster auf die Aufgabe die Sie ausführen möchten ...

Page 228: ...stellen 1 Klicken Sie in der Windows Taskleiste auf Erste Schritte Getting Started Neue Benutzer hinzufügen Add new users 2 Wählen Sie Anderes Konto verwalten Manage another account 3 Wählen Sie Neues Konto erstellen Create a new account 4 Geben Sie den neuen Benutzernamen ein 5 Wählen Sie den Benutzertyp entweder Standardbenutzer Standard user oder Administrator 6 Zum Fertigstellen klicken Sie au...

Page 229: ...enutzerkennwort 1 Wählen Sie den Benutzer für den Sie ein Kennwort erstellen möchten 2 Wählen Sie Kennwort erstellen Create a password 3 Geben Sie ein Kennwort ein und bestätigen Sie es Geben Sie ein Kennworthinweis ein 4 Zum Fertigstellen klicken Sie auf Kennwort erstellen Create password ...

Page 230: ...ltig die Lizenzbedingungen License terms Klicken Sie auf Zustimmen Aktivieren Agree Activate 3 Geben Sie Ihre E Mail Adresse und Ihren Standort ein Klicken Sie auf Weiter Next 4 Klicken Sie auf Fertigstellen Finish um die Aktivierung abzuschließen Windows Hilfe und Support Windows Hilfe und Support bietet Ihnen Anleitungen und Antworten für die Verwendung der Anwendungen auf der Windows 7 Plattfor...

Page 231: ...2 16 Kapitel 2 Verwenden von Windows 7 ...

Page 232: ...emove Hardware eingeblendet wird entfernen Sie den USB Datenträger von Ihrem Computer Entfernen Sie einen USB Datenträger nicht während eines laufenden Datentransfers Dies kann zu Datenverlust führen und den USB Datenträger beschädigen Anschließen eines USB Datenträgers Dieser Desktop PC enthält USB 3 0 2 0 Anschlüsse auf der Vorder sowie Rückseite Die USB Anschlüsse ermöglichen Ihnen das Anschlie...

Page 233: ...r Desktop PC enthält Mikrofon und Lautsprecheranschlüsse auf der Vorder sowie Rückseite Die auf der Rückseite gelegenen Audio E A Anschlüsse ermöglichen Ihnen den Anschluss von 2 Kanal 4 Kanal 6 Kanal and 8 Kanal Stereolautsprechern Anschluss von Kopfhörern und Mikrofon Anschluss von 2 Kanal Lautsprechern ...

Page 234: ...ASUS CS6110 3 3 Anschluss von 4 Kanal Lautsprechern Anschluss von 6 Kanal Lautsprechern ...

Page 235: ...3 4 Kapitel 3 Anschließen von Geräten an Ihren Computer Anschluss von 8 Kanal Lautsprechern ...

Page 236: ...ows Desktops verwenden So richten Sie mehrere Anzeigegeräte ein 1 Schalten Sie den Computer aus 2 Verbinden Sie die zwei Monitore mit Ihren Computer sowie die Netzteile mit den Monitoren Beziehen Sie sich auf den Abschnitt Einrichten Ihres Computer in Kapitel 1 für Details zum Verbinden eines Monitors mit Ihrem Computer Wenn eine Grafikkarte auf Ihren Computer installiert wurde verbinden Sie die A...

Page 237: ...esktop auf Monitor 1 oder Monitor 2 anzuzeigen Diesen Bildschirm entfernen Remove this display Treffen Sie diese Auswahl um den ausgewählten Monitor zu entfernen 6 Klicken Sie auf Übernehmen Apply oder auf OK und in der Bestätigungsnachricht dann auf Änderungen beibehalten Keep Changes 3 Schalten Sie den Computer ein 4 Folgen Sei einer nachstehenden Vorgehensweisen um das Einstellungsfenster Bilds...

Page 238: ...h Definition TV HDTV mit dem HDMI Anschluss Ihres Computers Sie benötigen ein HDMI Kabel um ein HDTV mit dem Computer zu verbinden Das HDMI Kabel muss separat erworben werden Um die beste Anzeigeleistung zu erhalten sollte das HDMI Kabel kürzer als 15 Meter sein ...

Page 239: ...3 8 Kapitel 3 Anschließen von Geräten an Ihren Computer ...

Page 240: ...el zu entspannen Verwenden Sie falls erforderlich eine Fussablage um Ihre Knie anzuheben Stellen Sie die Rücklehne Ihres Stuhls ein so dass die Unterseite Ihres Rückgrats fest abgestützt und etwas nach hinten gewinkelt wird Sitzen Sie aufrecht so dass Ihre Knie Ellbogen und Hüften beim Sitzen vor dem PC in etwa einen 90º Winkel bilden Stellen Sie den Monitor direkt vor Ihnen auf und passen die Pos...

Page 241: ... Sie eine Speicherkarte 1 Öffnen Sie die Abdeckung der E A Fronttafel an 2 Stecken Sie eine Speicherkarte in den Kartensteckplatz 3 Wählen Sie im AutoPlay Fenster ein Programm um auf die Dateien zuzugreifen Falls AutoPlay auf Ihren Computer NICHT aktiviert ist klicken Sie in der Taskleiste von Windows 7 auf die Start Taste klicken Sie auf Arbeitsplatz Computer und doppelklicken Sie das Speicherkar...

Page 242: ...greifen Optischen Datenträger entfernen So entfernen Sie einen optischen Datenträger 1 Folgen Sie einer Vorgehensweise um das Laufwerksfach auszuwerfen Drücken Sie die Auswurfstaste Klicken Sie im Fenster Arbeitsplatz Computer mit rechten Maustaste auf das Laufwerkssymbol und wählen Sie Auswerfen Eject 2 Entfernen Sie den Datenträger aus dem Laufwerksfach Falls AutoPlay auf Ihren Computer NICHT ak...

Page 243: ...4 4 Kapitel 4 Computer verwenden ...

Page 244: ... RJ 45 Kabel 2 Verbinden Sie ein Ende des RJ 45 Kabels mit dem LAN RJ 45 Anschluss auf der Rückseite Ihres Computers und das andere Ende mit dem DSL Kabelmodem Beziehen Sie sich auf die Dokumentation die mit Ihrem DSL Kabelmodem geliefert wurde 3 Schalten sie den DSL Kabelmodem und Computer ein 4 Konfigurieren Sie die nötigen Einstellungen für die Internetverbindung Für Details und Hilfestellung z...

Page 245: ...45 Kabels mit dem LAN RJ 45 Anschluss auf der Rückseite Ihres Computers und das andere Ende mit dem Internet LAN 3 Schalten sie den Computer ein 4 Konfigurieren Sie die nötigen Einstellungen für die Internetverbindung Für Details und Hilfestellung zur Einrichtung einer Internetverbindung wenden Sie sich an Ihren Internetdienstanbieter ISP RJ 45 Kabel ...

Page 246: ...ager installieren So installieren Sie AI Manager 1 Legen Sie die Support DVD in das optische Laufwerk Die DVD zeigt automatisch das Treiber Menü an wenn Autorun auf Ihrem Computer aktiviert ist Falls Autorun deaktiviert ist doppelklicken Sie die Datei setup exe im Ordner ASUS AI Manager auf der Support DVD 2 Klicken Sie auf den Tab Hilfsprogramme Utilities und dann auf ASUS AI Manager 3 Folgen Sie...

Page 247: ...m AI Manager zu schließen Hauptmenü Das Hauptmenü enthält fünf Anwendungen AI Disk AI Security AI Boosting and AI Probe Klicken Sie das kleine Dreieck neben dem Symbol Hauptmenü um die Anwendungen im Hauptmenü einzublenden AI Disk AI Disk ermöglicht Ihnen das einfache Löschen der temporären Internetdateien IE URLs IE Cookies IE Verlaufliste oder Papierkorb Klicken Sie in der Schnellstartleiste auf...

Page 248: ...ie Ihr Kennwort 3 Geben Sie einen Kennworthinweis ein empfohlen 4 Klicken Sie wenn soweit auf OK 5 Wählen Sie das zu sperrende Gerät und klicken Sie dann auf Übernehmen Apply 6 Geben Sie das zuvor eingerichtete Kennwort ein und klicken Sie auf OK So entsperren Sie ein Gerät 1 Wählen Sie die Auswahl für das gesperrte Gerät auf und klicken Sie auf Übernehmen Apply 2 Geben Sie das zuvor eingerichtete...

Page 249: ... 2 Klicken Sie wenn soweit auf Übernehmen Apply AI Probe Die aktuellen CPU und Motherboardtemperaturen sowie CPU Lüftergeschwindigkeit und Ausgangsspannung werden von AI Probe automatisch erkannt und angezeigt Sie können die Werte je nach Bedarf anpassen Klicken Sie auf die Auswahl Temperatur Temperature Spannung Voltage oder Lüftergeschwindigkeit Fan Speed und wählen Sie ein Element um es zu akti...

Page 250: ...en 2 Klicken Sie im Auswahlfenster auf Öffnen Open Die Anwendung wird zu Meine Favoriten My Favorites hinzugefügt Klicken Sie mit der rechten Maustaste auf das Anwendungssymbol um die entsprechende Anwendung zu öffnen löschen oder umzubenennen Doppelklicken Sie auf ein Symbol um die entsprechende Anwendung zu öffnen Support Klicken Sie im Fenster Support Unterstützung auf die Links um zur ASUS Web...

Page 251: ... der installierten Geräte anzuzeigen ASUS Anwendungen CPU Level Up CPU Level Up ermöglicht das sofortige Übertaken Ihres Systems in der Windows Umgebung mit voreingestellten Übertaktungsprofilen und ohne das umständliche Aufrufen des BIOS Setup So starten Sie CPU Level Up 1 Starten Sie AI Manager 2 Klicken Sie auf ASUS Anwendung Asus Utility und doppelklicken Sie auf CPU Level Up ...

Page 252: ...ramm ASUS Update unter Windows indem Sie auf Start Alle Programme All Programs ASUS ASUSUpdate ASUSUpdate klicken 2 Wählen Sie in der Dropdownliste eine der folgenden Methoden Aktualisieren über das Internet Updating from the Internet a Wählen Sie BIOS über das Internet aktualisieren Update BIOS from the Internet aus dem Pulldownmenü und klicken dann auf Weiter Next b Wählen Sie die Ihnen am nächs...

Page 253: ...en Sie dann auf Weiter Next 4 Wählen Sie BIOS über eine Datei aktualisieren Update BIOS from a file in der Dropdownliste und klicken Sie dann auf Weiter Next 5 Wenn Sie dazu aufgefordert werden suchen Sie die neue BIOS Datei und klicken Sie dann auf Weiter Next Es erscheint das ASUS MyLogo Fenster 6 Wählen Sie in der linken Fensterhälfte ein Bild das Sie als Boot Logo verwenden möchten Klicken Sie...

Page 254: ...edenen Typs Nero 9 installieren So installieren Sie Nero 9 1 Legen Sie die Nero 9 DVD in das optisches Laufwerk ein 2 Falls Autorun aktiviert ist erscheint automatisch das Hauptmenü Falls Autorun deaktiviert ist doppelklicken Sie die Datei SeupX exe im Hauptverzeichnis Ihrer Nero 9 DVD 3 Klicken Sie im Hauptmenü auf Nero 9 Essentials ...

Page 255: ...Sie die gewünschte Sprache für den Installationsassistenten Klicken Sie auf Weiter Next 5 Klicken Sie auf Weiter Next um fortzufahren 6 Wählen Sie Ich akzeptiere die Lizenzbedingungen I accept the License Conditions Wenn soweit klicken Sie auf Weiter Next ...

Page 256: ...l und klicken Sie dann auf Weiter Next 8 Wählen Sie Ja ich möchte Anwendungsdaten anonym an Nero senden Yes I want to help by sending anonymous application data to Nero und klicken Sie Weiter Next 9 Wenn abgeschlossen klicken Sie auf Beenden Exit ...

Page 257: ...n der Hilfsprogramme Dateien brennen So brennen Sie Dateien 1 Klicken Sie im Hauptmenü auf Daten brennen Data Burning Hinzufügen Add 2 Wählen Sie die Dateien die Sie brennen möchten Wenn soweit klicken Sie auf Hinzufügen Add ...

Page 258: ... Please select boot device Bitte Boot Gerät auswählen zu gelangen 2 Legen Sie die Wiederherstellungs DVD in das optische Laufwerk und wählen Sie das optische Laufwerk CDROM XXX als das Boot Gerät Drücken Sie die Enter Eingabetaste und dann eine beliebige Taste um fortzufahren 3 Warten Sie bis das Fenster Hard Disk Information Festplatten Informationen erscheint Wählen Sie zur Installation des neue...

Page 259: ...neu zu starten 7 Nach dem Systemneustart beginnt Windows 7 mit der Systemkonfiguration Folgen Sie den Bildschirmanweisungen um den Wiederherstellungsprozess abzuschließen und das System neu zu starten Schnelle Systemwiederherstellung 1 Schalten Sie den ASUS Desktop PC ein Drücken Sie beim Erscheinen des ASUS Logos auf F9 um zur Systemwiederherstellung System Recovery zu gelangen 2 Windows is loadi...

Page 260: ...ht reagierende Programm und klicken Sie auf Task beenden End Task Falls die Tastatur nicht reagiert drücken und halten Sie die Einschalttaste bis der Computer sich ausschaltet Drücken Sie erneut auf die Einschalttaste um ihn wieder zu starten Ich kann mich mit der ASUS WLAN Karte nicht mit dem Drahtlos Netzwerk verbinden an bestimmten Modellen Stellen Sie sicher dass Sie für das gewünschte Netzwer...

Page 261: ...m Computer installiert ist sollten die Monitore mit den Ausgängen der Grafikkarte verbunden sein Prüfen Sie ob die Einstellungen für mehrere Anzeigegeräte korrekt sind Für Details beziehen Sie sich auf den Abschnitt Anschließen von mehreren externen Anzeigegeräten in Kapital 3 Mein Computer kann meinen USB Datenträger nicht erkennen Beim ersten Verbinden eines USB Datenträgers mit Ihrem Computer i...

Page 262: ...utsprecher mit dem Line Out Anschluss Hellgrün auf der Vorderseite oder Rückseite verbunden sind Prüfen Sie ob die Lautsprecher an die Stromversorgung angeschlossen und eingeschalten sind Passen Sie die Lautstärke Ihrer Lautsprecher an Stellen Sie sicher dass die Lautstärke des Systems nicht stummgeschaltet ist Falls stummgeschaltet erscheint das Lautstärkesymbol als Um Lautstärke zu aktivieren kl...

Reviews: