background image

32

IV. Hardware Setup

IV

. Hardware Setup

AP8000 Hardware Reference Guide

• 4-12. SCSI Backplane Board Placement

Installing & Removing SCSI Backplane
Boards

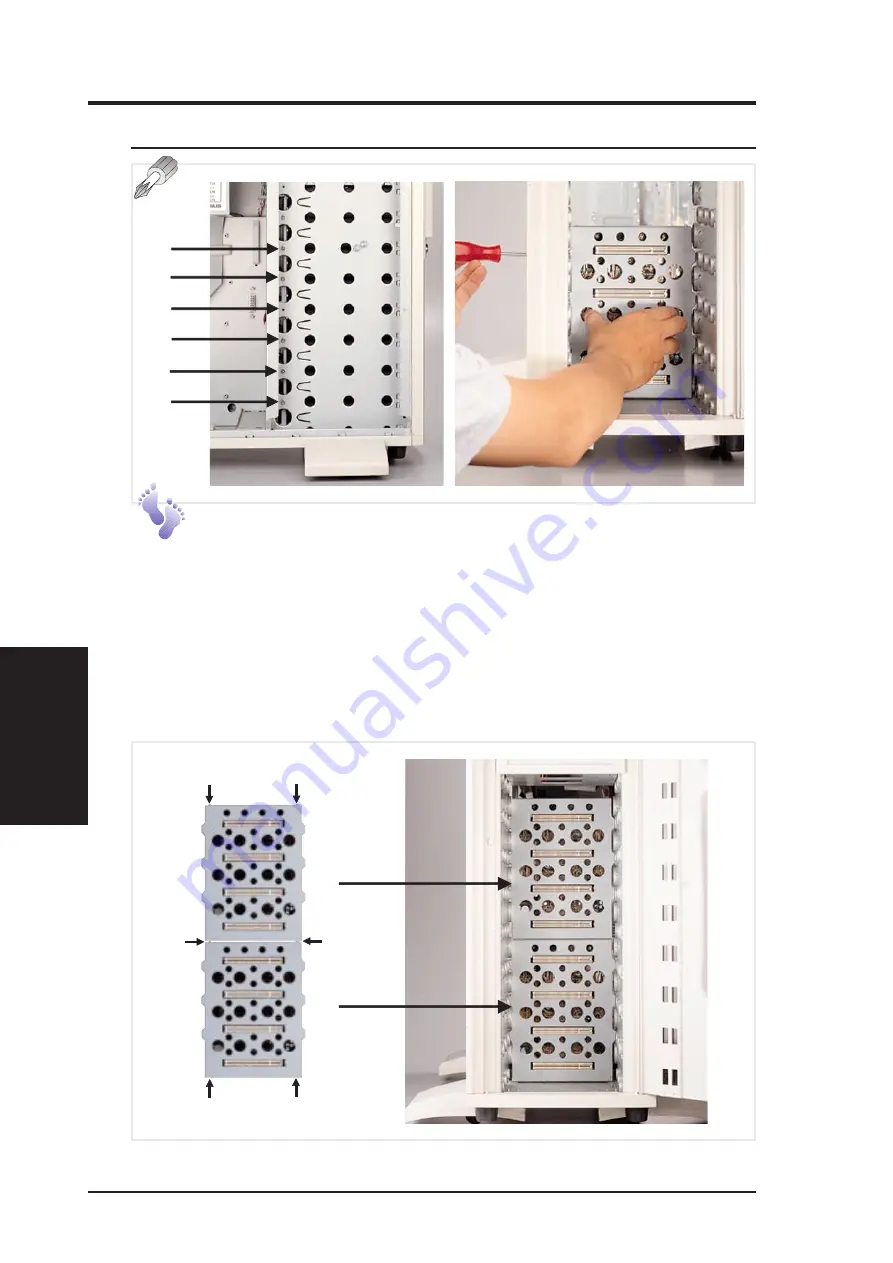
There are three screws on each side of the SCSI backplane board as shown by the
arrows. Both sides of the chassis side panels must be removed to access these
screws. Please note that notches on the top and bottom of the SCSI backplane
board must be placed as shown in order to properly seat the SCSI backplane boards
into the chassis. The SCSI backplane boards will only fit in one orientation but
may be interchanged between the top and bottom half. Check the SCSI ID DIP
setting of each SCSI backplane board before using.

SCSI Backplane Board

Summary of Contents for AP8000

Page 1: ...AP8000 Dual Pentium III XeonTM Corporate Server Hardware Reference Guide ...

Page 2: ...ied or altered unless such repair modification of alteration is authorized in writing byASUS or 2 the serial number of the product is defaced or missing Products and corporate names appearing in this manual may or may not be registered trade marks or copyrights of their respective companies and are used only for identification or explanation and to the owners benefit without intent to infringe The...

Page 3: ...tp asus com tw pub ASUS ASUS COMPUTER INTERNATIONAL America Marketing Address 6737 Mowry Avenue Mowry Business Center Building 2 Newark CA 94560 USA Fax 1 510 608 4555 Email info usa asus com tw Technical Support Fax 1 510 608 4555 BBS 1 510 739 3774 Email tsd usa asus com tw WWW www asus com FTP ftp asus com tw pub ASUS ASUS COMPUTER GmbH Europe Marketing Address Harkort Str 25 40880 Ratingen BRD...

Page 4: ...rver 16 3 2 LED Indicators 16 3 3 BIOS Setup 16 IV Hardware Setup 4 1 Opening the Chassis 17 Chassis Panels 17 Opening the Left Panel 17 Fan Replacement 17 4 2 Motherboard 18 Motherboard Spacers 18 Install the Baseboard 18 Motherboard Screws 18 Device Cables 19 Cable Connections 19 4 3 Central Processing Unit CPU 20 Install Retention Mechanisms 20 Install Retention Mechanism Brace Bars 20 Install ...

Page 5: ... 4 10 SCSI Backplane 29 4 11 SCSI ID Setting 30 Using the SCSI Backplane Boards Separately 30 Using Cascaded SCSI Backplane Boards 31 4 12 SCSI Backplane Board Placement 32 Installing Removing SCSI Backplane Boards 32 SCSI Hard Disk Connections 33 4 13 Circulation System 34 Fan Module 34 Fan Replacement 34 4 14 Power Supply 35 Redundant Power Supply 35 Power Supply Mounting 35 Removing One Power S...

Page 6: ...icular installation If this equipment does cause harmful interference to radio or television reception which can be determined by turning the equip ment off and on the user is encouraged to try to correct the interference by one or more of the following measures Re orient or relocate the receiving antenna Increase the separation between the equipment and receiver Connect the equipment to an outlet...

Page 7: ...hich gives descriptions of each server component III Getting Started This section gives information on getting started with the server IV Hardware Setup This section gives information on setting up the server V Appendix This section gives you additional information to help plan your server Symbols To complete certain tasks safely and completely you should be aware of a few symbols used throughout ...

Page 8: ...the necessary components for a server Standard components Motherboard XG DLS Chassis AS 50 Power Supply ATX Processor CPU Pentium II XeonTM Memory Modules 8 16 32 64 128 256 512MB SDRAM Hard Drive Ultra2 Ultra wide Floppy Drive 1 44MB CD ROM Drive 40X Expansion Cards Ethernet Graphics Modem SCSI Terminator Terminator for 68 pin SCSI cables User s Manuals CD ROM SCSI Motherboard Hardware Reference ...

Page 9: ...ed at 3D graphical display applications Using AGP will also free up a PCI slot Adaptec SCSI Chipset Features Adaptec AIC 7896 dual channel Ul tra2 SCSI chipset that supports any combination of 50 pin narrow or 68 pin wide ultra2 devices through the onboard 50 pin and 68 pin SCSI connectors Please refer to the SCSI cable limits in the appendix Device Bays Support one floppy one CD ROM two additiona...

Page 10: ...all cables are correctly connected and the power cables are not damaged If any dam age is detected contact your dealer as soon as possible To avoid short circuits keep paper clips screws and staples away from connectors slots sockets and circuitry Before opening the chassis panels make sure all power cables are unplugged Avoid dust humidity and temperature extremes Place the server on a stable sur...

Page 11: ...ters and disk drives are sensitive to static electricity discharge These devices are wrapped in antistatic bags to prevent this damage Take the following precautions If you have an antistatic wrist strap available use it while handling the device Do not remove the device from the antistatic bag until you are ready to install the device in the system unit With the device still in its antistatic bag...

Page 12: ...12 AP8000 Hardware Reference Guide This page was intentionally left blank ...

Page 13: ...ft Panel Knob 5 Metal Door Lock 6 Hot Swap Tray 7 Chassis Stabilizer with Wheel 2 1 Server Front Side The front side of the server is provided to show the front exterior components of this server The chassis is made of strong rust resis tant metal and covered with a protective ivory surfacing Server Front Side Front Side 1 2 4 5 7 3 6 ...

Page 14: ...y LED 3 Power Supply Fan 4 AC Power In Connector 5 Voltage Input Switch 6 PS 2 Keyboard 7 PS 2 Mouse 8 USB Ports 1 and 2 9 Serial Port COM1 10 Parallel Port 11 Serial Port COM2 12 RJ45 Port LAN 13 RAID Controller Optional 2 2 Server Back Side Server Back Side Back Side 2 4 9 6 8 3 11 5 10 12 7 13 1 ...

Page 15: ...nts II Components Back Side Back Side II Components Server Left Side 1 Redundant Power Supply Frame 2 Fan Array Module 3 Chassis Intrusion Switch 4 I O Device Panel Left Side 2 3 Server Left Side 1 3 4 2 Control Board Fan Release Handle Fan Array Module ...

Page 16: ... by following the mother board User s Manual 3 2 LED Indicators The LED indicators are located on the top left edge of the front panel The Power LED lights when the motherboard receives power from the power supply Activity LED lights when there is activity from IDE or SCSI de vices connected to the motherboard Fan 1 5 lights if the corresponding fan stops turning When installing Windows NT 4 0 use...

Page 17: ...clips in and then slide the fan out Opening the Left Panel The CAM has a rotating knob with its own keylock Turn the knob counterclockwise to release and clockwise to secure The keylock can be used to keep the knob from being turned by unauthorized people 4 1 Opening the Chassis Opening the Chassis NOTE The fan array module may be removed first for easier motherboard instal lation or removal Chass...

Page 18: ...lign the rub ber pad over the metal baseboard so that the holes match Align the XG DLS motherboard over the rubber pad and metal baseboard so that the screws match up with the motherboard s screw holes Place and tighten three captive nuts in the corner locations as circled Motherboard Motherboard Screws Place eight screws in the areas circled on the motherboard The four screws used with the moth e...

Page 19: ...s chassis The following picture points out the name of each cable and its suggested location Plastic keepers protect the cables from contacting with the fans and other devices Make sure that all cables are properly secured 68 pin SCSI Cable Floppy Disk Drive Cable CD ROM Drive Cable Cable Connections The cables connect to the motherboard as shown The motherboard includes onboard SCSI with 68 pin a...

Page 20: ...tive Nut Long Screw aligned with spacers Short Screw Install Retention Mechanisms The retention mechanism parts have a left and a right side The left side has a single dot and the right side has two dots when holding the motherboard with the ATX connectors to the left Place the retention mechanisms holes over the screws and the Slot2 Screw four captive nuts onto the inner screws 3 circled in the p...

Page 21: ...erboard with theATX connectors to the left Two Dots One Dot Install Retention Mechanism Cap The cap must first be installed from the left side with the ATX connec tors to the left The left side has one dot while the right side has two dots The right end of the cap enters the retention mechanism and a click is heard as it snaps into place Install Retention Mechanism Frame A metal frame is used accr...

Page 22: ... Intrusion Switch Chassis Intrusion Signal Cable Chassis Intrusion Switch The chassis provides a micro toggle switch that must be connected to the motherboard for the chassis intrusion detection to work The moth erboard will signal theASMAsoftware when the side panel is opened The connection diagram is given here 5VSB Chasis Signal GND Motherboard s Chassis Intrusion Connector from the Chassis Int...

Page 23: ...ntrusion Connector Chassis Intrusion Connector The chassis intrusion switch is connected to the motherboard s chassis intrusion connector through a single connector Expansion Cards Expansion cards can be easily installed just like on any stan dard PC Up to 5 PCI or 1 ISAcards can be installed OneAGP slot is also available for an AGP graphics adapter to provide hardware 3D acceleration and free up ...

Page 24: ... hard disk drive Four screws are provided as boxed for mounting a 6 inch device such as a CD ROM or tape drive Fixed Device Bay Cover Clips The device bay panel is held by two plastic clips on each side Press these clips in with a screwdriver to release Fixed Device Bay Cover After releasing the device bay cover clips pry the cover away from the chassis using a screw driver from the front Fixed St...

Page 25: ...in or out on the side rails 4 7 Floppy Disk Drive and CD ROM Floppy Drive Spacer CD ROM Drive The CD ROM drive can be in stalled as the floppy disk drive is installed CD ROM Drive Spacer Floppy Drive CD ROM If using an IDE hard disk drive in this large chassis it is recom mended that only one is installed and with the shortest IDE cable possible Long IDE cables will cause poor signal Select PIO DM...

Page 26: ...s Lock Power ON Unlock Power OFF Hot Swap Tray Usage Each hot swap tray provides an aluminum carrier for a single SCSI hard disk drive The alumi num tray provides protection and maximum heat dissipation for al most all types of high speed SCSI disk drives The provided cables and wires connect to the SCSI hard disk drive and screws are needed to secure the tray to the bottom of the SCSI hard disk d...

Page 27: ...y the hot swap tray s connector board the power LED will light When data is written or read to or from the contained hard disk drive the activity LED will flash proportional to the amount of data transferred To place the hot swap tray into the device bay you must lift the handle 45 degrees from rest position and then push the tray forcefully If the tray is snapped in place the handle can be lowere...

Page 28: ...2 These 3 pins connect to the power LED on the front of the tray to show when the connector board receives power ALED_In These 2 pins connect to the hard drive access LED on the back of the hard drive to show when the hard drive accesses data SCSI_ID These 8 pins connect to the hard drive s SCSI address pins to set the SCSI ID number of the hard disk drive Hot Swap Tray Docking Connector Connects ...

Page 29: ...the server using a common connector The female end is located on the SCSI backplane board while the male end is located on the hot swap tray 4 10 SCSI Backplane SCSI Backplane The DA BP4 SCSI backplane board has automatic termination If using Ultra wide devices make sure the termination on each device is disabled IMPORTANT SCSI Backplane Board Back Side 68 pin Ultra2 or Wide SCSI Connector SCSI Ba...

Page 30: ...board is needed You may also use two SCSI channels and treat each SCSI backplane board separately The SCSI ID for the hard drives used in each slot is determined by the SCSI ID DIP switch The switch controls two sets of SCSI IDs so individual ID settings cannot be made The following table shows the results when setting the SCSI ID switch to either the ON or OFF position SCSI ID Settings for Separa...

Page 31: ...2 Slot0 Slot1 Slot2 Slot3 Top ON OFF ID0 ID6 ID8 ID12 Top OFF OFF ID1 ID5 ID9 ID13 Bottom ON OFF ON ID3 ID4 ID10 ID11 When using a cascade configuration the top SCSI backplane board is referred to as BP4 1 and the bottom SCSI backplane board is re ferred to as BP4 2 but there are no physical differences The SCSI hard drives connected on the top SCSI backplane board may select from two sets of SCSI...

Page 32: ...des of the chassis side panels must be removed to access these screws Please note that notches on the top and bottom of the SCSI backplane board must be placed as shown in order to properly seat the SCSI backplane boards into the chassis The SCSI backplane boards will only fit in one orientation but may be interchanged between the top and bottom half Check the SCSI ID DIP setting of each SCSI back...

Page 33: ... above picture gives an example of how the SCSI backplane looks with all its cables connected SCSI Cables Plastic Keeper Make sure all SCSI cables are fixed with plastic keepers If any SCSI cable is not flat you may have trouble installing or removing the fan array module IMPORTANT SCSI Backplane Board ...

Page 34: ...handle out The handle must be in the out position to insert the fan module The in dividual fans are secured by two clips and two hooks To release these clips use a screw driver to push these clips in and then slide the fan out If an individual fan fails remove the fan and send it back to the vendor for replace ment If all five fans fail it may be that the fan control board needs replacing Remove t...

Page 35: ...own frame The entire frame can also be unscrewed for servicing if necessary A support brace must be used to support the frame under the inner edge There are four screws securing the power supply support brace as circled Redundant Power Supply This server has a special redun dant power supply with specifi cations to handle this server s re quirements Aclearly marked la bel gives detailed specificat...

Page 36: ... 8 screws on the back of the chassis and then connect the power cord IMPORTANT Power Supply Removing the Entire Power Supply Unit Remove the two boxed screws slide out the power supply mod ules with the support brace to the insertion position and then re move the two circled screws NOTE A long screw driver is required to reach into the chassis Screwdriver Power Supply Frame After the support brace...

Page 37: ...f in case it is not Using the power modules set on 115V in 230V environments may cause damage to the power modules CAUTION Power Module Failure If any of the power modules fails to provide a voltage on any of its outputs an audible alarm located in the frame will sound and the failed power module s LED will turn OFF The power module s status LED lights when both input and output voltages are stabl...

Page 38: ...s FCC class B and CISPR 22 class B conducted limits Power Supply Information Output Voltage Limits Vdc Ripple Noise Output Min Nom Max Maximum 1 3 17V 3 30V 3 46V 50mVp p 2 4 80V 5 00V 5 25V 50mVp p 3 11 40V 12 00V 12 60V 120mVp p 4 4 75V 5 00V 5 25V 120mVp p 5 11 40V 12 00V 12 60V 120mVp p Total output power for 3 3V and 5V combined shall be 210W Output Nom Vdc Max A Min A 1 3 3V 30 0 0 0 2 5 0V ...

Page 39: ...ly Requirement Calculation Table Item Volts Amp x Qty TotalAmp Watts 5V Watts 12V 230 120 Hard Drive 5 0V 1 3 x 12V 1 5 x CD ROM 5 0V x 12V x Tape Drive 5 0V x 12V x Floppy Drive 5 0V x 12V x System Fans 5 0V x 12V 0 3 x 0 6 7 2 Other 3 3V x 5 0V x 12V x Total Power Total MotherboardPower Power Supply Info ...

Page 40: ...40 AP8000 Hardware Reference Guide This page was intentionally left blank ...

Page 41: ...evices may be connected to the motherboard three connectors at one time NOTE Atotal of 15 Ultra2 SCSI devices ID0 ID15 may be connected to the 68 pin Ultra2 connector on the motherboard If connecting Fast Ultra devices with Ultra2 devices on the Ul tra2 connector the entire SCSI bus will be limited to the Ultra SCSI conditions listed above Mixing SCSI devices is highly not recommended A total of 8...

Page 42: ... Intel Pentium Processors fit on socket 7 Intel Pentium II fit on slot 1 and Intel Xeon fit on slot 2 Endian Endian is a byte order system used in data transfers In big endian architec tures the lower addresses are most significant In little endian architectures the higher bytes are most significant Mainframe computers such as those by IBM use a big endian architecture Modern PCs use the little en...

Page 43: ... or keyboard may be used on ATX motherboards RAID Redundant Array of Inexpensive Disks RAID can be set up to provide mirroring for fault tolerance parity for data guarding or striping for data distribution over several drives for in creased performance A RAID card is required to setup a RAID system RAM Random Access Memory There are several different types of RAM such as DRAM Dynamic RAM EDO DRAM ...

Page 44: ... This page was intentionally left blank 44 AP8000 Hardware Reference Guide ...

Reviews: