Chapter 2
–
Hardware Information
41
G
ENE
SY
S C
omp
act
E
mb
ed
ded
S
ystem
G
ENE
SY
S-
W
HU6
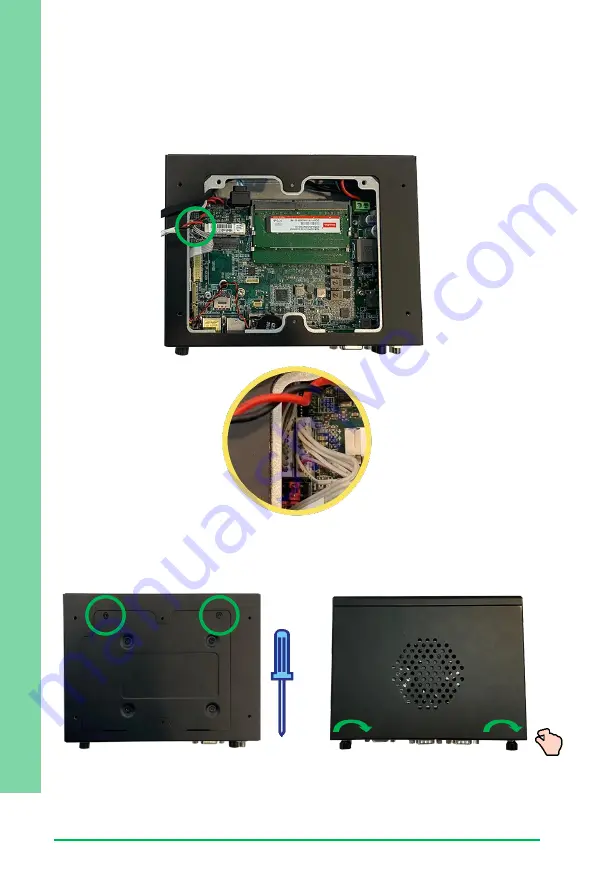
Step 4: Access the bottom side of the board. Carefully route the cables around the
board and connect each to the appropriate board connector. It may help to do each
cable one at a time to ensure the ports are connected correctly.
Step 4: Reattach the bottom panel and secure with two black screws. Then, close and
secure the top panel with the spring attached thumb screws.
Summary of Contents for Aaeon GENESYS-WHU6
Page 1: ...Last Updated March 16 2021 GENESYS WHU6 GENESYS Compact Embedded System User s Manual 1st Ed ...
Page 14: ...GENESYS Compact Embedded System GENESYS WHU6 Chapter 1 Chapter 1 Product Specifications ...
Page 17: ...Chapter 1 Product Specifications 4 GENESYS Compact Embedded System GENESYS WHU6 I O Touch ...
Page 18: ...GENESYS Compact Embedded System GENESYS WHU6 Chapter 2 Chapter 2 Hardware Information ...
Page 20: ...Chapter 2 Hardware Information 7 GENESYS Compact Embedded System GENESYS WHU6 GENE WHU6 Board ...
Page 58: ...GENESYS Compact Embedded System GENESYS WHU6 Chapter 3 Chapter 3 AMI BIOS Setup ...
Page 85: ...GENESYS Compact Embedded System GENESYS WHU6 Chapter 4 Chapter 4 Driver Installation ...
Page 88: ...GENESYS Compact Embedded System GENESYS WHU6 Appendix A Appendix A I O Information ...
Page 92: ...Appendix A I O Information 79 GENESYS Compact Embedded System GENESYS WHU6 ...


