background image

1-26

Chapter 1: Product introduction

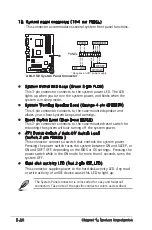
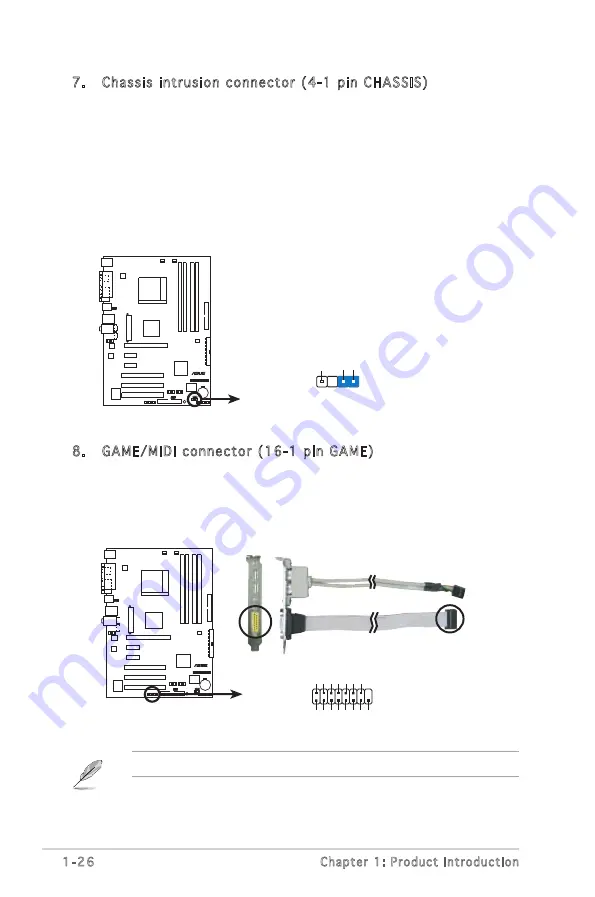
8.  GAME/MIDI connector (16-1 pin GAME)

This connector supports a GAME/MIDI module. If a GAME/MIDI module 

is available, connect the GAME/MIDI cable to this connector. The 

GAME/MIDI port on the module connects a joystick or a game pad for 

playing games, and MIDI devices for playing or editing audio files.

The USB/GAME module is purchased separately.

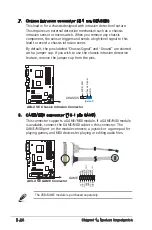
7.  Chassis intrusion connector (4-1 pin CHASSIS)

This lead is for a chassis designed with intrusion detection feature. 

This requires an external detection mechanism such as a chassis 

intrusion sensor or microswitch. When you remove any chassis 

component, the sensor triggers and sends a high-level signal to this 

lead to record a chassis intrusion event.
By default, the pins labeled “Chassis Signal” and “Ground” are shorted 

with a jumper cap. If you wish to use the chassis intrusion detection 

feature, remove the jumper cap from the pins.

A8S-X SE

®

A8S-X SE Chassis Intrusion Connector

CHASSIS

+5

VS

B_

M

B

C

ha

ss

is

Si

gn

al

G

N

D

(Default)

A8S-X SE

®

A8S-X SE GAME Connector

GAME

+5

V

+5

V

J2

B1

J2

C

X

M

ID

I_

O

U

T

J2

C

Y

J2

B2

M

ID

I_

IN

J1

B1

J1

C

X

G

N

D

G

N

D

J1

C

Y

J1

B2 +5

V

Summary of Contents for A8S-X

Page 1: ...Motherboard A8S X SE ...

Page 2: ...RTICULAR PURPOSE IN NO EVENT SHALL ASUS ITS DIRECTORS OFFICERS EMPLOYEES OR AGENTS BE LIABLE FOR ANY INDIRECT SPECIAL INCIDENTAL OR CONSEQUENTIAL DAMAGES INCLUDING DAMAGES FOR LOSS OF PROFITS LOSS OF BUSINESS LOSS OF USE OR DATA INTERRUPTION OF BUSINESS AND THE LIKE EVEN IF ASUS HAS BEEN ADVISED OF THE POSSIBILITY OF SUCH DAMAGES ARISING FROM ANY DEFECT OR ERROR IN THIS MANUAL OR PRODUCT SPECIFICA...

Page 3: ...ction 1 8 1 5 3 Screw holes 1 8 1 6 Central Processing Unit CPU 1 9 1 6 1 Overview 1 9 1 6 2 Installling the CPU 1 9 1 6 3 Installing the heatsink and fan 1 11 1 7 System memory 1 13 1 7 1 DIMM sockets location 1 13 1 7 2 Memory configurations 1 13 1 7 3 Installing a DIMM 1 16 1 8 Expansion slots 1 16 1 8 1 Standard interrupt assignments 1 17 1 8 2 IRQ assignments for this motherboard 1 17 1 8 3 PC...

Page 4: ...2 4 Menu items 2 10 2 2 5 Sub menu items 2 10 2 2 6 Configuration fields 2 10 2 2 7 Pop up window 2 10 2 2 8 Scroll bar 2 10 2 3 Main menu 2 11 2 3 1 System Time 2 11 2 3 2 System Date 2 11 2 3 3 Legacy Diskette A 2 11 2 3 4 Language 2 11 2 3 5 Primary Secondary Third and Fourth IDE Master Slave 2 12 2 3 6 Onboard PCI S ATA Controller 2 13 2 3 7 System Information 2 13 2 4 Advanced menu 2 14 2 4 1 J...

Page 5: ...e Monitor 2 25 2 6 Boot menu 2 26 2 6 1 Boot Device Priority 2 26 2 6 2 Boot Settings Configuration 2 27 2 6 3 Security 2 28 2 7 Exit menu 2 30 Chapter 3 Software support 3 1 Installing an operating system 3 2 3 2 Support CD information 3 2 3 2 1 Running the support CD 3 2 3 2 2 Drivers menu 3 3 3 2 3 Utilities menu 3 3 3 2 4 Make Disk 3 5 3 2 5 Manual 3 5 3 2 6 ASUS Contact information 3 6 ...

Page 6: ...ause harmful interference to radio or television reception which can be determined by turning the equipment off and on the user is encouraged to try to correct the interference by one or more of the following measures Reorient or relocate the receiving antenna Increase the separation between the equipment and receiver Connect the equipment to an outlet on a circuit different from that to which the...

Page 7: ...cal power company If the power supply is broken do not try to fix it by yourself Contact a qualified service technician or your retailer Operation safety Before installing the motherboard and adding devices on it carefully read all the manuals that came with the package Before using the product make sure all cables are correctly connected and the power cables are not damaged If you detect any dama...

Page 8: ...s chapter tells how to change system settings through the BIOS Setup menus Detailed descriptions of the BIOS parameters are also provided Chapter 3 Software support This chapter describes the contents of the support CD that comes with the motherboard package Where to find more information Refer to the following sources for additional information and for product and software updates 1 ASUS websites...

Page 9: ...at you MUST follow to complete a task Bold text Indicates a menu or an item to select Italics Used to emphasize a word or a phrase Key Keys enclosed in the less than and greater than sign means that you must press the enclosed key Example Enter means that you must press the Enter or Return key Key1 Key2 Key3 If you must press two or more keys simultaneously the key names are linked with a plus sig...

Page 10: ...y 1 x PCI Express x16 slot for discrete graphics card 2 x PCI Express x1 slots 3 x PCI slots South Bridge supports 2 x Ultra DMA 133 100 66 33 2 x Serial ATA with RAID0 RAID1 and JBOD ADI AD1986A SoundMax 6 channel Audio CODEC Supports S PDIF out interface Supports up to 8 USB 2 0 ports Realtek RLC8201 CL 10 100 Mbps LAN PHY ASUS AL Overclocking ASUS My logo ASUS EZ Flash ASUS Q Fan ASUS CrashFree...

Page 11: ...sis Intrusion 24 pin ATX Power connector 4 pin ATX 12V Power connector CD AUX audio in GAME connector Front panel audio connector Wfm2 0 DMI WOL by PME WOR by PME SM Bus Chassis Intrusion Drivers ASUS PC Probe II ASUS LiveUpdate Utility Anti Virus software ATX Form Factor 12 in x 8 6 in 30 5cm x 21 8cm Internal I O connectors Manageability Support CD contents Form Factor ...

Page 12: ...xii ...

Page 13: ...This chapter describes the motherboard features and the new technologies it supports 1 Product introduction ...

Page 14: ...nother standout in the long line of ASUS quality motherboards Before you start installing the motherboard and hardware devices on it check the items in your package with the list below 1 2 Package contents Check your motherboard package for the following items Motherboard ASUS A8S X SE motherboard Cables 1 x Ultra DMA cable 1 x SATA power cable 1 x SATA signal cable 1 x Floppy disk cable Accessori...

Page 15: ...velopment HyperTransport Technology HyperTransport Technology is a high speed low latency point to point link designed to increase the communication speed between integrated circuits in computers networking and telecommunicatons equipment up to 48 times faster than other existing technologies Cool ʻnʼ Quiet Technology The motherboard supports the AMD Cool ʻnʼ Quiet Technology that dynamically and ...

Page 16: ...r systems PCI Express interface The motherboard fully supports PCI Express the latest I O interconnect technology that speeds up the PCI bus PCI Express features point to point serial interconnections between devices and allows higher clockspeeds by carrying data in packets This high speed interface is software compatible with existing PCI specifications USB 2 0 technology The motherboard implement...

Page 17: ...d clear the RTC data Simply shut down and reboot the system and BIOS automatically restores the CPU previous setting for each parameter ASUS MyLogo This new feature present in the motherboard allows you to personalize and add style to your system with customizable boot logos ASUS EZ Flash BIOS With the ASUS EZ Flash you can easily update the system BIOS even before loading the operating system No ...

Page 18: ...y Hold components by the edges to avoid touching the ICs on them Whenever you uninstall any component place it on a grounded antistatic pad or in the bag that came with the component Before you install or remove any component ensure that the ATX power supply is switched off or the power cord is detached from the power supply Failure to do so may cause severe damage to the motherboard peripherals a...

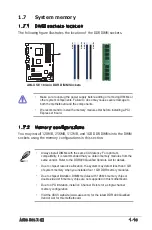
Page 19: ... 5cm 12in SATA1 FLOPPY USB78 SATA2 PWR_FAN PARALLEL PORT COM1 SPDIF_O PS 2KBMS T Mouse B Keyboard Below Mic In Center Line Out Top Line In USB12 RJ 45 Top USB3 USB4 Bottom SEC_IDE GAME DDR DIMM_A1 64 bit 184 pin module DDR DIMM_A2 64 bit 184 pin module DDR DIMM_B1 64 bit 184 pin module DDR DIMM_B2 64 bit 184 pin module PCIEX1_1 PCIEX1_2 PCIEX16 PCI1 PCI2 PCI3 Super I O AD1986A Socket 939 CPU_FAN S...

Page 20: ...rt of the chassis as indicated in the image below 1 5 3 Screw holes Place six 6 screws into the holes indicated by circles to secure the motherboard to the chassis Place this side towards the rear of the chassis Make sure to unplug the power cord before installing or removing the motherboard Failure to do so can cause you physical injury and damage motherboard components Before you install the mot...

Page 21: ...only 32 bit or 64 bit wide data paths Incorrect installation of the CPU into the socket may bend the pins and severely damage the CPU A8S X SE A8S X SE CPU Socket 939 Take note of the marked corner with gold triangle on the CPU This mark should match a specific corner on the socket to ensure correct installation Gold triangle 1 6 2 Installling the CPU To install a CPU 1 Locate the CPU socket on the...

Page 22: ...t it up to a 90 100 angle Make sure that the socket lever is lifted up to 90 100 angle otherwise the CPU does not fit in completely The CPU fits only in one correct orientation DO NOT force the CPU into the socket to prevent bending the pins and damaging the CPU 5 When the CPU is in place push down the socket lever to secure the CPU The lever clicks on the side tab to indicate that it is locked 6 In...

Page 23: ...ion module base is already installed on the motherboard upon purchase You do not have to remove the retention module base when installing the CPU or installing other motherboard components If you purchased a separate CPU heatsink and fan assembly make sure that a Thermal Interface Material is properly applied to the CPU heatsink or CPU before you install the heatsink and fan assembly CPU Fan CPU H...

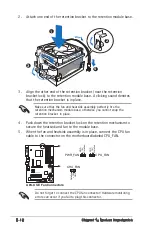
Page 24: ...tention mechanism module base otherwise you cannot snap the retention bracket in place 4 Push down the retention bracket lock on the retention mechanism to secure the heatsink and fan to the module base 5 When the fan and heatsink assembly is in place connect the CPU fan cable to the connector on the motherboard labeled CPU_FAN A8S X SE A8S X SE Fan Connectors PWR_FAN CHA_FAN GND Rotation 12V GND ...

Page 25: ...ecommend to install the memory modules first before installing a PCI Express x16 card Always install DIMMs with the same CAS latency For optimum compatibility it is recommended that you obtain memory modules from the same vendor Refer to the DDR400 Qualified Vendors List for details Due to chipset resource allocation the system may detect less than 4 GB of system memory when you installed four 1 GB ...

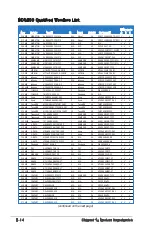
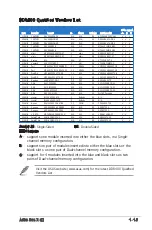
Page 26: ...V 256MB Transcend TS32MLD64V4F3 3 SAMSUNG SS K4H560838F TCCC V V 512MB Transcend TS64MLD64V4F3 3 SAMSUNG DS K4H560838F TCCC V V 1024MB Transcend TS128MLD64V4J 3 SAMSUNG DS K4H510838B TCCC V V 256MB A DATA MDOSS6F3G31Y0K1E0Z 3 SAMSUNG SS K4H560838E TCCC V V V 512MB A DATA MDOSS6F3H41Y0N1E0Z 3 SAMSUNG DS K4H560838F TCCC V V 256MB A DATA MDOHY6F3G31Y0N1E0Z 3 Hynix SS HY5DU56822CT D43 V V V 512MB A DA...

Page 27: ...T 5 V V V 512MB Veritech VU512FLTM25C 3 VM DS VT56DD32M8PC 5 V V V 256MB Pmi MD44256VIT3208GMHA01 2 5 MOSEL SS V58C2256804SAT5B V V 512MB Pmi MD44512VIT3208GATA03 2 5 MOSEL DS V58C2256804SAT5B V V V 256MB ProMOS V826632K24SCTG D0 2 5 N A SS V58C2256804SCT5B V V 512MB ProMOS V826664K24SCTG D0 2 5 N A DS V58C2256804SCT5B V V V 512MB Deutron AL6D8C53T 5B1T 2 5 PSC DS A2S56D30CTP V V 256MB GEIL GL5123...

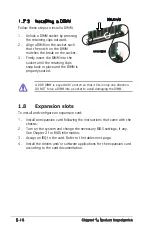
Page 28: ...ated A DDR DIMM is keyed with a notch so that it fits in only one direction DO NOT force a DIMM into a socket to avoid damaging the DIMM Unlocked DDR DIMM 1 8 Expansion slots To install and configure an expansion card 1 Install an expansion card following the instructions that came with the chassis 2 Turn on the system and change the necessary BIOS settings if any See Chapter 2 for BIOS information ...

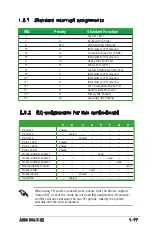
Page 29: ...3 8 Numeric Data Processor 14 9 Primary IDE Channel 15 10 Secondary IDE Channel When using PCI cards on shared slots ensure that the drivers support Share IRQ or that the cards do not need IRQ assignments Otherwise conflicts will arise between the two PCI groups making the system unstable and the card inoperable 1 8 2 IRQ assignments for this motherboard A B C D E F G H PCI slot 1 shared PCI slot 2...

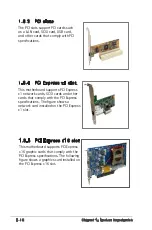
Page 30: ...hows a network card installed on the PCI Express x1 slot 1 8 5 PCI Express x16 slot This motherboard supports PCI Express x16 graphic cards that comply with the PCI Express specifications The following figure shows a graphics card installed on the PCI Express x16 slot 1 8 3 PCI slots The PCI slots support PCI cards such as a LAN card SCSI card USB card and other cards that comply with PCI specificati...

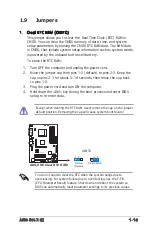
Page 31: ...ep the cap on pins 2 3 for about 5 10 seconds then move the cap back to pins 1 2 3 Plug the power cord and turn ON the computer 4 Hold down the Del key during the boot process and enter BIOS setup to re enter data Except when clearing the RTC RAM never remove the cap on the jumper default position Removing the cap will cause system boot failure You do not need to clear the RTC when the system hang...

Page 32: ... and S4 sleep modes no power to CPU DRAM in slow refresh power supply in reduced power mode A8S X SE A8S X SE USB Device Wake Up 3 2 2 1 5V Default 5VSB USBPW56 USBPW78 3 2 2 1 5V Default 5VSB USBPW34 USBPW12 The USB device wake up feature requires a power supply that can provide 500mA on the 5VSB lead for each USB port Otherwise the system would not power up The total current consumed must NOT ex...

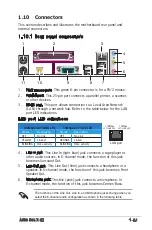
Page 33: ... the 6 channel audio configuration as shown in the following table SPEED LED ACT LINK LED LAN port LAN port LED indications 100Mbps ACT LINK LED 10Mbps ACT Link LED Status Description Status Description OFF No link OFF No Link YELLOW Linked ORANGE Linked BLINKING Data activity BLINKING Data activity 4 Line In jack This Line In light blue jack connects a tape player or other audio sources In 6 chann...

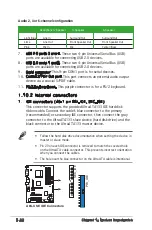
Page 34: ...ientation when you connect the cables The hole near the blue connector on the UltraATA cable is intentional A8S X SE A8S X SE IDE Connectors SEC_IDE PRI_IDE 7 USB 2 0 ports 3 and 4 These two 4 pin Universal Serial Bus USB ports are available for connecting USB 2 0 devices 8 USB 2 0 ports 1 and 2 These two 4 pin Universal Serial Bus USB ports are available for connecting USB 2 0 devices 9 Serial co...

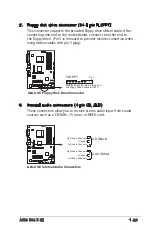
Page 35: ...ing ribbon cables with pin 5 plug A8S X SE A8S X SE Floppy Disk Drive Connector NOTE Orient the red markings on the floppy ribbon cable to PIN 1 FLOPPY PIN 1 3 Internal audio connectors 4 pin CD AUX These connectors allow you to receive stereo audio input from sound sources such as a CD ROM TV tuner or MPEG card A8S X SE A8S X SE Internal Audio Connectors AUX White Right Audio Channel Left Audio C...

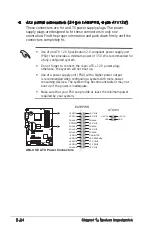
Page 36: ... not forget to connect the 4 pin ATX 12 V power plug otherwise the system will not boot up Use of a power supply unit PSU with a higher power output is recommended when configuring a system with more power consuming devices The system may become unstable or may not boot up if the power is inadequate Make sure that your PSU can provide at least the minimum power required by your system 4 ATX power c...

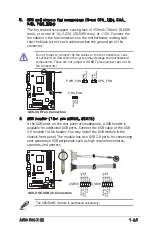
Page 37: ...r caps on the fan connectors 6 USB header 10 1 pin USB56 USB78 If the USB ports on the rear panel are inadequate a USB header is available for additional USB ports Connect the USB cable of the USB 2 0 module to this header You may install the USB module in the chassis front panel The module has two USB 2 0 ports for connecting next generation USB peripherals such as high resolution cameras scanner...

Page 38: ...signed with intrusion detection feature This requires an external detection mechanism such as a chassis intrusion sensor or microswitch When you remove any chassis component the sensor triggers and sends a high level signal to this lead to record a chassis intrusion event By default the pins labeled Chassis Signal and Ground are shorted with a jumper cap If you wish to use the chassis intrusion de...

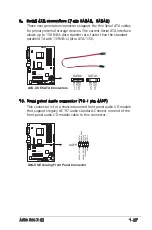
Page 39: ...A8S X SE SATA Connectors SATA2 GND RSATA_TXP2 RSATA_TXN2 GND RSATA_RXP2 RSATA_RXN2 GND SATA1 GND RSATA_TXP1 RSATA_TXN1 GND RSATA_RXP1 RSATA_RXN1 GND 10 Front panel audio connector 10 1 pin AAFP This connector is for a chassis mounted front panel audio I O module that supports legacy AC ʻ97 audio standard Connect one end of the front panel audio I O module cable to this connector A8S X SE AAFP SENS...

Page 40: ...ead Blue 2 pin RESET This 2 pin connector connects to the case mounted reset switch for rebooting the system without turning off the system power ATX Power Switch Soft Off Switch Lead Yellow 2 pin PWRSW This connector connects a switch that controls the system power Pressing the power switch turns the system between ON and SLEEP or ON and SOFT OFF depending on the BIOS or OS settings Pressing the ...

Page 41: ...This chapter tells how to change the system settings through the BIOS Setup menus Detailed descriptions of the BIOS parameters are also provided 2 BIOS setup ...

Page 42: ...rive b At the DOS prompt type format A S then press Enter Windows XP environment a Insert a 1 44 MB floppy disk to the floppy disk drive b Click Start from the Windows desktop then select My Computer c Select the 3 1 2 Floppy Drive icon d Click File from the menu then select Format A Format 3 1 2 Floppy Disk window appears e Select Create an MS DOS startup disk from the format options field then clic...

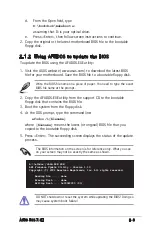
Page 43: ...the system from the floppy disk 4 At the DOS prompt type the command line afudos i filename where filename means the latest or original BIOS file that you copied to the bootable floppy disk 5 Press Enter The succeeding screen displays the status of the update process Write the BIOS file name on a piece of paper You need to type the exact BIOS file name at the prompt A afudos iA8S XSE ROM AMI Firmware Upd...

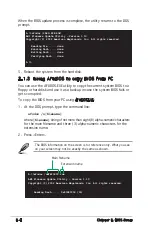
Page 44: ...rsion 1 10 Copyright C 2002 American Megatrends Inc All rights reserved Reading file done Erasing flash done Writing flash done Verifying flash done A 5 Reboot the system from the hard disk 2 1 3 Using AFUDOS to copy BIOS from PC You can use the AFUDOS EXE utility to copy the current system BIOS to a floppy or hard disk and use it as a backup in case the system BIOS fails or gets corrupted To copy the ...

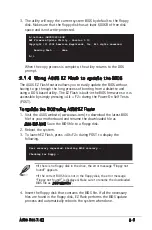
Page 45: ...me the downloaded BIOS file as A8S XSE ROM 2 1 4 Using ASUS EZ Flash to update the BIOS The ASUS EZ Flash feature allows you to easily update the BIOS without having to go through the long process of booting from a diskette and using a DOS based utility The EZ Flash is built in the BIOS firmware so it is accessible by simply pressing Alt F2 during the Power On Self Tests POST To update the BIOS usin...

Page 46: ...he support CD that came with the motherboard or a floppy disk that contains the motherboard BIOS before proceeding with the BIOS update process If you have saved a copy of the original motherboard BIOS to a bootable floppy disk you may also use this disk to restore the BIOS See section 2 1 1 Creating a bootable floppy disk 3 Insert a floppy disk that contains the original or the latest BIOS file for th...

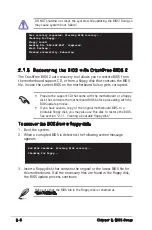
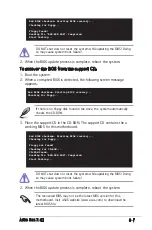
Page 47: ... may cause system boot failure Bad BIOS checksum Starting BIOS recovery Checking for floppy Floppy not found Checking for CD ROM CD ROM found Reading file A8S XSE ROM Completed Start flashing Bad BIOS checksum Starting BIOS recovery Checking for floppy Floppy found Reading file A8S XSE ROM Completed Start flashing Bad BIOS checksum Starting BIOS recovery Checking for floppy 2 When the BIOS update process...

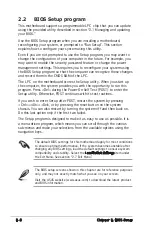
Page 48: ...s Del during the Power On Self Test POST to enter the Setup utility Otherwise POST continues with its test routines If you wish to enter Setup after POST restart the system by pressing Ctrl Alt Del or by pressing the reset button on the system chassis You can also restart by turning the system off and then back on Do this last option only if the first two failed The Setup program is designed to mak...

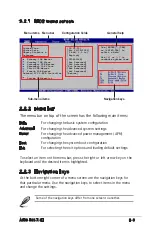
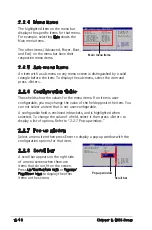
Page 49: ...asic system configuration Advanced For changing the advanced system settings Power For changing the advanced power management APM configuration Boot For changing the system boot configuration Exit For selecting the exit options and loading default settings 2 2 1 BIOS menu screen To select an item on the menu bar press the right or left arrow key on the keyboard until the desired item is highlighted 2...

Page 50: ...s Refer to 2 2 7 Pop up window 2 2 7 Pop up window Select a menu item then press Enter to display a pop up window with the configuration options for that item 2 2 8 Scroll bar A scroll bar appears on the right side of a menu screen when there are items that do not fit on the screen Press Up Down arrow keys or PageUp PageDown keys to display the other items on the screen Scroll bar Select Screen Sele...

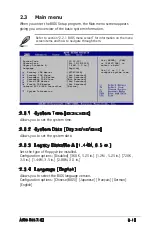
Page 51: ...4 Language English Allows you to select the BIOS language version Configuration options Chinese BIG5 Japanese Français German English Refer to section 2 2 1 BIOS menu screen for information on the menu screen items and how to navigate through them System Time 11 51 19 System Date Fri 12 16 2005 Legacy Diskette A 1 44M 3 5 in Language English Primary IDE Master ST340014A Primary IDE Slave Not Detect...

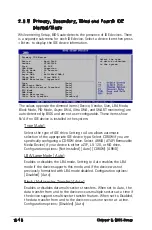
Page 52: ...on options Not Installed Auto CDROM ARMD LBA Large Mode Auto Enables or disables the LBA mode Setting to Auto enables the LBA mode if the device supports this mode and if the device was not previously formatted with LBA mode disabled Configuration options Disabled Auto Block Multi sector Transfer Auto Enables or disables data multi sectors transfers When set to Auto the data transfer from and to th...

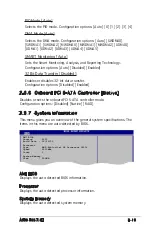
Page 53: ... the Smart Monitoring Analysis and Reporting Technology Configuration options Auto Disabled Enabled 32Bit Data Transfer Disabled Enables or disables 32 bit data transfer Configuration options Disabled Enabled 2 3 6 Onboard PCI S ATA Controller Native Disables or sets the onboard PCI S ATA controller mode Configuration options Disabled Native RAID 2 3 7 System Information This menu gives you an overvi...

Page 54: ...ration 2 4 1 JumperFree Configuration Configure System Frequency AI Overclocking Auto AI Overclocking Auto Sets the mode for overclocking Configuration options Manual Auto Overclock Profile The following items appear only when the Overclock Option is set to Manual CPU Frequency XXX value is auto detected Indicates the frequency sent by the clock generator to the system bus and PCI bus The bus frequen...

Page 55: ... processor installed This item appears only when the FID VID Change item is set to Manual Configuration options x8 1600 MHz x9 1800 MHz x10 2000 MHz Processor Voltage 1 400 V Sets the processor voltage The configuration options vary depending on the processor installed This item appears only when the FID VID Change item is set to Manual 2 4 2 USB Configuration The items in this menu allows you to ch...

Page 56: ...nd Off Enabled Allows you to stop the EHCI HC in OHCI handover Enable this item when installing operating systems that does not support EHCI host controllers Configuration options Disabled Enabled 2 4 3 CPU Configuration The CPU configuration menu displays the current CPU configuration CPU Configuration Module Version 14 08 Physical Count 1 Logical Count 1 AMD Athlon tm 64 Processor 3200 Revision D0 C...

Page 57: ...guration Primary Graphics Adapter PCI Express Card Primary Graphics Adapter PCI Express Card Sets the primary graphics adapter Configuration options PCI Expres Card PCI NorthBridge Chipset Configuration Memory Configuration Memory CLK 133 MHz CAS Latency Tcl 2 0 RAS CAS Delay Trcd 3 CLK Min Active RAS Tras 6 CLK Row Precharge time Trp 3 CLK RAS RAS Delay Trrd 2 CLK Row Cycle Trc 9 CLK Row Refresh Cyc...

Page 58: ...CLK 6 CLK 7 CLK 8 CLK 9 CLK 10 CLK 11 CLK 12 CLK 13 CLK 14 CLK 15 CLK TRP Auto Sets the TRP Configuration options Auto 2 CLK 3 CLK 4 CLK 5 CLK 6 CLK TRCD Auto Sets the TRCD Configuration options Auto 2 CLK 3 CLK 4 CLK 5 CLK 6 CLK The following items appear only when the MCT Timing Mode is set to Manual MCT Timing Mode Auto Allows you to set the MCT timing mode Set by the code using Auto or select Ma...

Page 59: ...y remapping around the memory hole Enable this item to be able to make all installed memory available The feature is only supported by Rev E0 processors Configuration options Disabled Enabled HyperTransport Configuration HT Width Auto Allows selection of HyperTransport upstream data width Configuration options 8 BIT 16 BIT Auto HT Speed 800 MHz Sets the HyperTransport frequency from CPU to the North...

Page 60: ... Parallel Port Mode is set to EPP or EPP ECP This item allows you to to select the Parallel Port EPP version Configuration options 1 9 1 7 ECP Mode DMA Channel DMA3 Appears when the Parallel Port Mode is set to ECP or EPP ECP This item allows you to set the Parallel Port ECP DMA Configuration options DMA0 DMA1 DMA3 Parallel Port IRQ IRQ7 Sets the Parallel Port IRQ Configuration options IRQ5 IRQ7 Onbo...

Page 61: ... devices The menu includes setting IRQ and DMA channel resources for either PCI PnP or legacy ISA devices and setting the memory size block for legacy ISA devices Take caution when changing the settings of the PCI PnP menu items Incorrect field values may cause the system to malfunction Advanced PCI PnP Settings WARNING Setting wrong values in below sections may cause system to malfunction Plug And...

Page 62: ...ms the PCI devices that an ISA graphics device is installed in the system so that the latter can function correctly Setting to Disabled deactivates this feature Configuration options Disabled Enabled 2 4 7 AMD Cool ʻN Quiet Configuration AMD Cool N Quiet Configuration Cool N Quiet Enabled Enabled Disabled Cool N Quiet Cool ʻN Quiet Disabled Enables or disables the ASUS AMD Cool ʻnʼ Quiet technology ...

Page 63: ... 0 specifications Configuration options No Yes 2 5 4 ACPI APIC Support Enabled Enables or disables the ACPI support in the ASIC When set to Enabled the ACPI APIC table pointer is included in the RSDT pointer list Configuration options Disabled Enabled 2 5 Power menu The Power menu items allow you to change the settings for the Advanced Power Management APM feature Select an item then press Enter to d...

Page 64: ...ays OFF Always On Keep Previous State Power On By PS2 Keyboard Disabled Allows you to disable or set the keyboard wake up feature This feature requires an ATX power supply that provides at least 1A on the 5VSB lead Configuration options Disabled Enabled Power On By PS2 Mouse Disabled When set to Enabled this parameter allows you to use the PS 2 mouse to resume the system This feature requires an AT...

Page 65: ...ard hardware monitor automatically detects and displays the motherboard and CPU temperatures CPU Fan Speed xxxxRPM or N A Chassis Fan Speed xxxxRPM or N A Power Fan Speed xxxxRPM or N A The onboard hardware monitor automatically detects and displays the CPU chassis and power fan speeds in rotations per minute RPM If any of the fans is not connected to the motherboard the specific field shows N A VCO...

Page 66: ... devices installed in the system Configuration options 1st FLOPPY DRIVE Hard Drive ATAPI CD ROM Disabled Boot Settings Boot Device Priority Boot Settings Configuration Security Boot Device Priority 1st Boot Device 1st FLOPPY DRIVE 2nd Boot Device Hard Drive 3rd Boot Device ATAPI CD ROM Specifies the Boot Device Priority sequence Smart Q Fan Function Disabled Enables or disables the ASUS Q Fan functio...

Page 67: ...Mouse Support Auto Allows you to enable or disable support for PS 2 mouse Configuration options Disabled Enabled Auto Wait for ʻF1ʼ If Error Enabled When set to Enabled the system waits for F1 key to be pressed when error occurs Configuration options Disabled Enabled Hit ʻDELʼ Message Display Enabled When set to Enabled the system displays the message Press DEL to run Setup during POST Configuration ...

Page 68: ...a Supervisor Password 1 Select the Change Supervisor Password item and press Enter 2 From the password box type a password combination of at least six 6 letters and or numbers then press Enter 3 Confirm the password when prompted The message Password Installed appears after you have successfully set your password The Supervisor Password item now shows Installed To change the supervisor password fol...

Page 69: ...Not Installed After you have set a password this item shows Installed To set a User Password 1 Select the Change User Password item and press Enter 2 On the password box that appears type a password combination of at least six 6 letters and or numbers then press Enter 3 Confirm the password when prompted The message Password Installed appears after you have successfully set your password The User P...

Page 70: ...t immediately exit this menu Select one of the options from this menu or F10 from the legend bar to exit Exit system setup after saving the changes F10 key can be used for this operation Clear User Password Select this item if you wish to clear the user password Password Check Setup When set to Setup BIOS checks for user password when accessing the Setup utility When set to Always BIOS checks for ...

Page 71: ... on the Setup menus When you select this option or if you press F5 a confirmation window appears Select Ok to load default values Select Exit Save Changes or make other changes before saving the values to the non volatile RAM Exit Save Changes Once you are finished making your selections choose this option from the Exit menu to ensure that the values you selected are saved to the CMOS RAM An onboard...

Page 72: ...2 32 Chapter 2 BIOS Setup ...

Page 73: ...This chapter describes the contents of the support CD that comes with the motherboard package 3 Software support ...

Page 74: ...D into your CD ROM drive The CD automatically displays the Drivers menu if Autorun is enabled in your computer Click on an item to install The contents of the support CD are subject to change at any time without notice Visit the ASUS website for updates If Autorun is NOT enabled in your computer browse the contents of the support CD to locate the file ASSETUP EXE from the BIN folder Double click th...

Page 75: ...roller Driver Install the SIS RAID Controller drivers SoundMAX ADI1986A Audio Driver Installs the SoundMAX ADI1986A audio driver and application SiS Ethernet Driver Installs the SiS Ethernet LAN driver USB 2 0 Driver Installs the USB 2 0 driver to upgrade your USB 1 1 ports to USB 2 0 For Windows XP users make sure to install Windows XP SP 1 to support USB 2 0 3 2 3 Utilities menu The Utilities me...

Page 76: ...e sure that you have an Internet connection so you can connect to the ASUS website Installing ASUS Update also installs ASUS Mylogo ASUS Screen Saver Installs the ASUS screen saver ASUS CoolʼnʼQuiet Utility Installs the ASUS AMD Cool ʻnʼ Quiet utility Acrobat Reader Installs the Adobe Acrobat Reader V7 0 The Acrobat Reader software is for viewing files saved in Portable Document Format PDF Microsof...

Page 77: ...5 3 2 4 Make Disk Make SIS RAID Controller Driver Disk Creates the SIS RAID controller driver disk 3 2 5 Manual SIS965 SIS965L SATA RAID Userʼs Manual Allows you to open the SIS965 SIS965L Serial ATA RAID userʼs manual ...

Page 78: ...3 6 Chapter 3 Software support 3 2 6 ASUS Contact Information Clicking the ASUS Contact Information tab displays as stated You may also find this information on the inside front cover of this user guide ...

Reviews: