background image

3-1

ASUS LCD Monitor 

VP32

Series

3.1  OSD (On-Screen Display) Menu


3.1.1 

How to Reconfigure

1.

Press the MENU button to activate the OSD menu.

2.

Press the 

 and 

 buttons to toggle between options in the

Menu. As you move from one icon to another, the option name is

highlighted.

3.

To select the highlighted item on the menu press the   button.

4.

Press the 

 and 

 buttons to select the desired parameter.

5.

Press the 

button to enter the slide bar and then use the 

 or

buttons, according to the indicators on the menu, to make your

changes.

6.

Select the   to return to previous menu or   to accept and return to

previous menu.

Splendid

Scenery mode

Standard Mode

Theater Mode

Game Mode

Night View Mode

sRGB Mode

Reading Mode

Darkroom Mode

ASUS  

V

P32AQ  HDR OFF  

Standard Mode


HDMI


2560

 x 1

440

 @ 

75

Hz

Summary of Contents for 195553046954

Page 1: ...VP32A Series LCD Monitor User Guide ...

Page 2: ...NTABILITY OR FITNESS FOR A PARTICULAR PURPOSE IN NO EVENT SHALL ASUS ITS DIRECTORS OFFICERS EMPLOYEES OR AGENTS BE LIABLE FOR ANY INDIRECT SPECIAL INCIDENTAL OR CONSEQUENTIAL DAMAGES INCLUDING DAMAGES FOR LOSS OF PROFITS LOSS OF BUSINESS LOSS OF USE OR DATA INTERRUPTION OF BUSINESS AND THE LIKE EVEN IF ASUS HAS BEEN ADVISED OF THE POSSIBILITY OF SUCH DAMAGES ARISING FROM ANY DEFECT OR ERROR IN THI...

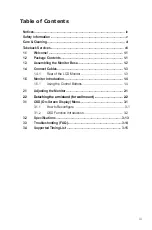
Page 3: ... Connect Cables 1 3 1 4 1 Rear of the LCD Monitor 1 3 1 5 Monitor Introduction 1 4 1 5 1 Using the Control Buttons 1 4 Adjusting the Monitor 2 1 3 1 OSD On Screen Display Menu 3 1 3 1 1 How to Reconfigure 3 1 3 1 2 OSD Function Introduction 3 2 3 2 Specifications 3 13 3 3 Troubleshooting FAQ 3 14 3 4 Supported Timing List 3 15 2 2 Detaching the arm stand for wall mount 2 2 ...

Page 4: ...to radio communications However there is no guarantee that interference will not occur in a particular installation If this equipment does cause harmful interference to radio or television reception which can be determined by turning the equipment off and on the user is encouraged to try to correct the interference by one or more of the following measures Reorient or relocate the receiving antenna...

Page 5: ...local power standard Do not overload power strips and extension cords Overloading can result in fire or electric shock Avoid dust humidity and temperature extremes Do not place the monitor in any area where it may become wet Place the monitor on a stable surface Unplug the unit during a lightning storm or if it will not be used for a long period of time This will protect the monitor from damage du...

Page 6: ...Conventions used in this guide WARNING Information to prevent injury to yourself when trying to complete a task CAUTION Information to prevent damage to the components when trying to complete a task IMPORTANT Information that you MUST follow to complete a task NOTE Tips and additional information to aid in completing a task The screen may flicker during the initial use due to the nature of the flu...

Page 7: ...de optional documentation that may have been added by your dealer These documents are not part of the standard package Takeback Services ASUS recycling and takeback programs come from our commitment to the highest standards for protecting our environment We believe in providing solutions for our customers to be able to responsibly recycle our products batteries and other components as well as the ...

Page 8: ...that enhance your viewing experience With these features you can enjoy the convenience and delightful visual experience that the monitor brings to you 1 2 Package Contents Check your package for the following items If any of the above items is damaged or missing contact your retailer immediately LCD monitor Monitor Base Quick Start Guide Warranty Card Power Cord DisplayPort cable optional HDMI cab...

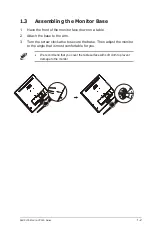
Page 9: ...ront of the monitor face down on a table 2 Attach the base to the arm 3 Turn the screw clockwise to secure the base Then adjust the monitor to the angle that is most comfortable for you We recommend that you cover the table surface with soft cloth to prevent damage to the monitor ...

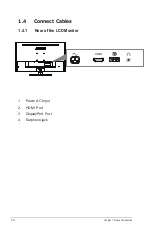
Page 10: ...1 3 Chapter 1 Product Introduction 1 4 Connect Cables 1 4 1 Rear of the LCD Monitor 1 Power AC Input 2 HDMI Port 3 DisplayPort Port 4 Earphone jack HDMI ...

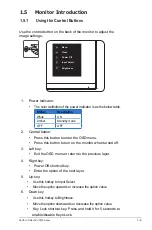
Page 11: ...tandby mode OFF OFF 2 Central button Press this button to enter the OSD menu Press this button to turn on the monitor when turned off 3 Left key Exit the OSD menu or return to the previous layer 4 Right key Power Off shortcut key Enter the option of the next layer 5 Up key Use this hotkey to Input Select Move the option upwards or increase the option value 6 Down key Use this hotkey to Brightness ...

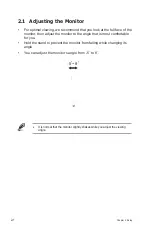
Page 12: ...full face of the monitor then adjust the monitor to the angle that is most comfortable for you Hold the stand to prevent the monitor from falling while changing its angle You can adjust the monitor s angle from 5 to 8 It is normal that the monitor slightly shakes while you adjust the viewing angle 5 8 ...

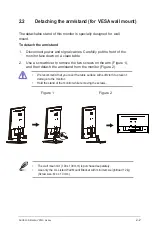
Page 13: ... screwdriver to remove the two screws on the arm Figure 1 and then detach the arm stand from the monitor Figure 2 We recommend that you cover the table surface with soft cloth to prevent damage to the monitor Hold the stand of the monitor while removing the screws The wall mount kit 100x 100 mm is purchased separately Use only the UL Listed Wall Mount Bracket with minimum weight load 12 kg Screw s...

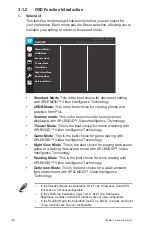
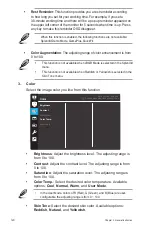
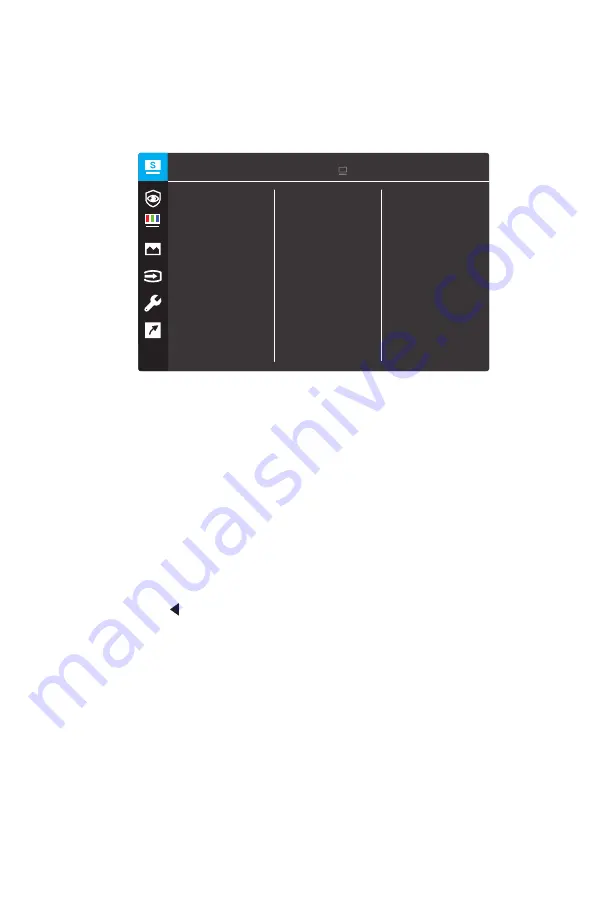
Page 14: ...he highlighted item on the menu press the button 4 Press the and buttons to select the desired parameter 5 Press the button to enter the slide bar and then use the or buttons according to the indicators on the menu to make your changes 6 Select the to return to previous menu or to accept and return to previous menu Splendid Scenery mode Standard Mode Theater Mode Game Mode Night View Mode sRGB Mod...

Page 15: ...with SPLENDID Video Intelligence Technology Night View Mode This is the best choice for playing dark scene game or watching dark scene movie with SPLENDID Video Intelligence Technology Reading Mode This is the best choice for book reading with SPLENDID Video Intelligence Technology Darkroom Mode This is the best choice for a weak ambient light environment with SPLENDID Video Intelligence Technolog...

Page 16: ...ault value 50 Please refer to the following to alleviate eye strains Users should take some time away from the display if working for long hours It is advised to take short breaks at least 5 mins after around 1 hour of continuous working at the computer Taking short and frequent breaks is more effective than a single longer break To minimize eye strain and dryness in your eyes users should rest th...

Page 17: ... desired skin color Available options Reddish Natural and Yellowish ASUS VP32AQ HDR OFF Standard Mode HDMI 2560 x 1440 75Hz Rest Reminder This function provides you a rest reminder according to how long you set for your working time For example if you set a 30 minute working time and there will be a pop up reminder appeared on the upper left corner of the monitor for 5 seconds when time is up Pres...

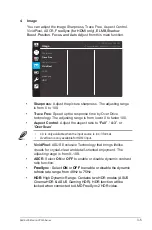
Page 18: ...The adjusting range is from lower 0 to faster 100 Aspect Control Adjust the aspect ratio to Full 4 3 or OverScan 4 3 is only available when the input source is in 4 3 format OverScan is only available for HDMI input VividPixel ASUS Exclusive Technology that brings lifelike visuals for crystal clear and detail oriented enjoyment The adjusting range is from 0 100 ASCR Select ON or OFF to enable or d...

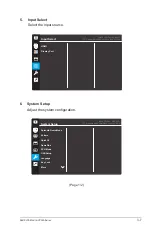
Page 19: ...t HDMI Dispiay Port ASUS VP32AQ HDR OFF Standard Mode HDMI 2560 x 1440 75Hz 6 System Setup Adjust the system configuration System Setup Splendid Demo Mode GamePlus ECO Mode OSD Setup Language Key Lock More Page 1 2 QuickFit ASUS VP32AQ HDR OFF Standard Mode HDMI 2560 x 1440 75Hz Volume ...

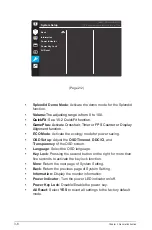
Page 20: ...ent function ECO Mode Activate the ecology mode for power saving OSD Setup Adjust the OSD Timeout DDC CI and Transparency of the OSD screen Language Select the OSD language Key Lock Pressing the second button on the right for more than five seconds to activate the key lock function More Return the next page of System Setting Back Return the previous page of System Setting Information Display the m...

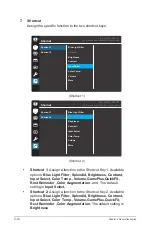
Page 21: ...60 x 1440 75Hz Blue Light Filter Splendid Brightness Contrast Color Temp Volume More Input Select Shortcut 1 Assign a function to the Shortcut Key1 Available options Blue Light Filter Splendid Brightness Contrast Input Select Color Temp Volume GamePlus QuickFit Rest Reminder Color Augmentation and The default setting is Input Select Shortcut 2 Assign a function to the Shortcut Key2 Available optio...

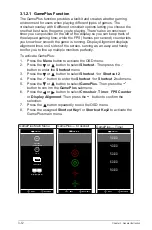
Page 22: ...mePlus 1 Press the Menu button to activate the OSD menu 2 Press the or button to select Shortcut Then press the button to enter the Shortcut menu 3 Press the or button to select Shortcut 1 or Shortcut 2 4 Press the button to enter the Shortcut 1 or Shortcut 2 submenu 5 Press the or button to select GamePlus Then press the button to con irm the GamePlus submenu 6 Press the or button to select Cross...

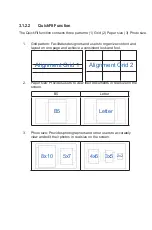
Page 23: ...organize content and layout on one page and achieve a consistent look and feel 2 Paper size Provides users to view their documents in real size on the screen B5 Letter B5 Letter EXIT 3 Photo size Provides photographers and other users to accurately view and edit their photos in real size on the screen 8x10 5x7 3x5 2x2 4x6 Alignment Grid 2 Alignment Grid 1 ...

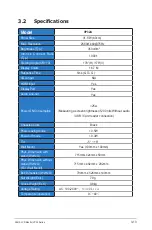
Page 24: ...w Mesauring a screen brightness of 200 nits Without audio USB Card reader connection Chassis Colors Black Power saving mode 0 5W Power off mode 0 3W Tilt 5 8 Wall Mount Yes 100mm x 100mm Phys Dimension with stand WxHxD Phys Dimension without stand WxHxD For Wall Mount 715mm x 492mm x 202mm Box Dimension WxHxD 799mm x 526mm x140mm Net Weight Esti 7 9g Gross Weight Esti 9 8kg Voltage Rating AC 100 2...

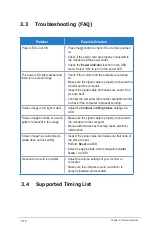
Page 25: ...r available monitor to check if the computer is properly working Screen image is too light or dark Adjust the Contrast and Brightness settings via OSD Screen image bounces or a wave pattern is present in the image Make sure the signal cable is properly connected to the monitor and the computer Move electrical devices that may cause electrical interference Screen image has color defects white does ...

Page 26: ...00 N 108 1280x1024 63 98 P 60 02 N 108 1280x1024 79 98 P 75 02 N 135 1366x768 47 712 P 59 79 P 85 5 1440x900 55 94 N 59 89 P 106 5 1600x1200 75 00 P 60 00 P 162 1680x1050 65 29 P 60 00 P 146 25 1920x1080 67 5 P 60 00 P 148 5 1920x1200 Reduced Blanking 74 038 P 59 95 N 154 1920x1200 74 556 N 59 885 P 193 25 2048x1152 Reduced Blanking 70 99 P 59 9 N 156 75 2560x1080 66 636 P 59 978 N 181 25 2560x144...

Reviews: