Astria london lights Installation And Operation Instructions Manual Download Page 9

Astria.US.com

127331-01A

9

INSTALLATION  

Continued

18 

3

/

4

"


37 

3

/

4

"


40 

3

/

4

"


44 

3

/

16

"


55 

3

/

16

"


16 

1

/

4

"


55 

3

/

16

"


47 

1

/

8

"


1

/

2

"


22 

7

/

16

"


11

/

16

"


4

13

/

16

"


13

 1

/

8

"


1"


14 

1

/

4

"


5

/

8

"


5

/

8

"


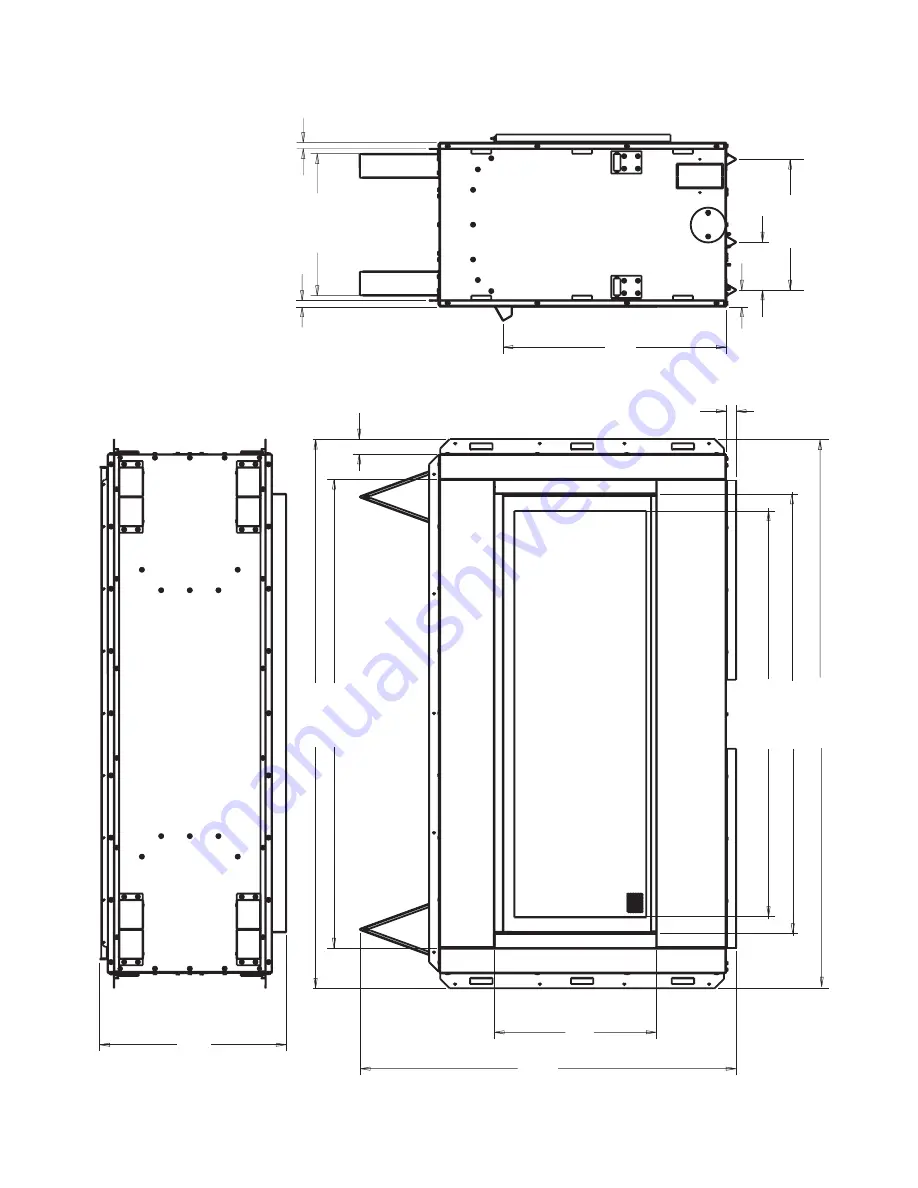
Figure 8 - LONDON LIGHTS Dimensions

Summary of Contents for london lights

Page 1: ...is installed Provisions for adequate combustion and ventilation air must be provided Refer to Air for Combustion and Ventilation section on page 5 of this manual WARNING If the information in these i...

Page 2: ...en people with heart or lung disease or anemia those under the influence of alcohol and those at high altitudes Make certain you read and understand all warnings Keep this manual for reference It is y...

Page 3: ...ot convertible for use with other gases 2 Always keep a fire extinguisher CLASS B near the appliance 3 Never refill appliance fuel reservoir when appliance is operating or still hot 4 This appliance s...

Page 4: ...e vent ing There is no heat loss out a vent or up a chimney Heat is generated by real flames This appliance is designed for vent free operation It has been tested and approved to UL 1370 standard for...

Page 5: ...u must provide additional fresh air See Ventilation Air From Outdoors page 6 If your home does not meet all of the three criteria above proceed to Determining Fresh Air Flow For Appliance Location Con...

Page 6: ...nt openings one within 12 of the ceiling and one within 12 of the floor on the wall connecting the two spaces see options 1 and 2 Figure 2 You can also remove door into adjoining room see option 3 Fig...

Page 7: ...CES WARNING Maintain the minimum clearances If you can provide greater clearances from floor ceiling and adjoining wall Carefully follow the instructions below This will ensure safe instal lation CLEA...

Page 8: ...wn in this manual INSTALLING REMOVING HOOD 1 Loosen screws at top of face opening and slide hood through screws as shown in Figure 7 2 Tighten screws securing hood to fireplace 3 To remove reverse the...

Page 9: ...Astria US com 127331 01A 9 INSTALLATION Continued 18 3 4 37 3 4 40 3 4 44 3 16 55 3 16 16 1 4 55 3 16 47 1 8 1 1 2 22 7 16 1 11 16 4 13 16 13 1 8 1 14 1 4 5 8 5 8 Figure 8 LONDON LIGHTS Dimensions...

Page 10: ...Reservoir Figure 9 Filling the Fuel Tank Reservoir FILLING THE FUEL TANK RESERVOIR 1 Open bottom access panel Note Use the index finger of both hands when opening access panel by inserting them thru...

Page 11: ...y periodically Replace battery if needed by unscrewing battery compartment cap see Figure 10 TO TURN OFF APPLIANCE 1 Slide shut off plate fully closed by pushing plate handle in com pletely and make s...

Page 12: ...rd you Insert bottom flange of screen door into the retaining channel at the bottom of firebox see Figure 12 Make sure door is center with firebox opening 2 Tilt top of door up toward top of firebox 3...

Page 13: ...Astria US com 127331 01A 13 CLEANING AND MAINTENANCE Continued Figure 14 Glass Nuggets Installation Nuggets Pan Burner Fuel Tray Access Door...

Page 14: ...FP1 or FP2 Denatured Ethanol only Note You can purchase these types of ethanol fuel by contacting PHARMCO AAPER at 800 456 1017 or www pharm coaaper com 5 Slide shutoff plate fully open 6 Wait at leas...

Page 15: ...so contact IHP at 1 800 655 2008 When calling please have your model and serial numbers of your ap pliance ready You can also visit our web site at Astria US com ACCESSORIES NOTICE All accessories ma...

Page 16: ...yle 3 16 1 11 126478 01 Fuel Tank Release Rod 1 12 126480 01 External Retaining Ring 1 13 17373 Spring Tank Release 1 14 111733 01 Washer Black M6 1 15 127000 01 Fuel Supply Line 9 5 1 16 126474 01 Cl...

Page 17: ...6 Screw 8 32 x 1 2 10 126559 01 Switch Momentary 1 11 126472 01 Bracket Spark Ignitor 1 12 11201 8 32 Hex Nut 2 13 125763 01 Bracket corner Wall 4 14 125813 02 Wall Side Porcelain 2 15 125814 01 Wall...

Page 18: ...____________________________ ______________________________________________________ ______________________________________________________ ______________________________________________________ ______...

Page 19: ...produce excessive temperatures and could result in a fire hazard c damages caused by failing to provide proper maintenance and service in accordance with the instructions provided with the Product d d...

Page 20: ...tion tag ____________________ Date Purchased _______________________ Keep receipt for warranty verification Innovative Hearth Products reserves the right to make changes at any time without notice in...

Reviews: