background image

Maintenance and adjustment

(continued from the previous page)

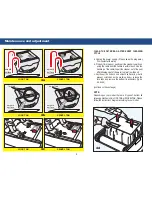
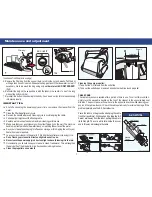
d. Remove the filter bag from the support bars, turn it inside out and wash off all the dirt 

with a garden hose or in a sink. Squeeze the bag gently until the rinse water is clear. If 

necessary, machine wash the bag using only cold water with NO DETERGENT! 

(fig.5)

e. Re-install the bag on the support bars with the label in the center of one of the long 

sides of the bottom lid (5a)

f.  Re-install the bottom lid assembly in the body. Push down on it until lock tabs will snap 

into place properly.

Shut off and unplug the power supply every time you remove the cleaner from the 

water.

Clean the filter bag after every cycle.

Reverse the handle after every cleaning cycle to avoid tangling  the cable.

Periodically straighten out the floating cable.

Replace worn brushes to ensure maximum cleaning performance

Make sure that your pool cleaner positions itself properly on the wall. The machine 

handle must rest parallel to the water line upon reaching the surface of the water.

Save your cleaner's packaging for off-season storage or for shipping the unit to your 

dealer if service is required. 

Leave your pool cleaner in the water for 15 to 20 minutes after every cleaning cycle.

Do not leave your cleaner in direct sunlight when not in use.

Never leave the power supply in direct sunlight and avoid leaving it in the rain.

Occasionally, you should rinse your cleaner in clean, fresh water. This will lengthen 

the service life of the drive belts, drive tracks and scrubbing brushes. 

Clean the propeller once a month 

IMPORTANT TIPS:

Cleaning the pump propeller: 

1) Take out the 2 (4) screws from the outlet top

2) Take out the outlet top and remove hair and other debris around propeller  

CABLE CARE

The cable may become twisted after a period of time in use. To correct this condition, 

simply lock the moveable handle on the top of the cleaner in the opposite diagonal 

direction. The pool cleaner will now travel in the opposite direction while cleaning your 

pool and the cable will uncoil. Check the cable periodically for external damage. 

If the 

problem persists, use the E-Z Swivel device.  

Place the robot on the ground and unplug the cable 

from the transformer. With one hand, holding the E-Z 

Swivel, walk away from the robot, pulling the cable to 

its full length. The core will rotate inside the cover 

and in this way will untangle the cable.

patent pending

outlet top

propeller 

Cable Assy

Core

Handle 

Cover

Screws

7

E-Z SWIVEL

label

30°C / 85°F

Filter bag

Summary of Contents for RB Robotic

Page 1: ...Installation and Operating Instructions RB Robotic Pool Cleaner Product 11712 Product Inst 320...

Page 2: ...ustomer Thank you for choosing our product to clean your pool We hope that you will enjoy usingyournewrobottomaintainyourswimmingpoolforyearstocome Before you begin to use your robot please take a few...

Page 3: ...le lock vertical Handle lock horizontal Operating the pool cleaner 4 Place the unit in the water Turn the unit side to side in the water to allow air to escape from the body and then let the cleaner s...

Page 4: ...terrupter or RCD residual current device havingaratedresidualoperatingcurrentnotgreaterthan30mA Fuse The fuse must be changed by an authorized service agent or trained and qualified person only Forcon...

Page 5: ...to always keep your pool cleaner properly stored anywhere between 10 to 40 degrees Celsius 50 to 104 degrees Fahrenheit This will keep the motors plasticsandsealsprotected Failuretocomplywillresultin...

Page 6: ...f the pool afterallowingmostofthewatertodrainfromtheunit c Lay the unit on its back on a smooth surface in order to prevent scratches on the machine body release the lock tabs and remove the bottom li...

Page 7: ...fserviceisrequired Leaveyourpoolcleanerinthewaterfor15to20minutesaftereverycleaningcycle Donotleaveyourcleanerindirectsunlightwhennotinuse Neverleavethepowersupplyindirectsunlightandavoidleavingitinth...

Page 8: ...wer cord Clean as necessary b Check if drive belts 6 have slipped out of place Also check for proper tension of drive belts 6 If necessary replace belts c Check for loose drive motor 3 connections d I...

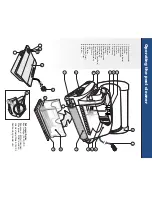
Page 9: ...ndle Assembly 15 Cable Assembly 16 Power Supply Transformer 17 Transformer Socket 18 Wheel Tube Assembly 19 OFF button 20 LED 21 ON button 22 Power Cord Outlet 23 Intake Valve Flaps 24 Lock Tabs Parts...

Page 10: ...nd the failure does not amount to a major failure The benefits of this warranty are in addition to any rights and remedies imposed by Australian state and federal legislation that cannot be excluded N...

Page 11: ...uct the customer must pay AstralPool s usual costs of service work and testing If such inspection and testing finds a defect that is not covered by this warranty the customer must pay AstralPool s usu...

Page 12: ...accident negligence alteration abuse or misuse The warranty does not extend to a normal wear and tear b weather and other environmental conditions including but not limited to storm flood and or heat...

Page 13: ...ills NSW 2147 Sydney Moorebank P 02 8778 9500 6 30 Heathcote Road Moorebank NSW 2170 Adelaide P 08 8152 7600 13 William Street Mile End South SA 5031 Brisbane P 07 3308 5400 1 27 Millenium Place Tinga...

Reviews: