background image

Using the Device


42

Wi-Fi

User Guide

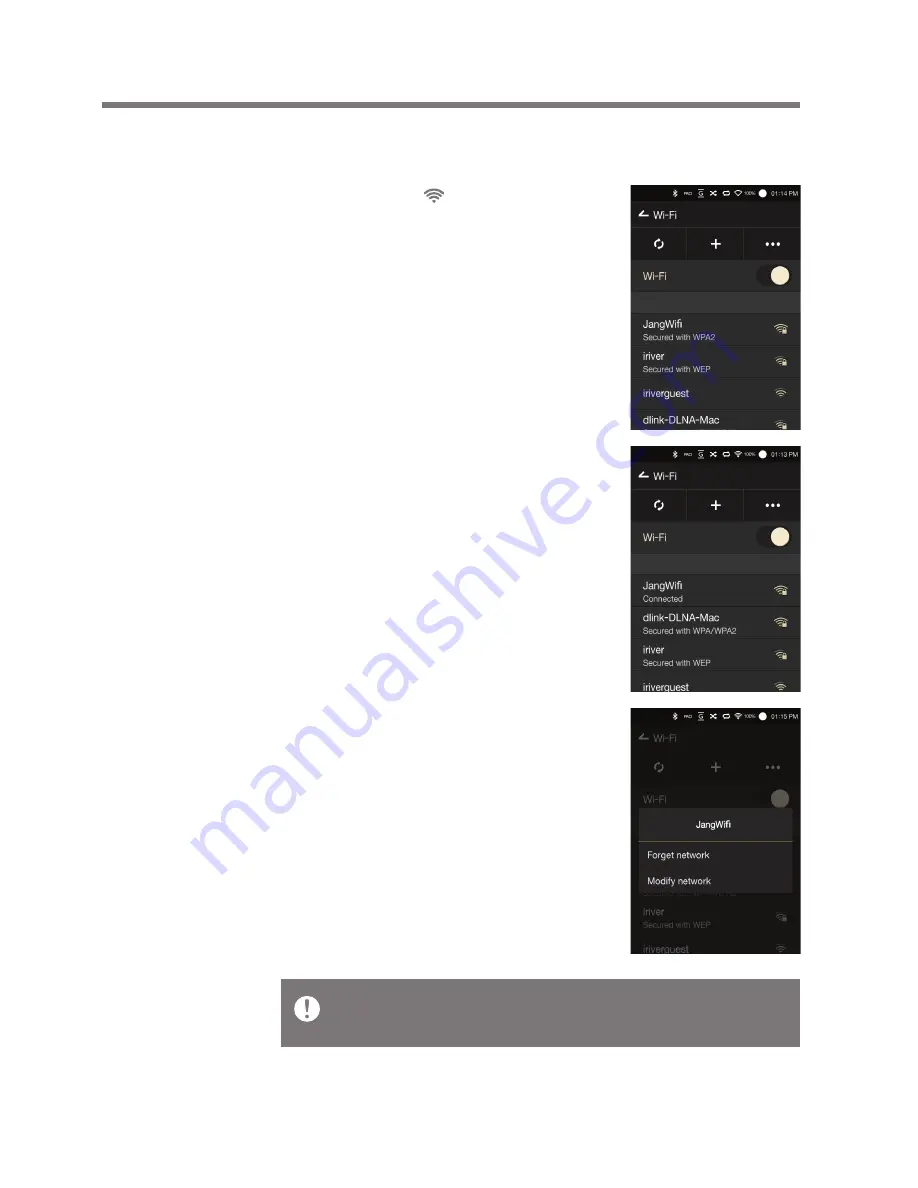
2. Select an appropriate AP to 
  connect to the wireless network.
  - Additional information 
     (encryption key, index, etc.) 
     may be required depending 
     on the network settings.

3. Long press the network name 
  and select [Network Settings] 
  to edit specific network settings.

Connect to a Wireless Network

1. Long press [     ] from the 
  Notification Bar or select 
  [Settings - Wi-Fi] to display 
  a list of Access Points (AP).

Networks requiring browser or other additional certifica-
tions are supported.

Summary of Contents for AK240

Page 1: ...INSTRUCTION BOOK AK240 User Guide...

Page 2: ...otification Bar Store MQS Streaming Music Player Playlist Management USB DAC Functionality Bluetooth Settings Wi Fi Equalizer 12 13 14 17 18 21 28 30 35 37 42 43 Using the Device _02 Safety Precaution...

Page 3: ...warranty card is required for customer technical support Do not misplace the card User Guide The User Guide can be downloaded from the Astell Kern website http www astellnkern com Support Download mic...

Page 4: ...arphones or headphones that support balanced audio connections Connect to an external audio device by using both the earphone port ground and balanced audio port LR in conjunction Micro USB port Conne...

Page 5: ...See p 39 Turn the Screen On Off 1 Press the button to turn on the screen 2 Another short press will turn off the screen Turn On Off 1 Long press the button to turn on off the device 2 A long press wh...

Page 6: ...battery will gradually lose capacity over time according to the number of charges discharges Be sure to use a high powered USB 2 0 port A low powered USB port i e keyboard or USB hub without a dedicat...

Page 7: ...rphones port Start 06 Balanced Earphones Headphones 1 Connect supported earphones or headphones to the Balanced port OR OR Balanced Audio Device 1 Connect to an external audio device by using both the...

Page 8: ...r 10 to be installed for the computer to recognize the USB device Download necessary Service Packs and Windows Media Player from the Microsoft website http www microsoft com DSD format is not supporte...

Page 9: ...SB cable or turning off the device computer during a file transfer may corrupt data on the device File transfer speeds may be affected by the computer and or the OS environment Disconnecting from the...

Page 10: ...select Safely remove SD card from the Notification Bar or select Unmount SD card from Settings System Information 3 Gently press the microSD card to release it from the slot Delete Files Folders on th...

Page 11: ...ge to the system Do not remove the microSD card while it s in use Doing so may cause data corruption deletion malfunction and damage to the microSD card Miscellaneous If the device is unable to recogn...

Page 12: ...ring a Firmware Upgrade Doing so may cause data corruption and or damage to the system If an error occurs or the notice in the Notification Bar disappears during an upgrade download the Firmware Upgra...

Page 13: ...variety of features Home Screen Home Screen 1 Press the Home button at any time to return to the Home Screen 2 Long press the Home button to move to the Music Player Do not use a sharp object or exce...

Page 14: ...ge their locations Pull down on the Notification Bar to view its contents See pp 14 16 Currently playing artist song information Select a menu button to move to the corresponding screen View the list...

Page 15: ...Using the Device 14 6 2 3 7 8 9 10 11 12 4 5 1 User Guide Notification Bar...

Page 16: ...s to display a list of items containing the search terms Select the appropriate mode when connected to a computer USB drive mode for transferring media files Listen to music from the PC through the de...

Page 17: ...e adjustment bar to control the display brightness Press to turn the Screen Lock on or off The volume wheel will not function when the screen is locked Press to cycle through different Play Modes Sequ...

Page 18: ...enu User Guide within the Groovers Store for relevant information Conveniently purchase music from the Store when connected to a wireless network Store Refer to page 42 of the manual for more informat...

Page 19: ...3 Check the User Guide within the program for detailed information on using the MQS Streaming Server The AK240 can access music files stored on a computer on the same network MQS Streaming Minimum sys...

Page 20: ...ting the server will connect automatically and direct the user to the server Home Screen 5 Select a search option at the bottom of the server Home Screen to display a list of music User Guide Refer to...

Page 21: ...to download songs A message on the Notification Bar will indicate a completed download User Guide Depending on network conditions song loading may be slow and streaming may stutter Server response ma...

Page 22: ...24 bit WMA 8 320 kbps MP3 8 320 kbps OGG APE Normal Fast High AAC AIFF ALAC DFF DSF Select an album cover from the Home Screen to begin playback Turn the Volume Wheel to adjust the volume Press durin...

Page 23: ...ist Long press a song on the Playlist for Playlist options Add to Playlist Remove Add to end of Playlist Add after current song are available from the Playlist Drag the progress bar to the desired loc...

Page 24: ...he current location Press to move return to the previous screen Displays the playlist for the current location Long press a song to add to or remove from the playlist Select a method for sorting the p...

Page 25: ...song to a Playlist Remove the selected song from the Playlist Add the selected song to the end of the Playlist Add the selected song after the song currently playing Add to Playlist Remove from Playli...

Page 26: ...2 1 9 7 4 3 5 6 10 8 11 12 Using the Device 25 User Guide Music Player Screen...

Page 27: ...st Displays bitrate and sampling frequency data Indicates song duration Press to switch from elapsed time to remaining time Indicates song progress Drag the indicator to move to the desired time Short...

Page 28: ...1 3 2 Using the Device 27 User Guide Add current song to a playlist Lyrics for the current song Detailed song information Add to Playlist Lyrics Details 1 2 3...

Page 29: ...then press Add 3 Enter a name for the playlist and press Create to create a new playlist Long press to Delete Rename a playlist Add a Song to a Playlist 1 Press All Playlists to display a list of play...

Page 30: ...Press All Playlists to display a list of playlists 2 Selected the desired playlist and press Remove 3 Check the box next to desired song and press Remove to remove the song from the selected playlist...

Page 31: ...ailable during USB DAC connection Playback may stutter when computer performance is slow or the USB connection is strained from heavy usage There may be issues with audio to video synchroniza tion dur...

Page 32: ...t is selected under Settings Connect USB USB DAC Installation 1 Set DAC Input from Settings Connect USB 2 Connect the device to the PC using the supplied Micro USB cable 3 Run Setup exe from Drivers 4...

Page 33: ...2 6 When the below screen is displayed click Finish to complete the installation User Guide Before driver installation After driver installation 5 Click Browse to select the driver destination folder...

Page 34: ...ystem as seen in the images below Win XP Control Panel Sound and Audio Devices Audio tab Change the default audio device under Sound playback to AK240 USB DAC Win 7 8 Control Panel Hardware and Sound...

Page 35: ...Sound Manage Audio Devices Double click AK240 USB DAC Advanced tab Default format Select 24 bit 192000 Hz Recommended Mac OS X System Preferences Sound Output tab Select AK240 USB DAC This step is on...

Page 36: ...r details 1 Select from the Home Screen or select On Off from Settings Bluetooth Bluetooth Pairing 1 Select the appropriate Bluetooth device from the list of available devices A Bluetooth device must...

Page 37: ...ultipoint devices make the necessary connections prior to use Car audio Bluetooth connections are not supported Malfunction noise and other undesirable effects may occur due to the device s battery le...

Page 38: ...settings and turn Wi Fi on or off Bluetooth Connect a Bluetooth device to listen to music wirelessly Refer to page 42 of the manual for more information on connecting to a wireless network Refer to pa...

Page 39: ...Doing so may cause permanent hearing loss Balanced Output Turn Balanced Output on or off Balanced Output will take priority when enabled When connecting earphones while Balanced Output is enabled the...

Page 40: ...rent Date Time and Region Language Select the displayed Language English Korean Japanese Chinese Simplified Traditional Power Automatic Shutdown The device will turn off after a defined period when th...

Page 41: ...m a PC on the device Select a default folder for downloading music during MQS Streaming Select Folder will prompt the user to manually select a folder for each downloaded file System Information Syste...

Page 42: ...the Device 41 User Guide System Restore Default Settings Revert all user settings back to their original settings Factory Reset Delete all user data and restore the device to its original factory set...

Page 43: ...y be required depending on the network settings 3 Long press the network name and select Network Settings to edit specific network settings Connect to a Wireless Network 1 Long press from the Notifica...

Page 44: ...e 2 Press Pro from the drop down list and select Add New 3 Enter a name for the custom EQ settings and select Add Equalizer Equalizer Setup 1 Long press EQ from the Notification Bar or turn on the fea...

Page 45: ...Using the Device 44 User Guide Reset Equalizer 1 Select the desired EQ setting and select Reset to revert the EQ to its default settings 4 Adjust the frequencies according to the user s preferences...

Page 46: ...e Delete Equalizer 1 Select Delete and choose the desired EQ setting for deletion 2 Press Confirm to complete process Rename Equalizer 1 Select Rename and enter a new name for the EQ setting 2 Press R...

Page 47: ...device may not be repairable Avoid places with excess moisture dust or smoke Never attempt to repair the device yourself Avoid exposing the device to direct sunlight or extreme temperatures 5 40 23 F...

Page 48: ...r ears lower the volume or stop listening to the device Do not listen to music at excessive volumes for extended periods Do not use the earphones headphones at excessive volumes Be careful not to get...

Page 49: ...r debris is on the screen 6 There is no sound or there s static Verify that the volume isn t set to 0 Check that the earphones are plugged in properly and make sure debris isn t in the port or on the...

Page 50: ...ellectual property rights related to this manual No contents of this manual may be copied or duplicated in any form or by any means without the prior written consent of iriver Limited Using or reprodu...

Page 51: ...17 5 mm D 6 5 oz 185g Firmware upgrade supported OTA 0 023 dB Condition 20 Hz 20 kHz Unbalanced Balanced 0 3 dB Condition 10 Hz 70k Hz Unbalanced Balanced 116 dB 1 kHz Unbalanced 117 dB 1 kHz Balance...

Page 52: ...was written based on current product specifications The manufacturer iriver Limited is currently adding new complementary features and will continue to apply new technologies in the future All standa...

Reviews: