Astar PDV-7077 User Manual Download Page 5

Introduction

-4-

Important Safety Instructions

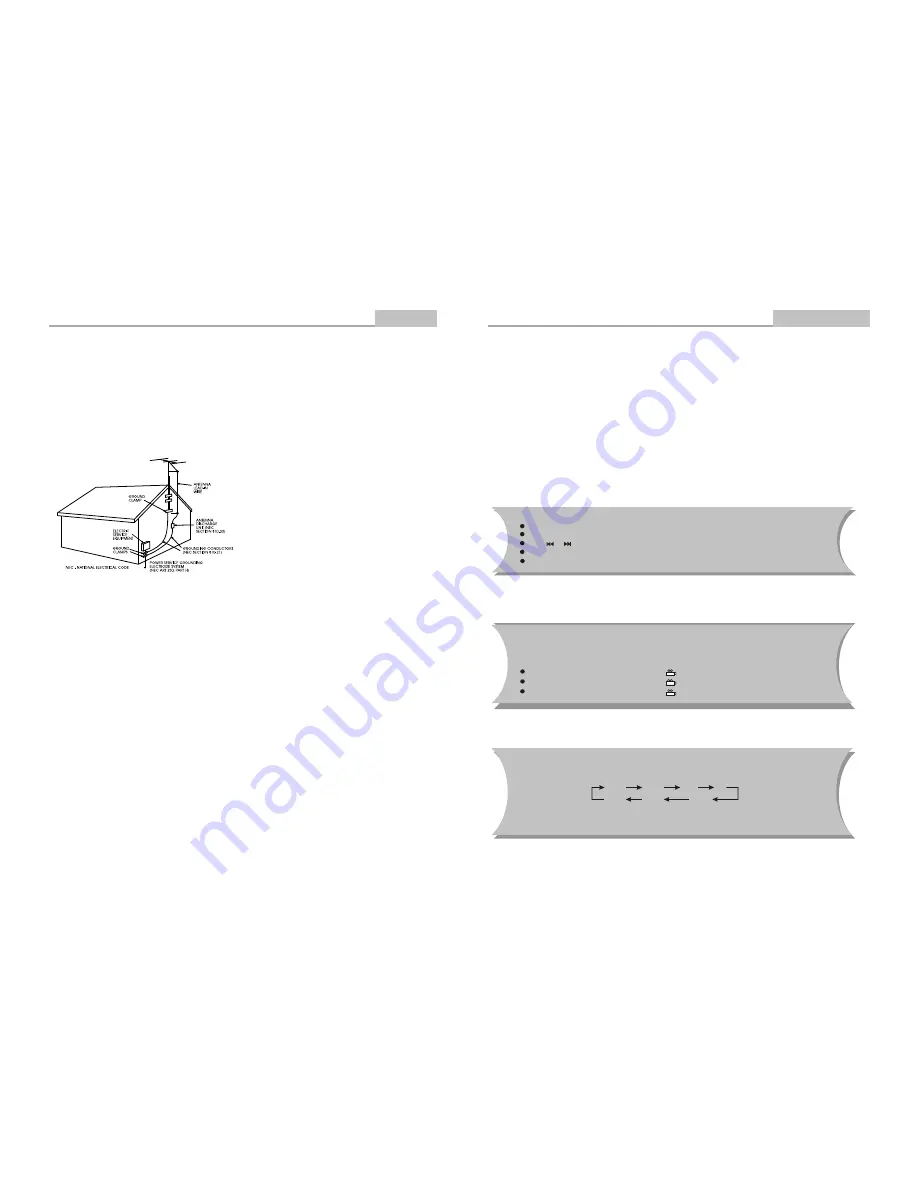
14. Outdoor Antenna Grounding


 If an outside antenna or cable system is connected to 
the product, be sure the antenna or cable system is 
grounded so as to provide some protection against 
voltage surges and built-up static charges. Article 810 
of the National Electrical Code, ANSI/NFPA 70, 
provides information with regard to proper grounding of 
the mast and supporting structure, grounding of the 
lead-in wire to an antenna discharge unit, size of 
grounding conductors, location of antenna discharge 
unit, connection to grounding electrodes, and 
requirements for the grounding electrode. See figure 
below.

19. Servicing  

Do not attempt to service this product yourself as 
opening or removing covers may expose you to 
dangerous voltage or other hazards. Refer all servicing 
to qualified service personnel.

20. Damage Requiring Service  

Unplug this product from the wall outlet and refer 
servicing to qualified service personnel under the 
following conditions:
A)When the power-supply cord or plug is damaged,
B)If liquid has been spilled, or objects have fallen 
into the product,
C)If the product has been exposed to rain or water,
D)If the product does not operate normally by 
following the operating instructions. Adjust only 
those controls that are covered by the operating 
instructions as an improper adjustment of other 
controls may result in damage and will often 
require extensive work by a qualified technician 
to restore the product to its normal operation,
E)If the product has been dropped or damaged in 
any way.
F)When the product exhibits a distinct change in 
performance this indicates a need for service.

21. Replacement Parts  

When replacement parts are required, be sure the 
service technician has used replacement parts 
specified by the manufacturer or have the same 
characteristics as the original part. Unauthorized 
substitutions may result in fire, electric shock, or other 
hazards.

22. Safety Check


Upon completion of any service or repairs to this 
product, ask the service technician to perform safety 
checks to determine that the product is in proper 
operating condition.

23. Wall or Ceiling Mounting 


The product should be mounted to a wall or ceiling only 
as recommended by the manufacturer.

24. Heat 


The product should be situated away from heat 
sources such as radiators, heat registers, stoves, or 
other products (including amplifiers) that produce heat.

15. Lightning  

For added protection for this product during a lightning 
storm, or when it is left unattended and unused for long 
periods of time, unplug it from the wall outlet and 
disconnect the antenna or cable system. This will 
prevent damage to the product due to lightning and 
power lines surges.

16. Power Lines


An outside antenna system should not be located in 
the vicinity of overhead power lines or other electric 
light or power circuits, or where it can fall into such 
power lines or circuits. When installing an outside 
antenna system, extreme care should be taken to keep 
from touching such power lines or circuits as contact 
with them might be fatal.

17. Overloading 


Do not overload wall outlets, extension cords, or 
integral convenience receptacles, as this can result in a 
risk of fire or electric shock.

18. Object and Liquid Entry  

Never push objects of any kind into this product 
through openings as they may touch dangerous 
voltage points or short-out parts that could result in a 
fire or electric shock. Never spill liquid of any kind on 
the product.

-25-

Kodak Picture CD Playback  

Advanced Features

Image Rotation

There are three modes to rotate a picture: original,  90 Deg, and 180 Deg.  These operations are

allowed only when a picture is being displayed normally and will be cancelled automatically 

when a new picture is displayed.  The ANGLE  keys are used to select the different rotation modes:

Press ANGLE                          OSD display            original.

Press ANGLE again               OSD display             90 Deg.

Press ANGLE again               OSD display             180 Deg.


The introduction of KODAK Picture CD

A Kodak Picture CD has the size and shape of a regular CD.  You can order a KODAK Picture CD simply by checking
the box on the photo finishing envelope when you drop off a roll of film (35 mm or Advanced Photo System (APS) 
color print film) at the time of processing in Kodak Express store displaying "Kodak Picture CD" sign. When your 
order is returned, you receive your prints, negatives, and your full roll of pictures safely stored on your KODAK 
Picture CD. Each KODAK Picture CD brings you the tools to enhance, share and manage your pictures on your 
computer. You also can record the JPEG picture into CD-R or CD-RW with the CD-Rewriter yourself.

Note: 

1.  The Max. Size of JPEG Picture can be supported: 3840X3840 pixels

           2.  JPEG stands for Joint Picture Experts Group. It is the first International Standard on Still Picture 
                Compressing: ISO 10918-1, constituted by the Committee on Still Picture Compressing Standard of ISO. 
                The pictures on KODAK Picture CD are stored in this format (JPEG). This player can decode the JPEG 
                pictures in KODAK Picture CD and playback the pictures in different modes.
 Now, you can playback Kodak Picture CDs on this player and view your wonderful pictures on your TV in the 
comfort of your living room.
When a Kodak Picture CD is inserted on a player an automatic slide show is launched.  Each picture in the Kodak 
Picture CD will be displayed consecutively in a slide-show fashion and will be scaled to fit in the whole TV screen.

General function:


You can set slideshow transition modes for any pictures.


Press 

PAUSE

  to stop playing.


Press 

PLAY

  to continue slideshow transitions.


Press      or      to see the previous or next picture.


Press STOP  to return to root menu.

Zoom Function:

Note: 

During the ZOOM function, slideshow transitions and image rotation are disabled.

           Q off:  close zoom, press 

PLAY


again to resume slideshow transition mode.


This player provides both Zoom in/out and Zoom pan function. Press the 

ZOOM


consecutively, the picture will zoom in/out in turn as followings:

Q4/3

Q3/2

Q2

Q1/2

Q3/4

Qoff

Q3

Summary of Contents for PDV-7077

Page 1: ...User Manual Please read this User Manual carefully to ensure proper use of this product and keep this manual for further reference PDV 7077 ...

Page 2: ...atio Resolution Audio characteristic Frequency response Audio S N ratio Dynamic range Distortion D A Converter Output characteristic Video output Audio output Power Voltage Power consumption Size Weight PDV 7077 NTSC PAL PAL SECAM Europe PAL NTSC America PAL NTSC SECAM DVD CD CD R CD RW HDCD JPEG DVD R RW DVD R RW VHF Lo 48 142 MHz VHF Hi 143 431MHz UHF 431 874MHz 65dB 500 lines fs 96KHz 20Hz 20KH...

Page 3: ...OSED TO WATER AND NO OBJECTS FILLED WITH LIQUID SUCH AS VASES SHALL BE PLAC ED ON THE APPARATUS WARNING WHEN THE MACHINE IS IN OPERATION THE RADIATORS ON THE BOTTOM MAY BE HOT PLEASE AVOID DIRECT CONTACT WITH YOUR BARE SKIN DIRECT CONTACT FOR EXTENDED PERIOD OF TIME MAY CAUSE INJURY DO NOT PLACE THE MACHINE ON HEAT SENSITIVE PLACE 27 BAD DISC DISPLAYED Ensure the disc is not warped damaged or defo...

Page 4: ...r covered The openings should never be blocked by placing the product on a bed sofa rug or other similar surface This product should not be placed in a built in installation such as a bookcase or rack unless proper ventilation is provided or the manufacturer s instructions have been adhered to 11 Power Sources This product should be operated only from the type of power source indicated on the mark...

Page 5: ...lines or circuits When installing an outside antenna system extreme care should be taken to keep from touching such power lines or circuits as contact with them might be fatal 17 Overloading Do not overload wall outlets extension cords or integral convenience receptacles as this can result in a risk of fire or electric shock 18 Object and Liquid Entry Never push objects of any kind into this produ...

Page 6: ...ess long to search down up one station In station status to change to previous next station PREV DOWN NEXT UP 6 2 3 4 5 20 21 22 23 24 25 26 7 8 12 9 10 11 13 14 15 16 17 18 19 1 ANT 27 1 2 3 4 5 6 7 8 9 TFT LCD SPEAKER RIGHT SPEAKER LEFT DISC TOP DISC WINDOW SENSOR POWER LED DVD TV VIDEO BUTTON AUTO SEARCH BUTTON 19 20 21 22 23 24 25 26 COAXIAL OUTPUT EARPHONE JACK VOLUME KNOB ANT IN JACK 27 OPEN...

Page 7: ...y liquid from the battery compartment then replace Remote Control Operation Advanced Features 23 Note This function is disc specific languages will vary During DVD playback Press SUBTITLE repeatedly to select from up to 32 subtitle languages A B N P SUBTITLE ANGLE SETUP MENU PBC STEP L R TITLE REPEAT PROG ZOOM ENTER STOP TV SETUP 1 2 3 4 5 6 7 8 9 10 0 TIME SPEAKER RETURN PLAY PAUSE VOL VOL LANGUA...

Page 8: ...fic VOLUME DC IN 12V ON OFF POWER COAXIAL AUDIO VIDEO Press MUTE to mute the Audio output Press MUTE again to resume normal audio output ANGLE LANGUAGE MUTE When a DVD is played the active dubbing language will be shown When a SVCD or VCD is played the left track right track or stereo will be displayed accordingly When a bilingual story VCD is played you may press the button to select the language...

Page 9: ... reduce volume 8 Connecting to an AV Amplifier with Digital Audio Input Connections Notes 1 Select the Coaxial digital audio output 2 Set the player s audio out to Raw or PCM mode 3 Set the Amplifier to the AVinput connected to the DVD player BASS TREBLE ECHO DOWN UP VOLUME INPUT SELECTOR MUTE KARAOKE CHANNEL TEST MODE 3 STEREO PRO LOGIC BYPASS EXCITE POWER MIC 2 1 1 MIC VOL 2 MIC Amplifier Coaxia...

Page 10: ...n or DOWN button adjust the parameter till available In TV mode Push the TV SETUP button twice the following menu show in the display screen TUNING BAND TV MODE FINE TUNE AUTO SEARCH HAND SEARCH SAVE STATION CHANNEL 01 VHF LO PAL I 1 CHANNEL Press buttons to change channel 2 BAND Press buttons to change band VHF LO VHF H and UHF 3 TV MODE Press buttons to change TV MODE It can support M N I B G DK...

Page 11: ...ay Program and then press ENTER to play the tracks in the new programmed order Select Clear All and press ENTER to clear all the numbers you have input Input the title number and the chapter number in the desired order Then select Play Program and press ENTER to play the chapters in the order you have set Select Clear All and press ENTER to clear all the numbers you have input Others Play Program ...

Page 12: ...o confirm B Press SETUP to exit the Setup Menu Language Setup OSD Menu Subtitle Audio DVD Menu Subtitle Audio DVD Menu OSD Menu Subtitle Audio DVD Menu English English English English English English English English English English English Press to change your selection Press to change your selection Note Audio languages vary by disc Note Menu languages vary by disc 11 Modes and Features Setup Adv...

Page 13: ...item Note Not all DVDs offer movies in Full Screen format If not the disc will override your TV Display setting and the movie will be displayed in Letterbox format A or set Press ENTER to B Press to return to the Setup Menu TV shape TV system View mode 4 3 PAL FILL 4 3 Pan and scan refers to pictures where part of pictures is cut off so it fills the whole screen 4 3 Letter Box refers to pictures w...

Page 14: ...ubtitle DVD Disc type Elapsed time of the current title Current chapter Current title Audio type Subtitle Chapter 2 20 Angle 2 2 1 Eng 5 1Ch 1 Eng Angle 0 04 45 DISPLAY Others 0 00 10 0 00 10 0 00 10 Introduction Modes and Features Setup 13 Raw Off Off Off Language Video Audio Rating Digital out Pink noise DRC LPCM 48k DS PCM RAW OFF Audio Setup The Audio menu allows you to set the analog audio ou...

Page 15: ...ating Setup The Rating menu allows you to block playback of DVDs based on their ratings Setting the Password Rating Level The DVD player allows you to block playback of inappropriate content with a password protected Rating system not all discs are rated A From Stop mode press SETUP B Select Rating and press ENTER C Select Rating and press ENTER repeatedly to set the rating from 1 most restrictive...

Reviews: