background image

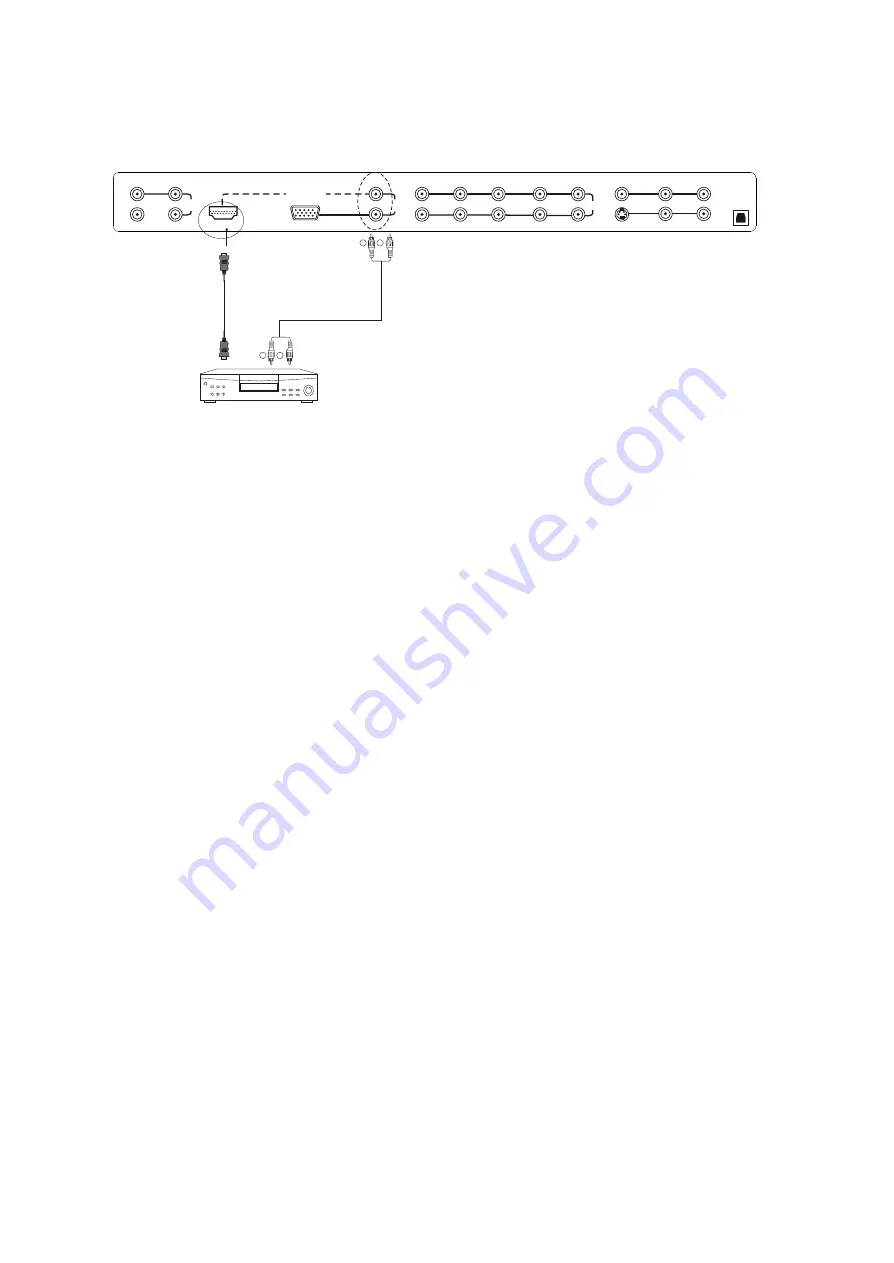
For DVD Players with DVI:

1.Turn off the power to the LCD TV and DVD player.
2.Using a HDMI-DVI cable, connect the DVI end to your DVD Player and the HDMI end to the HDMI input 
in the rear of your LCD TV.
3. Using an audio cable(white and red connectors), connect cable to the audio output connecters 
associated with the DVI output on the rear of your DVD Player, and connect the other end to the audio 
connectors associated with the HDMI input in the rear of  your LCD TV.
4. Turn on the power to the LCD  TV and your DVD Player.
5. Select HDMI using the 

INPUT

 button on the remote control or the front of the LCD TV, or directly by 

pressing the HD button on the remote control.

Y-2

Pb/Cb-2

Pr/Cr-2

Y-1

Pb/Cb-1

Pr/Cr-1

L-2

R-2

L-1

R-1

HDMI-IN

VGA IN

L

R

S-VIDEO IN

VIDEO IN

L-3

R-3

L-4

R-4

DIGITAL

AUDIO

 OUT

IN

COAXIAL OUT

VIDEO OUT

AUDIO 

OUT

L

R

AUDIO

IN

AUDIO

AUDIO

AUDIO

AUDIO

DIGITAL HD

www.astarelectronics.com

15

W

R

W

R

AV1

Summary of Contents for LTV-37HLS

Page 1: ...tion services for your ASTAR LCD TV please visit our website at 1 We recommend you register your ASTAR LTV 37HLS HDTV either at our website Write down your Serial Number located on the back of your LTV 37HLS S N Purchase Date 877 851 2528 877 851 2528 www astarelectronics com or call www astarelectronics com or fill in your registration card and mail it in For peace of mind and to protect your inv...

Page 2: ... use an adapter to ground the appliance safely Do not defeat the safety purpose of the grounded plug Do not overload power strips and extension cords Overloading can result in fore or electric shock The wall socket should be installed near the equipment and should be easily accessible Do not touch the power cord during lightning To avoid electric shock avoid handling the power cord during electric...

Page 3: ...or cable system Do not locate the antenna near overhead light or power circuits or where it could fall into such power lines or circuits Television Antenna Connection Protection Article 810 of the National Electrical Code ANSI NFPSA 70 provides information with regard to proper grounding of the mast and supporting structure grounding of the lead in wire to an antenna discharge unit size of the gro...

Page 4: ...uct gently Never place the unit on a surface with the glass facing downwards unless it is on protective padding When opening the carton check that the product is in good condition and that all standard accessories and items are included IMPORTANT Save the original box and all the packing material for future shipping needs ASTAR LTV 37HLS HDTV ASTAR Remote Control by Universal Electronics Audio Vid...

Page 5: ...formation Please ensure the product is installed with the screen in landscape orientation Any 90 clockwise or counter clockwise installation may induce poor ventilation and excessive component damage ASTAR offers professional installation services Please contact ASTAR for more information on these services at Avoid installing the product in the kitchen bathroom or other places with high humidity d...

Page 6: ...the display by grasping firmly to the base 5 Now the display can fit securely to a mount sold separately by utilizing the mounting holes in the center or the back panel of the display see Figure 3 3b Please make sure to read the directions of your specific wall mount to properly hang the LTV 37HLS HDTV Make sure the wall mount is rated to support at least 65 Ibs To find the perfect wall mount for ...

Page 7: ...g Your Antenna or Cable for TV 24 2 5 3 Using the Antenna or Cable through Your VCR 24 2 6 Connecting an Amplifier or Speakers 25 2 7 Connecting a Computer 26 3 1 Basic LCD TV Start Up 27 3 2 Watching a TV Program 28 3 3 Adjusting Basic LCD TV Settings 28 3 4 General 29 3 4 1 Parental Controls for DTV 34 3 4 2 DTV Channel Information 36 3 4 3 Program Information 37 3 4 4 Setting a Password 38 3 5 ...

Page 8: ...urces in the sequence AV1 AV2 S Video YPbPr1 YPbPr2 VGA HDMI ATV and DTV Press the button repeatedly to cycle through the available options 5 Power Button Switch the LCD TV on by pressing the button once Press the button again to turn the LCD TV off 6 Remote Control Sensor This is the window that passes all of the remote control signals to the TV Point the remote control directly at this window fo...

Page 9: ...or left audio and red for right audio inputs The green color band on the back of the display indicates this connection 7 VIDEO IN Connect the primary source for composite devices such as a VCR or video game console Use the white and red connectors to connect the external audio from the same source The yellow color band on the back of the display indicates this connection 8 S VIDEO IN Connect the p...

Page 10: ...utton is used to turn the OSD on INFO This button displays the image and system information display ENTER This button works to select your chosen option in On Screen Display OSD menu These buttons navigate the On Screen Display OSD menu RED GREEN YELLOW BLUE button These are short cut buttons using them with the hint OSD menu FREEZE Press this key to Freeze Frame the current screen Users may press...

Page 11: ...ize of the PIP screen from one of the following small medium or large in PIP mode Additionally press is to zoom the image from max 8 times to 1 8 times POS FAV LIST Press this button to change the PIP window position in PIP mode Additionally press it to show the favourite program list ADD DEL Press this button to add delete current channel to from the list of favorite programs SELECT Press it to s...

Page 12: ...remote control sensor to transmit the commands Do not place any obstacles between the remote control and the receiver window The effective range of the remote control is approximately 32 feet 10 meters from the front of the receiver window 30 to the left and right 20 up and down 1 4 3 Precautions for the ASTAR Remote Control The remote control should be kept dry and away from heat sources Avoid hu...

Page 13: ...nt The video signal is separated into three signals one containing the black and white information and the other two containing the color information This enhancement over S Video takes advantage of the superior picture provided by progressive scan DVD players and HDTV formats S Video The video signal is separated into two signals one containing the black and white information and the other contai...

Page 14: ...tarelectronics com or call 1 877 851 2528 Connecting DVD Player Best 1 Turn off the power to the LCD TV and DVD player 2 Connect a HDMI cable to the HDMI output of your DVD player and the other end to the HDMI input in the rear of your LCD TV 3 Turn on the power to the LCD TV and your DVD player 4 Select HDMI using the INPUT button on the front of the LCD TV or directly by pressing theHD button on...

Page 15: ...nd connect the other end to the audio connectors associated with the HDMI input in the rear of your LCD TV 4 Turn on the power to the LCD TV and your DVD Player 5 Select HDMI using the INPUT button on the remote control or the front of the LCD TV or directly by pressing the HD button on the remote control Y 2 Pb Cb 2 Pr Cr 2 Y 1 Pb Cb 1 Pr Cr 1 L 2 R 2 L 1 R 1 HDMI IN VGA IN L R S VIDEO IN VIDEO I...

Page 16: ...dio input connectors in the rear of your LCD TV 6 Turn on the power to the LCD TV and DVD player 7 Select YPbPr1 using the INPUT button on the remote or front of the LCD TV or directly by pressing the HD button on the Remote Control Note a If you are already using the YPbPr1input for another component or you do not want to use the Component Analog YPbPr1 input for the DVD player you can connect th...

Page 17: ...te color audio input connectors in the rear of your LCD TV 4 Turn on the power to the LCD TV and DVD player 5 Select S Video using the INPUT button on the remote or front of the LCD TV or directly by pressing the AV button on the Remote Control 2 2 3 Using S Video Connecting DVD Player Good Y 2 Pb Cb 2 Pr Cr 2 Y 1 Pb Cb 1 Pr Cr 1 L 2 R 2 L 1 R 1 HDMI IN VGA IN L R S VIDEO IN VIDEO IN L 3 R 3 L 4 R...

Page 18: ... the Remote Control or the front of your LCD TV or directly by pressing the AV button on the Remote Control Note a If you are already using the AV1for another component or you do not want to use the AV1 input for the DVD player you can connect the DVD player to the AV2 in the side of your LCD TV b Refer to your DVD player user manual for more information about the video output requirements of the ...

Page 19: ... the product or consult your satellite or cable operator You have several options for connecting your HDTV Set Top Box to your new LTV 37HLS HDTV HDMI Digital HD and VGA inputs Based on your home theater configuration you can decide which option is the right one for you HDTV Set Top Boxes that have a digital interface such as HDMI High Definition Multimedia Interface should be connected to the HDM...

Page 20: ...p Box and connect the other end to the audio connectors associated with the HDMI input in the rear of your LCD TV 4 Turn on the power to the LCD TV and your HDTV Set Top Box 5 Select HDMI using the INPUT button on the Remote or front of the LCD TV or directly by pressing the HD button on the Remote Control Y 2 Pb Cb 2 Pr Cr 2 Y 1 Pb Cb 1 Pr Cr 1 L 2 R 2 L 1 R 1 HDMI IN VGA IN L R S VIDEO IN VIDEO ...

Page 21: ...TV and HDTV Set Top Box 5 Select VGA using the INPUTbutton on the Remote or front of the LCD TV or directly by pressing the VGA button on the Remote Control Note Refer to your HDTV Set Top Box user manual for more information about the video output requirements of the product or consult your satellite or cable operator Y 2 Pb Cb 2 Pr Cr 2 Y 1 Pb Cb 1 Pr Cr 1 L 2 R 2 L 1 R 1 HDMI IN VGA IN L R S VI...

Page 22: ...amera 5 Select S Video using the INPUTbutton on the Remote or front of the LCD TV or directly by pressing the S Video button on the Remote Control Note Refer to your VCR or Video Camera user manual for more information about the video output requirements of the product or consult your satellite or cable operator Y 2 Pb Cb 2 Pr Cr 2 Y 1 Pb Cb 1 Pr Cr 1 L 2 R 2 L 1 R 1 HDMI IN VGA IN L R S VIDEO IN ...

Page 23: ...he LCD TV or directly by pressing the DTV ATV button on the Remote Control Note a Digital broadcasts are not available in all areas b Make sure the antenna is correctly grounded c For professional antenna installation please contact Astar Electronics at 1 877 851 2528 or visit our website at www astarelectronics com SERVICE AIR IN CABLE IN www astarelectronics com 23 2 5 2 Using Your Antenna or Ca...

Page 24: ... rear of your LCD TV 3 Turn on the power to your LCD TV and VCR 4 Select TV using the INPUTbutton on the remote or front of your LCD TV or directly by pressing the DTV ATV button on the Remote Control Note If you have an off air antenna or cable TV connect the off air antenna or TV cable to the RF connector on the rear of your VCR SERVICE AIR IN CABLE IN VIDEO EQUIPMENT with terminal www astarelec...

Page 25: ...or audio connectors on the Receiver Amp to the R red color and L white color audio output connectors in the rear of your LCD TV 3 Turn on the power to the LCD TV and Receiver AMP 4 Refer to your Receiver Amp system manual to select the corresponding audio input Note This audio output is not amplified and cannot be connected directly to external speakers Y 2 Pb Cb 2 Pr Cr 2 Y 1 Pb Cb 1 Pr Cr 1 L 2 ...

Page 26: ...VGAbutton on the Remote Control Note a For the best picture quality when computer through VGA set your computer timing mode to VESA 1366x768 at 60 Hz or 1024x768 at 60Hz Please refer to the graphic card s user guide for additional information on how to set the timing mode b Refer to your Computer s user manual for more information about the video output requirements of the product Y 2 Pb Cb 2 Pr C...

Page 27: ...ng TV Channel Skip Channel Name Air Press Enter 4 Off Press Enter TV Select Exit Enter Chapter 3 Setting Up to Watch TV and DTV 1 Connecting the Power Cable Connect the power cord to the power cord connector on the back of your LCD TV and then plug the power cord into an AC wall socket 2 Connect Audio and Video Cables to the LCD TV 3 Turning Power On Once all the components are connected press the...

Page 28: ...1 or YPbPr2 using the INPUTbutton on the front of your LCD TV Note You should be able to see a picture If you do not make sure that all connections are secure and you have selected the correct video input source 3 Press the CH buttons on the remote or the CH buttons on the front of your LCD TV to change the channel Note The CH buttons will not work if you are watching a program using HDMI YPbPr1 Y...

Page 29: ...ime Zone SPDIF Type Auto Scan Manual Scan Channel Skip English Eastern Time OFF Press Enter Press Enter Press Enter Audio language Setting the audio language to English French or Spanish Contrast Brightness Saturation Hue Sharpness Phase Color Temperature Back Light Advance Picture Adjust 80 55 60 0 4 5 User Bright Press Enter Video Select Exit Enter General Exit English Eastern Time OFF Press Ent...

Page 30: ... PCM off or Dolby digital Manual Scan If you feet that not all of the available digital TV channels were found with Auto Scan then selecting this option makes the TV try again to find any missing channels Press the DOWN arrow to highlight MANUAL SCAN and then press the ENTER button NOTE A channel will be missed if it is not transmitting at the time of the scan and so you should try again at a time...

Page 31: ...n defaults to ADD ON MODE and pressing the ENTER button at this stage makes the TV scan the whole channel range again Press MENU to navigate away from this screen NOTE If the ENTER button is pressed then the automatic scanning will start again If the or button is pressed first then RANGE MODE is activated so that the user can specify a smaller range of channels they want scanned again Press MENU t...

Page 32: ...WN arrow once to highlight the ANALOG CLOSED CAPTION option Caption Exit Analog Closed Caption Digital Closed Caption Digital Caption Style OFF OFF Press Enter Caption Exit Analog Closed Caption Digital Closed Caption Digital Caption Style OFF OFF Press Enter www astarelectronics com 32 Use the and arrow buttons to select the Analog Closed Caption usually CC1 Press MENU to navigate away from this ...

Page 33: ...er The default style AS BROADCASTER is shown as selected This means that the style of the closed caption is as received from the TV channel Use the or arrow button to select CUSTOM The Custom page allows you change the font size color the background color and the transparency of the closed caption Press MENU to navigate away from this screen when finished Caption Exit Analog Closed Caption Digital...

Page 34: ...own Press the ENTER button to highlight the bar Enter the four digit password The factory default password is 0000 If you change the password please make a note of it in a safe place 3 4 1 Parental Controls for DTV Parental Exit Password Parental Exit Password Contrast Brightness Saturation Hue Sharpness Phase Color Temperature Back Light Advance Picture Adjust 80 55 60 0 4 5 User Bright Press Ent...

Page 35: ...ssword has been entered the option for blocking channels becomes available Press ENTER The list of channels available and stored in memory is shown on the screen If the list is longer than 9 channels you will be able to scroll through the channel by pressing red button blue button and button repeatedly The boxes to the right of the channel names are empty by default As you scroll down the channels...

Page 36: ...ton these panels will remain on the screen even when changing channels Press the INFO button and the program summary will disappear but the information header will remain 3 4 2 DTV Channel Information DTV Program 58 2 KLCS DT Air 6 00 PM 6 30 PM Not Rated DTV Program Service 1 cc English Stereo 480i SD I L L B E LAUGHED RIGHT OUT OF SCHOOL Sesame Street 58 1 KLCS DT Air 6 00 PM 7 00 PM TV Y Rosita...

Page 37: ... Between the Lions Homework Hotline Zoom Roadtrip Nation Destination Unknown Charlie Rose Monday 31 October 2005 6 11 39 PM 58 4 58 1 KLSC DT 58 2 58 1 KLCS DT Rosita Befriends A Frog WearingA Crown Rosita is sad because alt of her friends are toobust to play with her She ends up meeting a frog thatwants to play and they 6 00 PM Mon 31 Oct TV Y Next Day 58 1 KLCS DT IT S THE RIGHT THING TO DO Pres...

Page 38: ...D Menu 2 Press the on the remote control until the setup menu opens 3 Press button on the remote control to highlight V Chip and press the ENTER button The Input your password please window should open 4 Use the number pad to type the default password 0000 then press ENTER 5 The setup window appears press the button on the remote control repeatedly to highlight change password then press ENTER 6 U...

Page 39: ... Advance Picture Adjust 80 55 60 0 4 5 User Bright Press Enter Video Select Exit Enter The remote control or the bottom control keys on the front panel of the TV can control all the function settings The on screen display OSD allows you to adjust and save contrast brightness and other settings The TV will save changes made to the settings even if the TV is turned off 3 5 Using the On Screen Displa...

Page 40: ... Option Chooses one of the following options OFF C1 C2 C3 C4 T1 T2 T3 T4 Default Resets the display back to the factory default settings 3 5 3 Setup Setup Select Exit Enter Language V Chip Closed Caption Blue Back Default English Press Enter Off On Press Enter Available for the following input sources AV1 AV2 S Video YPbPr1 YPbPr2 HDMI DTV or ATV Contrast Adjusts the level of white between the lig...

Page 41: ...e blocked without typing in the password For more information see Section 3 5 13 Block MPAA Unrated Select Yes to block unrated programs Block TV None Rating Select Yes to block TV None Rating Programs Change Password Changes the password used for modifying the parental control settings or watching a program blocked by parental controls For more information see Section 3 4 4 3 5 4 V Chip for TV Se...

Page 42: ... an image If the contrast is too low the picture appears dark and lacks detail If the contrast is too high the picture appears faded and lacks shadow and depth Brightness Adjusts the black levels of the picture Users may need to readjust the brightness after the LCD TV warms up Auto Setting Automatically sets the position and size of the picture Phase Press button to adjust phase Manual Clock Pres...

Page 43: ... frame movie in this mode the display image is stretched proportionately to fill the TV screen When watching a wide screen 1 78 1 source program or movie the display image fills the TV screen If you are watching a wide screen 1 85 1 or 2 35 1 source program or movie there will still be black bars at the top and bottom Panoramic When watching a standard broadcast or full frame movie in this mode th...

Page 44: ...ange the PIP channel press the button to select sub picture press the CH or button on the remote control Swapping PIP POP Video You can swap the program that is in the main picture with the program in the PIP sub picture To swap the main picture with the PIP sub picture program press SWAP on the remote control If you press SWAP again it will return the program to the main picture This works the sa...

Page 45: ...ated Block TV None Rating Change Password On Press Enter Press Enter No No Press Enter The V Chip feature prevents viewers from watching programs that are not age appropriate such as programs containing violence or adult language 1 Press the MENU button to open the main On Screen Display OSD Menu 2 Press the on the remote control until the Setup menu opens 3 Press button on the remote control to h...

Page 46: ...Sleep Timer lets you set a time delay to turn off your LCD TV automatically To set the Sleep Timer using the remote control 1 Press the SLEEP button on the remote control The Sleep Timer appears in the center of your screen 2 Press the SLEEP button one or more times to select the time you want Options include 15 30 60 90 or 120 minutes To turn off the sleep time using the remote control press the ...

Page 47: ...lay with a dry cloth after cleaning 1 Use a soft cotton cloth to gently clean the screen 2 The screen glass is very fragile Do not scrape it with any sharp object Do not press or tap the screen to avoid cracking When the screen is seriously contaminated use a soft cloth moistened with diluted neutral cleaner to clean display Remove water out of the cloth before cleaning to prevent water from penet...

Page 48: ... input source cable is attached securely and correctly to the back of your LCD TV Make sure that the video input source is within the range of your LCD TV Compare the video input source s specifications with your LCD TV specifications The display image does not cover the entire screen If you are using VGA mode make sure that H Size and V Position in the OSD are set correctly If you are using TV AV...

Page 49: ... displaycapabilities Up converting can cause noise or trash You switch to a different input and the screen size changes The LCD TVremember the viewing mode from the last time you used a particular input AV1 AV2 S Video Analog HD Digital HD VGAand TV Tips for High Definition Users When you LCD TV s digital capabilitiesexceed a digital broadcast signal the signal is up converted increased to match y...

Page 50: ...ouraged to try to correct the interference by one or more of the following measures 1 Reorient or relocate the receiving antenna 2 Increase the separation between the equipment and receiver 3 Connect the equipment into an outlet on a circuit different from that to which the receiver is connected 4 Consult the dealer or an experienced radio TV technician for help 4 5 FCC Class B Radio Frequency Int...

Page 51: ...ite AV1 AV2 1xS Video 1xComputer RGB 5xStereo Audio in RCA 1xRS232 for service RJ 11 1xAudio out RCA 1xVideo out RCA 1 coaxial out HDMI source 1digital audio optical output DTV ATSC Source PIP POP Noise Reduction 3 2 Pull Down 3D Comb Filter Progressive Scan Aspect Ratio conversion 3D D interlacer Gamma Correction Stereo MTS and SAP Closed Caption V Chip Parental Control stereo 18 watt channel int...

Page 52: ...900 000 2 1 million pixels Integrated HDTV An HDTV that has the digital tuner built into the set It does not need a separate set top box to receive over the air DTV signals progressively scanned lines 480p in 16x9 or 4x3 format 480 interlaced 480i is the quality of today s analog TV system SDTV provides 150 300 000 pixels Interlace Scan A way to scan vertical lines onto a TV picture by scanning al...

Page 53: ...www astarelectronics com ...

Reviews:

Related manuals for LTV-37HLS