3
Finishing the Installation
1
Electrically CONNECT the 9400/9500/9600
to the Plug In Connector, and ATTACH
the electric strike to the jamb using the
1/4
"
-20 x 1
"
mounting screws provided.
2
CHECK latchbolt interaction to determine
if horizontal adjustment is needed, and
ADJUST as needed; then LOCK DOWN the
horizontal adjustment using the
#10-32 set screws as illustrated on Page 4.
3
OPTIONAL LOCKDOWN FEATURE:
INSTALL the #10-24 UNC or 10-32
UNF lockdown screw if additional
security is required; however, REMOVE
the strike before drilling hole.
4
INSTALL the cover plate, and SECURE
in place using the #6-32 x 1/4
"
Cover
Screws as illustrated on Page 4.
Converting the
Operation Mode
NOTE 1:
The 9400/9500/9600 series
Electric Strikes are pre-set for FAIL SECURE
OPERATION as shown in Diagram 5.
NOTE 2:
There are Selector Stop Pins, one on
the left side and one on the right side. Both
Selector Stop Pins must be repositioned to
convert the strike to FAIL SAFE OPERATION.
1
To convert to FAIL SAFE OPERATION,
REMOVE the Selector Stop Pins on
each side of the strike body using
the provided 5/64" hex key.
2
MOVE the Selector Stop Pins to the FAIL SAFE
OPERATION position (towards the center
of the strike) as pictured in Diagram 6.
3
TIGHTEN both Selector Stop Pins after
they have been moved to the FAIL SAFE
OPERATION position using the 5/64" hex key.
Verifying the
Operation Mode
NOTE:
Both keepers should be unlocked without
power, but lock when power is applied.
1
VERIFY that both keepers are
in FAIL SAFE OPERATION.
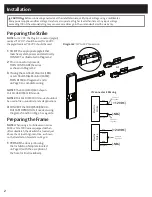
Diagram 3
Latchbolt Monitor
White
Common
Orange
Normally Open
Green
Normally Closed
Diagram 5:
Fail Secure Operation
If Connector Is Missing
Diagram 6:
Fail Safe Operation
Diagram 4
Latchbolt Strike Monitor
Brown
Common
Blue
Normally Open
Yellow
Normally Closed
White
Brown
Selector Stop
Pin Location
Selector Stop
Pin Location
Orange
Blue
Green
Yellow


