56
NUT1
NUT2
B
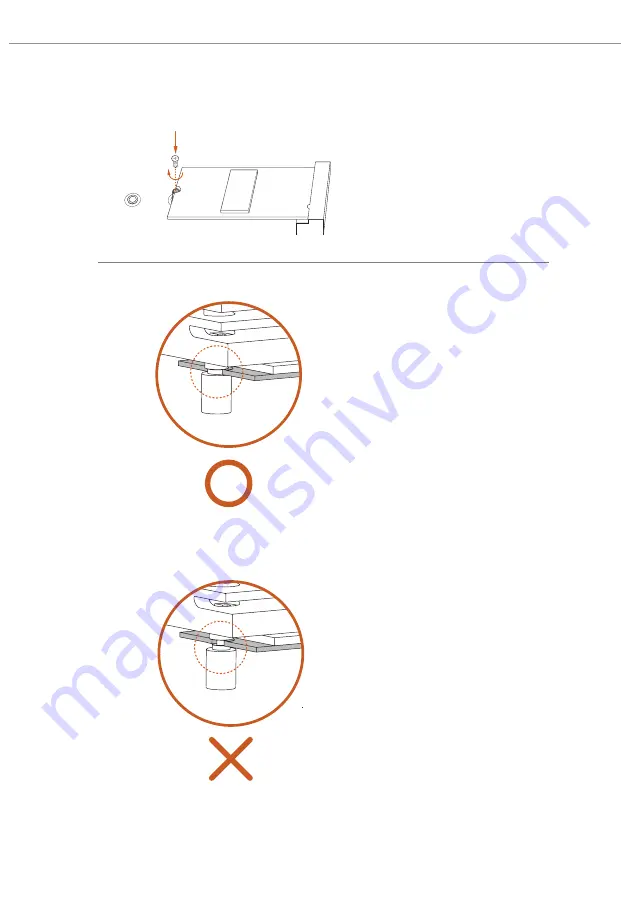
Step 6
Tighten the screw with a screwdriver
to secure the module into place.
Please do not overtighten the screw
as this might damage the module.
Skip Step 6 if your M.2 SSD module is
Type 2280.
Step 7
Before securing the M.2 heatsink,
make sure to align the notch on
the SSD to the standoff on the
motherboard if you use a Type 2280
SSD module; otherwise, the SSD
module may be damaged.
Correct Installation:
The SSD's PCB is in proper place, and
the M.2 heatsink can be screwed in.
Incorrect Installation:
The SSD's PCB sits between M.2 heatsink
and standoff. Do not continue.
Summary of Contents for B650M PG Riptide WiFi
Page 1: ......
Page 22: ...18 4 3 C P U _ F A N 1 ...
Page 23: ...19 B650M PG Riptide WiFi Installing the CPU Cooler Type 2 2 1 ...
Page 24: ...20 3 4 C P U _ F A N 1 ...
Page 26: ...22 Installing the CPU Cooler Type 3 2 1 ...
Page 27: ...23 B650M PG Riptide WiFi 4 3 ...
Page 28: ...24 5 C P U _ F A N 1 ...
Page 31: ...27 B650M PG Riptide WiFi 1 2 3 ...
Page 33: ...29 B650M PG Riptide WiFi 2 5 Installing the Motherboard B650M PG W F i i R I P T I D E ...
Page 34: ...30 2 6 Installing SATA Drives 1 2 Optical Drive SATA Drive SATA Data Cable ...
Page 35: ...31 B650M PG Riptide WiFi 3 4 SATA Power Connector SATA Data Connector ...
Page 36: ...32 2 7 Installing a Graphics Card 1 CLICK ...
Page 38: ...34 2 8 Connecting Peripheral Devices ...
Page 39: ...35 B650M PG Riptide WiFi 2 9 Connecting the Power Connectors 7 3 5 7 9 ...
Page 40: ...36 2 10 Power On 2 3 4 1 ...


