background image

2U4N-F Series

10

11

English

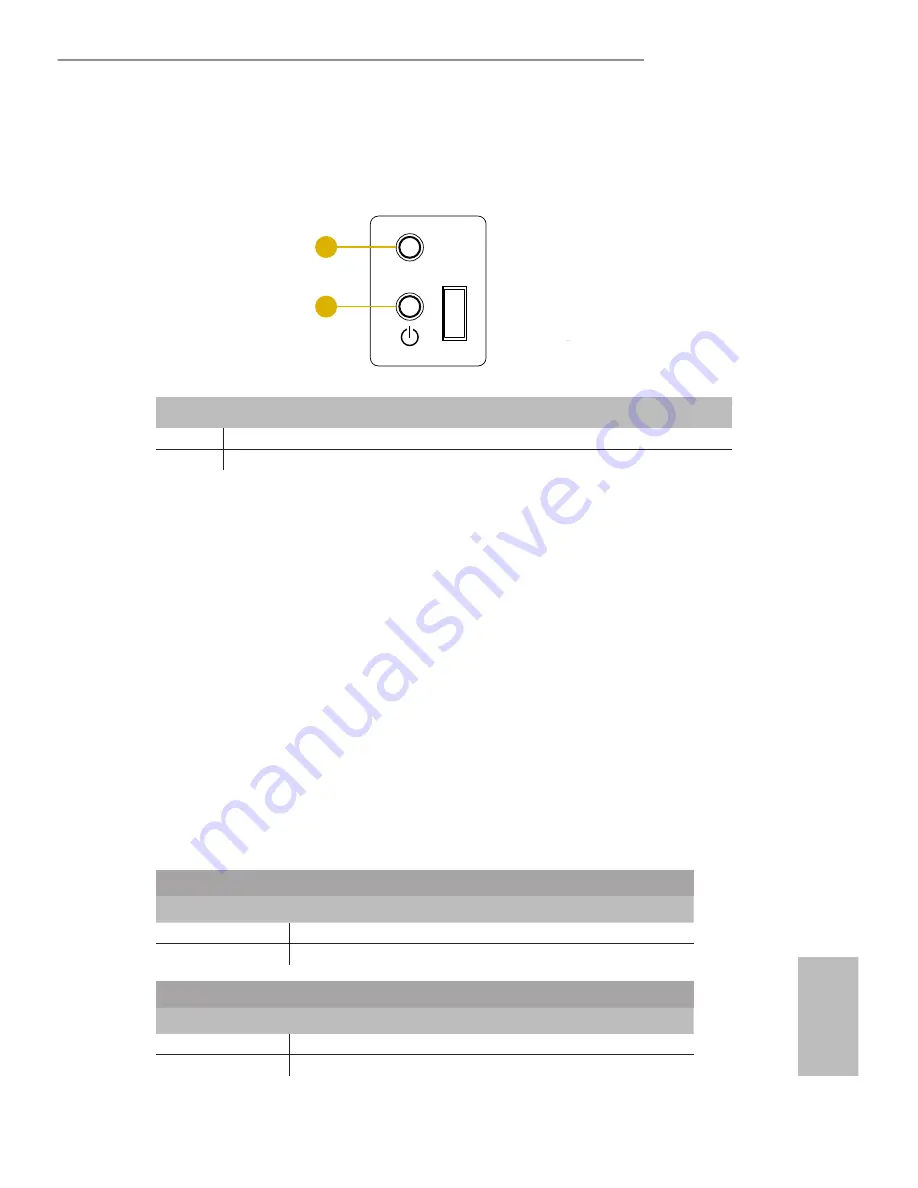
2.6  Front Control Panel Buttons and LEDs

Front Control Panel (per node)

RST

2

1

No.

Description

1

System Reset Button / UID LED

2

Power Button and LED

System Reset Button

When the system is completely unresponsive, press the system reset button to reboot the 
server without shutting it off and initialize the system. 

UID Button

Press the UID button on the rear panel to toggle the front panel UID LED on and off. You 
are able to locate the server you’re working on from behind a rack of servers.

Power Button

Press the power switch button to toggle the system power on and off modes.
To remove all power from the system completely, disconnect the power cord from the 
server.


Status LED Definitions

NMI LED
Status

Description

Blue

Nonmaskable interrupt occurs

Off

No nonmaskable interrupt

ID LED
Status

Description

Blue

System identification is active.

Off

System identification is disabled.

Summary of Contents for 2U4N-F Series

Page 1: ......

Page 2: ...mplied including but not limited to the implied warranties or conditions of merchantability or fitness for a particular purpose In no event shall we our directors officers employees or agents be liabl...

Page 3: ...en removal of the chassis lid required for servicing Turn off power and unplug any power cords cables and Reinstall the chassis lid before restoring power Important Safety Instructions Pay close atten...

Page 4: ...ont Panel 9 2 5 System Rear Panel 10 2 6 Front Control Panel Buttons and LEDs 11 2 7 PSU LED 12 2 8 Drive Tray LEDs 13 Chapter 3 Hardware Installation and Maintenance 14 3 1 Hard Drive 15 3 2 Power Su...

Page 5: ...kplanes BPB 36 5 2 Right Left Power Distribution Board RPDB LPDB 37 5 3 Right Left Interposer Board RIPB LIPB 38 5 4 Power Supply Unit Interposer Board PSU IPB 39 5 5 Chassis Management Board CM 39 5...

Page 6: ...quality control It delivers excellent performance with robust design conforming to our commitment to quality and endurance The illustrations shown in this manual are examples only the actual system ma...

Page 7: ...agement Board CM 1 Power Supply Units PSU 2 Mini SAS HD Cables L MB to BPB 760 mm 1 2 Mini SAS HD Cables R MB to BPB 630 mm 1 2 HDD Power Cables L 12Pin BPB to IPB 230mm 1 2 HDD Power Cables R 12Pin B...

Page 8: ...O Port 1 x USB 2 0 port Drive Bay External 16 x 2 5 SATA HDDs 6Gb s 4 per node System Cooling per node Fan 16 x 40 56 mm system fans 4 per node Power Supply Capacity 2 1 1 Redundant Output Watts 1000...

Page 9: ...verview This chapter provides diagrams showing the location of important components of the server system 2 1 System Components 4 x Nodes and Server Boards 16 x 2 5 Hot Swap HDD Trays Front Controls an...

Page 10: ...2U4N F Series 5 English 2 2 Internal Features 2 1 3 4 5 6 7 8 2 3 4 5 6 7 8...

Page 11: ...No From 1 Power Supply Bay 2 x Power Supply Units 2 Server Board 3 System Fan 1 4 System Fan 2 5 System Fan 3 6 System Fan 4 7 2 x 2 5 SATA HDDs Hot swapable HDD0 HDD1 8 2 x 2 5 SATA HDDs Hot swapable...

Page 12: ...Power Distribution Board LPDB 6 Right Power Distribution Board RPDB 7 Chassis Management Board CM 8 PSU Interposer Board PSU IPB Node 1 9 PSU Interposer Board PSU IPB Node 2 10 PSU Interposer Board PS...

Page 13: ...poser Board RIPB Node 4 16 2 5 HDD Backplane Board BPB Node 1 17 2 5 HDD Backplane Board BPB Node 2 18 2 5 HDD Backplane Board BPB Node 3 19 2 5 HDD Backplane Board BPB Node 4 20 Front Panel Boarde FP...

Page 14: ...System Front Panel 2 1 4 3 System Node 5 6 7 8 HDD1 HDD0 HDD3 HDD2 No Description 1 Node 1 2 Node 2 3 Node 3 4 Node 4 5 Node Tray Handle 6 4 x 2 5 HDD Trays per node 7 Control Panel Buttons and LEDs...

Page 15: ...ard Supports Low profile add on cards only 6 I O Shield depends on the specification of the server board 7 Mezzanine Card Support for 1GbE x 2 10GbE x2 or SFP Fiber x2 8 2 x Power Supply Units Redunda...

Page 16: ...the UID button on the rear panel to toggle the front panel UID LED on and off You are able to locate the server you re working on from behind a rack of servers Power Button Press the power switch but...

Page 17: ...tatus Description Green Normal work output ON and OK Amber Module fault protection in operating mode failure OCP OVP Fan Fail OTP UVP AC cord unplugged Amber blinking at 0 5Hz Warning high temp high p...

Page 18: ...1 HDD Power LED 2 HDD Activity LED Status LED Definitions HDD Power LED Status Description Blue HDD powered on Off No power to HDD HDD Activity LED Status Description Solid Green HDD active Blinking G...

Page 19: ...e power LED turns off 2 Ensure you have a clean and stable working environment Avoid dust and dirt because contaminants may cause malfunctions 3 Ground yourself properly before touching any system com...

Page 20: ...rts hot swappable 2 5 hard drives Four 2 5 hard drive trays are located on the front of each node Removing 2 5 Hard Drive Trays from the Chassis 1 Press the locking lever latch on the drive tray to un...

Page 21: ...th the printed circuit board side facing down Carefully align the mounting holes in the hard drive and the tray 2 Secure the hard drive using the two screws 3 Slide the drive tray into the HDD bay unt...

Page 22: ...rovides up to 1200 Watts of power 180V to 264VAC input One power supply is required for full load operation with the other power supply purely as a redundant load sharing backup It can be removed with...

Page 23: ...failed power supply identify the failed power supply by checking the power supply LED on the PSU 1 Hold onto the power supply handle while pressing the locking lever towards the power supply handle 2...

Page 24: ...cking tab on the side of the server board tray and then gently pull it out about an inch 2 Grasp the handle on the other side of the server board tray and gently pull it out of the chassis 3 Place the...

Page 25: ...letely out of the chassis 2 Disconnect all cables attached to the server board 3 Remove eight screws on the server board 4 Lift the server board up from the node 5 Hold the server board only by the ed...

Page 26: ...connecter and remove the failed fan 2 Align the mounting holes on the fan bar with the fan mounts on the replacement fan corners 3 Gently place the fan on the fan bar Make sure the fan is well seated...

Page 27: ...ing the add on card power off the server and unplug the power cord Removing the Blanking Plate from the Chassis 1 Remove the screws securing the blanking plate assembly on the chassis Keep the screws...

Page 28: ...card you need to install a mezzaine card and a riser card first Please refer to the followings for instructions 1 Install the add on card to the riser card 1 2 Insert the assembly into the PCIE slot m...

Page 29: ...24 English 4 Align the plate of the add on card with the openings in the back of the chassis Attach the add on card to the chassis with the screw that was previously set aside 4...

Page 30: ...2U4N F Series 25 English 3 7 LAN Mezzanine Card Removing the Blanking Plate for a LAN Mezzanine Card Remove the screws that secure the blanking plate on the chassis Keep the screws for later use...

Page 31: ...card must be used in conjunction with a matching I O module 1 Install the four standoffs into the motherboard around the mezzanine card slot Hand tighten the standoffs 2 Gently insert the mezzanine ca...

Page 32: ...2U4N F Series 27 English 4 Tighten the screws to secure the matching I O module to the chassis I O Module 5...

Page 33: ...de drives Removing the Backplanes 1 Remove all of cables connected to the backplane 2 Loosen the securing screws on the backplane 3 Lift the backplanes up from the chassis Hold the backplanes only by...

Page 34: ...rts one node interposer board Removing the Interposer Board 1 Remove all of cables connected to the interposer board 2 Loosen the securing screws on the interposer board 3 Lift the interposer board up...

Page 35: ...one front panel board Removing the Front Panel Board 1 Remove all of cables connected to the front panel board 2 Loosen the securing screws on the front panel board 3 Lift the front panel board up fr...

Page 36: ...ts one PSU interposer board Removing the PSU Interposer Board 1 Remove all of cables connected to the PSU interposer board Loosen the securing screws on the PSU interposer board 2 Lift the PSU interpo...

Page 37: ...on the power supply bay 2 Pull the power supply bay out of the chassis 3 Turn the power supply bay 180 degrees around with its bottome side up 4 Loosen the securing screws on the chassis management b...

Page 38: ...ution boards Removing the Power Distribution Board 1 Remove the screws on the BOTTOM side of the power supply bay 2 Remove the screws on the TOP side of the power supply bay 3 Carefully pull the power...

Page 39: ...type and quantity vary depending on the server board that comes with your system 1 MiniSAS HD Cable L L 760mm Quantity 2 R L 630mm Quantity 2 Server Board HDD BPB 2 HDD Power Cable 2 6PIN L L 230mm Q...

Page 40: ...Series 35 English 4 SMB Cable 1 5PIN L L 670mm Quantity 2 R L 890mm Quantity 2 HDD BPB Server Board 5 Power Cable 2 8PIN L 150mm Quantity 4 IPB PSU IPB 6 Power Cable CM 2 10PIN L 190mm Quantity 4 IPB...

Page 41: ...1 No Description 1 SAS Hot swap Connector 0 SAS_0 for HDD0 2 SAS Hot swap Connector 1 SAS_1 for HDD1 3 SAS Hot swap Connector 2 SAS_2 for HDD2 4 SAS Hot swap Connector 3 SAS_3 for HDD3 5 HDD Backplane...

Page 42: ...B CON2 CON1 CON2 CON1 LPDB RPDB 2 1 3 4 5 6 7 8 No Description 1 Connectors to PSU IPB Node 4 2 Connectors to PSU IPB Node 3 3 Connector to CM Board 4 Connector to PSU 5 Connectors to PSU IPB Node 2 6...

Page 43: ...ATX 16 Power Connector to PSU IPB CON26 5 Connector to Server Board 6 Node Fan Connector 1 REAR_FAN1 7 Node Fan Connector 2 REAR_FAN2 8 Node Fan Connector 3 REAR_FAN3 9 Node Fan Connector 4 REAR_FAN4...

Page 44: ...Interposer Board PSU IPB CON3 J5 1 2 3 No Description 1 Connectors to LPDB or RPDB 2 Power Header to IPB J5 3 ATX 16 Power Connector to IPB CON3 5 5 Chassis Management Board CM 1 CON1 CON2 2 No Descr...

Page 45: ...40 English 5 6 Front Panel Board FPB 2 1 3 No Description 1 Reset and Power Buttons 2 USB 2 0 Header to IPB 3 USB 2 0 Port...

Page 46: ...Pin CPU into the socket please check if the PnP cap is on the socket if the CPU surface is unclean or if there are any bent pins in the socket Do not force to insert the CPU into the socket if above...

Page 47: ...42 English A 3 B 4 5...

Page 48: ...lish Installing the CPU Fan and Heatsink Passive heatsink for narrow ILM socket Before you installed the heatsink you need to spray thermal interface material between the CPU and the heatsink to impro...

Page 49: ...r where to install them respectively Type a the Aluminum Extruded Heat Sink with larger gaps between fins allows more air flow to pass through Please install the Type a heatsink to the CPU socket near...

Page 50: ...ts in one correct orientation It will cause permanent damage to the motherboard and the DIMM if you force the DIMM into the slot at incorrect orientation For more information about DIMM installation p...

Page 51: ...aching the Slide Rail Assemblies to the Rack 1 Determine where to attach the slide rails Make sure you have enough free space above the slide rail bracket for the chassis 10U 11U 2U Server Free Space...

Page 52: ...3 Extend the pre attached front and rear adjustable brackets on the slide 4 Adjust the brackets to accommodate the depth of the rack 5 Align the holes on the brackets with the mounting holes you sele...

Page 53: ...48 English 7 Make sure the rear bracket meets the rear vertical rail of the rack Use the screws you previously keep to secure the rear bracket 11U 12 U 8U 9U 10 U...

Page 54: ...safe lifting two or more persons are required to install the server into the rack 11U 12U 9U 10U 3 To remove the server from the rack reverse these instructions When connecting cables to the server m...

Reviews: