27
There are several recording options and other settings that
should be understood and checked before you begin recording.
Setting the Record Quality
The Record quality determines the quality of your recordings as
well as the maximum amount of video you can record on a
disc. The higher the quality, the less video recording time can
be recorded.
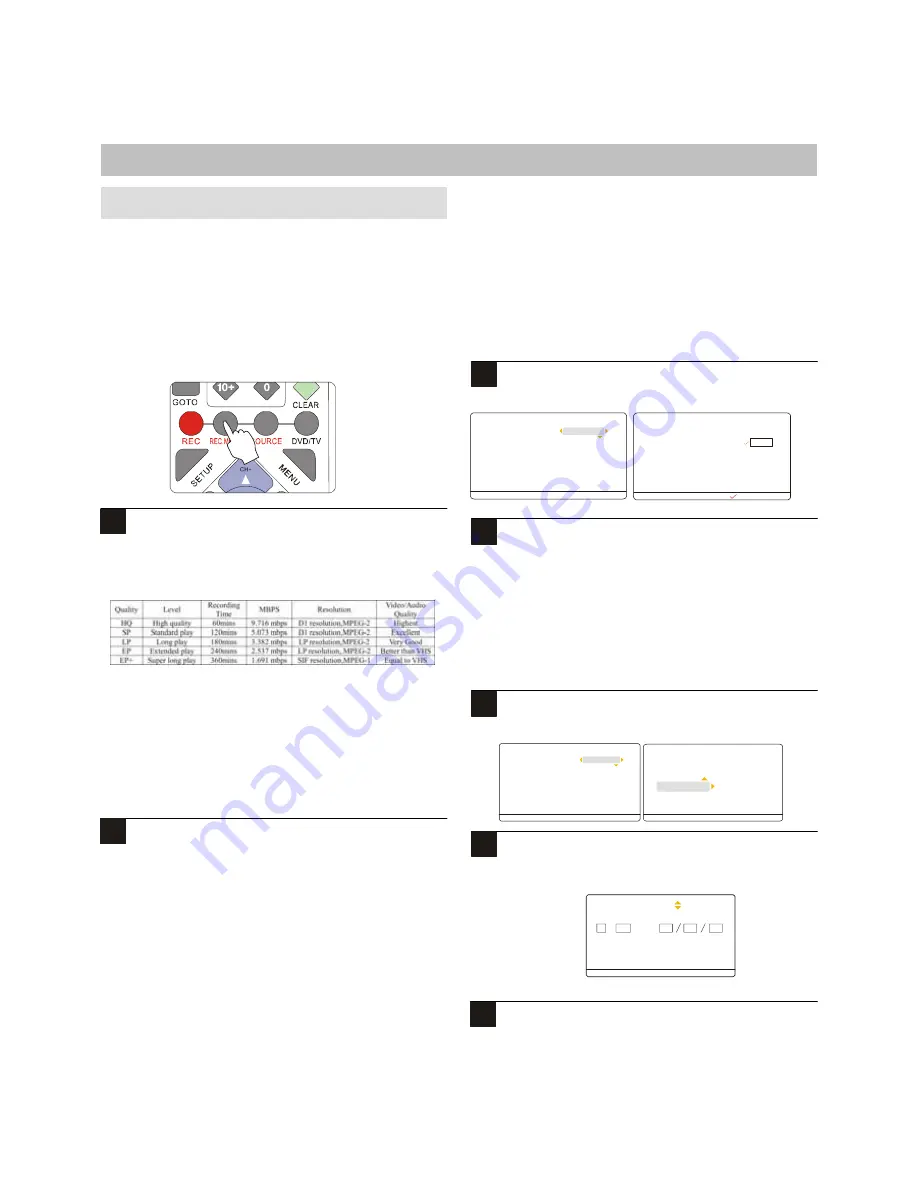
Press DVD/TV to enter to the live. And Press the
REC MODE key repeatedly to select the record
Quality for HQ, SP, LP, EP, EP+.
NOTE:
Recording time is Approximately value.
You can setting the record quality for SETUP MENU.
Setting the Auto Chapter Option
You can set the recorder to automatically add a "chapter
marker" every 10 minutes during your recordings. During
playback, this will allow you to skip forward or back in 10
minute intervals by using the NEXT/PREV keys on the
remote. These chapter markers are compatible with most
standard DVD Recorders as well.
You can also add chapter markers manually.
Press SETUP and navigate with the DOWN key to the
RECORDING menu. Press ENTER. Then, navigate to
The AUTO CHAPTER menu and press ENTER.
Watch TV
Play /Edi t Disc
Record program
Setup menu
Channel source
Channel setup
Press SETUP to exit
Recording setup
DVD control
General
Video
Speaker
Audio
Press SETUP to exit
Recording Quality
Set clock
Auto chapter
4m in
10min
20min
30min
OFF
C urr ent Se lec tio n
Select an Auto Chapter option with the UP/DOWN
Keys and press ENTER to confirm. Press SETUP to
exit and save changes.
Checking the Time and Date
Before you begin recording, you should make sure the Time
and Date are both correct. The Time and Date are used not only
to schedule recordings, but also to label recordings that you
make live.
Press SETUP and navigate with the DOWN key to the
SETUP MENU. Press ENTER, Then, press ENTER to
RECORDING SETUP and enter to SET CIOCK
Watch TV
P lay /Edit Disc
Record prog ram
S etup menu
Channel s ource
Channel s etup
Press SETUP to exit
Recording setup
DVD control
General
Video
Speaker
Audio
Press SETUP to exit
Recording Quality
Auto chapter
Set clock
Use the UP/DOWN keys to increase or decrease the
Time/Date value, and the LEFT/RIGHT keys to move
to a different field. Press DONE to save your
changes.
Select a field then use to edit
Press SETUP to exit
Hour Minute Year Mout h Day
23
11
2003
DEC
31
Press SETUP to exit the SETUP MENU.
Setting Recording Options
1
2
RECORDING
3
1
1
2
2


