background image

26

COMPUTER MODE

PC ADJUSTMENT

This Projector can automatically tune to the display signals from most personal computers currently distributed.
However, some computers employ special signal formats which are different from the standard ones and may
not be tuned by the Multi-Scan system of this projector.  If this happens, the projector cannot reproduce a proper
image and the image may be recognized as a flickering picture, a non-synchronized picture, a non-centered
picture or a skewed picture.
This projector has a PC ADJUSTMENT function to enable you to precisely adjust several parameters to match
with those special signal formats.  This projector has 8 independent memory areas to memorize those
parameters manually adjusted.  This enables you to recall the setting for a specific computer whenever you use
it. 

Note : This PC ADJUSTMENT function cannot be operated when the input signal is from the COMPUTER INPUT-1

(DIGITAL) terminal or “RGB” is selected on the SYSTEM MENU (P24 and 25).

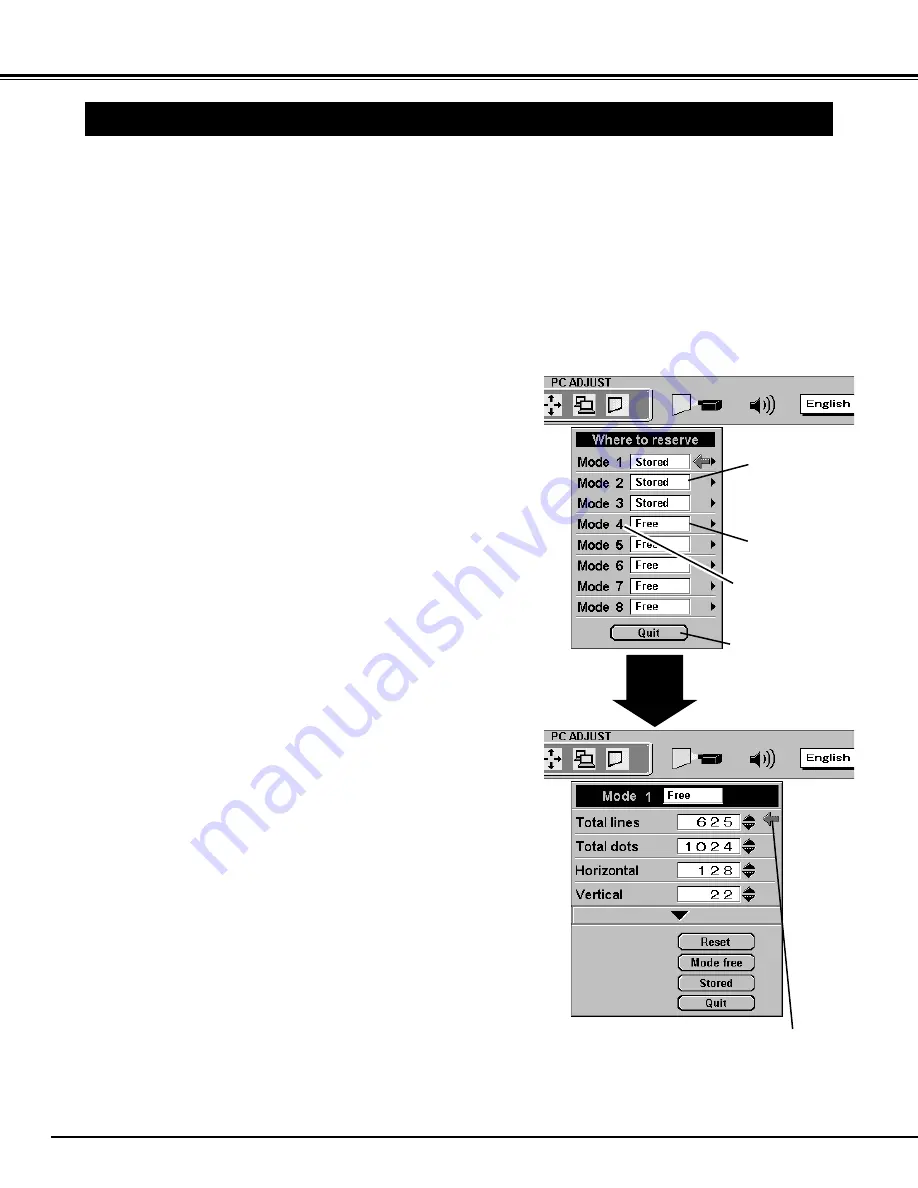
Press the MENU button and the ON-SCREEN MENU will
appear.  Press the POINT RIGHT/LEFT button to select PC
ADJUST and press the SELECT button.  Another dialog box
“Where to reserve” Menu will appear. 

In this dialog box, you can store the parameter into the area from
“Mode 1” to “Mode 8.”  When memorizing the new computer
parameter, select the Mode with the message “Free” by pressing
the POINT UP/DOWN button and the SELECT button.  To
change the parameters of the Mode previously set, select the
Mode with “Stored.”

1

2

When the Mode is selected, Parameter adjustment dialog box
appears.  Move the arrow to the item that you want to change by
pressing the POINT UP/DOWN button, and adjust each item by
pressing the SELECT button to match with your computer.

3

Move the arrow to “Stored” and press the SELECT button.  The
parameter is memorized in the selected Mode.

4

This Mode has
parameters being
stored.

Close the PC
ADJUSTMENT Menu.

The Vacant Mode.

Manual set Computer
Mode (1 to 8).

Move the arrow to 

or

and press SELECT

button.

To activate the Mode manually adjusted in this PC
ADJUSTMENT Menu, select the Mode at the SYSTEM SELECT
Menu.  (Refer to page 24.)

5

Summary of Contents for 9280

Page 1: ...Desktop Projector 9280 PRESENTATIONS WORKING SESSIONS TRAINING MULTIMEDIA VIDEO ANIMATION T E N T A T I V E...

Page 2: ...S WARNING TO REDUCE THE RISK OF FIRE OR ELECTRIC SHOCK DO NOT EXPOSE THIS APPLIANCE TO RAIN OR MOISTURE This projector produces intense light from the projection lens Do not stare directly into the le...

Page 3: ...abinet slots as they may touch dangerous voltage points or short out parts that could result in a fire or electric shock Never spill liquid of any kind on the projector This projector should be operat...

Page 4: ...o cause harmful interference in which case the user will be required to correct the interference at his own expense The AC Power Cord supplied with this projector meets the requirement for use in the...

Page 5: ...O SIGNAL FROM VIDEO OR S VIDEO JACK 32 VIDEO SIGNAL FROM Y Pb Cb Pr Cr JACKS 32 SELECTING COLOR SYSTEM 33 PICTURE IMAGE ADJUSTMENT 34 NORMAL FUNCTION 35 PICTURE SCREEN ADJUSTMENT 35 SETTING MENU 36 SE...

Page 6: ...Display Operation menu is displayed in English Deutsch Fran ais Italiano Espa ol or Japanese One Touch Auto Imaging Incoming computer video signals are recognized and the best setting is automatically...

Page 7: ...sed This projector detects the internal temperature and automatically controls the operating power of the Cooling Fans FRONT OF THE CABINET LAMP COVER ADJUSTABLE FEET AND FEET LOCK LATCHES This projec...

Page 8: ...the AC Power Cord when the appli ance is not used When this projector is connected to the outlet with the AC Power Cord the appliance is in Stand by Mode and consumes a little electric power CONNECTIN...

Page 9: ...as a great influence on the picture quality It is recommended to limit ambient lighting in order to provide the best image Max Zoom Min Zoom Min Zoom Max Zoom 100 77 11 8 3 6m 150 115 17 7 5 4m 200 15...

Page 10: ...event damage to the lens and cabinet When this projector is not in use for an extended period put it into the case dust cover supplied with this projector ADJUSTABLE FEET Picture tilt and projection a...

Page 11: ...tput stereo from the computer to these jacks Refer to P14 Connect the audio output from the video equipment to these jacks Refer to P13 CONTROL PORT 1 2 CONNECTORS COMPUTER AUDIO INPUT 1 2 JACKS AUDIO...

Page 12: ...ESET function excessively RESET BUTTON When using the Wired Wireless Remote Control Unit as the Wired Remote Control Connect the Wired Remote Control Unit to this jack with the Remote Control Cable su...

Page 13: ...nd S VIDEO jack are connected the Y Pb Cb Pr Cr jacks has priority over the S VIDEO jack S VIDEO Output Audio Input Cables used for connection Cables are not supplied with this projector Video Cable R...

Page 14: ...lied with this projector VGA CABLE HDB 15 pin CONTROL CABLE FOR PS 2 PORT SERIAL PORT or ADB PORT MAC ADAPTER DVI CABLE 24 pin BNC CABLE BNC x 5 AUDIO CABLE RCA X 2 Mini Plug stereo AUDIO CABLE Mini P...

Page 15: ...green in Power Management mode P36 This indicator is dim when the projector is turned on And bright when the projector is in stand by mode This indicator turns to yellow when the life of the projecti...

Page 16: ...y result hazardous radiation exposure Laser Light Window These caution labels are put on the remote control LASER POINTER FUNCTION Used to select COMPUTER input source P24 Used to select VIDEO source...

Page 17: ...e compartment Remote Control Batteries Installation 1 2 3 Operating Range Point the remote control toward the projector Receiver Window whenever pressing the buttons Maximum operating range for the re...

Page 18: ...ON SCREEN MENU 1 2 3 5 4 You can control and adjust this projector through the ON SCREEN MENU Refer to the following pages to operate each adjustment in the ON SCREEN MENU 1 MOVING THE POINTER 2 SELEC...

Page 19: ...just Fine sync Total dots and Picture Position automatically Refer to P29 MENU BAR IN COMPUTER MODE Press MENU BUTTON while in Computer mode SYSTEM MENU Used to select a color system of the selected v...

Page 20: ...ed off Wait at least 5 minutes before turning the projector on again When the TEMPERATURE WARNING indicator continues to flash follow procedures below 1 Turn the MAIN ON OFF SWITCH to OFF and disconne...

Page 21: ...smaller 1 Press the FOCUS button s on the Top Control or on the Remote Control Unit The message Focus is displayed 2 Adjust the focus of the image by pressing the FOCUS button s or the POINT UP DOWN...

Page 22: ...the picture has keystone distortion correct image with KEYSTONE adjustment BASIC OPERATION Press the FREEZE button on the Remote Control Unit to freeze the picture on screen This function is cancelled...

Page 23: ...To increase the volume point the arrow to and then press the SELECT button To decrease the volume point the arrow to and then press the SELECT button To cut off the audio sound point the arrow to Mut...

Page 24: ...system manually select the mode on the ON SCREEN MENU Display the SYSTEM being selected SYSTEM BOX The system being selected The systems on this dialog box can be selected Close the SYSTEM Menu Press...

Page 25: ...x 864 SXGA 2 1280 x 1024 63 48 79 35 SXGA 3 1280 x 1024 36 00 43 59 SXGA 4 1280 x 1024 64 20 70 40 SXGA 5 1280 x 1024 62 50 58 60 SXGA 6 1280 x 1024 63 90 60 00 SXGA 7 1280 x 1024 63 34 59 98 SXGA 8...

Page 26: ...he SYSTEM MENU P24 and 25 Press the MENU button and the ON SCREEN MENU will appear Press the POINT RIGHT LEFT button to select PC ADJUST and press the SELECT button Another dialog box Where to reserve...

Page 27: ...n the image has a dark bar s try this adjustment Clamp Adjustment of the area displayed with this projector Select the resolution at the Display area dialog box or adjust the number at the column of H...

Page 28: ...Quit Move the arrow to the color that you want to adjust Point to to lighten the color and select to deepen the color From 0 to 63 Each of the keys operates as follow Fine sync Total dots White balan...

Page 29: ...the Remote Control Unit 3 NOTE This menu cannot be operated when the input signal is from the COMPUTER INPUT 1 DIGITAL terminal or RGB HDTV720p HDTV1035i or HDTV1080i is selected on the SYSTEM MENU P2...

Page 30: ...the SELECT button The PICTURE POSITION dialog box will appear 1 2 Select the arrow to the direction described as or that you want to adjust by pressing the POINT UP DOWN LEFT RIGHT buttons and then p...

Page 31: ...ICK or POINT button To adjust the image to 1024 x 768 press NORMAL button To make the image into its original size select True in the dialog box When the original image size is larger than the screen...

Page 32: ...SOURCE Menu will appear Press the POINT DOWN button and a red arrow icon will appear Move the arrow to the source that you want to select and then press the SELECT button 1 2 This box indicates the V...

Page 33: ...er video image it is necessary to select a specific broadcast signal format among PAL SECAM NTSC NTSC 4 43 PAL M and PAL N Move the arrow to the Mode and press the SELECT button This box indicates the...

Page 34: ...n Blue Set On to reduce the noise rough parts of the image Noise reduction When selecting the custom setting dialog box will appear Move the arrow to the item that you want to change by pressing the P...

Page 35: ...SELECT button Another dialog box PICTURE SCREEN ADJUSTMENT DISPLAY will appear Press the POINT DOWN button and a red arrow icon will appear Move the arrow to the screen size that you want to set and t...

Page 36: ...reparation Display Our Logo Off sets the On Screen Displays disappeared except ON SCREEN MENU Power off message P TIMER Set the Pointer to the item and press the SELECT button This function turns the...

Page 37: ...like drawing the black curtains when the input source is turned into another one Remote control The Lamp age function is designed to reset the lamp replacement monitor timer When replacing the lamp re...

Page 38: ...a Personal Computer installation of the mouse driver not supplied is required Make sure that the mouse driver is properly installed in your computer And make sure that the mouse port of the computer c...

Page 39: ...2 The Removable Air Filter prevents dust from accumulating on the surface of the Projection Lens and the Projection Mirror Should the Air Filter become clogged with dust particles it will reduce the C...

Page 40: ...e Lamp Assembly is replaced When the Lamp Replacement Monitor Timer is reset the LAMP REPLACEMENT indicator stops lighting Turn the projector on and press the MENU button and the ON SCREEN MENU will a...

Page 41: ...dry cleaning cloth Avoid using an excessive amount of cleaner Abrasive cleaners solvents or other harsh chemicals might scratch the lens When the projector is not in use replace the lens cover 1 3 Lig...

Page 42: ...Y indicator will light green again and the projector may be turned on by pressing the power ON OFF button Check the TEMPERATURE WARNING indicator If the indicator flashes red the projector cannot be t...

Page 43: ...e difficulty We will advise you how to obtain service Remote Control Unit does not work Check the batteries Check the ALL OFF switch on the Remote Control Unit is set to ON Make sure nothing is betwee...

Page 44: ...D Panel System The specifications are subject to change without notice F 1 8 2 1 lens with f 48 4 mm 62 5 mm with motor zoom focus and shift 4 6 47 2 1 4 m 14 4 m 250 W RCA Type x 3 Video Y Pb Cb Pr C...

Page 45: ...3 4 5 6 7 8 COMPUTER INPUT 1 TERMINAL DIGITAL Terminal DVI 24 pin Connect the display output terminal of the computer to this terminal with the DVI cable not supplied 1 9 17 2 10 18 3 11 19 4 12 20 5...

Page 46: ...46...

Page 47: ...47...

Page 48: ...rned In all cases the product has undergone testing and quality inspection and Proxima s full warranty terms apply The end user s sales receipt or invoice showing the date of purchase of the product a...

Reviews: