


13
LOG PLACEMENT
WARNING
The positioning of the logs is critical to the safe and clean operation of this heater. Sooting and other problems
may result if the logs are not properly and
fi
rmly positioned in the appliance. Never add additional logs or
embellishments such as pine cones, vermiculite or rock wool to the heater. Only use the logs supplied with
the unit. Failure to position the parts in accordance with diagrams below or to use only parts speci
fi
cally
approved for this heater may result in property damage or personal injury.
Before you begin — This unit is supplied with
fi
ve ceramic
fi
ber logs. Do not handle these logs with your bare
hands. Always wear gloves to prevent skin irritation from ceramic
fi
bers. After handling the logs, wash your
hands gently with soap and water to remove any traces of
fi
bers.
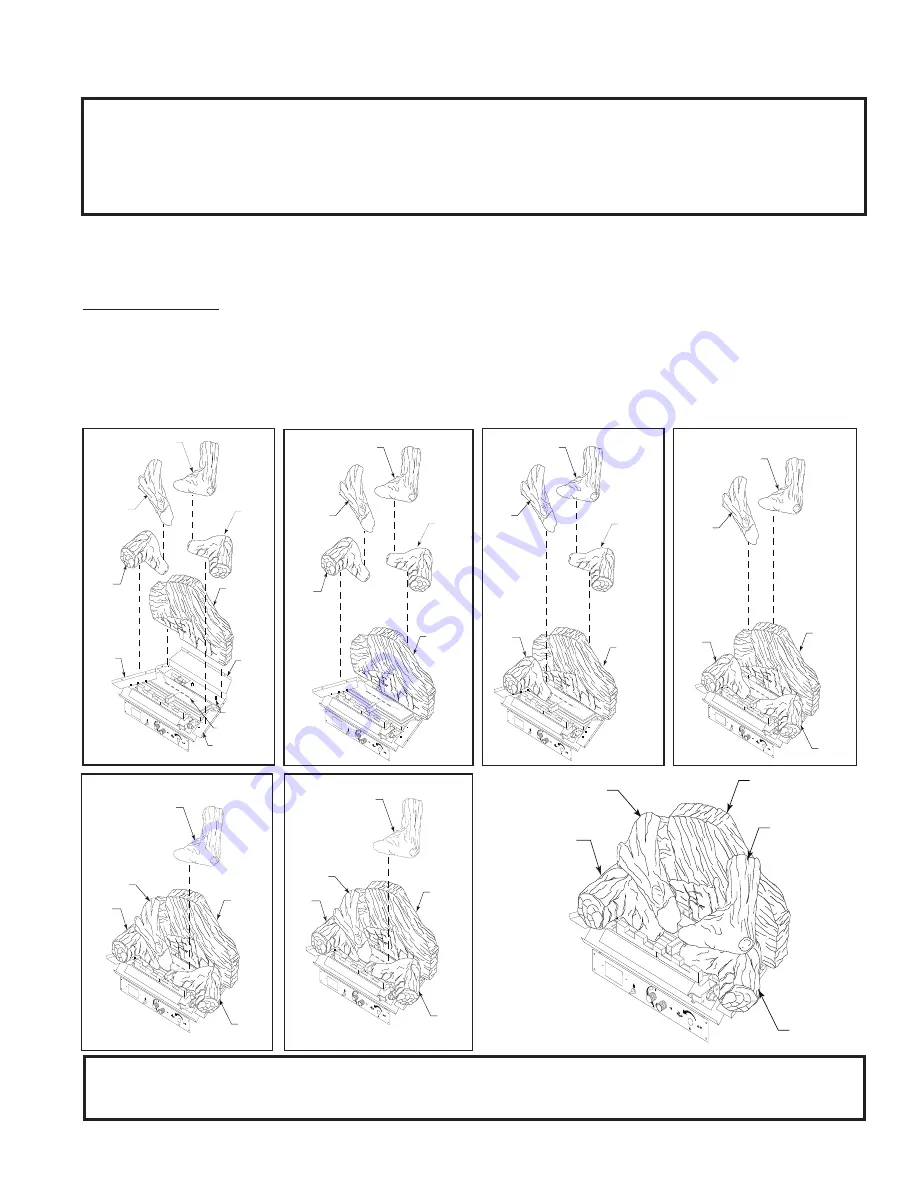
LOG PLACEMENT
NOTE: When placing logs DO NOT cover the burner ports.
1. To install the back log (#1), position on rear log support bracket and then press down over studs.
2. Install left bottom log (#2) on left log support bracket in front of back log.
3. Install right bottom log (#3) on right log support bracket in front of back log.
4. Install top left log (#4) on top of left bottom log.
5. Install top right log (#5) on top of right bottom log.
CAUTION:
During initial operation of the new heater, burning logs will give off a paper burning smell and orange
fl
ames
will be present. Simply open the windows for a few hours to vent the odor.
Left Bottom
Log #2
Back Log #1
Top Left
Log #4
Right
Bottom
Log #3
Right Top
Log #5
Rear Log
Support
Bracket
Left Log
Support
Bracket
Right Log
Support Bracket
PILO
T
OFF
Log Support
Bracket Studs
Burner Ports
Log #5
PILOT
OFF
Back Log #1
Left Bottom
Log #2
Log #4
Right
Bottom
Log #3
Top Left
Log #5
PILOT
OFF
Back Log #1
Left Bottom
Log #2
Log #4
Right
Bottom
Log #3
Top Left
Back Log #1
Top Left
Log #4
Right Top
Log #5
PILO
T
OFF
Left Bottom
Log #2
Right
Bottom
Log #3
Right
Bottom
Log #3
Left Bottom
Log #2
Back Log #1
Top Left
Log #4
Right Top
Log #5
PILO
T
OFF
Right
Bottom
Log #3
Left Bottom
Log #2
Back Log #1
Right Top
Log #5
PILO
T
OFF
Top Left
Log #4
PILO
T
OFF
Back Log #1
Top Left
Log #4
Left Bottom
Log #2
Right
Bottom
Log #3
Log #5