


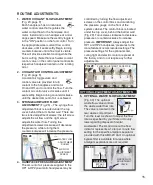
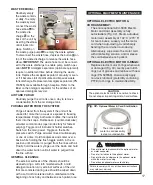


Waste pump is not working:
Optional electric motor control
panel does not light up when on:
Optional electric motor control
panel lights up when turned on,
but handpiece does not turn:
Optional electric motor slowing
down or sluggish:
Optional amalgam by-pass filter
leaks:
Optional electric motor
handpiece light does not turn on:
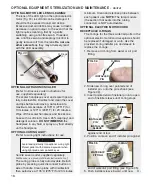
• Check to see if the optional amalgam separator is clogged by replacing it
with the by-pass filter.
• Press Standby Button on front panel.
• Check motor plug connection.
• Depress foot switch.
• Increase Speed.
• Increase Torque setting
• Check that a file is properly seated in the handpiece and
the latch is closed.
• Check for dirty, under-lubricated handpiece.
• Check if handpiece lubricant is draining into motor.
• After lubricating and before autoclaving, stand handpiece
on its base to let excess lubricant drain out.
• Check that the O-rings are properly installed onto ends of fittings.
• Press Illumination button to turn On.
• Increase light intensity setting on control panel.
21.
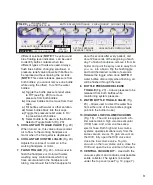
Problem:
Unit will not start:
Unit starts but trips circuit
breakers:
No water pressure:
Insufficient vacuum:
Insufficient handpiece operation:
No water to handpiece:
No coolant air to handpiece:
Unit is turning On and Off:
Correction:
• Check system power connection.
• Check voltage selector switch for proper voltage.
• Check circuit breakers.
• Check if waste tank sensor is connected.
• Check if waste tank is full.
• Check source circuit to see if it is a minimum of 15A.
NOTE:
Operating the unit off an extension cord is not recommended.
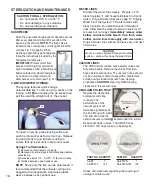
• Check water bottles for water level and verify that cap is tight.
• Check that water bottle pressure toggle is in the ‘On’ position.
• Check vacuum hose assemblies for blockage.
• Check amalgam collector for blockage. Empty/replace amalgam solids trap.
• Check that the waste container lid is properly seated and tightly secured.
• Check the pressure gauge on the front of the cabinet and ensure that
sufficient air is being delivered to the handpiece.
• Check that handpiece tubing is untangled and not crimped.
• Check handpiece connection for missing gasket.
• Check that the toggle on the foot control is to the ‘On’ position.
• Check that the control valve to the selected handpiece is open.
• Check that the toggle is in the ‘On’ position.
• Check that the flow control valve is open.
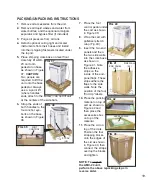
• Waste tank is full.
TROUBLESHOOTING:
OPTIONAL EQUIPMENT TROUBLESHOOTING: