background image

Installation Manual 


ASCO 5350 


Page 8 

ASCO Power Technologies 

381333-315 D 


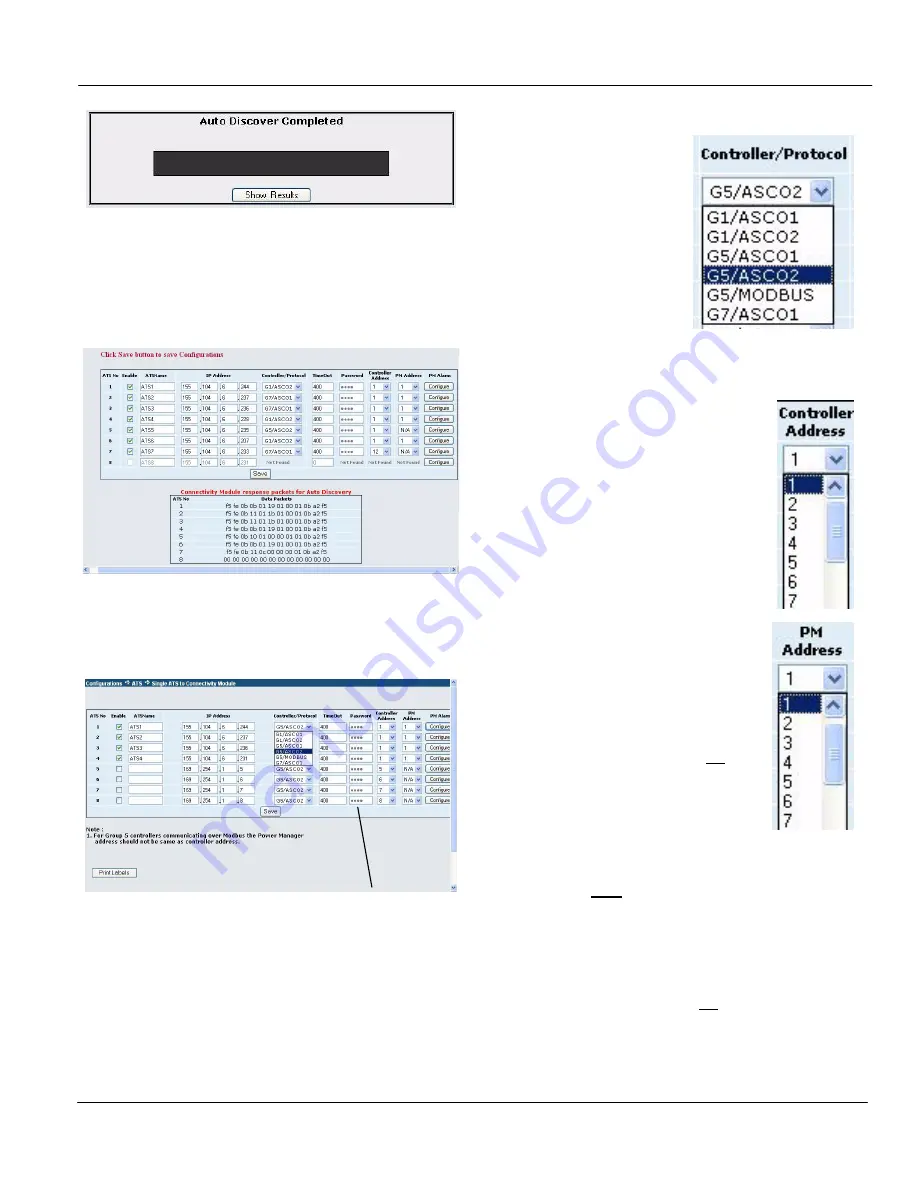
Figure 16: Auto Discover Completed 

2.


After auto discover is completed click 

Show Results

Many of the ATS configurations are automatically filled. 
Check the screen to be sure that all ATSs are found. If they 
are, proceed to step 5. See Figure 17 for an example. 


Figure 17: Auto Discover Results 

3.


To manually configure the ATSs click 

Manual

 on the 

Single ATS screen (Figure 14). See Figure 18. 


Figure 18: Manual Configuration 

4.


Click 

Enable

, enter the 

ATS Name

, and the 

IP Address

.  

On the 

Controller/ Protocol

 list, 

Controller Address

, and 

PM Address

, select the appropriate settings. See Figures 

19, 20, 21. 

For 7000, 4000 Series ATSs select 

G5/ASCO1

 or 

G5/ASCO2

ASCO1 is for baud rate x9600 

(ASCObus 1); ASCO2 is for 

baud rate 19.2K (ASCObus 2). 

For 

Modbus

, see 

Notes

 below. 

All ATSs must use the same 

protocol. Refer to G5 User’s 

Guide 381333-126. 
For Series 300 ATSs select 

G1/ASCO1

 or 

G1/ASCO2

. In 

the Group 1 Controller, 

visually determine the dash 

number on the 

microprocessor’s label (dash 

number 9 and higher is 

ASCObus 2). All ATSs must use the same protocol. For 

ASCO 940 and 962 ATSs select 

G7/ASCO1

Figure 19: 

Controller/Protocol 

manual selection 


Select the appropriate address that is set 
in the ATS controller (G1, G5, or G7). 


Figure 20: 

Controller Address


manual selection 


If a Power Manager (PM) is used, the 
address must be the same as the address set 
in the corresponding ATS controller. 

If 

G5/Modbus

 protocol is selected  

(Figure 19), the PM Address should not be 
the same as the address set in the Group 5 
controller. 

Figure 21: 

PM Address


manual selection 

Modbus Notes: 

The password entered (Figure 22) for each 

ATS must be the same as the password set in that ATS’s 
Group 5 controller. The passwords can be all the same or there 
can be 8 different passwords depending upon the passwords 
set in the G5 controllers. Refer to User’s Guide 381333-126. 

If the Group 5 password is not entered on the Configuration 
screen (Figure 18), the ATS Remote Annunciator will only 
show the status of the ATS.  It will not transfer the load.  No 
warning or indication of the reason will be shown.


For 7000, 4000 Series enter Group 5 Controller password

Summary of Contents for 5350

Page 1: ...light indicate switch status and position ATS switch position ATS source availability ATS alarm condition ATS time delay active Separate push buttons individually initiate transfer switch operation and testing ATS transfer test Transfer bypass cancel time delay Silence alarm Lamp test Reset The ATS Remote Annunciator can also be setup in multiple locations to monitor the same devices This arrangem...

Page 2: ...tings 1 A 110 220 V ac 50 60 Hz 1 Factory Default Information A label on the back to the ATS Remote Annunciator lists several important settings that you will need to do the configuration Write down this information below before installing it and after changing these settings IP Addr ______________ factory default 169 254 1 200 Login ______________ factory default admin and user see page 4 for Log...

Page 3: ...nals accept 30 to 12 AWG stranded flexible wire If the power wiring is solid wire pigtail it with stranded flexible wiring to the ATS Remote Annunciator Use a 3 mm flat screwdriver to tighten the power terminals screws to 5 in lb 0 5 Nm tightening torque To avoid shock burns or death deenergize all electrical sources before making connections 5 Internal Buzzer and Alarm Relay Refer to wiring diagr...

Page 4: ...P then click Properties 6 Set the IP setting of the laptop computer see Figure 2 IP Address 169 254 1 100 last digit must be different than ASCO 5350 Default IP Subnet Mask 255 255 0 0 same as ASCO 5350 Default Gateway leave blank This is needed only if communicating to a different LAN 7 Click OK and click Close Close the Local Area Connection window 8 Once the TCP IP setup is complete at the lapt...

Page 5: ...iguration 5 On the left pane under Configurations click Annunciator to configure the ATS Remote Annunciator See Figure 5 click Figure 5 Configurations Annunciator 6 The Configurations Annunciator screen appears See Figure 6 The configurations features are Annunciator name software upgrade IP address subnet mask gateway address port encryption buzzer mode Figure 6 Configurations Annunciator 2 1 Ann...

Page 6: ...e 8 Write which option is selected here___________________ Figure 8 Audible Alarm buzzer Mode The buzzer sounds in one second pulses not adjustable In the Continuous mode the pulsing buzzer sounds continuously on off cycles In the Periodic mode the duration of the pulses and interval between pulses can be set as follows Duration On Time 0 2400 minutes Interval Off Time 1 60 minutes See Figure 9 Fi...

Page 7: ...The Configurations ATS screen appears See Figure 13 Select either Single ATS or Multiple ATS based upon the communication architecture of the ATSs and press the corresponding Go button under the selection Single ATS connected to one Connectivity Module CM each ATS having its own Connectivity Module Multiple ATS connected to one Connectivity Module all ATSs connected through a single Connectivity M...

Page 8: ...ine the dash number on the microprocessor s label dash number 9 and higher is ASCObus 2 All ATSs must use the same protocol For ASCO 940 and 962 ATSs select G7 ASCO1 Figure 19 Controller Protocol manual selection Select the appropriate address that is set in the ATS controller G1 G5 or G7 Figure 20 Controller Address manual selection If a Power Manager PM is used the address must be the same as th...

Page 9: ...PM is provided with an ATS the PM s eight Status Inputs can be configured to signal an alarm at the ATS Remote Annunciator At the PM the Status Input must be set to ACTV on Refer to PM manual 381333 199 1 Be sure that a PM Address has been set Figure 21 Then click the Configure button Figure 23 next to PM Address 2 The first row top is for PM Status Input 1 Click Enabled 3 Next enter a name in the...

Page 10: ...creen 2 Alarm On the left pane under Diagnostics click Alarm to see the status of all ATS alarms that are configured See Figure 28 click Figure 28 Diagnostics Packet The Diagnostics Alarm screen shows if there any of these ATS alarms Communication Error ATS Locked Out 7ADTS 4ADTS Failure to Synchronize 7ACTS 4ACTS and Extended Parallel 7ACTS 4ACTS See Figure 29 Based upon which alarm has occurred ...

Page 11: ...ear a beep ATS Annunciator could have changed to default settings Refer to Installation Manual 381333 315 Use the configuration details entered on page 2 reconfigure the ATS Annunciator Password not set The password must be configured See Modbus Notes on page 8 5 Buzzer is beeping continuously Communication with the Power Manager may have stopped Refer to Installation Manual 381333 315 Check the E...

Page 12: ...ler password 8 custom ATS labels 2 D diagnostics 10 digital input 10 discover 11 F factory default information 2 firmware update 5 functional test 4 G gateway address 2 4 6 Group 5 controller 8 H HELP 800 800 2726 ASCO customercare asco com I initial checks 4 installation 3 internal buzzer and alarm relay 3 Internet Protocol 7 IP address 2 4 5 6 K key switch Control 11 refer to User s Guide 381333...

Reviews: