background image

Standalone DVR

z

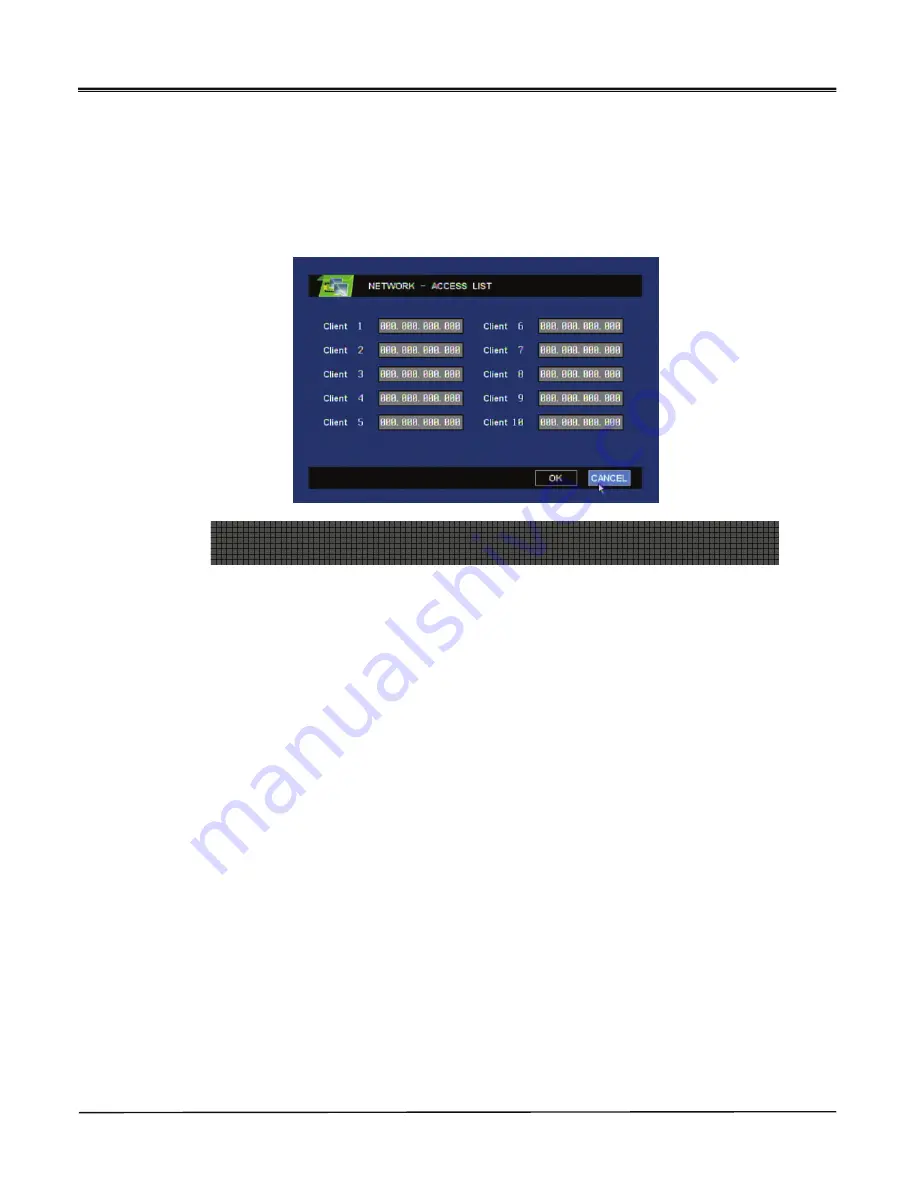
Access list 

¾

System can limit remote-PC, accessing network. 

¾

Able to register Static IP and only remote-PC with registered IP can access system.

NOTE  : the system restricts all the other IPs, those are not registered  if you once register an IP. If you want 
to access with all IP addresses, do not register any IP.  

NOTE  : the system restricts all the other IPs, those are not registered  if you once register an IP. If you want 
to access with all IP addresses, do not register any IP.  

49

Page:     

User Manual Ver. 1.3

Summary of Contents for X3NS Series

Page 1: ...X3NS Series DVR Please read this manual before using your DVR and retain it for future reference User s Manual ...

Page 2: ...ing 15 Search 16 Playback 17 Backup 18 PTZ 24 Audio 26 Log View 26 Remote control ID 27 SPOT 25 Chapter 4 System Setup Chapter 5 Firmware Upgrade 28 55 Chapter 6 CMS Display Mode 58 CMS Setup Mode 67 Sequence 27 CMS Setup Mode 67 CMS Search Mode 81 Chapter 7 CMS eMAP Editor Viewer 91 Chapter 9 web CMS 102 Chapter 8 CMS Remote Update 95 2 Page User Manual Ver 1 3 Chapter 10 MISC 104 Chapter 9 web C...

Page 3: ...or replacements necessitated by any cause as listed below 1 improper installation 2 acts of nature 3 id t 3 accident 4 lack of proper maintenance 5 voltage fluctuations 6 unauthorized repair or modifications For more details on the limitation of warranty refer to entire limited warranty as appendix at the end of this manual Service Information To avoid additional defects do not attempt to repair t...

Page 4: ...nsmitted video monitoring of ST DVRs up to 64 channels through CMS software network High speed network video monitoring by internet explorer through WEB CMS server within the system z System Design Watchdog function for hardware software error Robust design for physical impact and temperature Generating 30 different types of network massages for system errors Application of low power and low heat ...

Page 5: ...mote upgrade using CMS Free alarm max 30secs port alarm max 120secs recording Watermarking Private backup viewer E Map s layout mapping able to install maximum 4 HDDs or 1 ODD and 3HDDs able to install maximum 4 HDDs or 1 ODD and 3HDDs 5 Page User Manual Ver 1 3 ...

Page 6: ...Standalone DVR Chapter 3 Basic Product Operation Chapter 3 Basic Product Operation 6 Page User Manual Ver 1 3 ...

Page 7: ...rward Frame by frame play forward on playback Stops playback and converts to surveillance mode Max x 128 play backward frame by frame play backward on data playback Pause and playback the image Pause button 1ch 4ch 9ch 16ch division button 16ch REAR PANEL I O Description REAR PANEL I O Description 1 VIDEO IN BNC 16PORT 2 LOOP OUT 75Ω ON OFF 3 AUDIO IN 16 PORT 4 ALARM SENSOR RS 485 Connect Port for...

Page 8: ...nce button 1 division or 4 division rotating surveillance 10 Move button Moves to setup and menu Operates PTZ camera 11 Enter button Inputs setup value 12 Search button Searches saved data 13 Log button Shows DVR system logs 14 Play backward button Max x 128 play backward 15 Pause button 17 Stop button Stops playback and converts to surveillance mode 16 Play forward button 15 Pause button Pause pl...

Page 9: ...ystem Æ shutdown select Shutdown and press ENTER OK button select ENTER OK button after the message system will shutdown Press ENTER OK button press the power switch at the back to be Off press the power switch at the back to be Off System Login zInput password Input the password using number buttons at the password box The default value is 0000 9 Page User Manual Ver 1 3 ...

Page 10: ...k Speed play backward Double speed playback PTZ indication Double speed play backward Triple speed playback Triple speed play backward Coverted Channel HDD status HDD indication hard disk 1 h d di k 2 Slide bar CMS connection status USB device connection status D t ti Mouse hard disk 2 hard disk 3 hard disk 4 color icon indications Green HDD installed Active Blue recording in progress Date time Ba...

Page 11: ...ss this button shifts to the next channel each time you press this button If you press a channel number button on remote controller while being displayed in the current quad screen the selected channel turns full screen 1 6 If you press another channel number that is not being displayed in the current quad screen it turns another quad screen including the channel you selected 11 Page User Manual V...

Page 12: ...n mode press this button z POP screen mode only for 9Ch 16Ch products press POP button it will display a certain channel larger than other channels zOSD mode press OSD button icons and channel status phrases will appear or disappear OSD button or OSD 12 Page User Manual Ver 1 3 ...

Page 13: ...will be exchanged 3 If you press a channel number button on the controller the channel will be displayed in small screen Ex PIP Button PIP Button Ex Cam 6 Button Cam 6 Button 4 you can move the small screen using arrow buttons z Sequence playback screen mode If you press SEQ button full screen or quad screen will be displayed in sequence you can setup duration time at system menu 13 Page User Manu...

Page 14: ...ed channel in full screen mode sequence single l b k h h l i f ll d i playback each channel in full screen mode in sequence you can setup duration time at system menu sequence quad playback channels in quad screen mode in sequence No Camera 1 Camera 1 Camera 4 2 Camera 5 Camera 8 3 Camera 6 Camera 9 Quad No Camera 1 Camera 1 Camera 4 2 Camera 5 Camera 8 3 Camera 9 Camera 12 you can setup duration ...

Page 15: ...on one more time z press ENTER OK button it shows the selected area bigger like the images below Z F Z F Recording z press REC button to start recording Check before recording 1 Check if hard disk is formatted 2 Check the camera output 2 Check the camera output 3 Check if each channel names are correct 4 Set each channel s recording quality 5 Set each channel s recording frames 15 Page User Manual...

Page 16: ...you can see calendar menu like below if you select Search by calendar 2 select the date and time using arrow keys Press ENTER OK button 3 lastly select ENTER OK and press ENTER OK button z Search by event 1 you can see the menu like below if you select Search by event 2 input the beginning date time and ending date time to search 3 select channels to search 4 select events to search O 5 lastly sel...

Page 17: ...troller Select SHOW HIDDEN CH Hidden channels will be displayed Playback Playback z press Playback button to start playback from the recent part of recording z you can choose various playback screen modes by screen mode buttons Rewind Frame playback Rewind during playback Playback by frame during pause Playback Playback and pause the recorded 17 Page User Manual Ver 1 3 Playback screen Fast forwar...

Page 18: ...put the date time to finish backup 4 Select BACKUP and press ENTER OK button 5 Backup password window will show up and ask you to input the password You must remember this password and you will be asked to input this password when you playback the data NOTE 1 Both Admin and user can backup the data with this function Admin can backup and p p playback the hidden camera data but user can t access to...

Page 19: ... not remove USB device during Backup Note In case backup data file size is too small then backup will be completed shortly without showing this progress window without showing this progress window 19 Page User Manual Ver 1 3 ...

Page 20: ... Æ click again finish 3 th l b k i b fil 3 save save the playback images as bmp file 4 Print screen image 5 watermark check if there is any modification of data 6 playback playback the backup data playback pause speed playback playback by frame 20 Page User Manual Ver 1 3 7 division 1 division 4 division 9 division 16 division 8 status box display the status of backup viewer ...

Page 21: ... with this function Admin can backup and playback the hidden camera data but user can t access to backup the hidden camera data 2 Backup password is not related with DVR password you can input the virtual password for backup only and it must be 4 digit numbers 4 After it completes to load the backup file you can playback it and save it as bmp files 21 Page User Manual Ver 1 3 3 This function is av...

Page 22: ...ata 2 Select and playback the channel which audio is saved it playbacks audio data at the same time 1 Save backup data 2 Select screen division 3 Click save button 4 Name the Bmp file and save 22 Page User Manual Ver 1 3 Image of saved bmp file as 9 division screen ...

Page 23: ...arking 2 Click watermark check button 3 Click playback or speed playback button 4 It shows the image with error message if there is any modification of data It shows ENTER OK in the status box if there is no modification of data 23 Page User Manual Ver 1 3 ...

Page 24: ...other channels by number button on remote controller Z Z zPTZ ADVANCE 1 adjust focus Focus in Focus out AUTO Auto focus mode 2 Iris control Open iris Close iris AUTO Auto iris mode 3 operating speed increase the speed decrease the speed decrease the speed 4 preset scanning shortcut NOTE you can set Preset at System menu NOTE you can set Preset at System menu 24 Page User Manual Ver 1 3 Menu camera...

Page 25: ... at the front panel select SPOT to setup COVERT ON zSPOT OUT DISPLAY COVERT ON NO IMAGE IS SHOWN 25 Page User Manual Ver 1 3 Note Refer to page 30 in User Manual to select Spot out channels Screen display setup spot sequence scanning full screen Screen display setup spot sequence scanning quad screen ...

Page 26: ...audio in full screen mode Log View FUNCTION h h l z search the system event log 9 event type select types of event to search 26 Page User Manual Ver 1 3 9 event type select types of event to search 9 from input date time to start searching 9 to input date time to finish searching z select Search and press ENTER OK button to start log search ...

Page 27: ...roller s ID does not match with DVR ID Then you cannot operate z It will turn red if remote controller s ID does not match with DVR ID Then you cannot operate the DVR z you can set the DVR IDs at System menu menu system miscellaneous tti t t ll ID R 01 z setting up remote controller ID 1 press DVR ID button on the remote control 2 it will beep Then you can input Remote control ID 3 press the DVR I...

Page 28: ...Standalone DVR Chapter 4 System setup Chapter 4 System setup 28 Page User Manual Ver 1 3 ...

Page 29: ...SEQ QUAD SPOT SEQ FULL SPOT SEQ QUAD MISC GENERAL PTZ PRESET TOUR COLOUR POSITION PROPERTY SCHEDULE MISC MOTION SENSOR VLOSS E MAIL MISC SETUP DDNS CLIENT ACCESSLIST SERVER CONFIG TIME SOFTWARE MISC USER SHUTDOWN HDD FORMAT AUTO BACKUP z How to use Menu 9 you can move menu cursor using arrow buttons 9 press ENTER OK button to activate the selected menu or to go to sub menu 9 9 press Menu button to...

Page 30: ...ancel or Menu buttons z Text input box 1 select letters symbols using arrow buttons 2 press ENTER OK button to select the letter symbol p y 3 the selected letters symbols will show on the top text box Ex z Moving to the next menu page 30 Page User Manual Ver 1 3 1 8 9 16 Press or button to move to the next menu page ...

Page 31: ...cate the name of each channel 9Camera boarder indicate the boarder line of each channel 9L l t l 9Language select menu language 9Left margin adjust the left margin of OSD 9Right margin adjust the right margin of OSD 9Top margin adjust the top margin of OSD 9Bottom margin adjust the bottom margin of OSD Top margin Left margin Right margin 31 Page User Manual Ver 1 3 Bottom margin ...

Page 32: ...m 99 second NOTE can input maximum 99 second zScreen display setup live sequence scanning quad screen Setup duration time for live sequence scanning in quad screen NOTE can input maximum 99 second NOTE can input maximum 99 second Default Quad screen number camera 1 Camera 1 Camera 4 2 Camera 5 Camera 8 3 Camera 6 Camera 9 Quad screen number camera 1 Camera 1 Camera 4 2 Camera 5 Camera 8 9ch 32 Pag...

Page 33: ...sequence scanning quad screen Setup duration time for spot sequence scanning in quad screen NOTE can input maximum 99 second NOTE can input maximum 99 second Setup duration time for spot sequence scanning in quad screen Default Quad screen number camera 1 Camera 1 Camera 4 2 Camera 5 Camera 8 8ch Quad screen number camera 1 Camera 1 Camera 4 2 Camera 5 Camera 8 3 Camera 9 Camera 12 33 Page User Ma...

Page 34: ...Deinterlace prevent screen twittering during playback of image which is recorded in low frame rate and 720X480 or 720X576 resolution zVGA frequency setup the frequency of connected VGA monitor 800 600 1024 768 34 Page User Manual Ver 1 3 1024 768 1280 1024 ...

Page 35: ...tup general title input channel names SHOW show or hide channels audio select connected audio channels zCamera setup PTZ ID input camera IDs protocol select the registered protocol baud select the registered baud 35 Page User Manual Ver 1 3 ...

Page 36: ...preset positions of camera check if camera supports preset function before setting up can setup 64 preset positions for each channel 1 Select camera 2 Select Set button 3 Then the channel turns PTZ mode 4 Move the camera to get the position you want 9 camera select cameras to setup preset positions 9 page move to the next page 9 clear all clear all the setup values g p y 5 Press ENTER OK button to...

Page 37: ...st for each channel camera select a camera to set scan point list select a list to save scan point NOTE you can setup total 4 lists one scan list is consist of total 16 preset position NOTE you can setup total 4 lists one scan list is consist of total 16 preset position preset select preset position you want clear all clear all setup values Ex Camera 1 will move following the path as below PTZ01 Æ...

Page 38: ...adjust color brightness contrast adjust color contrast color adjust camera color default value set it as default value zCamera setup position zCamera setup position camera select a camera right left move the camera to right and left default value set it as default value 38 Page User Manual Ver 1 3 ...

Page 39: ...lution set recording resolution for each channel 352 x 240 352 x 288 Recording quality Display quality HDD capacity needed quality set recording quality for each channel needed Basic Low Small Normal Normal Medium High Good Large best Very good Very large 39 Page User Manual Ver 1 3 Frame rate set frame rate for each channel ...

Page 40: ...tem records according to set schedule see below to see how to set up schedule I C continue E event Blank Not recording 1 Select a channel to set up schedule 2 Select day time to record and press ENTER OK button 3 it shifts to different type as you press ENTER OK button 40 Page User Manual Ver 1 3 ...

Page 41: ...recording while it is in process as it continuously records watermark activate watermarking function Note when setting as on for Water Mark option all recording files are applied with watermarking this recorded file can be checked at Backup Viewer if someone is altered or edited recorded file with intentional purpose please check out Backup watermark section of user manual 41 Page User Manual Ver ...

Page 42: ...R side DVR alerts by message pop up beep sound or E mail notification You must setup event recording on schedule record setup to use this function z Event Setup Motion Motion area select detecting area 1 all detect the whole camera screen 2 part detect motion detection area Motion detection area 3 off no motion detection 42 Page User Manual Ver 1 3 sensitivity select a level of detection sensitivi...

Page 43: ...lect sensor type alarm out activate alarm out on sensor detection zEvent setup VLOSS Video Loss ALARM OUT select alarm port NONE disable alarm out PORT 1 4 select alarm out port to generate beep sound Multi multiple camera mapping on alarm out to generate beep sound 43 Page User Manual Ver 1 3 ...

Page 44: ...ction DVR NAME input DVR name showing on E mail E MAIL ADDRESS input E mail address maximum 3 Note when you apply this function on frequent motion detection or sensor detection it will cause a lot of E mail transmission then it will affect to DVR system performance Therefore we suggest you to escape this kind of case EX E mail notification you would receive EX E mail notification you would receive...

Page 45: ...ime setup duration to activate alarm out on the selected event detection EVENT POPUP select on to enable message pop up on the selected event detection POPUP OUT select type of video out for message pop up VGA or SPOT POPUP Sequence time setup POPUP sequence time 1 10sec z HDD Failure alert by E mail notification When HDD fails the system alerts by error message pop up beep sound as well as E mail...

Page 46: ...ide external USB TYPE storage You can backup data using TYPE set operation types of AUTO BACKUP 1 OFF turn off AUTO BACKUP function 2 EXTEND when local hard is full it will copy old data to USB hard to extend data save time USB1 4 select HDD of connected USB type FORMAT format HDD of connected USB type PASSWORD Backup password Temporary SHOW show saved file info of HDD of connected USB type 46 Pag...

Page 47: ...lone DVR Network zNetwork setup static input static IP address and gateway net mask DHCP system automatically recognizes IP address PPPOE ADSL only input registered ID and password 47 Page User Manual Ver 1 3 ...

Page 48: ...er password input password registered to server group ID input group ID registered to server status indicate operation status of DDNS test try to connect with ID and password registered to server password input password to connect to CMS S W same as CMS Administrator s passwoard client port select port to connect zClient client port select port to connect web port select web port to connect to web...

Page 49: ...em NOTE the system restricts all the other IPs those are not registered if you once register an IP If you want to access with all IP addresses do not register any IP NOTE the system restricts all the other IPs those are not registered if you once register an IP If you want to access with all IP addresses do not register any IP 49 Page User Manual Ver 1 3 ...

Page 50: ...r CC IP input connection info of CAMS CC PORT input connection port of CAMS CC default value 6500 CMM IP input connection info of CAMS CMM PORT input connection port of CAMS CMM default value 7600 50 Page User Manual Ver 1 3 ...

Page 51: ...set values for menu to USB storage NOTE you can save the set values for menu to USB storage Load configuration loads saved configuration information Save configuration save the values set in the current menu Default value set it as default value 51 Page User Manual Ver 1 3 ...

Page 52: ... YY MM DD 2008 03 03 MM DD YY 03 03 2008 DD MM YY 03 03 2008 classification display AM PM 01 39 01 PM 24 HOURS 13 39 01 Time format select time format to display 24 HOURS 13 39 01 Day Light Saving Time zone Select the time different from standard time of Time Server then check automatically the check box of on off option 52 Page User Manual Ver 1 3 ...

Page 53: ...NOTE be cautious when you change system time Because if you set the system time earlier than the time originally set the saved data after changed system time will be deleted Change time change system time zSystem USER Password management 9 ADMIN password change the administrator password 9 ADMIN password change the administrator password 9 NETUSER password from network user password by CMS 9 USER ...

Page 54: ...emote controller ID input remote controller ID 9 KEYBOARD control the system using keyboard contoller 9 Key tone set buzzer sound on off 9 Key tone set buzzer sound on off zSystem System shutdown Select System shutdown If you see the message system will shutdown you can shutdown system 54 Page User Manual Ver 1 3 ...

Page 55: ...Standalone DVR Chapter 5 Firmware Upgrade Chapter 5 Firmware Upgrade 55 Page User Manual Ver 1 3 ...

Page 56: ... by internet connection USB upgrade NOTE The firmware file should be saved in route directory of the USB device NOTE The firmware file should be saved in route directory of the USB device 2 Connect USB memory stick to system USB port 3 Press Menu button and move to the next software menu system software 4 You will see a new box if you select Upgrade 5 You will see menu like below if you select USB...

Page 57: ...ct Upgrade z Network upgrade 3 Select Network upgrade 4 Select Server IP with firmware file and file name then select ENTER OK 5 You can manually input server IP and file name if the system appointed server IP and file name is different is different 6 System will automatically reboot after upgrade is completed 57 Page User Manual Ver 1 3 ...

Page 58: ...Standalone DVR Chapter 6 CMS Display Mode p p y Display Mode Setup Mode Search mode 58 Page User Manual Ver 1 3 ...

Page 59: ...em E Map Monitor DVR sites Camera Sensor and Control through E MAP Start can execute overall CMS functions such as log in out Setup Search E Map Monitor DVR sites Camera Sensor and Control through E MAP Log Viewer can check or print Log file in the CMS system Log out Log in out 59 Page User Manual Ver 1 3 ...

Page 60: ...30 14 DVR System time E Map Click this button to enable E MAP Print Click the button to print the image Snapshot Click the button to save the appropriated image Location for saving C CMS_2KV3 Image E Map Print Snapshot button shown on one division screen Screen Switch on Display mode put the mouse on the screen and click right mouse button and drag to the desired screen to display ap t S aps ot bu...

Page 61: ...set Setting after selecting Preset click SET button User move PTZ on the direction of up down left right with Zoom In Out to the position which user want to move and then click Set Button and then click Set Button Preset setting can be available up to 64 times Preset Operation select Preset at PTZ Main controller and then inp t Preset n mber at 61 Page User Manual Ver 1 3 Preset Operation select P...

Page 62: ... order of the left image menu select Preset number dwell time ScanPoint can be set up to 4 times per camera ScanPoint Operation Select ScanPoint at PTZ Main controller input ScanPoint number on number and then click RUN Button can be operation for Scanpoint function 62 Page User Manual Ver 1 3 ...

Page 63: ...cting screen or list Single Multiple Mode Click the button to activate single or multiple mode as pre memorize access Connection Click the button to connect or disconnect to DVR DVR list Monitor each screen in order without extra display setup Remote Setup Click the button to use remote setup for selected DVR Remote Search Click the button to use remote search for selected DVR E map Click the butt...

Page 64: ...utton of sensor g and control to activate Screen Division Various surveillance modes available through division buttons Status Status List Click the button to check the details of event message Status List It represents the event message of CMS program 64 Page User Manual Ver 1 3 ...

Page 65: ...send request to DVR site Audio chat button will be flashed on off on DVR site by requesting audio communication from CMS Setup the port for 2way audio communication Control the setup and volume of microphone by volume button Digital Clock It represents the date of CMS system Display format can be changed System Utility Search access to various search mode general search special h l ti lti ti d h b...

Page 66: ... position of DVR Camera Sensor and Control through E MAP Log Viewer Check Log file in the CMS system by clicking the button Logout log in or out shutdown EMC Standby cancel the program Default User ID administrator Password 1234 Ask administrator or dealer if you forgot ID or PW 66 Page User Manual Ver 1 3 ...

Page 67: ...Standalone DVR Chapter 6 CMS Setup Mode Display Mode Setup Mode Search mode 67 Page User Manual Ver 1 3 ...

Page 68: ...istered user list It represents the group of registered users Register new user Register new user click this button to add new user and click Apply Privilege you can assign different privilege to each user My image change the image with that you prefer such as company logo 68 Page User Manual Ver 1 3 ...

Page 69: ... site list It represents registered DVR LIST IP address of my computer It represents IP information of CMS System DVR Info Input the information of Network connection as DVR is registered Add site Input Site name DVR Type PORT and Site IP 69 Page User Manual Ver 1 3 ...

Page 70: ...Modem on OS and this button will be enabled Adjust the time for retrying connection If there is no response from the site system the system will retry connection as you set up N I O h th f d t l D bl li k E t d it Name I O you can change the name of sensor and control Double click Enter name and it will be enabled to put the name 70 Page User Manual Ver 1 3 ...

Page 71: ...ion of CMS currently using click Send site version to show y g the information of site version DVR Info shows the information of connecting site program version time capture card type the number of sensor and control 71 Page User Manual Ver 1 3 ...

Page 72: ...on on the LIST Setup Pre Memorize Display list can be generated by clicking and after setup display SCREEN Info Select DVR name and camera after selecting Display List to monitor the appropriate image PTZ info Check the information of PTZ setup of each DVR 72 Page User Manual Ver 1 3 ...

Page 73: ...DVR Recording Schedule setup save schedule for the selected DVR from the DVR Select DVR to save from DVR List Drag or click to select the date time to change the schedule Click C Continue N Not Recording buttons to change the schedule 73 Page User Manual Ver 1 3 ...

Page 74: ...ata from Installed drive s list 2 Click Add Disk button to add it as Save drive you can use Recycle drive function when you added more than 2 drives Setting up Network Drive 1 Checkmark Network Drive and click Network Drive Add button 2 Network Drive will be generated Then Click Add Disk button to add it as Save drive from the list You cannot use Recycle drive function 74 Page User Manual Ver 1 3 ...

Page 75: ...creen or single screen Enable alarm sound checkmark to enable alarm sound when EMC is activated Open the Enable alarm sound checkmark to enable alarm sound when EMC is activated Open the folder and select wave file EMC activation after setup is completed go to monitoring mode Click log out button and you can see EMC standby button Select it it will go to EMC mode EMC icon will be generated on the ...

Page 76: ...Standalone DVR EMC single screen pop up automatically pop up with site name and camera number 76 Page User Manual Ver 1 3 ...

Page 77: ...e from latest registry backup file in case of system shutdown changes Restore setting value from latest registry backup file in case of system shutdown changes in system setting value or other functions you can restore the latest setting value Send list message board to recycle bin send the all messages on Message board to recycle bin Backup Log shutdown all the generated log files Auto reconnecti...

Page 78: ...he network Select a camera to setup 2 Camera name change the camera name and adjust color brightness contrast of the camera 3 Use Motion select the full or part of motion area and also control motion sensitivity 4 Color control color bright and contrast 78 Page User Manual Ver 1 3 5 Use PTZ select PTZ and put the address ...

Page 79: ...vidual camera recording setup select image quality frame rates for each camera SCHEDULER 79 Page User Manual Ver 1 3 1 Recording schedule select a date of a week and setup recording schedule Selected value will be shown in red mark Click All to apply the same setup for all cameras ...

Page 80: ...DVR name program version 80 Page User Manual Ver 1 3 2 Network info shows network connection information such as IP address subnet mask gateway 3 User info shows user list of the connected DVR You can change password register new user delete user depends on user privilege 4 Network Transmission Speed Setup Network transmission speed ...

Page 81: ...Standalone DVR Chapter 6 CMS Search Mode Chapter 6 CMS Search Mode Display Mode Setup Mode Search mode 81 Page User Manual Ver 1 3 ...

Page 82: ... Select the date to search and then system will start to load data Search select a folder to search data Time table after data loading is completed the data save location will be shown on the time table You can select camera and time to playback System Utility buttons access to Special Search and Save function Special Search provides real player multi time player day search object search Click OPE...

Page 83: ...mes x5 If you want to go back to the 16division mode d bl li k i ht b tt double click right mouse button 00 00 00 093 M hour minute second millisecond recording mode Digital Clock Calendar Digtital Clock displays current time of the system Calendar the date has save data is showed in orange color If you select the date it is selected with white square box Search indicates today s calendar Select t...

Page 84: ...i d th Event data cell each event data cell indicates different recording mode so you can find the event type easily on the time table Blue Instant recording Light blue Pre Recording Violet Intensive sensor recording S light red Audio recording Pink Sensor recording Red Continue recording recording Brown Intensive motion recording Yellow Motion recording Screen division buttons Playback scroll bar...

Page 85: ...Play forward per frame Move to the last image of the data Special search click Special search button and open the sub menu to access to the advanced search tool Real time player Multi time Player Day search Object Search General search you can set as continue motion sensor instant pre recording audio intensive all 85 Page User Manual Ver 1 3 ...

Page 86: ...ore data save process Save file folder you can select the folder to save Click the folder icon on the left it shows all the folders to save Default is C DVR_Site2 and file name is the time of data save It can be changed by administrator Size of save device displays total size of data you can calculate the device capability Watermarking setup check it to apply watermarking technology In case of wat...

Page 87: ...e playback screen 3 Day Search you can search a day of data 00 00 23 59 per camera by hour by minute For example if you want to see the data by minute select one screen of specific time by mouse double click If you want to go back to the previous step click RETURN icon If you want to go back to the previous step click RETURN icon Not Found will be shown if there is no data on that time zone 87 Pag...

Page 88: ...to 24 Default is 13 SEC MIN select search by minute or by second Time Scope setup searching time Scan button click the button when you designate the area and click again to start search Scan button click the button when you designate the area and click again to start search Result search result will be shown Click each result to check the movement If you click playback control button you can do no...

Page 89: ...back screen displays playback image of the screen Digi clock Calendar digi clock shows current system time The date which has save data is Digi clock Calendar digi clock shows current system time The date which has save data is shown with different color Select the date to search and then system will start to load data Time table after data loading is completed the data save location will be shown...

Page 90: ...Standalone DVR Recording event Search by event It playbacks only the selected event data if you checkmark Event Mode Real Time Play playback Audio and Video data in real time 90 Page User Manual Ver 1 3 ...

Page 91: ...P file will be open Default E MAP FILEÆSITE 100 Editing E MAP Default E MAP FILEÆSITE 100 2 SITE NAME should be the same as the name of the E MAP The below warning message is shown as the SITE NAME and EMAP name are not the same 3 Click OK button E MAP Viewer window will be open Click Editor button 3 Click OK button E MAP Viewer window will be open Click Editor button 91 Page User Manual Ver 1 3 ...

Page 92: ...t mouse button can be clicked on the arranged cameras to change the direction or to change the original image to PTZ camera image 7 Click SITE INFO button to add additional information on the DVR site 8 Save the file in the EMAP folder in the directory where CMS_2 is installed ex C CMS_2KV3 emap 9 User can remove the arranged icons to drag them to 92 Page User Manual Ver 1 3 ...

Page 93: ...Click CMS MAP button and operate E MAP Viewer 2 Click Editor button 3 Click File Æ NEW and select bmp JPG file for E MAP 4 Once bmp JPG file is open SITE icons can be located on the map by using Site button 5 Double click the located Site icons Property window will appear 6 Input the Site name that was saved in SITE MAP SITE MAP will be linked with CMS MAP If an event occurs at Site relative Site ...

Page 94: ...p file or EMAP file 4 PASTE MAP Paste copied file 4 PASTE MAP Paste copied file 5 DELETE MAP Delete currently displayed map 6 DELETE OBJECT Delete selected icons 7 Select All Object Select all the icons on the current map Map Mode 1 SITE MAP Change Editor mode to SITE MAP 2 CMS MAP Change Editor mode to CMS MAP View 1 CAMERA STATE Camera information can be viewed 2 CONTROL STATE Control informatio...

Page 95: ... 8 325 version consultation you can check the version as follow CMSÆSTARTÆSETUPÆon left top screen you cannot use firmware update function if it is an earlier version 3 check if you have the upgrade file from supplier or dealer consultation the upgrade file name is gz file Dealer or supplier will not be responsible for problems caused due to changes of file made by user 4 if you made all request f...

Page 96: ...e selected DVR 8 After uploading the INFO window will pop up If you click Yes it will start updating the DVR if you click No it will cancel the update consultation After completing the DVR update it will disconnect with CMS You can connect to CMS after 96 Page User Manual Ver 1 3 consultation After completing the DVR update it will disconnect with CMS You can connect to CMS after about 3 minutes a...

Page 97: ...splay the update file folder that you selected 3 display uploading status of update file 4 display the uploading progress of update file by 5 display the update DVR IP information 6 select update file location 7 upload the file on the DVR to be updated 8 cancel file uploading 97 Page User Manual Ver 1 3 ...

Page 98: ...SYSTEM Æ check NS DVR version at DVR Setup 2 check if the version of CMS is later than 3 1 8 325 version consultation you can check the version as follow CMSÆSTARTÆSETUPÆon left top screen you cannot use setup upload download function if it is an earlier version 3 if you made all request from above you can use function and the process of remote update will be proceeded by CMS z How to use Setup Up...

Page 99: ...ndow Then it will start uploading the NS DVR setup value to the selected DVR 8 After uploading the INFO window will pop up If you click Yes it will start uploading the DVR 8 After uploading the INFO window will pop up If you click Yes it will start uploading the DVR if you click No it will cancel the uploading consultation After completing the DVR uploading it will disconnect with CMS You can conn...

Page 100: ...t you want to setup upload download from DVR list 3 Click REMOTE SETUP button 4 In SETUP go to SYSTEM and select Setup from Update options click Export button 5 Click Browse button from Setup Download window 6 Select the folder to save NS DVR setup value from File Save window Click Save button 100 Page User Manual Ver 1 3 ...

Page 101: ...ndalone DVR 7 Click Download button from Setup Download window Then it will start downloading NS DVR setup value 8 After downloading the INFO window will pop up click OK button 101 Page User Manual Ver 1 3 ...

Page 102: ...Remote monitoring available through internet explorer without the specific software 36 Display Screens Division screens PTZ Controller supported Input IP or domain on the address Install ActiveX file related to Web CMS 102 Page User Manual Ver 1 3 ...

Page 103: ...connection starting screen of connection Click Connect button to input each information and IP address for connection Click Connect button after input DVR Type name user s ID password Site IP port number etc 103 Page User Manual Ver 1 3 ...

Page 104: ... supporting port I O CONFIGURATION ALARM Sensor RS 485 4ports 9ports 1port 4ports 16ports 1port 16ports 8ports 4ports 4ports 2port 2port 2 Connecting information of Alarm Sensor 104 Page User Manual Ver 1 3 X3S 9120 X3S 16120 X3S 8240 X3S 16480 ...

Page 105: ...uration 3 RS 485 connecting configuration 1 DVR Key Board controller Tx Rx Cross Tx Rx Key board controller 105 Page User Manual Ver 1 3 Note For correcting operation of DVR when using this function user must setup System ID SETUPÆSYSTEMÆMISC ...

Page 106: ...onnecting Configuration 3 RS 485 Connecting Configuration 2 DVR PTZ camera Tx Rx Cross Tx Rx 106 Page User Manual Ver 1 3 Note For correcting operation of DVR when using this function user must setup System ID SETUPÆSYSTEMÆMISC ...

Page 107: ...eaker Mic DVR Mic Speaker Note For using two way audio communication at Windows system it must be operated correctly for Audio device without problem Control Panel Æ HardwareÆ device manager Æ check at Sound video and game controllers 107 Page User Manual Ver 1 3 ...

Page 108: ... MIC Speaker or Headset it must be connected with CMA system CAMS CMA Rear Pannel Mic in Speaker out after preparing MIC Speaker or Headset it must be connected with DVR system NS DVR Speaker out Mic in 108 Page User Manual Ver 1 3 ...

Page 109: ... Product is provided on an as is basis without an other warranties or conditions express or implied including but not limited to warranties of 1 Merchantable quality 2 Merchant ability or fitness for a particular purpose 3 Those arising by law statue usage of trade or course of dealing Th ti i k t th lt d f f th P d t i d b N ith The entire risk as to the results and performances of the Product is...

Page 110: ...Standalone DVR 110 Page User Manual Ver 1 3 ...

Reviews: