ArtPro Nail V6.1 User Manual Download Page 18

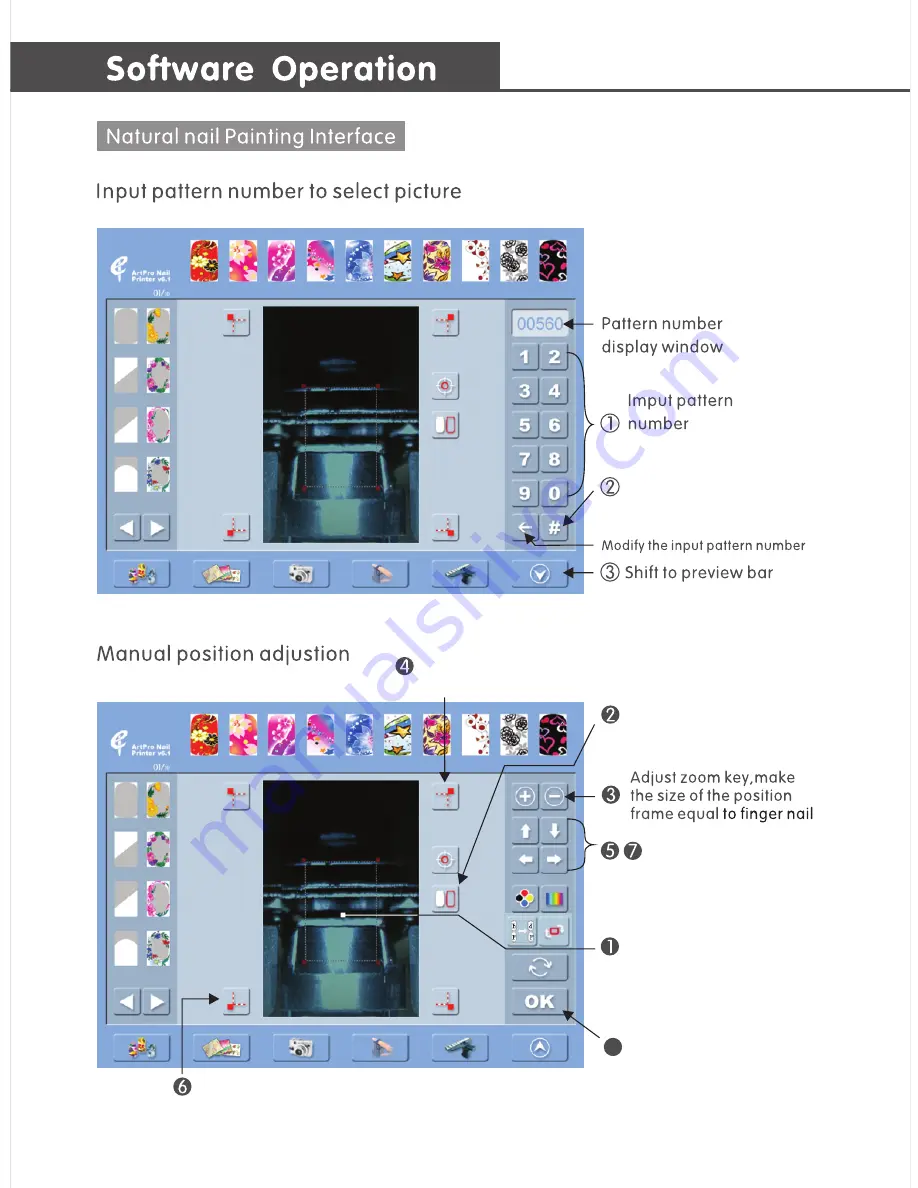
Show/Hide pattern key. 

Hide the pattern for observe

the nail size conveniently.

8

Adjust the related direction 

key, align the positioning 

frame edges match the 

nail edges.

Start painting.

 Select angle

can control the two edges of angle 

-16-

Corresponding pattern 

to preview of selection

Select control point, can 

control the two edges of 

control point.

Click the surveillance 

zone  of  nail  to  move 

the positioning frame 

on it

Summary of Contents for V6.1

Page 1: ...User Manual PRINTER V6 1...

Page 2: ...Please note that prior to use Before using remove one screw as below Fixed them before transportation to avoid damage to the unstable components Pull it out of the round sheath Remove the one screw...

Page 3: ...02 03 04 05 06 07 08 09 10 12 15 16 18 19 20 20 20 21 22 23 24 24 25 26 27...

Page 4: ...o Capture Able to paint 20 artificial fingernails toenails or 1 natural nail at a time Integrated design without any auxiliary devices Built in various nail patterns input through multiple memory card...

Page 5: ...25kg LCD 12 Touch Screen Nail Holder Carrying Handle...

Page 6: ...04 Open the carton and accessory box Check the items according to the list of forms...

Page 7: ...05 When the machine is power off take out sheath and put your hand into the machine to make the cartridge carriers move to the middle of the front of machine Do not touch the copper sheet...

Page 8: ...06...

Page 9: ...stallment Steps Select one piece of one set of nail tips Fix in the nail tips holder Put into the nail holder Single Nail placement Steps Press down the slider Press slider and put finger inside Slide...

Page 10: ...08 Start the machine the screen will appear the standard pattern interface Interface layout as follows Gallery folder preview and tool bar Page Flip Key for pattern folders and pattern pages Interfac...

Page 11: ...09 Click the pattern it will be added to the preview of selection Click the pattern it will be added to the painting preview frame Click pattern will be automatically positioned on the nail area...

Page 12: ...n it will be added to the preselection zone Click to remove the pattern Click expand the category of pattern Flip pages to view more folders Shift to pattern page and tool bar Flip pages to view more...

Page 13: ...11 Click add the template to the patterns on the current page Flip pages to view more templates...

Page 14: ...Adjust the selection frame movement up down left and right Click to obtain the desired area the template will be moved here 12 Click spread out the current pattern Flip pages to view more patterns...

Page 15: ...Click to obtain the desired area the template will be moved here 13...

Page 16: ...14...

Page 17: ...Click select the photo 15 Adjust users positions or camera angle determine the p h o t o g r a p h composition select the photo to the preview of selection...

Page 18: ...key align the positioning frame edges match the nail edges Start painting Select angle can control the two edges of angle 16 Corresponding pattern to preview of selection Select control point can con...

Page 19: ...Cancel template and restore the pattern Cancel template and restore the pattern Fill color into the excision part 17 Design Template Application 2...

Page 20: ...one two Nail Tips Set painting space Painting Preview Zone 18 Note Mirror Images Key Default setting the upper design is lower design s mirror images Click shift between the mirror images effect and c...

Page 21: ...The prompt volume adjustment Light Color Standard Color Dark Color area area 19 Restore Factory Default Click will pop up the frame click the ok button to return to the default settings and reboot the...

Page 22: ...t corner The symbol automatically moves to lower left corner Tap it to adjust the contact It moves to the lower right corner Tap it to adjust the lower right corner and then repeat when the moves to t...

Page 23: ...d The four edges of the solid line frame should be shown perfectly on the test card Remarks If there are big deviation select status and press the right key to do the adjustment angle edges 21 Restric...

Page 24: ...22...

Page 25: ...23...

Page 26: ...lug it into the machine s USB port the Nail Printer will be updated automatically StandardDIY exe is a software that is provided by the manufacturer it can help you to update new designs for your Nail...

Page 27: ...25...

Page 28: ...Check whether two protected screws have been removed refer to Page1 1 Check whether two protected screws have been removed refer to Page1 Miss to apply pre print coat Nozzle blocked Apply Pre print c...

Page 29: ...27...

Page 30: ......

Page 31: ......

Page 32: ...2013 01 A GUANGZHOU...

Reviews: