background image

11 


Connecting the pads, the cymbals, the hi-hat pedal and the kick: 


Summary of Contents for EDK260

Page 1: ...1 Artist EDK260 EDK280 Electronic Drum Kit User manual V1 00 ...

Page 2: ...he kick 11 Connecting the adapter the headphone the Amps and others 12 Function 13 1 1 KIT 13 1 2 DEMO 13 1 3 DRUM SOUND 14 1 4 SETUP 15 1 5 MEMORY 17 1 6 CLICK 17 1 7 TEMPO 18 1 8 DEMO MUTE 18 1 9 DRUM KEY 18 1 10 PAD HEAD SHOTS AND RIM SHOTS 19 1 11CYMBAL BOW SHOTS AND EDGE SHOTS 20 1 12 CYMBAL CHOKE 21 Factory Reset 22 MIDI Implementation Chart 23 General MIDI Drums Note assignments 24 ...

Page 3: ...3 Introduction Thank you for purchasing the Artist Electronic Drum Kit To help you get the most out of your new instrument please read this manual carefully ...

Page 4: ... preset kits 10 user kits EDK260 20 user kits EDK280 Demo 20 demo for practise Controls Power Switch Start Stop Setup Memory Kit Drum Sound Level Pan Demo volume Click Hi Hat Crash Ride Hi Hat Control Snare Tom1 Tom2 Tom3 Kick Rim Volume Tempo Display LED display Connections MidiOut Phones Hi Hat Control Hi Hat Crash Ride Snare Tom1 Tom2 Tom3 Kick Output R L Mono Line In Power Supply DC adaptor 9V...

Page 5: ... Control Front panel 13 12 11 1 Display the information about the current menu 2 Control the volume of the device 3 Enter the voice menu 4 Enter or quit the memory status 5 Start Stop demo 6 Enter the kit menu ...

Page 6: ...o practice menu 8 Setup the parameters of the current pad 9 Adjust the parameters of current menu 10 Tempo increase decrease 11 Those buttons match the drum pads 12 Turn the click on off 13 Turn the demo practice on off ...

Page 7: ...17 14 15 14 Power switch Switch turns the power on off 15 DC adapter jack 9V DC 16 Headphone jack A pair of stereo headphones can be connected to this jack 17 MIDI OUT It can be connected with the external MIDI sound generator ...

Page 8: ... 18 LINE IN Connect this to the external sound source 19 OUTPUT Jacks L MONO R Connect these to your amp or audio system 20 TRIGGER INPUTS These inputs are to connect the pads cymbals kick hi hatcontrol ...

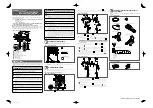
Page 9: ...9 Setting up the whole system ...

Page 10: ...10 Setting up the Kick ...

Page 11: ...11 Connecting the pads the cymbals the hi hat pedal and the kick ...

Page 12: ...12 Connecting the adapter headphone amp and CD MP3 ...

Page 13: ...r kits EDK280 Use the button to choose the desired kit The LED will display the current kit number 1 2 DEMO Press the DEMO PRACTISE button to enter the DEMO menu page There are 20 preset demo songs for you to practise Use the button to choose the desired DEMO Press the PLAY STOP button to play or stop the demo practice ...

Page 14: ...UND Press the DRUM SOUND button to enter the DRUM SOUND menu page There are 260 voices that can be chosen and assigned to the current pad Press the DRUM SOUND again to enter the VOICE VOLUME page The current pad volume can be changed by using the button Ppress the DRUM SOUND a third time to enter the VOICE PAN page Using the button to change the pan value left or right for the current voice ...

Page 15: ...y value by using the button in this page The second is the PAD RIM SENSITIVITY page if the current PAD has rim the rim sensitivity can be adjusted by using the button The third is the CROSSTALK page When striking a pad it may trigger the sound of another pad To cut down this problem use the button to adjust the crosstalk value ...

Page 16: ... CURVE page you can use the button to choose the desired pad curve The lower the number the easier it is to produce a more powerful stroke The higher the number a harder stroke is required the more sensitive the pad is to velocity ...

Page 17: ... choose the memory area To operate the Memory Function 1 Load your preferred sounds for each pad 2 Press MEMORY the dot will start flashing 3 Choose the location from 21 40 21 30 for EDK260 using the keys 4 Press MEMORY again 1 6 CLICK Press the CLICK button to turn on or turn off the metronome ...

Page 18: ... MUTE Press the ACCOMP button to activate or inactivate the demo mute function When activating the demo mute you will not hear the demo but it will continue to play internally 1 9 DRUM KEYS These buttons snare kick tom1 tom2 tom3 crash ride hihat hihat ctrl rim can be used to preview the sound of the corresponding pad when changing the voice ...

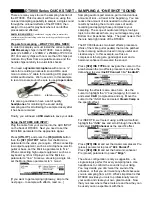
Page 19: ...19 1 10 PAD HEAD SHOTS AND RIM SHOTS Head shot for all pads Head shot Rim shot only for snare ...

Page 20: ...20 Rim shot 1 11 CYMBAL BOW SHOTS AND EDGE SHOTS Bow shot for all cymbals Bow shot Edge shot only for crash ride EDK280 only ...

Page 21: ...21 Edge shot 1 12 CYMBAL CHOKE Squeezing the rim after striking the cymbal the sound can be muted ...

Page 22: ...reset of your drum module 1 Turn the power off 2 Press and hold the and buttons on the front panel 3 Turn the power back on This will restore all settings to the factory settings Caution By doing this you will lose any saved preset drum kits ...

Page 23: ...ice 0 127 0 127 Velocity Note on Note off 〇 99H V 1 127 〇 99H V 0 After key s Touch Ch s Pitch Bend Control 0 127 Change Program Change True Number System Exclusive System Song Position Common Song Select Tune System Clock Real Time Commands 〇 〇 START and STOP only LOCAL ON OFF All Notes Off Active sensing System Reset All Sounds Off ResetAl l Controller 〇 Mode 1 OMNI ON POLY Mode 2 OMNI ON MONO M...

Page 24: ... Floor Tom 58 Vibraslap 75 Claves 42 Closed Hi Hat 59 Ride Cymbal 2 76 Hi Wood Block 43 High Floor Tom 60 Hi Bongo 77 Low Wood Block 44 Pedal Hi Hat 61 Low Bongo 78 Mute Cuica 45 Low Tom 62 Mute Hi Conga 79 Open Cuica 46 Open Hi Hat 63 Open Hi Conga 80 Mute Triangle 47 Low Mid Tom 64 Low Conga 81 Open Triangle 48 Hi Mid Tom 65 High Timbale 49 Crash Cymbal 1 66 Low Timbale 50 High Tom 67 High Agogo...

Reviews: