background image

Safety thermostat

Incorrect operation of the appliance or

defective components can cause

dangerous overheating. To prevent this,

the oven has a safety thermostat which

interrupts the power supply. The oven

activates again automatically when the

temperature drops.

HINTS AND TIPS

WARNING! Refer to Safety

chapters.

The temperature and baking

times in the tables are

guidelines only. They depend

on the recipes and the quality

and quantity of the ingredients

used.

Inner side of the door

In some models, on the inner side of

the door you can find:
• the numbers of the shelf positions.

• information about the oven functions,

recommended shelf positions and

temperatures for typical dishes.

General information

• The appliance has five shelf positions.

Count the shelf positions from the

bottom of the appliance floor.

• The appliance has a special system

which circulates the air and constantly

recycles the steam. With this system

you can cook in a steamy environment

and keep the food soft inside and

crusty outside. It decreases the cooking

time and energy consumption to a

minimum.

• Moisture can condense in the

appliance or on the door glass panels.

This is normal. Always stand back from

the appliance when you open the

appliance door while cooking. To

decrease the condensation, operate

the appliance for 10 minutes before

cooking.

• Clean the moisture after each use of

the appliance.

• Do not put the objects directly on the

appliance floor and do not put

aluminium foil on the components when

you cook. This can change the baking

results and cause damage to the

enamel.

Baking cakes

• Do not open the oven door before 3/4

of the set cooking time is up.

• If you use two baking trays at the same

time, keep one empty level between

them.

• The function Top / Bottom Heat at the

default temperature is ideal for bread

baking.

Cooking meat and fish

• Use a deep pan for very fatty food to

prevent the oven from stains that can

be permanent.

• Leave the meat for approximately 15

minutes before carving so that the juice

does not seep out.

• To prevent too much smoke in the oven

during roasting, add some water into

the deep pan. To prevent the smoke

condensation, add water each time

after it dries up.

Cooking times

Cooking times depend on the type of food,

its consistency, and volume.
Initially, monitor the performance when

you cook. Find the best settings (heat

setting, cooking time, etc.) for your

cookware, recipes and quantities when

you use this appliance.

15

Summary of Contents for AKM5641PAX

Page 1: ...AKM5641PAX EN Oven User Manual 2 DE Backofen Benutzerinformation 34 ...

Page 2: ...vulnerable people safety This appliance can be used by children aged from 8 years and above and persons with reduced physical sensory or mental capabilities or lack of experience and knowledge if they have been given supervision or instruction concerning the use of the appliance in a safe way and understand the hazards involved Do not let children play with the appliance Keep all packaging away fr...

Page 3: ...the glass If the mains power supply cable is damaged it must be replaced by the manufacturer its Authorised Service Centre or similarly qualified persons to avoid an electrical hazard Excessive spillage must be removed before the pyrolytic cleaning Remove all parts from the oven To remove the shelf supports first pull the front of the shelf support and then the rear end away from the side walls In...

Page 4: ...e appliance Always pull the mains plug Use only correct isolation devices line protecting cut outs fuses screw type fuses removed from the holder earth leakage trips and contactors The electrical installation must have an isolation device which lets you disconnect the appliance from the mains at all poles The isolation device must have a contact opening width of minimum 3 mm Fully close the applia...

Page 5: ...orised Service Centre Be careful when you remove the door from the appliance The door is heavy Clean regularly the appliance to prevent the deterioration of the surface material Clean the appliance with a moist soft cloth Only use neutral detergents Do not use any abrasive products abrasive cleaning pads solvents or metal objects If you use an oven spray follow the safety instruction on it s packa...

Page 6: ... The type of light bulb or halogen lamp used for this appliance is only for household appliances Do not use it for house lighting WARNING Risk of electrical shock Before replacing the lamp disconnect the appliance from the power supply Only use lamps with the same specifications Disposal WARNING Risk of injury or suffocation Disconnect the appliance from the mains supply Cut off the mains electric...

Page 7: ...nce operate for 1 hour 3 Set the function and set the maximum temperature 4 Let the appliance operate for 15 minutes Accessories can become hotter than usual The appliance can emit an odour and smoke This is normal Make sure that the airflow in the room is sufficient DAILY USE WARNING Refer to Safety chapters Retractable knobs To use the appliance press the control knob The control knob comes out ...

Page 8: ...ozen food Moist Fan Bak ing To bake breads cakes and cookies To save energy dur ing cooking This function must be used in accordance with the Moist Fan Baking table in order to achieve the desired cooking result To get more information about the recommended settings refer to the Hints and Tips chap ter Moist Fan Baking table This function was used to de fine the energy efficiency class acc to EN 6...

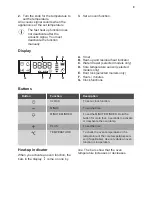
Page 9: ...only E Door lock selected models only F Hours minutes G Clock functions Buttons Button Function Description CLOCK To set a clock function MINUS To set the time MINUTE MINDER To set the MINUTE MINDER Hold the button for more than 3 seconds to activate or deactivate the oven lamp PLUS To set the time TEMPERATURE To check the oven temperature or the temperature of the core temperature sen sor if appl...

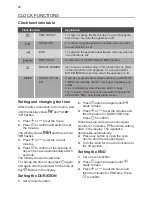
Page 10: ...er the first connection to the mains wait until the display shows and 12 00 12 flashes 1 Press or to set the hours 2 Press to confirm and switch to set the minutes The display shows and the set hour 00 flashes 3 Press or to set the current minutes 4 Press to confirm or the set time of day will be saved automatically after 5 seconds The display shows the new time To change the time of day press aga...

Page 11: ...ER First you set the seconds then the minutes When the time you set is longer than 60 minutes flash in the display 3 Set the hours 4 The MINUTE MINDER starts automatically after 5 seconds After 90 of the set time an acoustic signal sounds 5 When the set time ends an acoustic signal sounds for 2 minutes 00 00 and flash in the display Press any button to stop the acoustic signal COUNT UP TIMER To re...

Page 12: ...areful when you remove the tip and plug of the core temperature sensor The core temperature sensor is hot There is a risk of burns Every time you put the core temperature sensor in the socket you need to set the core temperature time again You cannot select the duration and end time When the appliance calculates the provisional duration time for the first time the symbol flashes in the display Whe...

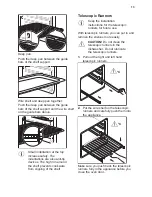
Page 13: ...om slipping of the shelf Telescopic Runners Keep the installation instructions for the telescopic runners for future use With telescopic runners you can put in and remove the shelves more easily CAUTION Do not clean the telescopic runners in the dishwasher Do not lubricate the telescopic runners 1 Pull out the right and left hand telescopic runners C 2 Put the wire shelf on the telescopic runners ...

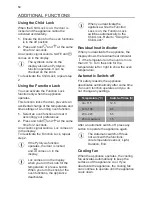
Page 14: ...s on in the display when you turn the knob for the temperature or press a button When you turn the knob for the oven functions the appliance deactivates When you deactivate the appliance while the Function Lock is on the Function Lock switches automatically to the Child Lock Refer to Using the Child Lock Residual heat indicator When you deactivate the appliance the display shows the residual heat ...

Page 15: ...r on the door glass panels This is normal Always stand back from the appliance when you open the appliance door while cooking To decrease the condensation operate the appliance for 10 minutes before cooking Clean the moisture after each use of the appliance Do not put the objects directly on the appliance floor and do not put aluminium foil on the components when you cook This can change the bakin...

Page 16: ...cake 170 1 165 2 80 100 In a 26 cm cake mould Apple cake Ap ple pie 1 170 2 160 2 left and right 80 100 In two 20 cm cake moulds on a wire shelf Strudel 175 3 150 2 60 80 In a bak ing tray Jam tart 170 2 165 2 left and right 30 40 In a 26 cm cake mould Sponge cake 170 2 150 2 40 50 In a 26 cm cake mould Christ mas cake Rich fruit cake1 160 2 150 2 90 120 In a 20 cm cake mould Plum cake1 175 1 160 ...

Page 17: ... 25 45 In a bak ing tray Biscuits pastry stripes two levels 140 150 2 and 4 35 40 In a bak ing tray Biscuits pastry stripes three lev els 140 150 1 3 and 5 35 45 In a bak ing tray Merin gues one level 120 3 120 3 80 100 In a bak ing tray Merin gues two lev els1 120 2 and 4 80 100 In a bak ing tray Buns1 190 3 190 3 12 20 In a bak ing tray Eclairs one level 190 3 170 3 25 35 In a bak ing tray Eclai...

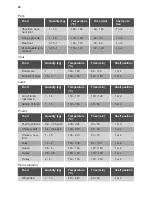
Page 18: ...Com ments Temper ature C Shelf po sition Temper ature C Shelf po sition White bread1 190 1 190 1 60 70 1 2 pieces 500 gr per piece Rye bread 190 1 180 1 30 45 In a bread tin Bread rolls1 190 2 180 2 2 and 4 25 40 6 8 rolls in a bak ing tray Pizza1 230 250 1 230 250 1 10 20 In a bak ing tray or a deep pan Scones1 200 3 190 3 10 20 In a bak ing tray 1 Preheat the oven for 10 minutes Flans Food Top B...

Page 19: ...reheat the oven for 10 minutes Meat Food Top Bottom Heat True Fan Cooking Time min Com ments Temper ature C Shelf po sition Temper ature C Shelf po sition Beef 200 2 190 2 50 70 On a wire shelf Pork 180 2 180 2 90 120 On a wire shelf Veal 190 2 175 2 90 120 On a wire shelf English roast beef rare 210 2 200 2 50 60 On a wire shelf English roast beef me dium 210 2 200 2 60 70 On a wire shelf English...

Page 20: ...hole Rabbit 190 2 175 2 60 80 Cut in pieces Hare 190 2 175 2 150 200 Cut in pieces Pheasant 190 2 175 2 90 120 Whole Fish Food Top Bottom Heat True Fan Cooking Time min Com ments Temper ature C Shelf po sition Temper ature C Shelf po sition Trout Sea bream 190 2 175 2 40 55 3 4 fish Tuna fish Sal mon 190 2 175 2 35 60 4 6 fil lets Grilling Preheat the empty oven for 3 minutes before cooking Food Q...

Page 21: ...of chicken 4 400 max 12 15 12 14 4 Hambur ger 6 600 max 20 30 4 Fish fillet 4 400 max 12 14 10 12 4 Toasted sand wiches 4 6 max 5 7 4 Toast 4 6 max 2 4 2 3 4 Turbo Grilling Beef Food Quantity Temperature C Time min Shelf posi tion Roast beef or fillet rare1 per cm of thickness 190 200 5 6 1 or 2 Roast beef or fillet medium1 per cm of thickness 180 190 6 8 1 or 2 Roast beef or fillet well done1 per...

Page 22: ...Quantity kg Temperature C Time min Shelf position Leg of lamb roast lamb 1 1 5 150 170 100 120 1 or 2 Saddle of lamb 1 1 5 160 180 40 60 1 or 2 Poultry Food Quantity kg Temperature C Time min Shelf position Poultry portions 0 2 0 25 each 200 220 30 50 1 or 2 Chicken half 0 4 0 5 each 190 210 35 50 1 or 2 Chicken pou lard 1 1 5 190 210 50 70 1 or 2 Duck 1 5 2 180 200 80 100 1 or 2 Goose 3 5 5 160 1...

Page 23: ...Defrosting time min Further defrost ing time min Comments Chicken 1000 100 140 20 30 Place the chicken on an upturned saucer placed on a large plate Turn halfway through Meat 1000 100 140 20 30 Turn halfway through Meat 500 90 120 20 30 Turn halfway through Trout 150 25 35 10 15 Strawberries 300 30 40 10 20 Butter 250 30 40 10 15 Cream 2 x 200 80 100 10 15 Cream can also be whip ped when still sli...

Page 24: ...osition 1 position 2 positions Plums 60 70 8 10 3 1 4 Apricots 60 70 8 10 3 1 4 Apple slices 60 70 6 8 3 1 4 Pears 60 70 6 9 3 1 4 Core temperature sensor table Food Food core temperature C Roast veal 75 80 Veal knuckle 85 90 English roast beef rare 45 50 English roast beef medium 60 65 English roast beef well done 70 75 Shoulder of pork 80 82 Shin of pork 75 80 Lamb 70 75 Chicken 98 Hare 70 75 Tr...

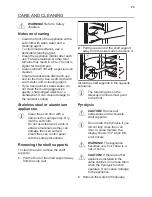
Page 25: ...Dry it with a soft cloth Do not use steel wool acids or abrasive materials as they can damage the oven surface Clean the oven control panel with the same precautions Removing the shelf supports To clean the oven remove the shelf supports 1 Pull the front of the shelf support away from the side wall 2 Pull the rear end of the shelf support away from the side wall and remove it 2 1 Install the shelf...

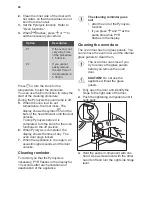
Page 26: ...rolysis is completed the display shows the time of day The oven door stays locked 7 When the appliance is cool again an acoustic signal sounds and the door unlocks Cleaning reminder To remind you that the Pyrolysis is necessary PYR flashes in the display for 10 seconds after each activation and deactivation of the appliance The cleaning reminder goes out after the end of the Pyrolysis function if ...

Page 27: ...ge of the door at the two sides and push inwards to release the clip seal 1 2 B 9 Pull the door trim to the front to remove it 10 Hold the door glass panels by their top edge and carefully pull them out one by one Start from the top panel Make sure the glass slides out of the supports completely 11 Clean the glass panels with water and soap Dry the glass panels carefully When the cleaning is compl...

Page 28: ...The lamp and the lamp glass cover can be hot CAUTION Always hold the halogen lamp with a cloth to prevent grease residue from burning on the lamp 1 Deactivate the appliance 2 Remove the fuses from the fuse box or deactivate the circuit breaker The back lamp 1 Turn the lamp glass cover counterclockwise to remove it 2 Clean the glass cover 3 Replace the lamp with a suitable 300 C heat resistant lamp...

Page 29: ...It takes too long to cook the dishes or they cook too quickly The temperature is too low or too high Adjust the temperature if necessary Follow the ad vice in the user manual Steam and condensation settle on the food and in the cavity of the oven You left the dish in the oven for too long Do not leave the dishes in the oven for longer than 15 20 minutes after the cooking process ends The display s...

Page 30: ...the dis play and Demo indicator start to blink 4 Enter the code 2468 by pressing the buttons or to change the val ues and press to confirm 5 The next digit starts to blink 6 Demo mode deactivates when you confirm the last digit and the code is correct Service data If you cannot find a solution to the problem yourself contact your dealer or an Authorised Service Centre The necessary data for the se...

Page 31: ...ety chapters This appliance is supplied only with a main cable Cable Cable types applicable for installation or replacement H07 RN F H05 RN F H05 RRF H05 VV F H05 V2V2 F T90 H05 BB F For the section of the cable refer to the total power on the rating plate You can also refer to the table Total power W Section of the ca ble mm maximum 1380 3 x 0 75 maximum 2300 3 x 1 maximum 3680 3 x 1 5 The earth ...

Page 32: ...make sure it is well fixed in its position Use metal dishes to improve energy saving When possible do not preheat the oven before you put the food inside When the cooking duration is longer than 30 minutes reduce the oven temperature to minimum 3 10 minutes before the end of the cooking time depending on the duration of the cooking The residual heat inside the oven will continue to cook Use the re...

Page 33: ...her programmes When you use Moist Fan Baking the lamp automatically turns off after 30 seconds You may turn on the lamp again but this action will reduce the expected energy savings ENVIRONMENTAL CONCERNS Recycle the materials with the symbol Put the packaging in applicable containers to recycle it Help protect the environment and human health and to recycle waste of electrical and electronic appl...

Page 34: ...päteren Nachschlagen auf Sicherheit von Kindern und schutzbedürftigen Personen Das Gerät kann von Kindern ab 8 Jahren und Personen mit eingeschränkten physischen sensorischen oder geistigen Fähigkeiten oder mit mangelnder Erfahrung und oder mangelndem Wissen nur dann verwendet werden wenn sie durch eine für ihre Sicherheit zuständige Person beaufsichtigt werden oder in die sichere Verwendung des G...

Page 35: ... Vergewissern Sie sich dass das Gerät ausgeschaltet ist bevor Sie die Lampe austauschen um einen Stromschlag zu vermeiden Reinigen Sie das Gerät nicht mit einem Dampfstrahlreiniger Benutzen Sie zum Reinigen der Glastür keine scharfen Scheuermittel oder Metallschaber sie könnten die Glasfläche verkratzen und zum Zersplittern der Scheibe führen Wenn das Netzkabel beschädigt ist muss es vom Herstelle...

Page 36: ...einstimmen Schließen Sie das Gerät unbedingt an eine ordnungsgemäß installierte Schutzkontaktsteckdose an Verwenden Sie keine Mehrfachsteckdosen oder Verlängerungskabel Achten Sie darauf Netzstecker und Netzkabel nicht zu beschädigen Falls das Netzkabel des Geräts ersetzt werden muss lassen Sie diese Arbeit durch unseren autorisierten Kundendienst durchführen Achten Sie darauf dass das Netzkabel d...

Page 37: ...beschädigt werden Um Beschädigungen und Verfärbungen der Emailbeschichtung zu vermeiden stellen Sie feuerfestes Geschirr oder andere Gegenstände nicht direkt auf den Boden des Geräts legen Sie keine Alufolie direkt auf den Boden des Garraums füllen Sie kein Wasser in das heiße Gerät lassen Sie nach Abschluss des Garvorgangs kein feuchtes Geschirr oder feuchte Speisen im Gerät stehen gehen Sie beim...

Page 38: ...d der Pyrolyse vom Gerät fern Das Gerät wird sehr heiß und aus den vorderen Kühlungsöffnungen tritt heiße Luft aus Die pyrolytische Reinigung erfolgt bei sehr hoher Temperatur und kann Dämpfe von Lebensmittelrückständen und Gerätematerialen freisetzen Beachten Sie unbedingt Folgendes Sorgen Sie während und nach der Pyrolyse für eine gute Belüftung Sorgen Sie während und nach dem ersten Gebrauch mi...

Page 39: ...Verwenden Sie ausschließlich Originalersatzteile GERÄTEBESCHREIBUNG Gesamtansicht 7 10 8 9 5 4 1 2 3 3 1 4 2 5 6 1 Bedienfeld 2 Backofen Einstellknopf 3 Elektronischer Programmspeicher 4 Temperaturwahlknopf 5 Heizelement 6 Buchse für den KT Sensor 7 Backofenbeleuchtung 8 Ventilator 9 Einhängegitter herausnehmbar 10 Einschubebenen Zubehör Kombirost Für Kochgeschirr Kuchenformen Braten Brat und Fett...

Page 40: ...i normalem Gebrauch Das Gerät kann Geruch und Rauch verströmen Das ist normal Sorgen Sie für eine ausreichende Raumbelüftung TÄGLICHER GEBRAUCH WARNUNG Siehe Kapitel Sicherheitshinweise Versenkbare Knöpfe Drücken Sie zum Benutzen des Geräts auf den versenkbaren Knopf Der Knopf kommt dann heraus Ein und Ausschalten des Geräts Je nach Modell besitzt Ihr Gerät Kontrolllampen Knopfsymbole oder Anzeige...

Page 41: ...fkühlgerichten wie z B Gemüse und Obst verwendet werden Die Auf tauzeit hängt ab von der Menge und Größe der Tiefkühl gerichte Feuchte Heißluft Zum Backen von Brot Kuchen und Gebäck Zum Ener giesparen während des Garvorgangs Diese Funktion muss gemäß der Tabelle Backen mit feuchter Heißluft verwendet werden um das gewünschte Ergebnis zu er zielen Weitere Informationen zu den empfohlenen Ein stellu...

Page 42: ...Restwärmeanzeige C Wasserschublade nur ausgewählte Modelle D KT Sensor nur ausgewählte Modelle E Türverriegelung nur ausgewählte Modelle F Stunden Minuten G Uhrfunktionen Tasten Taste Funktion Beschreibung UHR Einstellen einer Uhrfunktion MINUS Einstellen der Zeit KURZZEIT WECKER Einstellen des Kurzzeit Weckers Halten Sie die Taste zum Ein oder Ausschalten der Backofenlampe länger als 3 Sekunden g...

Page 43: ...t verwendet werden mit den Funktionen DAUER ENDE KT Sensor Einstellen und Ändernder Uhrzeit Warten Sie nach dem ersten Anschluss an die Stromversorgung bis das Display und 12 00 anzeigt 12 blinkt 1 Drücken Sie zum Einstellen der Stunden oder 2 Drücken Sie zur Bestätigung und zum Umschalten auf die Minuteneinstellung Im Display wird und die eingestellte Stunde angezeigt 00 blinkt 3 Drücken Sie zur ...

Page 44: ...it blinken im Display Das Gerät wird ausgeschaltet 5 Schalten Sie den Signalton durch Drücken einer beliebigen Taste oder durch Öffnen der Backofentür aus 6 Drehen Sie den Backofen Einstellknopf in die Position Aus Einstellen des KURZZEIT WECKERS 1 Drücken Sie und 00 blinken im Display 2 Drücken Sie oder um den KURZZEIT WECKER einzustellen Stellen Sie zuerst die Sekunden und dann die Minuten ein I...

Page 45: ...tönt für zwei Minuten ein Signal 5 Schalten Sie den Signalton durch Drücken einer beliebigen Taste oder durch Öffnen der Backofentür aus 6 Ziehen Sie den Stecker des KT Sensors aus der Buchse Nehmen Sie das Fleischstück aus dem Gerät 7 Schalten Sie das Gerät aus WARNUNG Seien Sie vorsichtig wenn Sie die Spitze des KT Sensors herausnehmen und den Stecker ziehen Der Kerntemperatursensor ist heiß Es ...

Page 46: ...e Führungsschienen der Einhängegitter und den Kombirost in die Führungsschienen darüber Die kleine Einkerbung auf der Oberseite erhöht die Sicherheit Diese Einkerbungen dienen auch als Kippsicherung Durch den umlaufend erhöhten Rand des Rosts ist das Kochgeschirr gegen Abrutschen vom Rost gesichert Teleskopauszüge Bewahren Sie die Montageanleitung der Teleskopauszüge für die zukünftige Verwendung ...

Page 47: ... Schritt 2 Verwenden der Tastensperre Die Tastensperre lässt sich nur bei eingeschaltetem Gerät einschalten Die Tastensperre verriegelt die Tür und verhindert ein versehentliches Ändern der Temperatur und Zeiteinstellung während eine Ofenfunktion in Betrieb ist 1 Wählen Sie eine Ofenfunktion aus und nehmen Sie die gewünschten Einstellungen vor 2 Halten Sie und gleichzeitig 2 Sekunden lang gedrückt...

Page 48: ...efekte Bestandteile können zu einer gefährlichen Überhitzung führen Um dies zu verhindern ist der Backofen mit einem Sicherheitsthermostat ausgestattet der die Stromzufuhr unterbrechen kann Die Wiedereinschaltung des Backofens erfolgt automatisch bei Temperaturabfall TIPPS UND HINWEISE WARNUNG Siehe Kapitel Sicherheitshinweise Die Temperaturen und Backzeiten in den Tabellen sind nur Richtwerte Sie...

Page 49: ...h ein damit keine hartnäckigen Flecken im Backofen verbleiben Das Fleisch vor dem Anschneiden mindestens 15 Minuten ruhen lassen damit der Fleischsaft nicht ausläuft Um die Rauchentwicklung beim Braten zu vermindern geben Sie etwas Wasser in das tiefe Blech Um die Kondensierung des Rauchs zu vermeiden geben Sie jedes Mal wenn das Wasser verdampft ist erneut Wasser in das tiefe Blech Garzeiten Die ...

Page 50: ...a denku chen 170 2 165 2 links und rechts 30 40 In einer Kuchen form 26 cm Biskuit 170 2 150 2 40 50 In einer Kuchen form 26 cm Stollen Üppiger Früchte kuchen1 160 2 150 2 90 120 In einer Kuchen form 20 cm Rosinen kuchen1 175 1 160 2 50 60 In einer Brotform Kleine Kuchen eine Ebe ne1 170 3 150 160 3 20 30 Auf dem Back blech Kleine Kuchen zwei Ebe nen1 140 150 2 und 4 25 35 Auf dem Back blech Klein...

Page 51: ...uf dem Back blech Plätz chen Feinge bäck drei Ebe nen 140 150 1 3 und 5 35 45 Auf dem Back blech Baisers eine Ebe ne 120 3 120 3 80 100 Auf dem Back blech Baisers zwei Ebe nen1 120 2 und 4 80 100 Auf dem Back blech Rosinen bröt chen1 190 3 190 3 12 20 Auf dem Back blech Blätter teig ei ne Ebene 190 3 170 3 25 35 Auf dem Back blech Blätter teig zwei Ebe nen 170 2 und 4 35 45 Auf dem Back blech Tört...

Page 52: ...form 20 cm 1 Backofen 10 Min vorheizen Brot und Pizza Gargut Ober Unterhitze Heißluft mit Ringheiz körper Dauer Min Bemer kungen Tempe ratur C Ebene Tempe ratur C Ebene Weiß brot1 190 1 190 1 60 70 1 2 Stück 500 g pro Stück Roggen brot 190 1 180 1 30 45 In einer Brotform Bröt chen1 190 2 180 2 2 und 4 25 40 6 8 Brötchen auf ei nem Back blech Pizza1 230 250 1 230 250 1 10 20 Back blech oder tie fes...

Page 53: ... 25 40 In einer Auflauf form Cannello ni1 180 190 2 180 190 2 25 40 In einer Auflauf form 1 Backofen 10 Min vorheizen Fleisch Gargut Ober Unterhitze Heißluft mit Ringheiz körper Dauer Min Bemer kungen Tempe ratur C Ebene Tempe ratur C Ebene Rind fleisch 200 2 190 2 50 70 Kombi rost Schwei nefleisch 180 2 180 2 90 120 Kombi rost Kalb 190 2 175 2 90 120 Kombi rost Roast beef englisch 210 2 200 2 50 ...

Page 54: ...5 Ganz Pute 180 2 160 2 210 240 Ganz Ente 175 2 220 2 120 150 Ganz Gans 175 2 160 1 150 200 Ganz Hasen braten 190 2 175 2 60 80 Zerlegt Hase 190 2 175 2 150 200 Zerlegt Fasan 190 2 175 2 90 120 Ganz Fisch Gargut Ober Unterhitze Heißluft mit Ringheiz körper Dauer Min Bemer kungen Tempe ratur C Ebene Tempe ratur C Ebene Forelle Seebras se 190 2 175 2 40 55 3 4 Fi sche Thun fisch Lachs 190 2 175 2 35...

Page 55: ... 4 max 10 15 10 12 4 Hähn chenbrust filet 4 400 max 12 15 12 14 4 Hambur ger 6 600 max 20 30 4 Fischfilet 4 400 max 12 14 10 12 4 Belegte Toastbro te 4 6 max 5 7 4 Toast 4 6 max 2 4 2 3 4 Heißluftgrillen Rindfleisch Gargut Menge Temperatur C Dauer Min Ebene Roastbeef oder Fi let englisch1 je cm Dicke 190 200 5 6 1 oder 2 Roastbeef oder Fi let medium1 je cm Dicke 180 190 6 8 1 oder 2 Roastbeef oder...

Page 56: ...der 2 Lamm Gargut Menge kg Temperatur C Dauer Min Ebene Lammkeule Lammbraten 1 1 5 150 170 100 120 1 oder 2 Lammrücken 1 1 5 160 180 40 60 1 oder 2 Geflügel Gargut Menge kg Temperatur C Dauer Min Ebene Geflügelteile je 0 2 0 25 200 220 30 50 1 oder 2 Hähnchenhälf ten je 0 4 0 5 190 210 35 50 1 oder 2 Hähnchen Poularde 1 1 5 190 210 50 70 1 oder 2 Ente 1 5 2 180 200 80 100 1 oder 2 Gans 3 5 5 160 1...

Page 57: ...5 2 Brotpudding 150 160 75 90 2 Milchreis 170 190 45 60 2 Apfelkuchen 150 160 75 85 2 Weißbrot 180 190 50 60 2 Auftauen Gargut Menge g Auftauzeit Min Zusätzliche Auftauzeit Min Bemerkungen Hähnchen 1000 100 140 20 30 Legen Sie zunächst eine umgedrehte Untertasse auf einen großen Teller und legen Sie dann das Hähnchen darauf Nach der Hälfte der Zeit wen den Fleisch 1000 100 140 20 30 Nach der Hälft...

Page 58: ...r Dörrzeit den Backofen ausschalten öffnen und am besten über Nacht auskühlen lassen Gemüse Gargut Temperatur C Dauer Std Ebene 1 Ebene 2 Ebenen Bohnen 60 70 6 8 3 1 4 Paprika 60 70 5 6 3 1 4 Suppengemü se 60 70 5 6 3 1 4 Pilze 50 60 6 8 3 1 4 Kräuter 40 50 2 3 3 1 4 Obst Gargut Temperatur C Dauer Std Ebene 1 Ebene 2 Ebenen Pflaumen 60 70 8 10 3 1 4 Aprikosen 60 70 8 10 3 1 4 Apfelscheiben 60 70 6...

Page 59: ...inigern Reinigen Sie alle Zubehörteile nach jedem Gebrauch und lassen Sie sie trocknen Feuchten Sie ein weiches Tuch mit warmem Wasser und etwas Reinigungsmittel an Zubehörteile mit Antihaftbeschichtung dürfen nicht mit aggressiven Reinigungsmitteln scharfkantigen Gegenständen oder im Geschirrspüler gereinigt werden Andernfalls kann die Antihaftbeschichtung beschädigt werden Geräte mit Edelstahl o...

Page 60: ...en Programms die Taste oder sobald blinkt Option Beschreibung P1 Bei geringfügig verschmutztem Backofen Pro grammdauer 1 Std 30 Min P2 Wenn sich die Verschmutzun gen nicht einfach entfernen lassen Programmdauer 2 Std 30 Min Drücken Sie oder drehen Sie den Temperaturwahlknopf um das Programm zu starten Sie können den Start des Reinigungsvorgangs mit der Endefunktion verzögern Während der Pyrolyse i...

Page 61: ...HT Verwenden Sie das Gerät nicht ohne die Glasscheiben 1 Öffnen Sie die Backofentür vollständig und fassen Sie das Scharnier auf der rechten Seite der Tür an 2 Drücken Sie auf das Befestigungselement bis es zurückgezogen werden kann 3 Halten Sie das gedrückte Befestigungselement mit einer Hand Verwenden Sie mit der anderen Hand einen Schraubendreher um den Scharnierhebel auf der rechten Seite anzu...

Page 62: ...nigen Sie die Glasscheiben mit Wasser und Spülmittel Trocknen Sie die Glasscheiben sorgfältig ab Nach der Reinigung müssen die Glasscheiben und Backofentür wieder eingebaut werden Führen Sie die oben aufgeführten Schritte in umgekehrter Reihenfolge durch Achten Sie darauf die Glasscheiben A B und C in der richtigen Reihenfolge einzusetzen Die mittlere Glasscheibe B hat einen Dekorrahmen Der bedruc...

Page 63: ...wieder an FEHLERSUCHE WARNUNG Siehe Kapitel Sicherheitshinweise Was tun wenn Störung Mögliche Ursache Abhilfe Der Backofen kann nicht eingeschaltet oder bedient werden Der Backofen ist nicht oder nicht ordnungsgemäß an die Spannungsversorgung an geschlossen Prüfen Sie ob der Backofen ordnungsgemäß an die Spannungsversorgung an geschlossen ist siehe An schlussplan falls vorhan den Der Backofen heiz...

Page 64: ...oder sie garen zu schnell Die Temperatur ist zu nied rig oder zu hoch Ändern Sie ggf die Tempe ratur Folgen Sie den Anwei sungen in der Bedienungs anleitung Dampf und Kondenswasser schlagen sich auf den Spei sen und im Garraum nieder Die Speisen standen zu lan ge im Backofen Lassen Sie die Speisen nach Beendigung des Gar oder Backvorgangs nicht länger als 15 20 Minuten im Backofen stehen Das Displ...

Page 65: ...m Display er scheint wenden Sie sich an den Kundendienst Das Gerät ist eingeschaltet heizt aber nicht auf Der Ventilator funktioniert nicht Im Display erscheint De mo Der Demo Modus ist einge schaltet 1 Schalten Sie den Back ofen aus 2 Halten Sie die Taste gedrückt 3 Die erste Ziffer auf dem Display und die Anzeige Demo blinken 4 Geben Sie den Code 2468 durch Drücken der Tasten oder ein um die Wer...

Page 66: ...0 20 589 114 16 573 590 min 560 594 3 5 595 1 Befestigung des Geräts im Möbel A B Elektrischer Anschluss Der Hersteller haftet nicht für Schäden die aufgrund der Nichtbeachtung der in den Sicherheitshinweisen beschriebenen Sicherheitsvorkehrungen entstehen Das Gerät wird nur mit einem Netzkabel geliefert Kabel Einsetzbare Kabeltypen für Montage oder Austausch H07 RN F H05 RN F H05 RRF H05 VV F H05...

Page 67: ...ektrische Kochgeräte für den Hausgebrauch Teil 1 Herde Backöfen Dampfgarer und Grillgeräte Verfahren zur Messung der Gebrauchseigenschaften Energie sparen Der Backofen verfügt über Funktionen mit deren Hilfe Sie beim täglichen Kochen Energie sparen können Allgemeine Tipps Achten Sie darauf dass die Backofentür während des Betriebs richtig geschlossen ist Die Gerätetür darf während des Garvorgangs ...

Page 68: ...eleuchtung Schalten Sie die Lampe während des Garvorgangs aus Schalten Sie sie nur ein wenn Sie sie benötigen Feuchte Heißluft Diese Funktion ist entwickelt worden um während des Garvorgangs Energie zu sparen Die Temperatur im Garraum kann während des Garvorgangs von der auf dem Display angezeigten Temperatur abweichen Die Gardauer kann sich von der Dauer bei anderen Programmen unterscheiden Wenn ...

Page 69: ...69 ...

Page 70: ...70 ...

Page 71: ...71 ...

Page 72: ...867340919 B 202017 ...

Reviews: