


-3-
-8-
5.9
EDIT AUTO-PROGRAMMING PROGRAM
1)
Press the
【
ENTER
】
button in
【
PROGRAM
】
menu, then enter to the editing auto-programming
program.
2)
Press the
【
UP/DOWN
】
button to select
【
CHASE01
】…【
CHASE03
】
3)
Press the
【
ENTER
】
button for confirmation and enter to the next menu.
4)
Press the
【
UP/DOWN
】
button to select
【
SCENE01
】…【
SCENE20
】
5)
Press the
【
ENTER
】
button for confirmation and enter to the next menu.
6)
Then press the
【
UP/DOWN
】
button to select
【
RED1
】,
【
GREEN1
】……
【
WHITE3
】,
【
SHUT
】,
【
TIME
】,【
WAIT
】,【
USE
】
7)
Press the
【
UP/DOWN
】
button to set up the parameter which are needed.
8)
Press the
【
ENTER
】
button to escape and save.
5.10
CHECK THE LIGHTING INFORMATION
1)
Press the
【
ENTER
】
button in
【
INFO
】
menu, then enter to the checking
the lighting information.
2)
【
SOFT
】
button is for software version information.
3)
【
LEDs
】
button is for the LED quantity information.
4)
【
POW
】
button is for the current information of power reduction. It is 100% output in normal
conditions, but 80% or 50% output in over temperature protection situation.
5.11
LIGHTING SETTING PARAMETER RESET
1)
Press the
【
ENTER
】
button in
【
ST L
】
menu, then enter to the lighting setting parameter reset.
2)
Press the
【
UP/DOWN
】
button to select
【
YES
】
.
3)
Press the
【
ENTER
】
button to escape and save.
5.12
【
PROG
】
AUTO-PROGRAMMING PARAMETER RESET
1)
Press the
【
ENTER
】
button in
【
PR L
】
menu, then enter to the
【
PROG
】
auto-programming
parameter reset.
2)
Press the
【
UP/DOWN
】
button to select
【
YES
】
.
3)
Press the
【
ENTER
】
button to escape and save.
5.13
LIGHTING RESET
1)
Press the
【
ENTER
】
button in
【
REST
】
menu, then enter to the lighting reset.
2)
Press the
【
UP/DOWN
】
button to select
【
YES
】
.
3)
Press the
【
ENTER
】
button for confirmation of lighting reset.
5.14
LIGHTING PARAMETER DOWNLOADING EACH OTHER
1)
Press the
【
ENTER
】
button in
【
SEND
】
menu, then enter to sending parameter to other lightings.
2)
Press the
【
UP/DOWN
】
button to select
【
YES
】
.
3)
Press the
【
ENTER
】
button to confirm sending.
Illustrations
:When【USE】 is set to be【NO】,or the
parameter of【TIME】 is 0, it will not run this scene.
When 【WAIT】is set to be FADE time, the running process
isas the right chart showing.
2)Press the
【
UP/DOWN
】
button to select
【
AT01
】
…
【
AT33
】,【
SPEED
】,【
CHASE01
】
…
【
CHASE03
】
3)Press the
【
ENTER
】
button to start running.
2、
TECHNICAL PARAMETER
Input Voltage
:
AC100V-AC240V
,
50/60HZ
;
Power Consump
ti
on
:
120W ;
Lamp Speci
fi
ca
ti
ons
:
12
pcs four in one
(
RGBW) high-efficiency 10W LED, rated life 50000
hours
;
Lens Angle
:
25
º(
Optional
:
45
°);
Spot Angle
:
40
º;
Color
:
RGBW linear color mixing
;
Color Temperature
:
color cast calibration setting
、
color temperature output inside device
;
Dimmer
:
0-100% linearly dimming
,
5 types dimmer modes
,
smooth dimming, flicker-free
;
Shu
tt
er
:
independent electronic strobe
;
Control Mode
:
Standard DMX512
,
3 pin interfaces
;
5 channel modes
;
Master/slave mode
,
no need to set up the master and slave manually, will receive the main
engine data automatically;
33 auto-running modes
,
rainbow channel and rainbow effect
;
Other Func
ti
ons
:
Self-programming function, 3 chases
,
each chase has 20 scenes
,
fade function;
Lighting setting data
、
self-programming data can be downloaded each other;
Temperature Control Protec
ti
on
:
Both of
lamp holder and base have temperature control
protection;
Waterproof Grade
:
IP65
;
Work Environment Temperature
:
-20
°
C
~
40
°
C
;
Net Weight
:
5.6
Kg
;
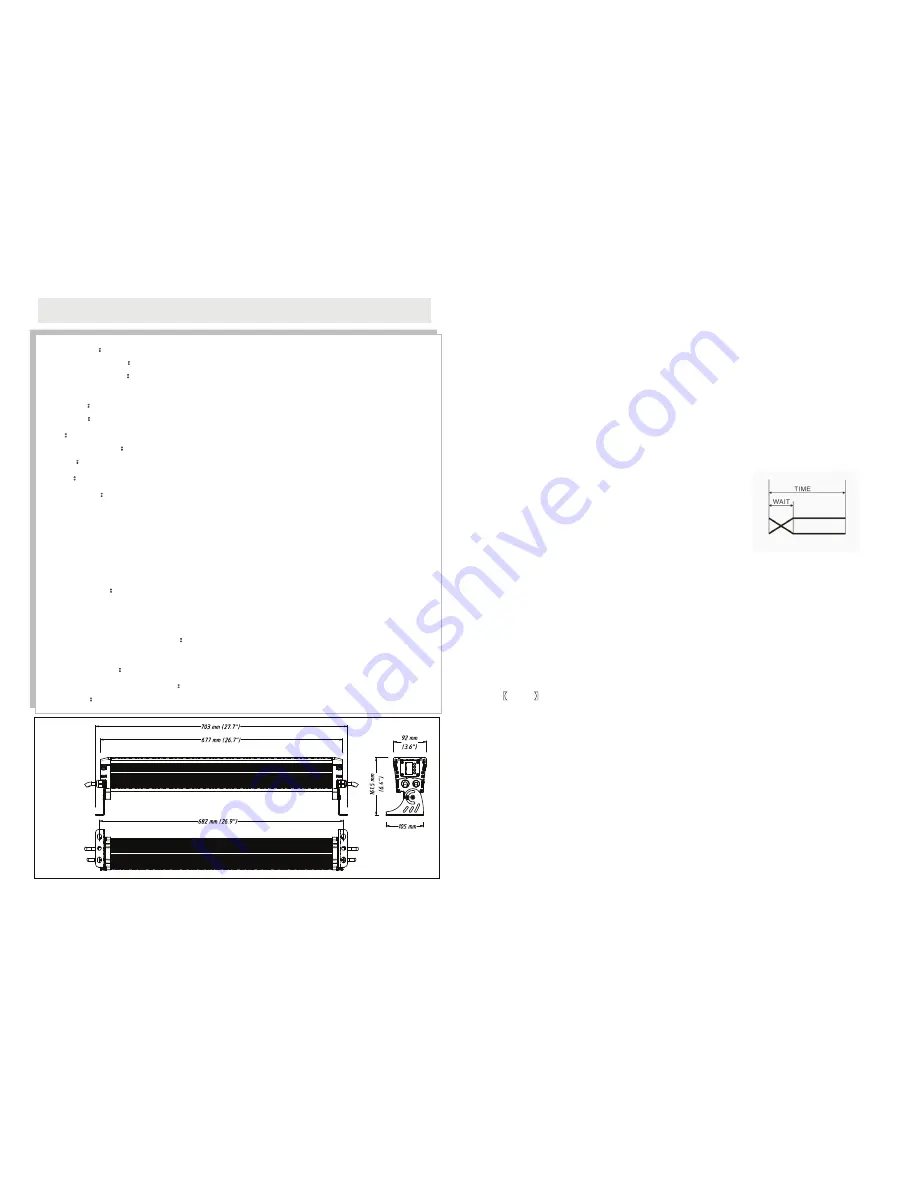
DIMENSION


