I
NSTALLATION
&
USER MANUAL
ENERGY EFFICIENT WOODSTOVE
| ASSOS & ASSOS OVEN
6 |
Page
5.
F
IRE SAFETY
It is OBLIGATORY to respect the National and European rules and local regulations concerning building matter and fireproof rules.
The installation MUST be inspected by a qualified auditor, prior to lighting the woodstove. Also the appropriate local authorities must be
informed.
5.1.
Safety distances
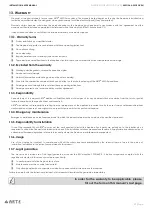
Safety distance Α
The side panels must be at least 25cm away from any flammable materials, like furniture, clothes etc.
Safety distance Β
The flue pipes must be at least 25cm away from any flammable materials.
Safety distance C + D
Any flammable materials on the floor must be at least 50cm from the front (distance C) and 30cm from
the sides (distance D) of the stove.
Safety distance Ε
The combustion chamber opening must be at least 80cm away from any flammable materials that are
inside the heat radiation zone.
Safety distance F
The minimum distance from the ceiling must be 60cm.
Safety distance G
The back must be at least 25cm away from any flammable materials, like furniture, clothes etc.
5.2.
General security instructions
Never leave children alone or without supervision near the woodstove when it is lit.
Teach children how to operate the woodstove correctly and safely.
Never touch the external surfaces of the woodstove or the glass when it is lit. There is a high risk of burns!
Due to the self closing door, you have to be extra careful when you are filling the woodstove.
It is forbidden to use the woodstove as a waste incinerator.
Don’t use burned or used wood as fuel.
Remove the ash only after it has completely cooled off.
Ash should be placed outdoors or be disposed in a place where there is no risk of ignition.
Immediately inform your specialized local supplier if you find any malfunction.
Don’t use chemicals or liquids as fire starters.
Do not use ANY fuel other than the recommended.
5.3.
Flue security instructions
Prior to installing the woodstove ARTE® the chimney sweep or a qualified technician should check the condition and operation of your
chimney in accordance with the standards
EN13384-1
&
EN13384-2
.
This way you ensure the best conditions for heating without issues.
5.3.1.
Basic requirements for proper flue operation
The internal section of the flue must preferably be circular. In a case of square or rectangular flue, the internal corners should have a radius
of at least 20mm. In case of rectangular flue, the ratio of the sides should be at maximum 1: 1.5.
The flue must be properly insulated and waterproof and constructed of materials with thermal resistance and resistance to combustion
products and any deposits.
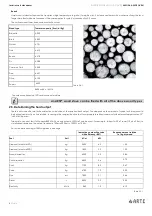
The flue must have no constrictions; it must have a vertical path and it should not change in direction that exceeds 45
o
. (
Pic. 5.3.1.1
)
In case of an existing flue the construction material should be checked. Materials such as cement with
lime, galvanized steel and rough or porous materials are contraindicated as they create issues in the
correct operation of the woodstove. Also, a proper study for the flue size must be conducted because
often old flues have quite large diameters. This means that the amount of air draft is not proportional to the
heat generated by the woodstove and by extension means that you consume more wood than necessary
and will spend more time on maintenance. The solution proposed in these cases is the connection of an
inner tube inside the flue. This tube should extend over the whole length of the flue and at no point should
exceed in diameter the outlet flue of the woodstove. If the existing flue has the desired diameter a proper
cleaning by qualified personnel should be done.
Pic. 5.3.1.1
Follow the operating instructions supplied with the product to help prevent fire and
protect the environment.
Summary of Contents for ASSOS
Page 1: ......
Page 19: ...INSTALLATION USER MANUAL ENERGY EFFICIENT WOODSTOVE ASSOS ASSOS OVEN 18 Page NOTES S N...
Page 20: ......


